May 03, 2019
Averyanova Sveta
Man is the most amazing and unique creature in the world. And also one of the most beautiful. This is evidenced by the fact that images of people (men or women) are present in almost every known painting related to masterpieces of fine art. A child thinks about how to draw a person: mom, dad or himself from an early age. Some children inspiredly draw circles and squiggles on their own, while others require training.
They teach how to draw a person, starting from early preschool age. The children's first sketches resemble scribbles. If a child constantly trains, then in elementary school (6-7 years old) and even in the preparatory group he is able to quickly draw a person in different poses. It is great if at the same time the young artist conveys facial expressions, portrait resemblance and individual characteristics.
The task of teachers in secondary and art schools is to teach how to draw the human body in accordance with the anatomical structure. For this purpose, several hours in the curriculum are allocated for academic drawing. The best learning effect comes from sketching from life.
You can learn to draw people well at home on your own. For a beginner, all options are good: drawing from photos, video tutorials, using paintings and reproductions for sketching, the main thing is to choose a drawing technique to your liking. Many beginning artists always take a sketchbook with them and sketch in 5 minutes at any time.
If you don’t want to sketch on the street, you can draw relatives and friends, or your reflection in the mirror. This is also a good way to learn how to draw people.
The benefits of step-by-step drawing

Parents should understand that it is much easier to teach a child to portray people using sequential actions than through observations and sketches. In addition, you need to remember the benefits of this method of drawing:
- developing the ability to follow clear instructions;
- the ability to separate an entire object into individual parts;
- the ability to bring your own vision into the picture;
- manifestation of independence.
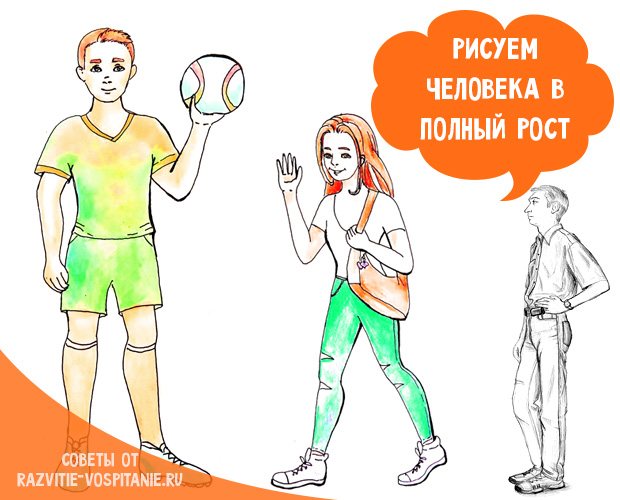
Full length drawings of a person for sketching
Here you can download templates of people and novice artists can use them for sketching (click on the picture - it will enlarge and download):
Required Tools
Before creating your first painting, you need to make sure you have the necessary equipment:
- a workplace with good lighting;
- a simple pencil, you can immediately purchase both a soft and hard version, for a small child - preferably with edges;
- paper - individual sheets or album;
- eraser;
- sharpener;
- colour pencils.
Age characteristics

You can start drawing people step by step until you are four years old. The main thing is that the baby can already hold a pencil and be familiar with the existence of simple geometric shapes. What are the features of drawing at different ages:
- up to 3 years old, a child will be able to draw a basic man if he uses a prepared template;
- from 3 to 4 years - you can start drawing a person with an image of a snowman or matryoshka doll;
- from 4 to 5 – complicate the picture, add detail to your nesting doll;
- from 5 to 6 – draw a person using simple shapes: ovals, circles, rectangles, lines;
- From 6 years old you can begin to depict people in more detail, draw them in different poses, in motion or at rest.
How to build an image of a person using geometric shapes
The methodology of a lesson on a given topic in kindergarten is based on the similarity of certain parts of the body with geometric shapes. So, babies’ heads are round, adults’ heads are oval, legs and arms look like rectangles, etc.
You can make a silhouette of a person from any shapes - circles, rectangles, squares.
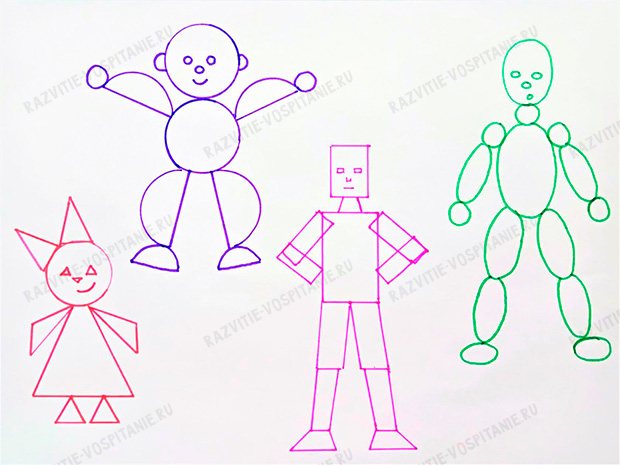
To solve this problem, the preschooler is given blanks made of paper or cardboard, and he draws up a layout according to a given scheme or comes up with his own sketch. A more difficult task is to draw a person yourself using geometric shapes.
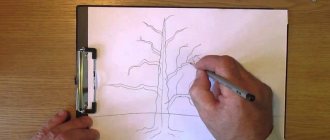
Simple algorithm
If you are wondering how to teach a 5-year-old child to draw a person, especially if he has no previous experience in such drawings, then you should start with a simple plan of action. Moreover, it will be correct if you first show how to portray a person, and then, if necessary, guide the baby’s hand, helping to repeat the sequence of actions and the correctness of the lines.
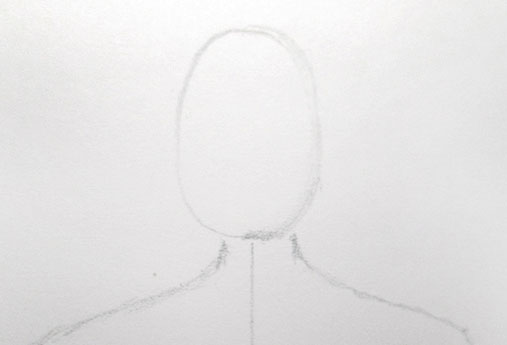
- Draw an oval that will become the head.
- Below it we draw a large rectangle, but at a small distance from the oval. This will be the torso.
- We connect the rectangle and the oval using two straight lines - this is the neck.
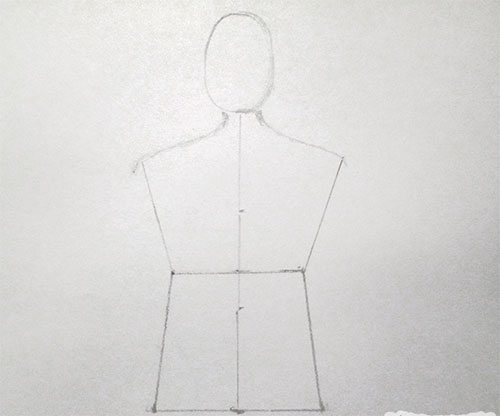
- Add four rectangles to create arms and legs.
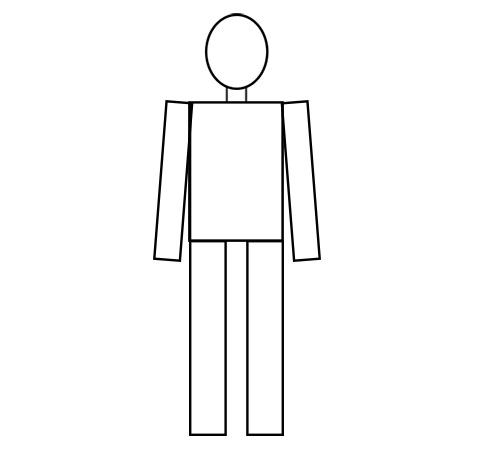
- On the hands we draw the fingers in the form of small rectangles.
- On the legs we draw some kind of boots.
- On the head (on the sides) we add two circles - these are the ears. We add curls inside them.
- We draw facial features. We do this in the most basic way. The eyes are small circles, the nose is a vertical line, the lips are a concave arc.
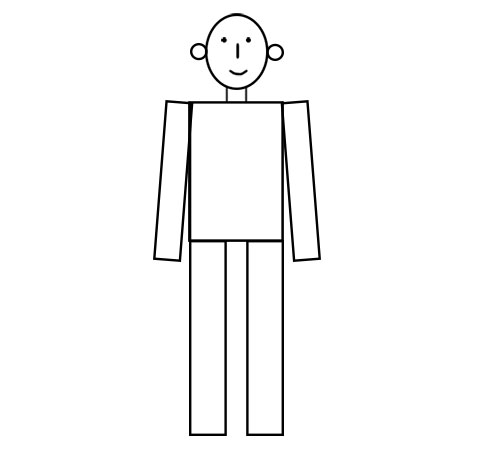
- Adding clothing items.
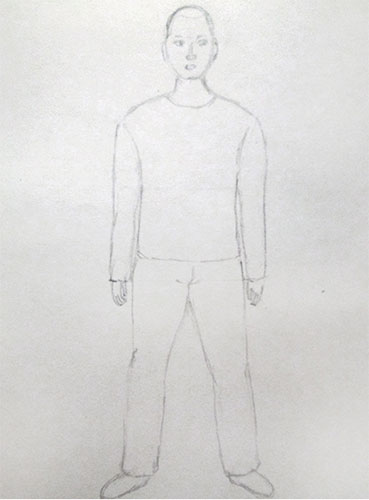
- You can start coloring.
I’ll tell you about myself: I’ve never been able to draw people, or maybe I just didn’t want to learn it. Animals, nature, still lifes - that's it, please. My son also has not yet shown interest in this kind of drawings. He loves to depict various types of transport, buildings and nature.
MAGAZINE Preschooler.RF
Abstract of OD on drawing for children of the preparatory group on the topic: “Drawing a person”Author: Ryzhikova E.A. teacher of kindergarten No. 164 “Vestochka”
Goal: To strengthen children’s ability to graphically model a human figure in motion, observing the proportions of body parts based on the schematic method of drawing with ovals. Reinforce the theoretical part.
NGO "Cognitive Development":
- Encourage drawing large on the entire sheet;
- Practice creating contours with a simple pencil;
- Develop the ability to convey the shape and structure of the depicted object, taking into account the correct proportions of all parts of the body;
- Develop the ability to draw a human figure in motion from different angles (front, profile);
- To teach the ability to convey dynamics in a drawing, depicting different poses of people, through detailing;
- To awaken children’s cognitive activity and interest in creativity;
- Develop hand-eye coordination, speed of action, perception, imagination;
- Stimulate children's independence and creativity in visual arts.
NGO "Speech Development":
- Enrich the dictionary with new words: genre, painting, graphics, sculpture, dynamics, statics, profile, phases, compositional center, proportions, diagram, modeling;
- To develop the ability to correlate words denoting the names of body parts and their location.
NGO "Artistic and Aesthetic Development":
- To introduce a variety of genres in painting, graphics and sculpture (everyday genre, portrait);
- Continue to introduce children to works of art: The image of man in the ancient cultures of Egypt, Assyria, Ancient Greece, Makovsky K. “Children running from a thunderstorm” , Deineka A.A. “Running” , “Girls” , Vasnetsov V. “Alyonushka” , Yablonskaya T. “Morning” , Serebryakova Z. “Whitening the Canvas” , Fedotov P. “Fresh Cavalier” , “Breakfast of an Aristocrat” , “Players” , Repin I. "Barge Haulers on the Volga" .
NGO "Social and communicative development":
- Develop the child’s communication and interaction with adults and peers;
- To develop the ability to act, agreeing on who will draw what, independence in work, accuracy; cultivate interest in joint activities with peers, friendly relationships;
- Learn to evaluate your actions and your work, as well as all work in general.
Form of organization of children: subgroup.
Materials and equipment: interactive whiteboard, projector, presentations on the topic “Human Proportions” , “Man in Motion” , flannelographs, large and small wooden model of a man for a subgroup of children, human body parts made of fabric (for a subgroup of children), felt-tip pen, paper A3 format, magnets.
Preliminary work:
For the teacher:
- Prepare visual demonstration and handout materials (manuals and illustrations);
- Select works of portraiture and everyday life in painting (reproductions and illustrations depicting them) in sculpture, taking into account the basic requirements;
- Enrich the electronic library with photos, illustrations of various sports, examples of professional human activity;
- Create presentations on the topic: “Man in motion” , “Proportions of parts of the human body” ;
- Enrich the corner of artistic creativity with visual and practical material on depicting the human world using various visual means;
- Organize and design a place in the group for displaying children's works;
- Enrich the young artist’s library (purchase art history and specialized literature on this topic);
- Select and produce the necessary didactic games and teaching aids in order to enrich the subject-development environment on this topic: “Geography of the body” , “Depict the movement” , “Assemble correctly” , “Dancing men” , “Collect facial expressions” .
For children:
- Consider presentations on the topic “Man in Motion” , pay attention to the proportions (sizes) of the human body, the nature of poses, dynamics, facial expressions.
- Consider illustrations of works of art that clearly depict a human figure in motion, get acquainted with the genres of portraiture and everyday life in painting, graphics and sculpture.
- Consider albums with types of sports and professions of a person.
Expected results:
For children:
- developing the skills to accurately and expressively depict a person in motion;
- developing the ability to use a pencil fluently;
- developing confidence in one's abilities;
- developing in preschool children an interest in depicting the human world, creating motivation to engage in physical education and sports.
For teachers:
- increasing the level of knowledge in the field of fine arts methodology;
- development of methodological material for teaching children 5-7 years old to depict a person in motion.
Progress: Children enter. There is a large wooden model of a man on the stand next to the interactive whiteboard.
Educator: Do you guys believe that this wooden man is capable of following my commands?
Children: How is that?
The teacher invites the children to stand near the interactive board in a semicircle and look at the “obedient little man” carrying out the teacher’s commands. The teacher models various movements on a wooden model (stands straight with his head bowed, raises his right arm above his head, stands on one left leg, tilts his torso forward, arms to the sides, etc.)
Educator: Now let's try to draw a person.
Children: We don’t know how to draw a person.
Educator: Guys, first of all, please tell me all the parts of the human body?
Children: Head, torso, arms, legs, lower leg, forearm, foot, elbow, neck, shoulders, waist, hips, hand, knee, etc.
Educator: Well done, you named almost all the necessary parts of the human body. And in order to learn how to draw a person correctly, we need to remember the basic proportions (dimensions) of the human body. I suggest you watch a short presentation.
The teacher demonstrates the presentation “Human Proportions” , comments on the slides and shows the main proportions of body parts on a wooden model, on a flannelgraph, then draws a graphic model on paper.
Presentation text:
Slide No. 1. Man, unlike animals, is an upright creature on two legs, the position of the human spine is vertical, while that of an animal is horizontal, supported by four legs (front and back). The human head is a universal measure of the entire figure. Usually 7-8 heads fit into the full height of a person. The shape of the head resembles an inverted egg - a rounded back of the head, a pointed chin.
Slide No. 2. The head rests on the neck (we will further depict the neck with two short lines). The head is rotated by the muscles of the neck, which stands on the shoulders; here the figure has the widest part of the body. The arms are attached to the shoulder joint. The arms are quite long, reaching the middle of a person’s thigh. The elbow is at the level of the waist, the narrowest part of the human torso. The elbow divides the arm into two parts, approximately equal in size, the upper part is the shoulder and the lower part is the forearm, and the arm ends with the hand. The arm bends and rotates at three joints: the shoulder, the elbow, and the hand.
Slide number 3. The torso consists of two parts: chest and stomach with hips. The legs are attached to the thighs. A person’s legs are very long in relation to the body, and roughly divide the entire figure in half. The legs rotate and bend at three joints, the hip, the knee, and the shin. Remember, the kneecap protects the joint and prevents the legs from bending forward; this must be remembered when drawing characteristic movements.
Educator: Now guys, let’s assemble our little man on a flannelgraph and draw a graphic model of a person using a diagram of ovals.
The teacher collects the little man in phases, in a clear sequence. Then, commenting on his actions, he draws a diagram of ovals on a sheet of paper, placing the first figure on the left on a sheet of F4 format (horizontal position).
Description of the drawing sequence:
- We mark the topmost mark of the top of the head and the bottom mark of the feet.
- Draw an oval head
- Mark the neck with two lines
- Draw the shoulders on the left and right, placing them on the same line
- We form the chest and pelvis of two trapezoids, correct and inverted, the large one is the chest, the small one is the pelvis), connecting the two parts at the waist (the narrowest part of the body). The human body is elongated.
- From the shoulder points we draw elongated ovals of the shoulder and forearm, marking the elbow at waist level. Shoulder length, from shoulder to waist. Forearm length from waist to mid-thigh.
- We draw the legs from three ovals. The legs are thicker and longer than the arms. We draw an elongated oval from the points of the thigh, from the thigh to the knee, one part, from the knee to the shin, the second part, both parts are approximately the same in length. The foot is a small oval.
Educator: Draw your little man at rest, upright, in phases, taking into account the proportions of all parts of the body.
Children draw the first diagram of a person from the front. Independent work of children. Monitoring the teacher and helping those who have difficulty. Individual analysis of work.
The teacher suggests taking a short break and doing a physical warm-up: “Little Red Riding Hood and the Gray Wolf”
Goal: Increase the energy level in the group, relieve emotional stress.
Behavior: Children stand in a circle. The teacher offers to play a game. Red Riding Hood will be a small ball that participants must pass to each other in a circle, from the first player to the next. Little Red Riding Hood runs from the wolf, who will come later. The wolf will be a slightly larger rubber ball. The evil wolf stubbornly runs after Little Red Riding Hood in the same direction. If he overtakes her, she must turn around and continue running in the other direction. And one more thing: each player has the right to change the direction in which the Wolf runs. To do this, he simply must say: “Turn!” then the Wolf will change the direction of his movement and Little Red Riding Hood should also change the direction of her running.
Educator: I suggest that after our fun warm-up we continue to work. Guys, you did a good job with the first task, and now let's draw the first simple movement.
The teacher models the movement on a wooden model, then lays out this movement on a flannelgraph, on a fabric model, then draws a graphic model. Invites children to depict a simple movement, first on their wooden men, then on their flannelographs, and then on a piece of paper to draw the movement that they gave their man.
Conclusion: To summarize, the children organize a vernissage of their works. Discuss their own and other people's work. They find errors and give their recommendations.
In subsequent classes, the tasks become more complicated, the movements “Walking, running, sitting, lying down, etc.” are modeled. , from a new angle, in profile. At the next stage, draw a pair composition in which a couple of people are depicted interacting with each other: “In a cafe” , “In a hairdresser” , “Boxers” , etc. Children first model the interaction design on a flannelgraph to understand how to position all the body parts, and then graphically model the resulting movement. On paper with contour lines using a diagram of ovals.
| Next > |
Basics of Proportions
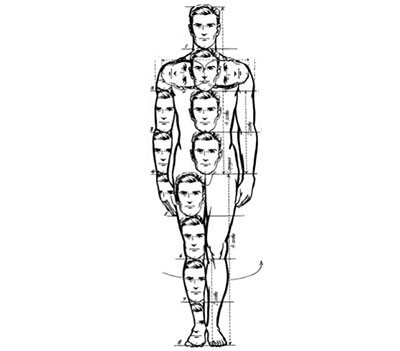
How to teach a 7-year-old child to draw a person if he already has good experience behind him? It's time to introduce him to the correct proportions of the human body.
- The head is outlined.
- A vertical line is lowered, which will include seven more ovals of the same size.
- The center of the chest is at a distance of two measured units (ovals below the main one, which is the head).
- Three units will lead to the navel.
- The pubic bone is marked after four units.
- The center of the knees will be indicated by a measured area of five heads and the distance from the top of the head to the future eyes.
- The middle part of the shin is 7 units.
It is also important to consider the following points:
- the width of the head and the female shoulder are equal;
- The shoulder width of men is equal to one measured unit;
- the width of the chest corresponds to three units;
- the elbow of the person depicted should be at the level where the thigh begins;
- the oval, which represents the torso, should be larger than the one that represents the pelvis.
Drawing of an experienced kid
Older children who understand what human figures are like will be able to draw more detailed pictures with a pencil.
- We schematically draw a future person by making sketches. We depict it with simple geometric shapes.
- We draw the neck, make characteristic curves on it, and decide on the width.
- We depict the line of the shoulders, taking into account whether we are a man or a woman.
- We mark the waist; its width also depends on the gender of our person.
- We draw the arms, mark the elbows and hands.
- Let's start with the legs, draw the presence of the knees, make the hips wider than the shins, draw the feet or boots if our little man is wearing shoes.
- We finish drawing the ears, hair, and do the detailing of the face.
- You can start drawing out the details of the clothing.
- We color our picture, bringing the little man to life.
Progress of the lesson:
All people are different. Each of you is one and only. And nowhere in all our vast land will there be exactly the same boy or girl.
But you and I have a lot in common:
There are nails on our fingers, On our hands there are wrists and elbows. Crown, neck, shoulders, chest And don’t forget the tummy. There are knees, there is a back, But there is only one. On our head we have two ears and two lobes. Eyebrows, cheekbones and temples, And eyes that are so close. Cheeks, nose and two nostrils, Lips, teeth - look! Chin under lip. That's what you and I know!
The reading of the poem is accompanied by a demonstration of the named body parts.
How does our body work?
Our body is structured like this: on top - the head, then the neck and torso. The torso has upper limbs - legs and lower limbs - legs.
Exercise “Complete the task”
Put your hands on your head. Turn your neck in different directions. Wave your upper limbs. Stomp your lower limbs. Tilt your torso left, right.
What capabilities does the human body have?
When you were born and were babies, your body was disobedient: you could not sit, stand, or walk. You couldn't even pick up a toy. But you grew and became older, from helpless babies you turned into strong and skillful children. When you become an adult, you will be able to do even more. And by old age, the body seems to wear out and becomes weak again. It is difficult for old people to stand and carry heavy objects for a long time. That's why we give them a seat in public transport and help them carry their bags.
The story is accompanied by a display of pictures depicting different stages of a person’s life (baby, child, adult, old man).
Now your body is mobile, flexible, obedient, because a person is able to control his body. We can force our body to stand or run, draw, look and perform many, many other actions.
Didactic exercise “Name the word denoting the action”
Children name verbs. If there is difficulty, the teacher asks questions: “What can your hands do?”, “What can you do with your feet?”, “What can your head do?”
Dynamic pause
You will move around the group to the music. When the music stops, I will show you a picture of a person in a certain pose. You should take the same position.
How to maintain a strong and healthy body for a long time?
How long our body will serve us and be young and healthy depends only on us. What should you do for this? Exercise, eat healthy food, breathe fresh air, be clean and tidy, go to bed on time. But if you don’t take care of your body, it will quickly grow old, become weak and sick. What should you not do with your body? Eat junk food, move little, wash rarely and be dirty, smoke, sleep little.
Self-massage of ears
To prevent your ears from hurting, we will stretch them as quickly as possible: Here we bend them, let them go, and repeat everything again. We will knead the tragus and run a finger along the ear. And press it with your palm and rub it very, very hard.
Finger gymnastics “About the left and right hand”
Look, here are two hands: Right and left! (we stretch our arms forward, showing)
They can clap their hands - both right and left! (clap our hands)
They can hold my nose - Both the right and the left! (we alternately pinch our nose with our right and left hands)
They can cover their mouth with their palm - Both the right and the left! (cover the mouth of both)
Both the right and the left can show the way! (we show the direction with either the right or the left hand)
They know how to pick their nose - both the right and the left! (we imitate picking your nose with each hand in turn)
And if someone screams, both the right and the left will help to shut my ears! (cover our ears)
I am always friends with my hands - both right and left! (friendly handshake)
And both the right and the left can be affectionate! They will hug you, they will press you to me - Both the right and the left! (we wrap our arms around ourselves - “hug”)
Visual activity “Our palms”
Children trace their left palm with a pencil. Then they dip their fingertips in the paint and leave fingerprints on the top of the painted fingers.
Recommendations

Parents should understand that teaching a child to draw a human figure can be a difficult task. In this case, the following points must be observed:
- do not push the child, do not expect quick results;
- do not criticize his first attempts, much less laugh at him;
- diligence and consistency of actions, regular training will bear fruit;
- you must always follow the algorithm of actions, do not change points;
- during your first attempts, you can use a template, then samples, and then move on to drawing on your own;
- Praise your child even for the smallest victories.
Now you know how to teach a child to draw a person. Remember the need for consistent training. Never put pressure on your child, demanding quick and high-quality results from him. Do not force drawing if the child does not like this type of activity at all. Creative impulses must come from the heart and be filled with the emotional experiences of the little one.
Lesson summary for the middle group “Drawing a Person”
Yulia Rakhmatullina
Lesson summary for the middle group “Drawing a Person”
Purpose: To train children in depicting a person .
Educational. Teach children to draw a person with watercolors, conveying the characteristic features of appearance.
Developmental. Develop the ability to draw a person in a certain sequence;
Educational. To educate: accuracy, perseverance, interest in the result obtained; educational interest in the defenders of the Fatherland.
Creative. Develop children's creativity, cultivate emotional interest in the result of their work;
Preliminary work. Examination of illustrations of soldiers, educational activity about the defenders of the Fatherland; conversations about the Russian Army, about the branches of the military, about the Motherland, about the Fatherland; reading fiction; listening to musical works dedicated to the army and defenders of the Fatherland.
Materials and equipment: 1/2 landscape sheet of paper, watercolor paints, a simple graphite pencil, a sippy cup (for each child), brushes, napkins (for each child, a sample drawing, a picture of a military man .