In order to raise a harmoniously developed personality, it is advisable not to waste a minute, starting from a very tender age. The formation of personality begins immediately after birth, and how exactly the parents behave at this time will subsequently influence what kind of person the newborn will be. There are many techniques that can be used in the early stages. One of the most popular is the early development method of Maria Montessori, because it can be implemented without any problems without having a special education or the ability to pay for the services of professionals.
The essence of Maria Montessori's method
Maria Montessori's method is one of the leading in the world. This woman was a doctor, teacher and scientist, therefore the method she created is based not only on scientific facts, but also on personal experience. Montessori was the first female doctor to graduate in Italy. In addition, she worked with children diagnosed with mental disabilities.
The program that Maria Montessori developed was based on the development of children and their self-education. Initially, she tested it on the patients she worked with (remember, these were mentally retarded children), and within a couple of months the children demonstrated results that surpassed their peers with normal development.
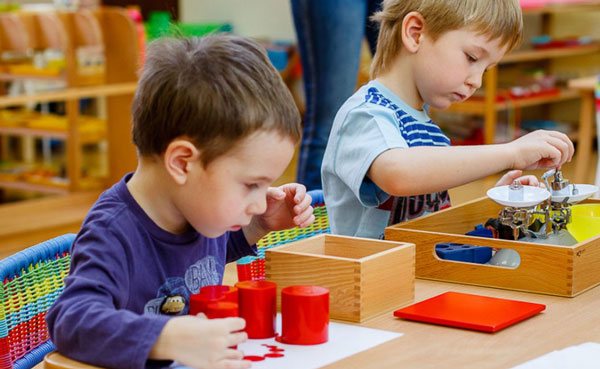
The essence of the technique is that the child should feel happiness. If he finds the activity interesting, he will definitely continue. That is why educational toys are used, which children enjoy playing with. And classes are held in zones. Each zone develops certain personal components.
Many famous people studied under this system. For example, Princes Harry and William, Sergius Brin, Gabriel Garcia Marquez (writer), Jeff Bezos, Jimmy Wales and many other outstanding people of our time. So there is no point in proving the effectiveness of this technique.
System principles
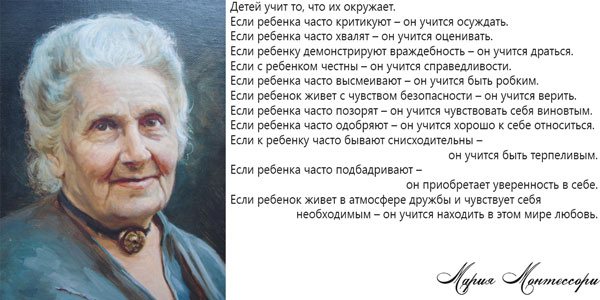
Maria Montessori's system includes twelve basic principles:
- A child learns from what is around him.
- Criticism towards the baby teaches him to judge.
- Praising the baby teaches him to evaluate.
- Hostility towards a child teaches him to fight.
- Honesty towards the baby teaches him justice.
- Ridicule teaches you to be timid.
- Ensuring the safety of the baby teaches him to believe (trust).
- Frequent attempts to shame teach feelings of guilt.
- Frequent approval teaches you to feel good about yourself.
- Forbearance teaches you to be more patient.
- Encouragement makes you more confident.
- Living in a friendly atmosphere makes you feel needed and teaches you to find love in the world.
According to this methodology, children had to be educated from birth to school, gaining knowledge through practice.
Components of the program
The method under consideration has three components:
- child;
- environment;
- teachers.
Let's look at each component in more detail. One of the most important components of the program is the child, or more precisely, how receptive he is to learning.
Each age corresponds to a certain nature of susceptibility:
- from birth to 6 years - speech development;
- from 0 to five and a half years - sensory;
- from 0 to three years - the stage of establishing and perceiving order;
- from one and a half years to five and a half years - development of fine motor skills;
- from one to 4 years - mastering various actions;
- from two and a half years to six - socialization.
As for the environment, it is important that the baby is surrounded by things that are understandable and accessible to him. For example, a child will never learn to dress himself when all his clothes are hidden in the closet on the top shelf, where he cannot reach. But if you prepare your clothes in the evening and leave them on a high chair near the bed, children usually quickly learn how to get ready. Of course, they need adult support, but not so much.
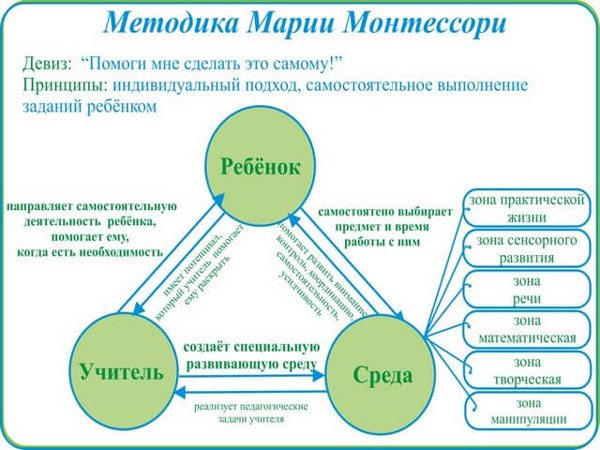
The teacher component is perhaps the most interesting. The child must become his own teacher. Adults only observe and explain if the need arises. A parent or teacher should not do anything with or for the child. The motto of the method is: “Help me do it myself.”
Creative corner
Very often, paints, plasticine, and glue are stored in drawers and other places inaccessible to children. A child draws only when his mother suggests, and not when he wants it. However, it is very important to provide the child with the opportunity for spontaneous creativity.
Try to organize a creative corner for your child so that the same rules about accessibility, limited availability and regular updating of materials are observed.
This could be a creative table in a place convenient for the child or a shelf on your shelf reserved for creative materials. Do not post a lot of different materials there at once; it would be better if they are updated regularly.
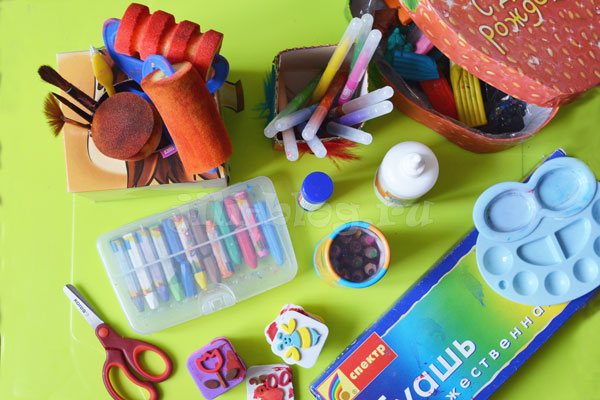
Naturally, if the child is still too young, tastes almost everything and does not yet know the rules for working with certain materials, you should not put glue, sharp scissors or liquid paints in the public domain. But you can already put a stack of paper and a few wax crayons.
Comparison with other methods
A child's early development can be supported by many techniques, and each is useful in its own way. They differ in materials, place and role of the adult. Let's look at the most popular methods:
| Methodology | Differences |
| Zaitseva | Zaitsev's technique is essentially a game. The Montessori system does not have a direct play component. This is a specially organized life of a child and the adults who surround him. |
| Glen Doman | Glen Doman's method involves learning using flashcards. It does not affect the child’s sense of touch, although it is the leading source of perception for a child under five years of age. |
| Nikitins | In the Nikitin method, parents are also not perceived as someone in charge. Here they are senior comrades. But the Nikitins provide for stabbing the baby, while Montessori does not affect physical development so actively. |
| Cecil Lupan | Provides that in the first year of life you need to learn as much as possible. Montessori speaks of a dosed supply of material, but the process of mastering something new is continuous. |
Parents can choose for themselves which method is closer to them and more suitable for the baby. Montessori has developed a truly unique scenario for the development of children, but it is not the only one. Perhaps some ideas from other methods may be better suited for parenting.
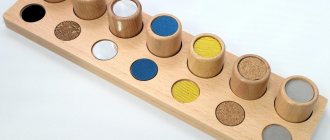
Selecting objects with the same texture (2–5 years)
This game is suitable for developing tactile sensations. You will need a set of wooden squares or circles with one of the surfaces having a different texture. You can create it by applying a thin layer of glue and attaching a piece of fabric, Velcro, seeds, sand or something else. Objects must be paired so that the surface texture of two circles or squares is the same to the touch. If you turn them over, they should all look the same.
Invite your child, with his eyes closed or blindfolded, to “see” objects with his fingertips and find paired ones. When turning objects over, the child will be able to clearly see how correct his choice was.
How to build classes at home
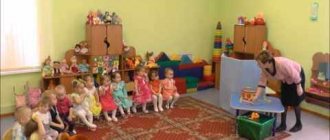
To achieve results, you need to create the right atmosphere. The first stage is zoning the space. Each zone is filled with so-called didactic material. At first glance, this may seem inconvenient, but this arrangement allows you to keep things in their designated place. As a result, this will help not only children to master the world, but also adults to maintain order.
Classes cannot be held only at certain times or force the child to do something he does not want. Children study when they want. An example of a standard situation when the system works is when a mother is cleaning the apartment, and the child goes to his practice corner, takes a broom or dustpan and helps. At first, you can ask the baby to help, but ideally it should be his decision.
It is interesting that classes using this method often do not include any special equipment or toys. Everything you need is usually already in the house where the baby lives. And if not, you can create the inventory yourself.
Classes for babies under 1 year old
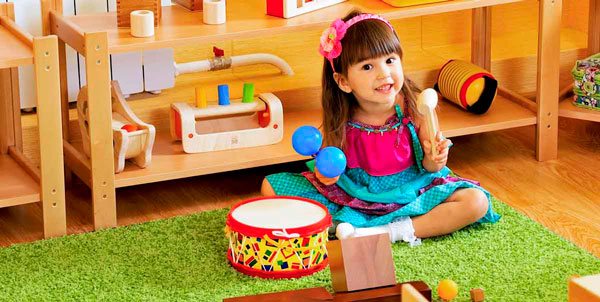
The method under consideration affects the development of children under 1 year of age. It can be taught from a very early age. It is important to choose “toys” that will help babies get more sensory experiences. For example, they can be noisy, bright, soft or hard, smooth or rough.
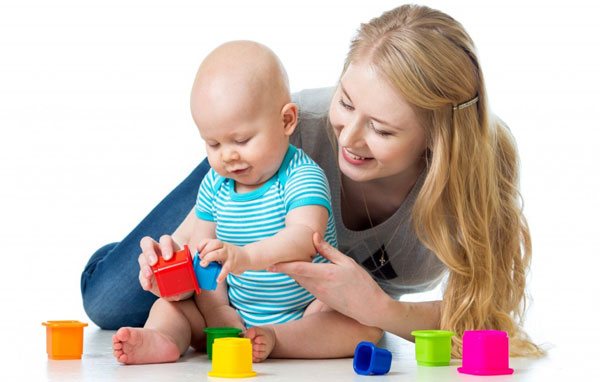
Babies up to 6 months are interested in games that show the properties of objects:
- to train the grasp, you can hold out various objects to your baby and wait for him to grab them;
- to develop memory - name the objects that are in his hands;
- to train coordination - transfer objects from one hand to another.
To make it more fun, such actions can be accompanied by songs or rhymes. As toys for little ones, you can use fabric bags with various fillings from cereals, flour, etc. And the fabric can be of different textures. You can also use buttons, beads and other things you have at home. The main thing is that the baby plays under parental supervision.
The best exercises for children from 1 to 2 years old
When the child grows up a little, Maria Montessori's early development method for children from 1 year of age involves the use of more complex games. It is already possible to give children a basic concept of maintaining order, and to more actively train motor skills and sensory perception. The children are already able to concentrate and imitate adults, and understand the consequences of some of their actions.
Now children can play independently, but not for long and only if the toys they are using at that moment are absolutely safe.
Several games:
- Place jars, bottles, tubes, etc. in a box. It is important that they are tightly closed, and if there are any liquids inside (shampoo, dishwashing detergent), it is advisable to pour them out and wash the container. You can put some cereals inside. Unscrewing the caps of the bottles will help develop motor skills and extinguish the fire of the baby’s curiosity.
- You can pour cereals into a basin and bury larger objects in them . For example, you can use chestnuts, shells, etc. Parents show that these items can be looked for in the basin. Kids, as a rule, quickly figure out what to do and how to do it, getting real pleasure from the game. But it is better for such little ones to play under supervision. In addition, this game is universal for older children; it is enough to complicate the task, for example, by searching for things of the same color.
- Playing with plasticine usually captivates children for a long time . Multi-colored, bright material from which you can fashion anything, kids really like. Usually children under two years old make balls or sausages, but gradually the tasks can become more complicated. If your child likes to try everything by heart, you can make your own plasticine from dough and food coloring.
- And of course, children love to draw . Ordinary pencils or felt-tip pens and a sheet of white paper should always be at hand if the young artist wants to show off his skills.
In addition to the games listed above, you can use special Montessori toys. For example, lacing, turrets, etc.
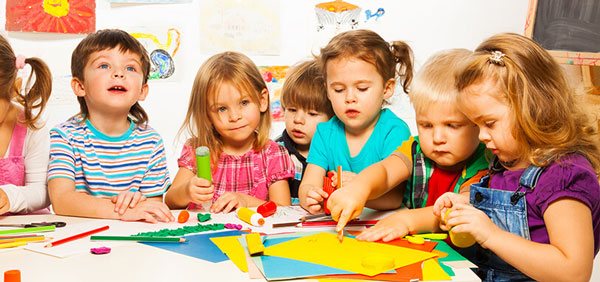
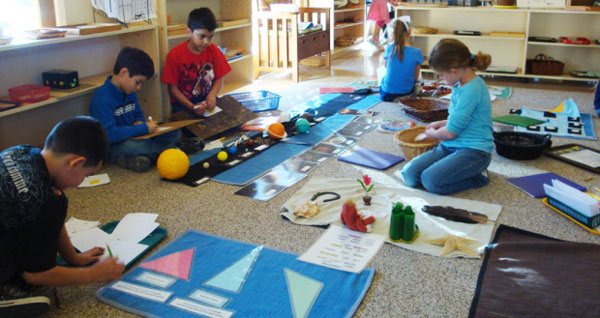
Classes for parents and children from 2 to 3 years old
Children aged two or three already know how to play independently and they really like to communicate with other children. But a little intervention from an adult will be required, because children from 2 years old are still very young and do not know much. They are happy to copy the actions of adults or their fellow yearlings. At this age, children love to study, because they understand that this way they can achieve better results.
At the age of 2-3 years, children enjoy mastering the following activities:
- Construction . Any multifunctional items can help with this: pieces of fabric, pebbles, blocks of wood, ropes, etc. They do not limit children and help them prepare for role-playing games.
- Slicing . You can cut book pictures, postcards, or just multi-colored sheets of paper, making something like a puzzle out of them. Children can cut them themselves or just assemble the finished parts. Depends on their interest.
- Distribution of objects into groups . In the boxes you need to sort the items: by size (from large to small), shape, color, specific application, etc. This game develops thinking, speech, and teaches children to classify and systematize.
An adult increasingly moves from the function of a teacher to the function of an observer. Children become creative. They are more interested in creating something new by changing objects.
Method for children from 3 to 6 years old
According to the Montessori method, lessons for children from 3 to 6 years old differ from the methods that were used for the youngest children. The main emphasis is on trying to make the child a full-fledged member of the family. He can have the rights of adults and perform feasible duties.
Children after three years of age can consolidate previously acquired skills in terms of personal care, cleaning the house, caring for animals or plants. This way the baby will develop and help his parents.
Children aged 4-5 years can do more complex things:
- draw with your eyes closed;
- play musical instruments;
- learn to write using shading or a board and colorful crayons;
- learn to read and count (you can create homemade cards or books with letters and numbers).
At the age of 5-6 years, children are interested in everything about the world around them. You can tell your little one about other countries and their customs. Show what animals live in other countries. To do this, you can use pictures, picture books, photographs, cartoons, etc.
This is a creative stage of personality development that cannot be limited. If the child becomes interested in plants, you can let him make herbariums or applications. Let him sculpt from clay, plasticine, and draw a lot. You can go beyond four walls and take your child to the zoo, to an exhibition, or just go to the country where he can explore nature far from the city.
“Magic bag” (3–6 years)
This is one of the favorite children's games. It usually requires a simple cloth bag or box with a hole where the child can stick his hand in and feel an object that he cannot see. You will need a set of small items that are familiar to the baby. Ask him to close his eyes and put any item in a bag or box. Let him find out by touch what it is. If he guesses right, switch roles. For older children, the game can be complicated by using, for example, cones, shells or geometric shapes.
Zoning of premises
According to the Montessori system, the following main zones are distinguished:
- Practice or real life . Here children will learn basic everyday skills. Cleaning and washing supplies, buttons and laces can be placed here.
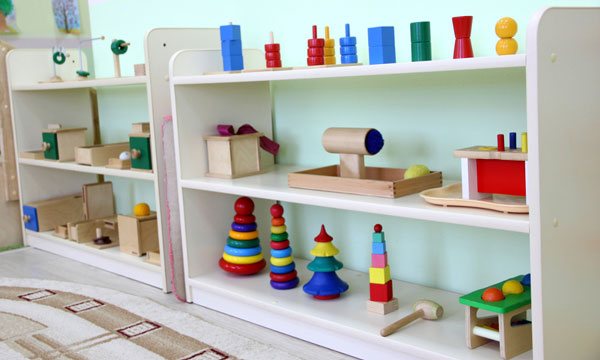
- Perception or sensory . For children to be able to develop, all objects located in this zone must be of different shapes, weights, sizes and shades. You can use jars, boxes, etc. The baby will train fine motor skills and learn to distinguish things by tactile sensations. In addition, in this zone he will be able to train his memory and attention.
- Mathematicians . This zone promotes the development of abstract thinking, fosters perseverance and patience. Materials can be counting sticks, figures (squares, triangles, etc.).
- Language . Here children can learn to write and read, therefore in this area there should be various cubes with letters, copybooks and alphabet books.
- Space . As the name implies, this area is used so that the baby can get acquainted with the world around him. For example, with other countries, weather, animals, etc. In this area you can place animal figures, maps, books, etc.
This is the author’s version of zoning, but more modern variations of the technique involve the use of zones for physical development, music, art, dance, foreign languages, etc. But there is rarely enough space for them in average apartments. But such in-depth zoning comprehensively develops the child.
Real life zone
This zone is called practical, since its main task is to accustom the baby to the everyday side of life and instill hygiene habits.
Classes in this area help children master the following skills:
- how to take care of yourself (fold clothes, perform hygiene procedures, eat and even cook);
- how to care for the surrounding space (clean, water flowers, feed pets);
- how to move (walk quietly, in a straight line);
- how to create communications (communicate with parents, educators, peers, in society).
In the area under consideration, you can use materials such as:
- boards with buttons, straps, clasps, etc.;
- dishes of different shapes and sizes;
- indoor plants and cut flowers;
- broom and dustpan.
In principle, you can use any item that is used in everyday life. But the use of toys is undesirable - all things must be real. Although you should not forget about safety rules and such items as scissors, knives, etc. use only when the child begins to understand what danger this thing can bring and how to use it correctly.
Sensory area
This area promotes the development of sensory perception.
Helps improve:
- fine motor skills;
- vision;
- touch;
- hearing;
- baric feeling (feeling of weight).
To ensure that children can fully play in this area, the following items are used:
- multi-colored signs;
- nesting cylinders of different sizes;
- signs with rough and smooth surfaces;
- fabric scraps;
- bells;
- heavy and light objects;
- fragrant bags.
The main difficulty of equipping this zone is to emphasize all sensory senses without highlighting any one. Therefore, it is important to collect a variety of materials. Some will affect hearing, others - vision, others - smell, etc.
Math Zone
The areas of sensory and mathematics are interconnected. Comparing materials with each other, the child measures them by performing mathematical operations. The sensory zone only prepares the baby for numerical operations. In mathematics, children are already beginning to master mathematical concepts.
This will require special materials:
- numbers made of fabric (can be made of paper, but then the risk of tearing them is higher);
- cards with numbers;
- rulers;
- beads for mastering basic mathematical operations;
- circles divided into shares;
- geometric figures.
The main thing is that the materials are visual. It is easier for a child to remember a number if he can touch it or turn it in his hands.
Language zone

This zone is closely connected with the sensory zone and develops fine motor skills.
That is why almost all the equipment in it is aimed at developing sensory sensations:
- letters made of tactilely pleasant materials;
- inserts;
- movable alphabet;
- frames for shading;
- intuitive reading cards.
All these devices contribute to the correct formation of speech skills and their development. The materials expand children's vocabulary.
Space zone
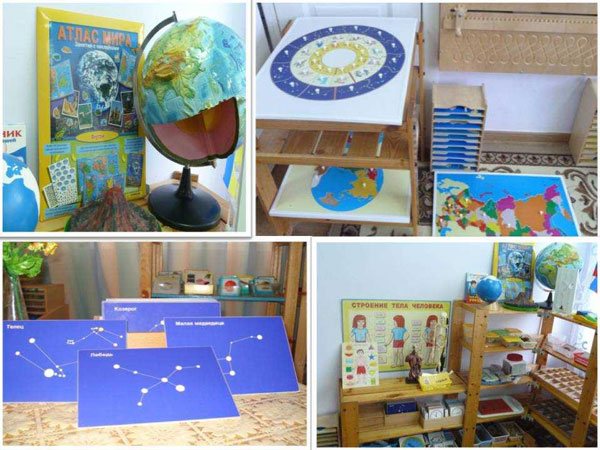
The second popular name for this zone is natural science education. Children here receive information about the environment, subject connections, learn historical facts and gain an understanding of biology, geography, natural history and other sciences.
So that the guys can gain as much knowledge as possible in this zone, you can leave the following equipment:
- encyclopedias and reference books (naturally, for children, with an abundance of colorful pictures);
- maps (geographical and natural);
- models (for example, solar system, mountains, volcanoes);
- materials on the typology of animals and plants;
- calendars;
- materials for experiments (something safe, such as potatoes and iodine to see starch);
- seeds and leaves of the plant.
In general, these can be any materials thanks to which the child can better get to know the world where he lives.
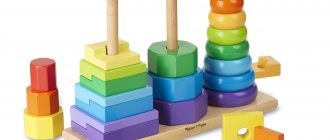
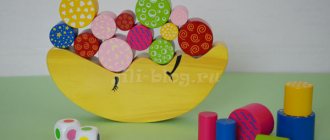
Combining multi-colored signs (3–5 years)
Montessori schools use ready-made sets of multi-colored wooden tablets, with the help of which children learn to distinguish primary colors, tones and shades, and also learn their names.
You can make the signs yourself. The signs can be used to create three separate sets of colors. The elements in the set must be the same size and differ only in color.
For kids, you can start with a set containing 6 signs in three colors: two each yellow, red and blue. Ask your child to match the paired signs and learn with him the names of the 3 primary colors.
When the child has mastered this task, prepare a set of signs of 11 pairs of primary colors and tones: yellow, red, blue, green, orange, purple, pink, brown, gray, black and white. Offer to find paired signs and name the colors.
To make it more challenging, create a third set of signs consisting of 7 shades of each of the 9 colors (yellow, red, blue, green, orange, purple, pink, brown, grey). Invite your child to arrange them in order from lightest to darkest. Once all the signs are neatly arranged on the tray, you will have a beautiful display of different colors.
There are also many games with such signs. For example, ask your child to find a sign of the color that is closest to the color of an object in the room. Another option: show your child a plate from the third set of colors and ask him, from memory, to find a plate with a color that is one tone lighter or darker than the one you showed.
The third option is to teach how to create lighter or darker shades by adding white or black paint to the base color. By starting with a base color and adding white paint little by little, a child can create a set of dark to light shades, similar to a set of wooden signs.
How to make Montessori toys with your own hands
The peculiarity of the Montessori system is that, in fact, you do not need to buy any special toys. If you don’t have something at home, you can do it yourself or buy it in a store for pennies.
It will take a minimum of time and will not require special skills on the part of parents. And improvised means are suitable as materials.
Insert frames
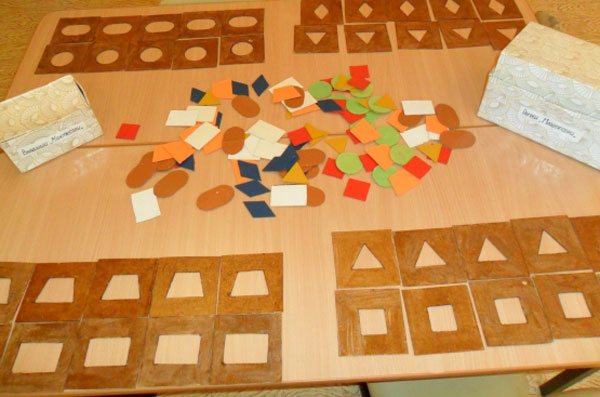
Such toys will help kids understand what shapes are and what they are. And also learn to quickly distinguish colors, master the concepts of “more and less.”
For production you will need:
- box (you can take it from the candy you’ve eaten);
- a landscape sheet, but a Whatman paper is better;
- multi-colored cardboard.
Cut the box into rectangles. Their size depends on the number of figures that will be placed in the frame. For each rectangle, its own geometric figure is cut out of multi-colored cardboard. The figures in one row should be multi-colored and vary in size. The largest figure comes first, and those below should gradually become smaller. To hold the figures, whatman paper is glued to the back of the box.
Pyramid
The easiest way is to sew such a toy, but in order to do this, the parent must have at least primitive sewing skills. But there are a lot of benefits from this toy. She will teach the baby to distinguish colors, sizes, tactile sensations and more. All you need to do is use different fabrics and fillers.
To work you will need:
- fabric of different colors and, if possible, texture;
- Velcro tape;
- materials for stuffing - cereals, foam rubber, padding polyester, pebbles, in general, anything.
The fabric needs to be cut into paired squares of different sizes - from 5 to 12 cm. Take a pair of squares. Velcro is sewn onto one of the flaps of fabric, and the part that should stick is sewn onto the second. The squares are sewn together (from the wrong side). Next, the material needs to be turned out and filled with filler. And repeat this until all the pads are filled.
But it is important that the pyramid does not turn over; the lower layers are filled with heavier materials.
Colored hedgehogs
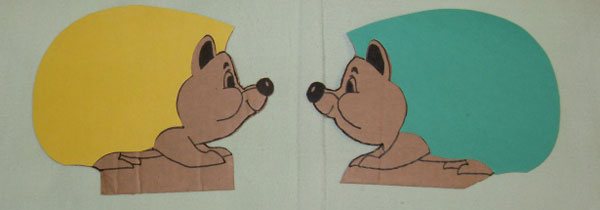
Hedgehogs are one of the most popular characters in children's fairy tales, so a child will be happy to play in such company.
To make these toys we will need:
- sheets of multi-colored cardboard;
- multi-colored clothespins.
You need to cut out two identical hedgehog shapes from cardboard. The easiest way to do this is to fold the cardboard in half and then start cutting. Next, you need to glue the figures together, drawing eyes, a mouth, and a nose. When the workpiece is ready, all that remains is to invite the child to give the hedgehog needles by attaching multi-colored clothespins to it.
Laces
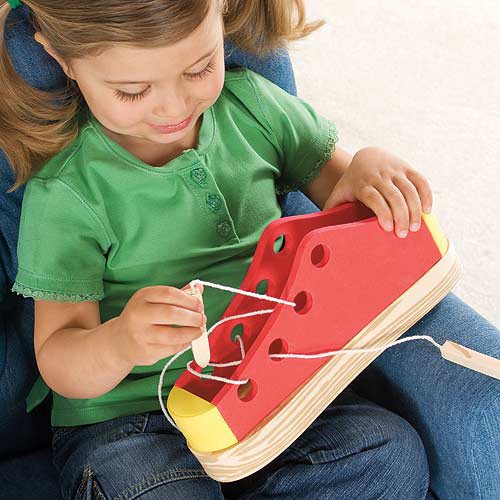
Lacing games are the best way to develop fine motor skills in a child’s hands. You can buy them in a store, but the price isn’t great, so it’s much cheaper to make them at home.
Moreover, everyone probably has the materials needed for this at home:
- wooden base, an alternative to which can be thick cardboard or plywood;
- holes can be made with a hole punch or knife;
- buttons glued to the base;
- lace.
The set of materials depends on what is at hand. Sometimes you don’t even need to drill anything, just glue buttons to the board and show your child how to wrap the laces around them. It all depends on your imagination.
Soft balls
The essence of the game is that the baby is given four fur balls, which must be pushed through the tube one at a time so that the last one pushes the first one out.
To make such a toy, we need:
- thick cardboard;
- bushing (balls will pass through it);
- shampoo bottle (this will be the leg that will hold the sleeve);
- skeins of multi-colored yarn acting as balls.
You need to make two cuts in the shampoo bottle through which the sleeve will go. The sleeve itself should be exactly long enough for three balls stacked in a row to pass through it. You can secure the structure with tape and decorate it with colored paper.
Sorting objects (2–5 years)
Sorting objects by shape, color or other physical characteristics is a great activity that encourages children to look closely at objects and make logical choices. You need several sets of items that differ in shape, color and size. Be careful with small objects as small children may swallow them or put them in their nose or ears.
A good option is button sorting. Buy or find at home several sets of four or more identical buttons. Mix them in a large bowl, then show your child how to pick one button, put it in a smaller bowl, and pick out all the same buttons from the larger bowl.
Pros and cons of the system
Like any system, the Montessori method has opponents and admirers. It will be easier for most people to figure out which group they belong to after they become familiar with the pros and cons of the system.
pros
Among the advantages of the system are:
- the adult has virtually no influence on the development of children or makes only minor interference, which allows the child to master the world without imposed prejudices;
- the technique allows children to express themselves and takes into account individual characteristics;
- children are not forced, but motivated to learn, they are not praised, but they are not scolded either, so the learning process is not so traumatic;
- children gain freedom, independence and develop the ability to independently plan and organize their activities;
- the system takes into account the periods of children's development, improves fine motor skills, develops senses;
- quickly instills skills of self-service, responsibility, and self-control;
- develops intelligence, speech, logical and analytical thinking;
- gives an idea of world realities and contacts with other people (if the child is brought up according to this system and in a group).
There is no need to set aside any time to use the Montessori system. The beauty of this technique is that you don’t do it periodically, but live in it. Moreover, this form of living is quite convenient for adults. Children develop themselves at a pace that is convenient for them, and the adult’s task is to provide the baby with everything necessary and monitor his safety. In addition, this technique is “inexpensive”. All equipment is inexpensive, especially if you make it yourself.
Minuses
The method also has some drawbacks:
- greater emphasis on the intellectual side of the child’s development to the detriment of his emotionality and creative inclinations;
- ignoring role-playing games, arguing that they distract the child;
- omissions related to the temperamental characteristics of children (not all children will ask for help, and not everyone will be interested);
- the methodology is fundamentally different from the methods of education and presentation of material in kindergartens and schools, which creates difficulties for the child in adapting to the school schedule and the peculiarities of interaction with teachers;
- lack of physical activity.
Given these shortcomings, classical Montessori is rarely implemented in its “pure” form. More active games and elements of control over the child’s activities are added to it, so that it is easier for him to socialize in educational institutions.
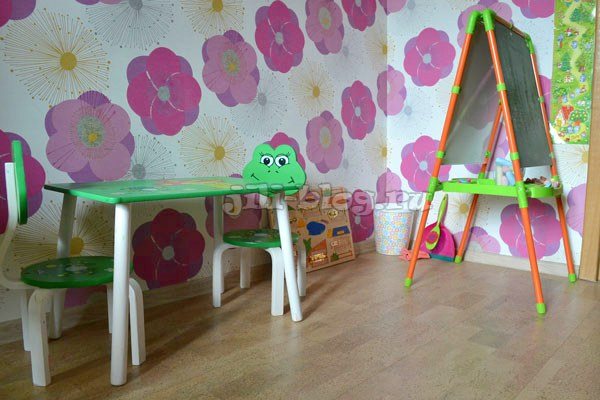
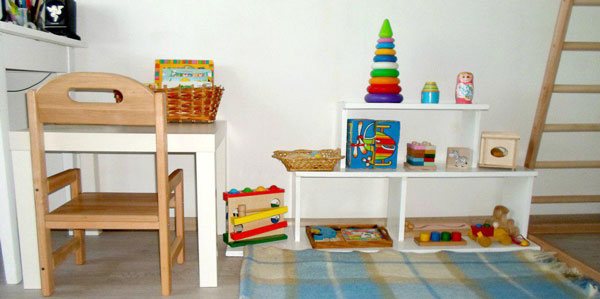
Furniture and play equipment according to the child’s height
To prevent your baby from feeling like a midget in the land of giants, it is advisable to purchase furniture for him according to his height. A children's table and chair are primarily needed to ensure that the baby sits in the correct position during creative activities, and also to ensure that the child has the opportunity to independently prepare his/her own work space (bring paints, brushes). A children's easel and magnetic board will also be very useful.