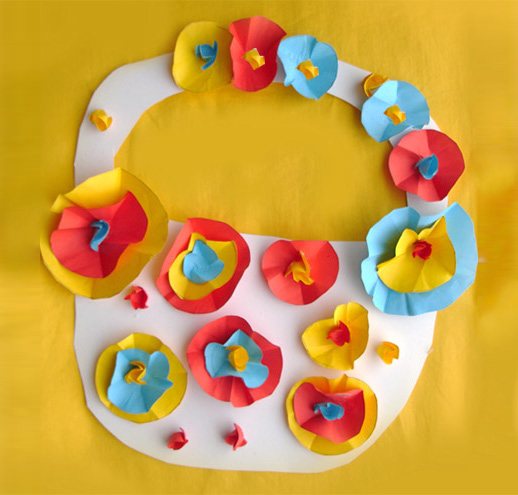
Bouquet
These are not just flowers, but a structure that will stand. In this case we will make all parts of the plant. The flowers, leaves and stems themselves. Children in the middle group will master this simple applique very quickly.

We fold the green leaf in half so that the colored part is on the outside. Edge to edge. We secure them
It is very important not to bend it too much, just run your hand lightly in the middle.
Now you can make cuts from the middle to the edges of the sheet, not reaching the edge by approximately 1.5-2 cm.
We roll the sheet into a tube and fasten its corners at the bottom one to the other. Produces a stable structure
We slightly spread the “petals” of the bouquet at the top.
It will not be difficult to cut out flowers of different colors. They will be nicely decorated with centers that can be made round, heart-shaped, and even triangular or square.
We attach the flowers to the edges of the stems at the top. The bouquet is ready, you can give it as a gift!
Books for laptops
Books (notebooks) inside a laptop can be of several types:
- Regular, with pages of the same size. To diversify them, you can make shaped books - “babies”, by cutting out and fastening several pages in the shape of a snowman, an apple, or a house.
- Accordion books. They are easy to make by attaching the selected template to accordion-folded paper or cutting out a finished shape.
- Books with pages of different sizes. They are extremely simple to make; you just need to fold and fasten the sheets of paper so that each top one is 0.8–1 cm smaller than the previous one along the bottom or side edge.
For the little ones
Who said that plot application is difficult? Even the younger group can cope with some types of applications. Now we will create a beautiful basket with flowers in it.
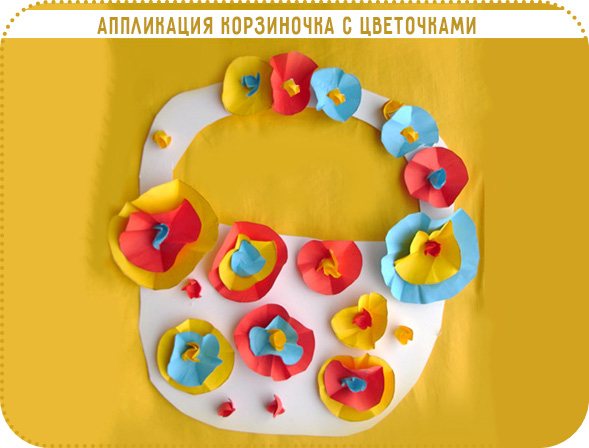
What we may need for the application:
- Colored thin paper;
- Cardboard;
- Pencil;
- Stencils;
- Glue.
Glue the basket to a thicker paper base or cardboard. Then our difficult volumetric paper applique will hold firmly. Let's start creating.
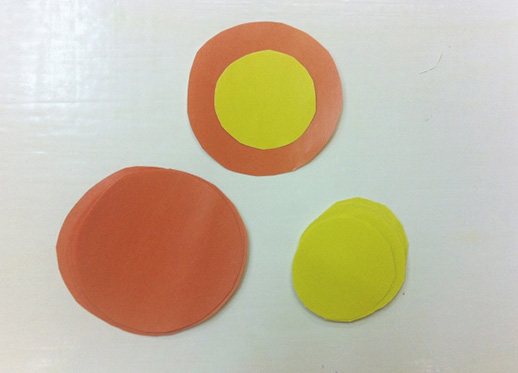
Step 2. Using a stencil, cut out circles from a sheet of paper. A stencil can be different objects: small cups, coins, round bottles, cups.
We take paper of bright colors, since the pictures should be colorful and joyful. Just the right entertainment for children 2-3 years old, exactly what they love.
Step 3. Place a pencil on the colored part, in the middle of the circle, and wrap paper around it. In order for us to get voluminous applications, it is enough to even slightly press the circles against the rod.
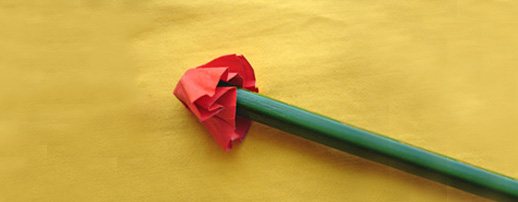
Step 4. Without removing the pencil, dip the center of the future bell or orchid into glue and press it with a pencil. You can continue and stick a second circle of smaller diameter into the very center in the same way to create voluminous poppies and daisies.
Hedgehog
Applications for the little ones are creativity, where the abilities of even the tiniest fidget are taken into account. And this example with the “hedgehog” is just right for toddlers who, by the age of three, still cannot cut and glue, but they will be great at participating in the work. How?
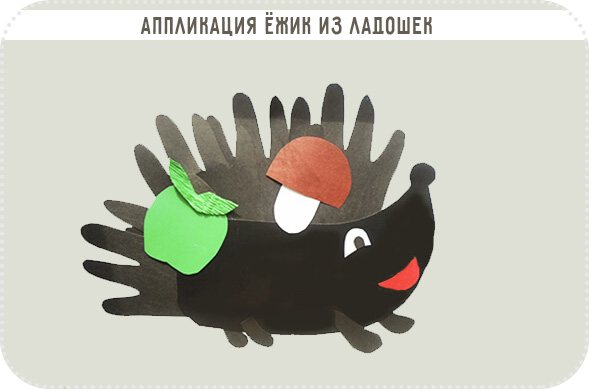
- There are two options for preparing to make this applique for kids.First
. We trace the baby's palm on a sheet of black or brown paper. Cut it out. Glue it. Four palms will be enough.
Second option
. Or we use finger paints. The child dips his palm, and we help him put his palm in this way several times, at different angles in the upward direction, to make a fan.
- Cut out something like a boat from paper of the same color. This is the body and nose of the hedgehog (cut out a small circle and glue the “nose” to the edge of the muzzle).
- We place the body under the “needles”.
- You can draw a mouth and an eye, or make semicircles from red and white paper. Don't forget about the pupils.
- Paper applications would be incomplete without a plot. We come up with a story with the baby. Our hedgehog is coming from the forest, so we’ll cut out and glue his “prey”: an apple and a mushroom.
- We complement the paper applique with small black paws.
Tools needed for the lesson
Modeling, like every type of art, requires special training and specific tools. In kindergarten, each child should have his own individual devices for this activity.
So, what will you need:
- modeling board;
- material from which the figures will be sculpted (plasticine, dough, clay);
- water;
- clean rags;
- stacks.
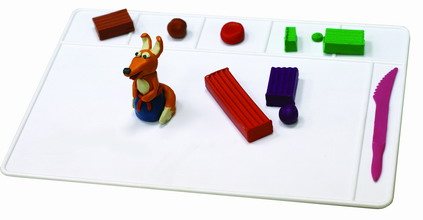
And also a prerequisite is the small palms and fingers of a smart child, whether he is in the younger group or the older one - it doesn’t matter!
During the lesson, the teacher will first tell the kids in the group an entertaining, and maybe an instructive story about a hero who will later be asked to sculpt.
After the fairy tale, the teacher, in a playful way, will show each child in the group the already molded main character of the fairy tale. Kids will immediately want to independently sculpt the same character out of plasticine, but their own, individual one! And here the teacher faces a difficult task: to gradually tell, show, explain and teach each child:
- Using various techniques, independently make individual blanks of various shapes from plasticine.
- Using known methods, connect the newly sculpted parts together into one three-dimensional figure.
- Teach kids to place ready-made figures on a special stand (board), using already known methods.
- If the group lesson is supposed to be plot-based, then it is necessary to teach the child to come up with or choose a plot for his composition, plan where each character will be, what he will look like, what will happen between the characters in the plot, and then begin making individual parts. Such an activity will take more than one lesson, so for unfinished compositions it is necessary to find a place where the work will wait for its next “incarnation”.
- During the decorative lesson, the teacher will teach the kids, using fairly simple techniques (rolling a flagellum, a ball), to decorate a ready-made “freshly sculpted” object in a folk-applied style.
So, step by step, lesson by lesson, kids will learn to create, receive real aesthetic pleasure, and discover the world of the most beautiful fine arts.
Chick
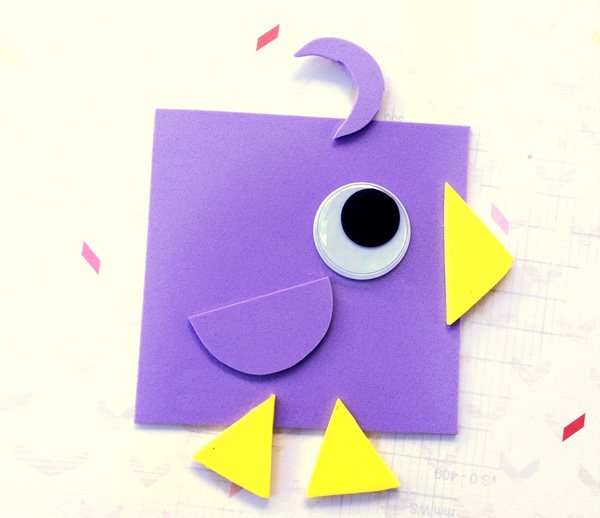
Kids think abstractly; for them, such a trifle as the color or shape of a character does not matter if his image conveys child-like emotions. But how can you make an applique just like this so that your baby feels a kindred spirit? Here's a great example of this!
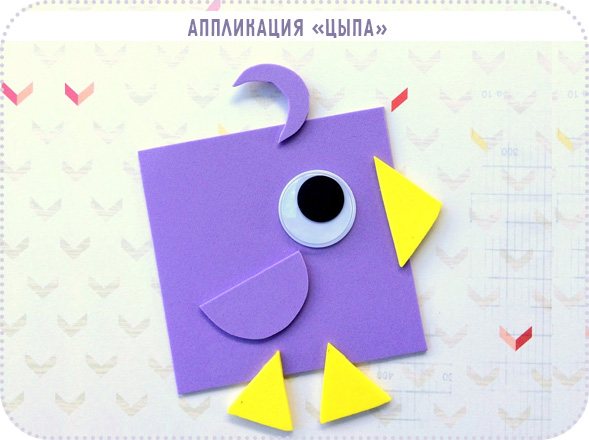
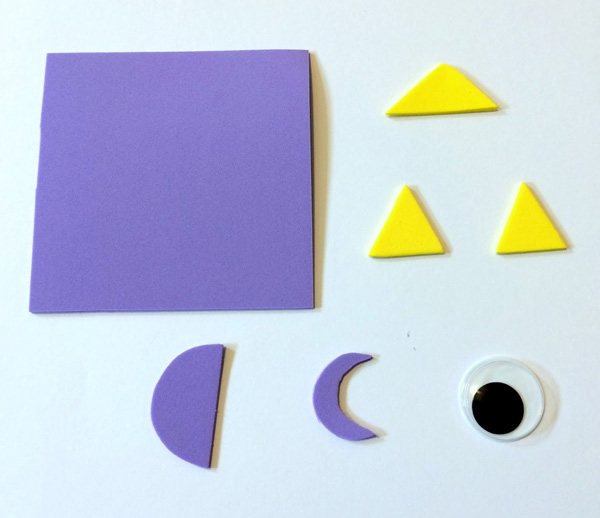
Meet Tsypa! Him:
- Body - square;
- Eye – 2 circles (black and white, and a little more white);
- Beak - triangle;
- The paws are also triangular;
- The wing is a semicircle;
- Tuft - crescent.
Now, trust the little one, let him choose what color will be! Explain what each figure means and why the bird needs it. Isn't that interesting? So, finding the right stencils for applications is already a game. All that remains is to glue everything together!
The benefits of applications in child development
Applique is the gluing of something onto any surface. Most often, children glue colorful paper onto cardboard.
This type of creativity can be done with kids. From the age of one year, with the help of adults, a child can glue various elements onto paper or cardboard. The older the child, the less he needs the help of an adult.
The benefits of this type of creativity, as well as others, are enormous.
By doing such painstaking work, the child learns patience, develops perseverance, trains attention, and shows accuracy when cutting out parts. Cutting, applying glue, and gluing itself very well develop fine motor skills of a child’s hands.

Application on paper
The benefits of the application in the development of mental abilities
- the child gets acquainted with the concepts of shape, color, texture
- compares parts and finds the same ones
- teaches differences in the size of parts, small-large
- shows imagination and creativity in the creation of his works
- sees the main thing among the secondary
- finds parts of a whole and learns to assemble them
In addition, the child receives satisfaction from the result of his work, learns to do something himself and give his crafts or decorate the house with them.
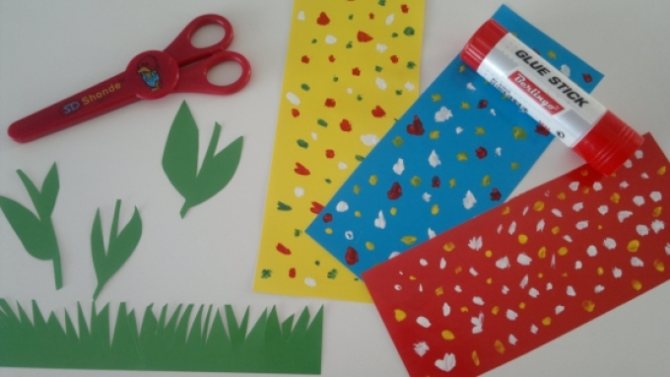
Materials for application
- special kits are sold with ready-made parts and base
- you can draw the details yourself and cut them out
- You can also find diagrams on the Internet, print them and cut them out
- you will also need a base, it can be white or colored cardboard, whatman paper, just paper, paper with some drawings or an interesting texture
- glue, scissors
Materials for application
Sequence of actions for practicing paper appliqué
- Come up with a picture or story of what you want to get as a result. At the same time, take into account the desires of the child and his gender.
- Cut out the parts you need
- Stick them on the base
- Complete the work and don’t forget to praise your child.
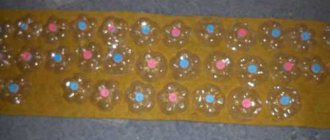
Application with cereals
Cereals are a safe natural material for activities with children. Applications with cereals are good because they do not require special tools, you only need a base, glue and cereal.
- Cereals can be painted in different colors, so the child will learn them
- Cereals are good for irritating the nerve endings in the fingers and promote the development of fine motor skills.
- A child learns new material through tactile sensations
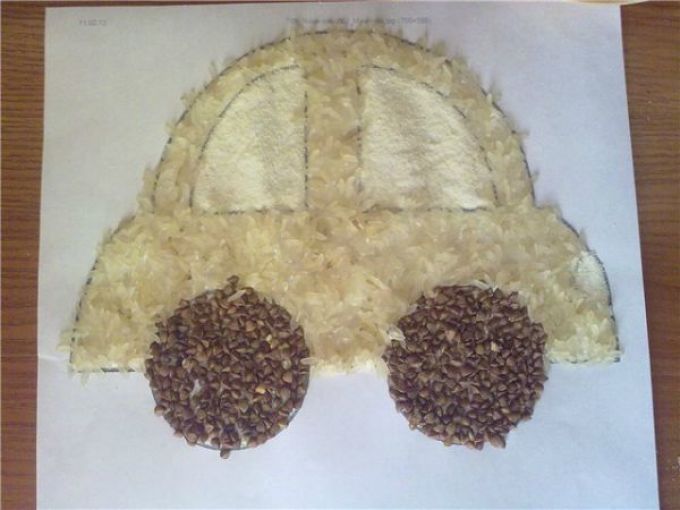
Application with cereals
There are two techniques for working with cereals:
- Sprinkling. To do this, you need to spread glue or stick double-sided tape on the base in the right place and ask the child to sprinkle it with cereal - it will stick
- Indentation. Stick plasticine on the base in the right place and press the cereal into it
Lilac
Probably, a broken applique is the sweetest and most tender thing you can imagine. She just looks so fluffy that I can’t believe it was all created. A torn applique achieves this effect due to small uneven parts assembled into one composition.
- Background
. There are 2 simple ways to create it. 1) decorate cardboard with paints; 2) or, take colored paper and glue it to a more durable base. You can paint and glue using one, two or more colors. - Vase
. Any shape and color is cut out and glued to the background sheet. - Stems and leaves.
The cut applique will look even more delicate if you use corrugated paper for the secondary parts of the picture, such as leaves and stems. Cut out thin strips and small leaves. We glue the stems immediately. - Lilac.
It is very true when the inflorescences, consisting of many small flowers, are made in the style of broken appliqué. This will allow you to depict flowers more realistically. First, we determine the shape and size of the inflorescences. Cut out the silhouette of each of them from a colored napkin. Attach above the stem. Cut the napkins into small squares. We crumple some of them. Others - we tear into several parts before crumpling them up. This is a material for crafts in the cut-out applique format.
Lubricate the silhouette of the inflorescences with glue. We press each lump against the silhouette, tightly collecting one against the other, so that there is no gap between them.
The finishing touches. Leaves and volume. Add leaves to the composition.
And now, so that the broken applique acquires volume, in watercolor, in the color of the inflorescences, only a little darker or lighter in tone, we make a few strokes directly on top of the flowers. The work is done, all that remains is to admire the result and praise the kid for his ideas and work!