Flowers
The easiest way to make a flower using plasticine printing:
- In the center of a sheet of paper or thick cardboard used, draw the outlines of an open flower (middle and petals).
- Using a small amount of yellow plasticine, rubbed over the middle of the flower, paint the inside area of the bud.
- Grind the red plasticine evenly, covering the inside of the drawn petals with it, without going beyond the middle.
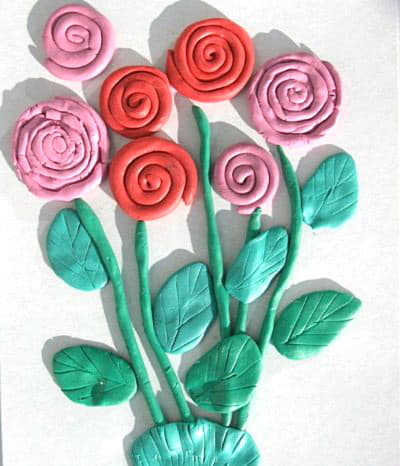
- Twist several sausages from blue plasticine, and then use them to mark the boundaries of the flower. As an alternative to sculpting additional elements to create borders, the simplest rubbing of blue plasticine along the contour of the image using a finger or a special spatula is allowed.
- Cover the image with 2 layers of clear varnish, then let it harden on its own.
- Draw several thin lines from the middle of the flower by rubbing a small amount of plasticine, directing them to different petals.
The benefits of plasticine painting
The benefit of this activity is that children study shapes, properties of objects, develop finger movements, which helps the development of speech.
Read also: Matte French manicure (41 photos)
When studying objects, children develop their powers of observation and imagination; modeling helps them create and fantasize.
During the classes, coordination of movements, consistency in the actions of the eyes and hands are developed, and children learn to work with tools.
The technique of this creativity is simple and accessible to everyone; everything you need can be easily purchased in the store, so it is not difficult to organize classes at home.
Templates for plasticineography
Templates for plasticineography make it much easier to organize activities with kids. It is still difficult for children aged 2-3 years to independently come up with a plot for a picture or create a composition on a given topic.
The template is the silhouette of an object that children will decorate with plasticine. In addition, the use of identical templates presupposes the initial equality of children: there will be no disputes due to the fact that someone’s craft is larger in size and someone’s is smaller.
Children's works made on a template end up being the same in size, but different in content. For example, if the theme of the lesson is “New Year,” children can be given templates in the form of Christmas tree balls. Everyone will decorate this ball with plasticine the way they want. In the future, you can draw a Christmas tree on whatman paper and attach children’s works to it using the plasticineography technique.
Plasticineography for children on the theme “Spring”

Prepare everything you need, then it’s time to get down to business. It is better to first mark with a simple pencil where everything will be located. Then you show your child how to knead the plasticine and make it into something like melted snowdrifts. And from black he will create emerging islands of earth.
Let it be seen how the melt water flows. The baby will convey this using a strip of blue plasticine. From the same mass he will create clouds. Then you need to tear off several pieces from the white plasticine and create a semblance of buds from them. And the blossoming petals consist of three such blanks. All that remains is to make a sun and attach it to the top of the drawing. The result was a wonderful work using the plasticine technique.
Operating rules
Learning the plasticineography technique occurs quickly. Children simply need to tear small pieces of the desired color from a piece of material, and then make small balls out of them. These elements need to be glued to a sheet of paper with an image drawn on it in the right place. After placing the next part of the picture on the surface, lightly press it with your finger. This procedure is convenient because it allows you to correct mistakes without any extra effort.
When a child creates a plasticine image on a canvas, it is necessary to follow this procedure. In your work, use only bright material that can be easily given the required shape. This will make it easier for pens that are not yet too strong to create exclusive drawings.
To consolidate the acquired skills, separate the stages of training: first show how to press on the material, then practice smearing it. Then combine both methods in the game.
The benefits of plasticineography
Plasticineography is a creative process during which children create three-dimensional pictures from plasticine , without using classic drawing tools - brushes, paints or pencils. For the working surface, sheets of paper, A3 size or larger, or thick cardboard are usually used.

Plasticineography for children is very useful due to its positive effect on their mental and physical development
Regardless of how old the child is, 2 or 8, the type of arts and crafts in question has a positive effect not only on his mental, but also physical development:
- filling the cognitive needs of children (especially important for children from 2 to 4-5 years old);
- acquiring the ability to navigate in the horizontal plane;
- formation of the creative component of the personality of a growing person (awakening interest in creativity, understanding the algorithm of the creative process, and so on);
- development of fantasy;
- development of fine motor skills of the hands (positively affects the child’s speech and overall development);
- broadening one's horizons;
- increasing the sensitivity of tactile perception;
- expansion of vocabulary (if the child already knows how to speak) or stimulation of speech (if the child does not yet speak due to age or developmental delay);
- instilling perseverance, accuracy, and independence in the child during the work process.
Planar modeling
You should start introducing your child to plasticineography by learning the skills of drawing with longitudinal strokes. Show your child how to rub several multi-colored slices of crushed plasticine over the surface. Then start “coloring” geometric shapes in the form of the sun, a large flower, a pyramidal poplar, and animals. Children often use only their index finger when working, but try to get them to use both limbs. Such exercises will help improve the synchronization of the brain hemispheres.