Where to start learning
It is advisable to teach children to draw animals by mastering a simple pencil. It will create an outline of the image, which you can later happily color. In addition, children quickly get upset if something doesn’t work out for them. In the case of a simple pencil, it’s not difficult to fix everything: erase the missing element with an eraser and continue creating.
Which animal to choose for drawing
The first lesson is the most important, because you can teach a child to draw animals in a few minutes, provided that the object to be depicted is chosen correctly. You shouldn’t immediately suggest drawing a horse or a giraffe. The best option is a duckling, kitten or puppy. The images of these pets consist of a small number of elements, which minimizes the risk of failure in the lesson.
Interesting! Parents who decide to try to learn drawing techniques using step-by-step templates themselves rejoice like children, amazed at the result.
What you need for drawing
Any activity, be it drawing or morning exercises, should be started when the child himself wants it. It makes no sense to force someone to draw, because creativity is closely related to the state of the soul. For the first lessons you will need a minimum of tools:
- paper;
- a simple hard-soft pencil (marked TM or HB);
- eraser.
Note! It is preferable to take A4 paper or a classic sketchbook, but a notebook sheet will not work, the lines and cells in it will interfere with the baby, and the sheet will seem initially unclean to him.
Reading fairy tales in preparatory groups of kindergartens
It is recommended to give preference to a hard-soft pencil, because it is easiest to work with. Drawing with a hard stylus is inconvenient because it requires stronger pressure and the mark left behind is not bright. It will not be possible to erase it efficiently - a groove from the rod will remain on the paper. On the contrary, a soft lead does not require pressure at all, its mark is bright and clear, but when you try to erase the line, the eraser will smear the soft mark, leaving dark stains.
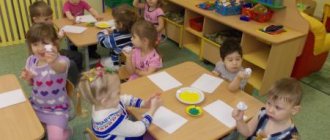
GOALS:Educational
♦ Strengthen the skills of drawing animals by composing an image from individual parts - circles, ovals, triangles. Learn to make a pencil sketch of your intended drawing.
♦ Learn to select the color of an image by mixing paints to obtain the desired shade.
♦ Learn to use different visual means to obtain an expressive image.
♦ Teach children to think through a plan and ways to implement it, to independently choose visual means to realize the plan.
Developmental
♦ Develop a sense of composition, learn to harmoniously place the elements of a drawing on a sheet of paper.
♦ Develop the ability to compose a simple plot using proven drawing techniques.
Lesson materials
♦ Sheets of AZ paper and small cards measuring 5x5 cm.
♦ Simple pencils and erasers.
♦ Watercolor and gouache paints, palettes.
♦ Jars of water.
♦ Wax and lime crayons, sanguine, pastel, charcoal.
♦ Different brushes - squirrel brush No. 8, kolinsky, bristle.
♦ Napkins for blotting brushes.
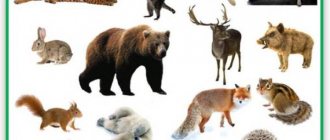
♦ Pictures and photo illustrations depicting wild animals in static poses and movement.
O.A. Skorolupova.
Find MASTER CLASSES on step-by-step drawing of animals on our website.
Part 2
Working with color
Educator:
- Now that the sketches are ready, think about what and how you will color them. We have paints - watercolor and gouache; wax and lime crayons, pastel, sanguine. There are also different brushes.
Remember which brush can be used to convey the fluffiness of fur? That's right, using stiff bristles, picking up gouache on a dry brush. But the white chest and belly of the fox can be emphasized using pastels or lime chalk. As you can see, various visual media can be combined.
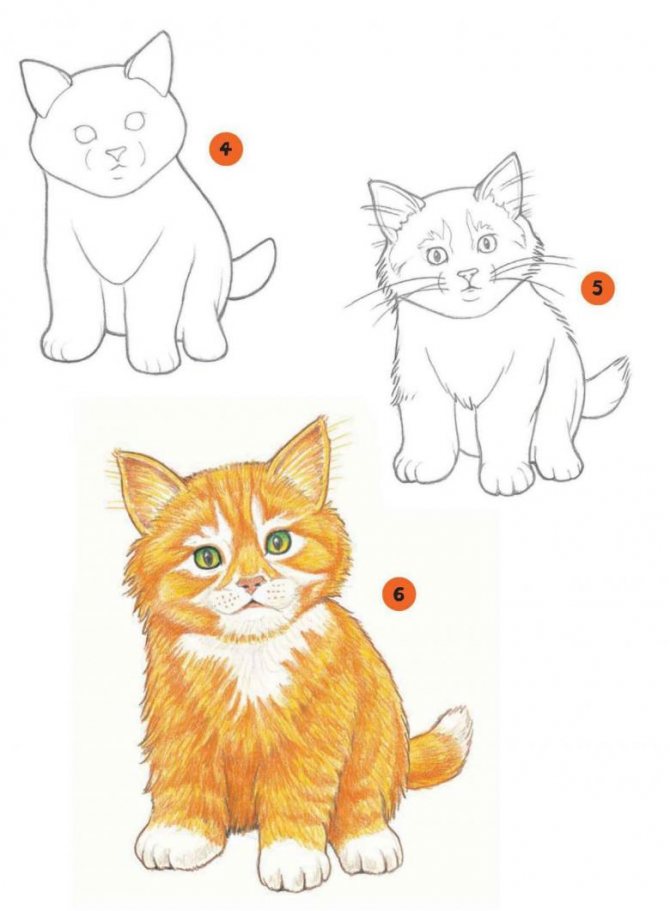
An explanation of how to compose an image from individual parts. Sketching with a simple pencil
Educator:
— Guys, remember yesterday we played a new game “Why do hares need wolves?” And today I invite you to draw new cards for this game. Here you can see various illustrations of wild animals. Images of each of them are easy to compose from simple figures.
Look at the fox. Her body has a shape similar to an oval. The head is also oval, and the muzzle and ears are triangular in shape. (The teacher can make a sketch with chalk on the board.)
And here is the bunny. His body is an oval, his head is a circle, to which we add long ears.
Here's a busy squirrel. Look, her body also looks like an oval. At the bottom of it we draw a circle - the outlines of the hind legs. The head is an elongated oval, the tail is large, curved, fluffy.
Try drawing any of these animals on small cards. You can draw not one, but several animals. Start with pencil sketches. If necessary, correct them with an eraser.
Step-by-step schemes for kids
There are many simple patterns that make beautiful drawings; for children, animals are of more interest than household items or landscapes, so you should start with them.
A simple example of drawing a bird. Children love to feed the ducks on the ponds, any child would love to draw their own duck.
- The creative process begins with two ovals: the head and the torso, connected to each other by a short neck.
- Paws are drawn from the body down.
- On the duck's body, just below the middle, draw an arc representing a folded wing.
- Sharpen the edge of the oval from the tail side using an eraser. The tail is depicted by several almost parallel lines of short length
- A beak and an eye are drawn to the duck's head.
- The final touch is adding details in the form of drawing feathers throughout the body and wing of the bird.
- Now you can color it.
How to draw a duck
Benefits of drawing
It is worth noting that drawing animals is useful not only for children. In the modern world, people experience enormous difficulties in finding peace and harmony.
Painting, or simply drawing with a pencil, puts the excited nervous system in order, reveals hidden abilities in a person, and helps to reveal oneself as an individual.
Masterpieces created with your own hands can be an excellent exclusive gift that will decorate the interior. At first, learning to draw is really difficult, but after some time, patience and work are rewarded with an excellent result - a beautiful picture, pleasure, and the praise of others.
Classes for senior and preparatory groups
Schemes for drawing various animals for preschoolers are also used in master classes at preschool educational institutions. A popular technique is drawing with geometric shapes, from which not only insects are obtained, but also flowers, large animals and people. There is also a secret to using the number 8, which is demonstrated to children in open lessons in the form of presentations with templates. When teaching an algorithm for drawing a fly or a wasp, a figure eight is used, the horizontal arrangement of which helps to proportionally depict the head and abdomen of the insect.
More complex drawing algorithms
In the senior group of kindergarten, children already have a fairly broadly developed horizon, they think and fantasize more broadly, so at this age they can already learn more complex compositions.
More complex drawing techniques
These lessons pay more attention to detail, using shading, curved lines and irregular geometric shapes.
Using available templates and diagrams for drawing, you can teach your child to depict all representatives of the animal world, not only in our country. Many adults, trying to teach a child to create their own drawings, are so carried away by the diagrams that, to their surprise, they discover the hidden talent of an artist in themselves.
Source
Schemes and templates for children 4-5 years old
Children at five years old already have basic drawing skills, especially if they attend a preschool where they are taught by teachers. But in the hot summer, many kindergartens are closed, and not all parents know how to draw themselves. In order to help your child with creativity, you can use children's instructions from the Internet.
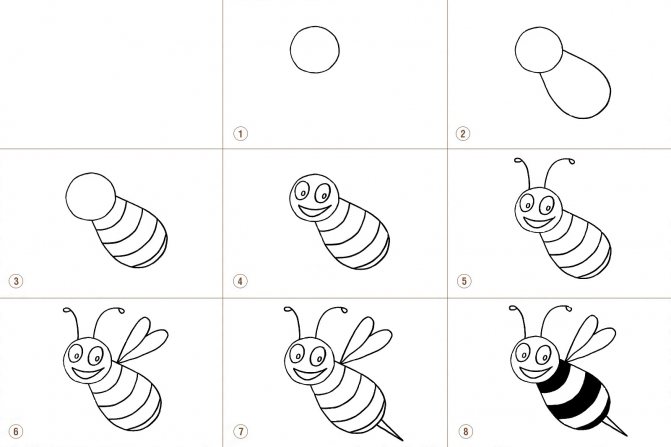
How to draw a bee by creating your own coloring book.
Step-by-step instruction:
- Draw a round head.
- The body is drawn towards the head, like a flower petal or a propeller blade.
- Slightly curved lines divide the body into segments, depicting striped coloring.
- Children's imagination perceives animals as endowed with emotions, just like people. Therefore, the bee needs to finish drawing her eyes and smile.
- Now it's time to add antennae and wings.
- The final touch is a sting in the form of a narrow inverted cone.
More complex drawing techniques
Interesting! Insects are the best representatives of the fauna on which you can train your artistic skills. It’s easy to draw them using the simplest geometric shapes: a circle and an oval, which make beautiful caterpillars, bumblebees and bees.
Environmental education of preschool children
Contents of lessons on drawing wild animals
Click on the desired option and you will go to it.
| 1 option | Option 2 - Video | Option 3 |
| Option 4 | Option 5 - Video | Option 6 |
| Option 7 | Option 8 - Video | Option 9
|
| Option 10 | Option 11 - Video | Option 12 |
| Option 13 | Option 14 - Video | Option 15
|
| Option 16 | Option 17 - Video | Option 18 |
| Option 19 | Option 20 - Video | 21 options
|
| Option 22 | Option 23 - Video | Option 24 |

Leave your comment
Gift certificates
Accreditation of Russian universities will become indefinite from March 1, 2022
Reading time: 2 minutes
The Russian government will consider the issue of providing children with milk in schools
Reading time: 1 minute
The Ministry of Education is ready to consider alternatives to the Unified State Exam
Reading time: 1 minute
Every third student is behind in school
Reading time: 3 minutes
The Ministry of Health will allow research on Sputnik V on children over 12 years old
Reading time: 1 minute
Russian universities will begin training new climate specialists
Reading time: 1 minute
Responsibility for resolving any controversial issues regarding the materials themselves and their contents is taken by the users who posted the material on the site. However, the site administration is ready to provide all possible support in resolving any issues related to the work and content of the site. If you notice that materials are being used illegally on this site, please notify the site administration using the feedback form.
All materials posted on the site were created by the authors of the site or posted by users of the site and are presented on the site for informational purposes only. Copyrights for materials belong to their legal authors. Partial or complete copying of site materials without written permission from the site administration is prohibited! The opinion of the administration may not coincide with the point of view of the authors.
Source
Nice cat
We talked about pictures of cats, now we combine knowledge and test the ability to imagine outlines. Let's pretend to be a good cat.
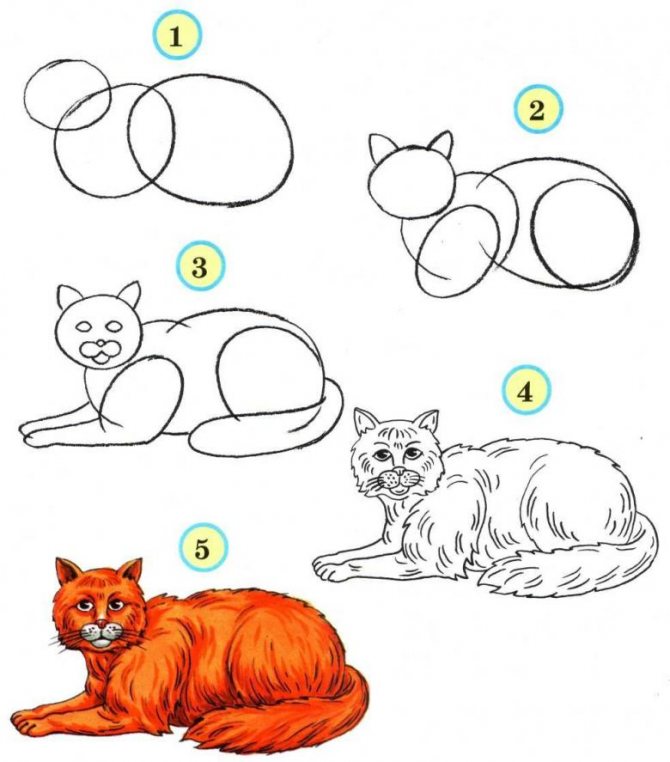
To depict the beast, we take a black gel pen; for beginners it is better to take a regular pencil, but when the image is ready, you will need to draw an outline.
- In the middle of the sheet we draw an arcuate segment. The arc should be directed downwards. At the end of the arc we draw cat ears on the two edges. From the edge of the colored ears we continue to show the circumference of the head.
- In the middle of the resulting figure, we will draw two circles apart, they will become the eyes of the cat. In the middle of the eye shape we show off the large pupils and add highlights. We go a little lower and depict a triangular nose with rounded corners. Let's add lips under the nose.
- Now let's outline the cat's fluffy chest. Under the chest we draw the front paws and divide their lower parts into fingers. Starting from the upper left side of the head, draw the torso and draw 2 hind limbs.
- Add a fluffy tail to the outline. We detail the ears and color the image. If you used a regular pencil to draw, outline the entire area with black.
- Use a black pen to fill in the eyes, leaving a shine. Use a pink pencil to color the inner edge of the ears. We show parts of the shadows in the image in black or gray. Paint the remaining perimeter of the eyes blue or green.
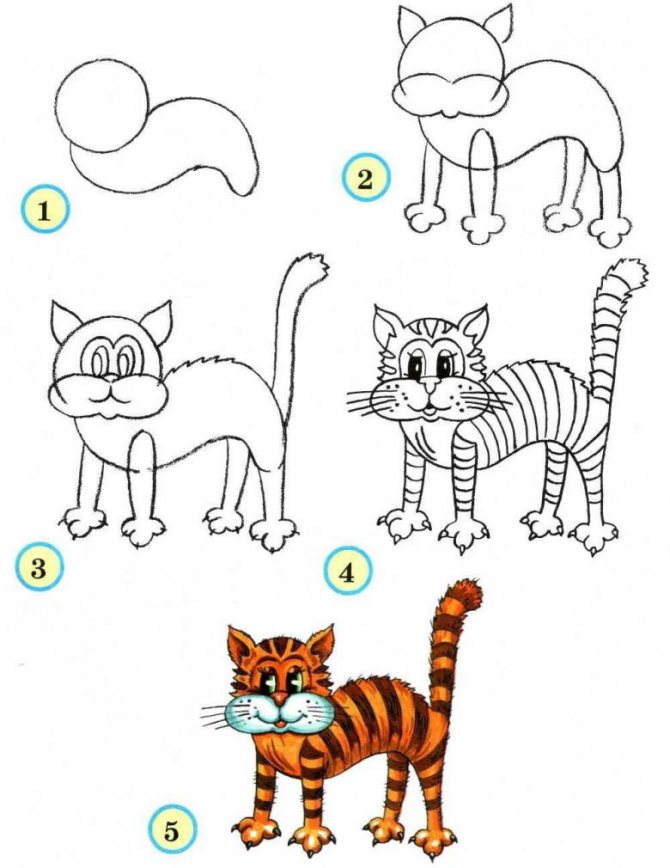
The cute cat is ready and now you can imagine how to make an animal drawing like a cat. The work is mostly simple. If you are a budding artist at a very young age, don't worry, if you meet our conditions, you will get a real creation.