Counting is one of the key skills you want to master before your child starts school. No one will require a first-grader to solve complex examples, but it will be useful before school to learn how to count the number of objects and know the basics of addition and subtraction. It will not be difficult for a child to understand the teacher’s request - for example, “take two pencils” - and a first-grader will feel no less smart than peers who have already learned to count.
There are many ways to teach a child to count: using methods developed by professional teachers, in a playful way, with a combination of children's poems and thematic videos. Whichever method you choose, learning to count can be considered the first step in learning mathematics. Good knowledge of mathematics is a guarantee not only of positive grades, but also of excellent memory and attention, developed logical thinking and the ability to calculate the right decision in any situation.

First acquaintance with numbers: when and where to start
You can start teaching your baby about numbers at 1.5-2 years old. But it is too early to expect significant mathematical success from a young child, although children quickly understand the difference between the concepts of “one” and “many” even at an early age.
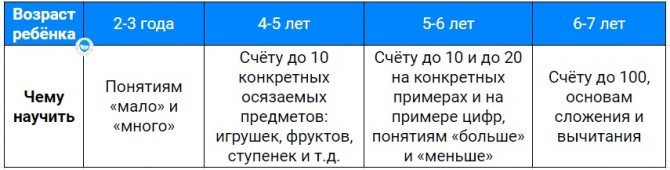
Briefly about the stages of teaching a child to count - in the table:
Trying to teach a child to count too early is not worth it because of the difference between the thinking of children and adults. There is such a thing as the Piagetian phenomenon, demonstrated by the French psychologist Jean Piaget.
The psychologist showed that children under six years old cannot treat counting abstractly, counting correct mathematical operations only in the present tense and precisely with those objects that an adult shows. For example, a child under six years old will be convinced that if you take the apples to another room or replace the apples with pears, the number of objects will change.
The best way to teach children to count is in 4 steps:
- At 2-3 years old, this is enough to teach a child to understand the difference between “a little” and “a lot.”
- At 4-5 years old, it’s time to learn to count within 10 concrete, not abstract objects: candy in a jar, dishes on the table, books on a shelf.
- At 5-6 years old, a child can be taught to count to 10 and 20 and show what numbers look like and how they are written. At the same age, the child already knows how to understand the terms “more or less,” adding the required amount to objects or, conversely, removing the excess to achieve equality (for example, putting toys in equal piles).
- At the age of 6-7 years, a child is ready to learn to count to 100, add and subtract numbers up to 10.
Slide captions:
“Sound line” Master class for parents
Step 1. Take 2 sheets of paper or cardboard.
Step 2. On the first sheet, mark 3 equal stripes horizontally.
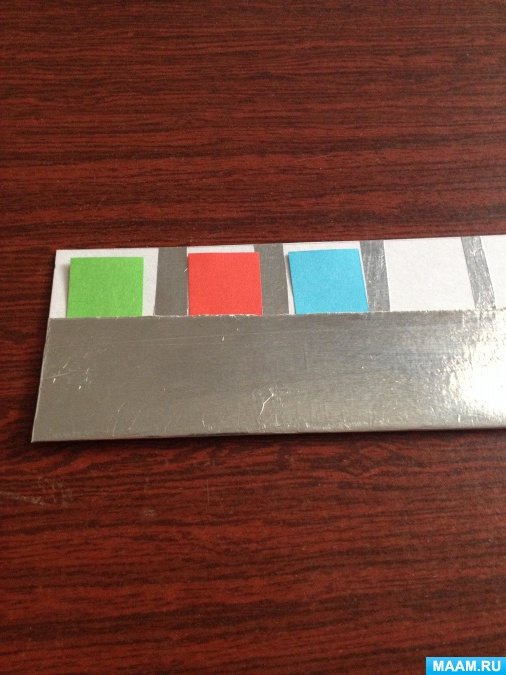
Step 3. Draw and cut out circles on the stripe that is in the middle. For example 5. Fold the edges along the line so that one covers the other and glue it to secure our ruler.
Step 4. On the second sheet, also mark 3 equal stripes and cut. 1 for closing sounds 2 for sounds 2 for sounds
Step 5. Take colored paper (blue, green, red) - Hard consonants - Soft consonants - Vowels
Step 6. Cut colored paper into equal rectangles or squares. The main thing is that they fit into the cut out circles on the sound ruler!
Step 7. We come up with a word with from 2 to 6 sounds.
Step 8. Take a strip, insert it into our sound ruler and draw circles.
Step 9. Glue our word onto the strip with circles. Let's look at the word "peace". It's the same strip!
Step 10. “Reading” the word on the sound line: we pronounce the sounds while simultaneously opening the windows with them. The 1st sound [m `] - sounds soft, as it comes before the sound [ and ]. (green rectangle) The 2nd sound [ and ] is a vowel. We can sing it. (red rectangle) 3rd sound [p] - consonant. This is a solid sound. (blue rectangle)
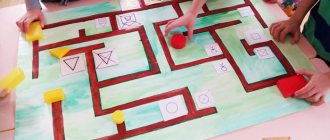
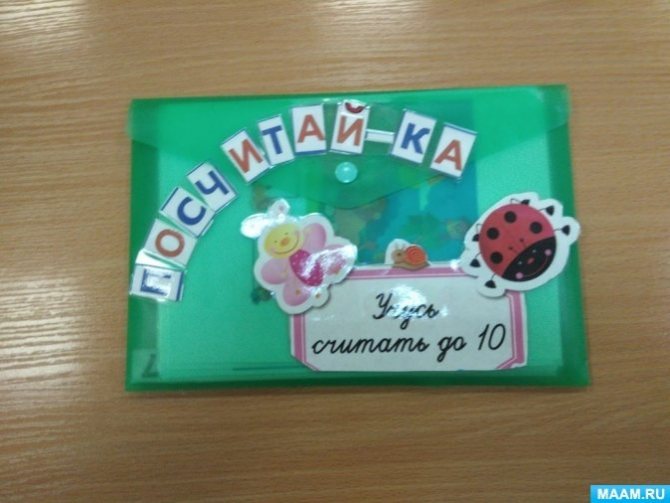
Didactic game “Count. Counting within 10" for children 4–5 years old
Tatiana Mezentseva
Didactic game “Conte. Count within 10 “for children 4-5 years old
Annotations
In preschool age, the foundations of the knowledge a child needs in school are laid. Mathematics is a complex subject that can be challenging in school. Also, not all children have inclinations and a mathematical mindset, so when preparing for school it is important to introduce the child to the basics of counting.
Developing quantitative relationships is a complex process that causes significant difficulties for most children. Often children do not understand why they need to count, measure, and not approximately, but accurately. Without realizing the meaning of the actions they perform, preschoolers perform them mechanically, which leads to formal assimilation of knowledge.
Premature learning of counting activities inevitably leads to the fact that the idea of number and counting becomes formal. Therefore, learning to count does not begin immediately. It is preceded by preparatory work: numerous and varied exercises with a variety of objects, in which children, using appliqué and overlay techniques, compare aggregates and establish “additional” connections.”
, “less” without using numbers or counting. Taking into account all of the above, the game “Count” was created.
The game is designed for both joint and individual activities.
The games offered are designed for children aged 4 to 5 years.
Task:
Strengthening counting skills by 10.
Tasks:
1. Consolidation of reverse and ordinal counting, the ratio of number and quantity.
2. Development of attention, memory, figurative and logical thinking, the ability to analyze, compare, classify.
3. Strengthen the ability to answer questions “How much?”
, “Which number is greater?” , “Which number is lower?” , “To what extent is the number . more number? , “How much is the number .. smaller than the number?” ; strengthen the ability to combine into groups of elements for a given number, look at the total number of elements and call it a number. 4. Develop ideas about color, shape, size and properties of objects through vivid images and playful activities.
What else to read: Extracurricular event “Legal Tournament” for grades 10-11
Material:
The game consists of ten basic cards depicting various animals from 1 to 10 and a series of numbers from 1 to 10.
Rules of the game:
Under the card, put a number corresponding to the number of objects or animals shown in the picture.
The child, having looked at the card and listened to the teacher’s task, must place a certain number.
Complication: using understanding of the meaning of the words “How many more?”
, "Least?" , “They left” , “On the right” .
MAGAZINE Preschooler.RF
Topic “Measuring length” Program “From birth to school” Age Preparatory group Main educational area “Cognitive development” Integration with other areas “Physical development”, “Social and communicative development”, “Speech development” Form of implementation Joint activities of children and adults Goal Development of cognitive and mathematical abilities Educational tasks To cultivate discipline, the ability to listen to the teacher, to continue to develop the ability to quickly complete tasks. Developmental tasks Develop attention, intelligence, logical thinking, imagination.Educational objectives - To consolidate the understanding of measuring length using a measure and the ability to practically measure the length of a segment with a given measure; - introduce cm and m as generally accepted units of measurement of length, develop the ability to use a ruler to measure the lengths of segments; — consolidate ideas about comparing groups of objects using pairing, addition and subtraction, the relationship between the whole and parts, the composition of the number 6. Planned result Learn to use a ruler to measure the lengths of segments. Methods and techniques Verbal: explanation, clarification; Visual: display; Practical: exercises, completing assignments. Visual teaching aids Demonstration: white strip of paper - 40 cm, measuring strips: red - 10 cm, blue - 8 cm; meter (tailor's, folding, tape measure, etc.); model cm; ruler. Handout: white strip of paper - 20 cm; measuring strips: red - 5 cm, blue - 4 cm; ruler; sheets with three segments 5 cm, 2 cm, 4 cm; stars. Organization of children
Individual work Remind Nikita how to use a ruler correctly. Vocabulary work Centimeter, meter, span, fathom, elbow, segment, longer, shorter, “whole” and “sum”, wider, narrower. Preliminary work Conversation about units of measurement, ways to measure length. Structure 1. Start of GCD: 1 min. 2. Experiment: 5 min. 3. Work with handouts: 6 min. 4. Physical exercise: 1 min. 5. Measuring lengths: 6 min. 6. Physical exercise: 2 min. 7. Repeat: 6 min. 8. Lesson summary: 3 min.
GCD move
I. Start of GCD -1 min. II. Experiment -5 min. III.Work with handouts. IV. Physical exercise V. Measuring lengths with a ruler VI. Fizminutka VII. Repetition VIII. Lesson summary
-Hello guys! Today I will teach the class, Dinara Lyaufirovna. Now I ask you to sit correctly and listen to me carefully. Agreed? For each correct answer, I will give these stars (I show it). Additional stars will be awarded for good behavior. Whoever has the most stars will receive the main prize. It's here (showing the gift-wrapped box. Then I put the box in the closet so the kids won't be distracted). Guys, today we will learn how to measure length using a ruler, we will find out what cm and m are.
A) Now I want to invite the tallest boy and the shortest girl (names). Guys, look at the two stripes on the floor. Look carefully and tell me, which stripe do you think is longer? (I ask several children individually). That's right, they are the same length. Now let's conduct an experiment. Maxim will walk along this lane, Ksyusha will walk along this one (I show). This row will count how many steps Maxim has taken. This row will count how far Ksyusha has walked. How many steps did Maxim take? How many steps does Ksyusha have? Does Maxim have more steps or does Ksyusha? Now think, the strips are the same length, but the number of steps is different, why did this happen? What do you think, Nikita? What do you think, Dilyara? Thus, we can draw a conclusion: the wider the steps, the fewer the number of steps. Maxim had wider steps, but he had fewer steps. And Ksyusha’s steps are narrower, so she has more steps. Well done boys! I give stars to Ksyusha and Maxim for their good work. Thank you! You can take your seats. (Then I give stars to the children who answered). B) The next task is this. On your tables there are white (20 cm), blue (4 cm), red (5 cm) stripes. Please compare the blue and red stripes. Which stripe is longer: red or blue? How did you measure, overlay or app? Very good. Now measure the white strip using the red stripe. How many red stripes fit into the white one? Vera, how many strips do you have? Fine. Did this happen to everyone? Amazing! Remember this number. Now measure the white one using the blue strip. How many strips are there? Does everyone have the same quantity? Which stripes fit more: red or blue? Polina, how did it work out for you? Let us conclude: we have found that the larger the size of the measure, the smaller the measurement result, i.e. There were fewer red stripes, because it's longer. Well done boys! (During the task, I complete it on the board. I approach each child and help. I give stars for correct answers).
In the last lesson, you were introduced to some measurements for measuring length. Let's remember what other standards can be used to measure the lengths of segments? (stars for correct answer). Do you think the same result will be obtained when measured in all people? That's right, guys. To avoid disputes, people agreed to use measurements that are not related to the size of the human body - they are always the same. Today we will get acquainted with two such measures - the meter and the centimeter. (I demonstrate a model of a meter and a centimeter). Now mark 1 cm on your rulers with a green pencil (or a simple pencil) (I show it on the board on a demonstration ruler. I explain how to use the ruler correctly). Which measure do you think is more convenient for measuring distance in a room? The first row measures the length of the table, the second the length of the board, the third the length of the carpet (I help each row. I ask each row how many they got. I give stars for correct answers). Now look at task number 1. What yardstick is used to measure the length of the board by the boy in the picture? That's right, by meter. What is the most convenient yardstick to measure the length of the path along which a snail has crawled? Centimeter. How many small 1 cm segments are included in this path? Let's check. Yasmina, please count. Fine. Dima, how did it work out for you? Did everyone get 4 pieces of 1 cm each? Well done boys. Segments of 1 cm are laid out on the ruler. Numbers 1,2,3, etc. show how many cm are deposited. For example, there are six segments on my segment, which means there are 6 cm (I show it on the board on the demonstration ruler). Let's find out how many cm the snail crawled? Denis, how should you apply the ruler correctly? Nikita, you need to hold the ruler like this (individual approach to children). So, guys, how many cm did the snail crawl? Well done, that's right, the snail crawled 5 cm.
Guys, we have been studying for a very long time and we need to rest a little. We all go out onto the mat and get on all fours. Let us imagine that we are very slow snails. You know that a snail takes a very long time to crawl. Who crawls so slowly and carries his own house? It will crawl a little more, stick out and hide its horns. A snail crawls flexibly along a leaf, along a branch. Very slowly. Well done! Now we sit down at our seats and continue the lesson.
Your rulers are waiting for you on yours. Now we need them. Look at task #2. What is shown here? Right. These are segments. Our small task is to measure their length. I need helpers. There are segments on the board. They are exactly the same length as in your notebook (I call one of the children to the board). (d.) will measure, and you will measure from your notebooks. Then we’ll check (individual approach). Let's check. How many cm did you get, Karina? What about you, Kirill? Fine. Now let's find out how many cm (child at the board) got? This means that we have correctly measured all three segments (asterisks). Now we will conduct a small experiment. What geometric shapes are drawn on the board? Right. You have exactly the same figures in your notebooks. Let's remember where the sides of these figures are? (we consider each figure). Do you think the sides of these figures are equal? For example, does a triangle have equal sides? What about the square? At the rectangle? Now we will find out. (I break down the figures that are on the board into parts. Each one separately. I attach the parts to each other). Look guys, each piece has a different length. What does this mean? This means that, for example, a triangle has different sides. What can you say about the square? Rectangle? Measure the sides of the geometric figures in your notebooks and write the results in the box. (I give time, I help). Did everyone complete this task? Fine. Guys, look at task No. 4. What do you think we need to do? What it is? That's right, these are equalities and they need to be composed correctly. First we need to measure the length of each segment. Measure the length of the largest segment and write the result in the upper “window”. What equations can be drawn up? (I ask several children individually. For the correct answer - an asterisk. The answers are written down. I show it on the board).
We did a very good job. I think we deserve a break. We put on the record and go out to warm up. Get ready to exercise, get ready to exercise, get ready to exercise! We start running on the spot, the finish line is in two hundred meters! One-two, one-two, One-two, one-two! Enough, enough! They came running! Stretch and breathe! Let's work out a little more, and you'll rest longer.
Now look at task No. 5. Look how beautiful the pictures are. What do you think needs to be done here? There are > < = signs here. That's right, we need to compare. Artem, please tell us what is shown in the first picture? Right. Where are there more balls, where are there fewer? So, what sign will we put up? (showing signs on the board) Correct. Egor will tell us about the next picture. Please tell me what is shown and what sign should be placed? Why? Be careful. Right. All agree? Fine. And the last picture. Rostislav, please tell me what sign should be put up? Everything is correct. Guys, you completed this task. You will complete task No. 6 with Olga Sergeevna after sleep. And then I will check how you completed it. (In case I don’t meet the deadline).
Guys, today we got acquainted with new measurements. Let's remember what these measurements are? That's right, meter and centimeter. Why do we need such a measure as a meter? What is a centimeter for? Nikita, please remind us how to use a ruler correctly? Well done! So that you do not forget about these measurements, measure the length of the table, bed, and the length of your books that you have at home. I am very glad that you listened to me so carefully, behaved well, and were so active. As promised, the most active and obedient will receive the main prize. (we determine the most active, smart and obedient. The rest receive incentive prizes). You are all very smart, active, obedient, but, as you can see, (child’s name) was quicker and faster than everyone else. I have also prepared incentive prizes for you. Thank you all and see you again!
| Next > |
How to teach counting to 10
You can teach your child to count to 10 before the age of five or, if necessary, at an older age. The main conditions for successful learning to count mentally up to 10 are a child’s good vocabulary and interest in numbers.
How to teach your child to count to 10:
- focus on numbers that you already use in everyday situations, for example: “You are four now, and soon you will be five,” “It’s time to get up, it’s already seven”;
- show pictures with different numbers of objects within 10: illustrations in books, cubes, your own drawings;
- educational videos and cartoons on relevant topics will help you quickly remember the sequence of counting to 10;
- connect the elements of mental arithmetic: teach your child to use an abacus – often children quickly learn to count to the nearest 10, manage an abacus or even a classic wooden abacus;
- use an element of the Montessori method: a famous teacher successfully taught children 3-6 years old to count, regardless of their initial skills, using the most visual practical material: money (Maria Montessori considered money exchange exercises her most effective lesson for understanding counting).
When sending your child to school, take care not only of his intellectual preparation. After all, at school the child will have to face a completely new world. Some children find it difficult to endure the adjustment period. Make sure that your child is not bullied by peers or teachers, that he does not have problems and that the “Where are my children” application will definitely help him!
Master class on making a sound ruler
Tatyana Getmanskaya
Master class on making a sound ruler
The main task in the process of teaching literacy is to form in preschoolers a general orientation in the sound system of the language , teaching them the sound analysis of a word (determining the order of sounds in a word , establishing the distinctive role sound , its main qualitative characteristics). Children cannot master sound analysis sound lines in my work , which help to perceive information visually. The lines are like this :
this ruler has pockets in which, for phonetic ( sound-letter )
while parsing the word, children insert colored rectangles
How to teach counting to 20
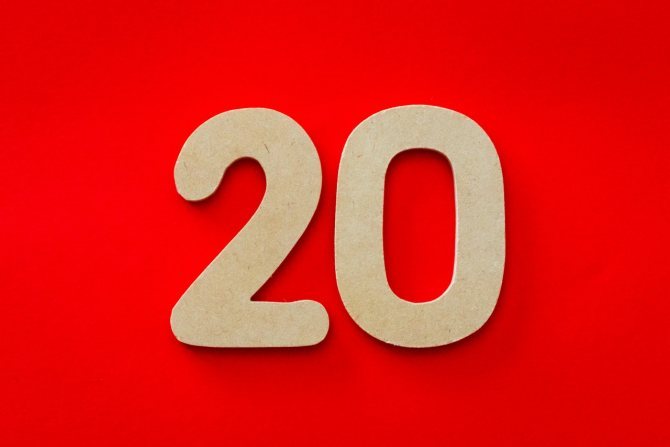
You can teach your child to count to 20 when he is confident in counting to 10. To quickly and easily learn to count to 20, follow these steps:
- Teach your child what zero is (if he doesn't already know) using visual examples. For example, show two books or two other identical objects and then remove them. Explain: there were two books, and now there are zero.
- Show how new numbers are formed - it will be easier for the child to understand the principle using the example of numbers ending in zero. Let's say, in the Old Russian language “dtsat” means ten and, accordingly, the number 20 is two tens (you need to count to ten twice).
- Introduce your child to the concept of “number composition” - including with the help of improvised objects: counting sticks, toys, fruits. Place 10 identical objects in a row, and on top put one object different from these ten, for example, a counting stick of a different color. Explain to your child that this is the number eleven. With sticks on top, show how you get 12, 13, 14 and other numbers up to 20.
- Instruct your child to collect a certain number of identical objects (16, 17, 18, etc.), such as small toys, and count the number of objects out loud together.
- Reinforce the material with a line of numbers from 0 to 20: this way the child will learn to count to 20 much faster. You can draw the number line yourself or use a 20cm ruler. By practicing with a ruler, the child will gradually remember how to write numbers and their correct sequence.
What else to read: Entertainment “The Adventure of Kolobok” for children of the first junior group
How to teach counting to 100

When a child learns to count to 20 without leaving, it's time for parents to help their son or daughter learn to count to one hundred. Try teaching your child to count to 100 like this:
- Tell your child that numbers greater than ten are called “two tens,” “three tens,” “four tens,” and so on. Subsequently, the word “ten” was shortened to “twenty” and the familiar “twenty”, “thirty”, “fifty” appeared. The exceptions to remember are “forty” (meaning “many”) and “ninety” (meaning “from nine to one hundred”).
- Practice memorizing tens in the correct order from 10 to 100: 10, 20, 30, 40, 50...
- Once you have memorized the correct sequence of tens, move on to units. Explain to your child that the numbers from 20 to 100 do not come in a row - there are always between them: 21, 22, 23 and so on. Children who have learned to count to 10 and 20 well understand and remember the sequence of counting to one hundred.
- Ask your child to learn numbers gradually, one ten a day: from 10 to 20, from 20 to 30, and so on until 100.
- Practice in a playful way. Connect your child’s love to finding inconsistencies and errors - deliberately skip the number in the line up to 100 and ask the child to find the “missing” number - such logic games help you quickly remember counting up to 100.
Having learned the numbers, proceed to gradually study the multiplication table. We have collected in one place and talked about the most effective ways to help your child easily cope with this task!
Addition and Subtraction: Effective Ways to Learn
At the beginning of school, most children already know how to operate basic mathematical operations: addition and subtraction. The modern curriculum for the first grades is structured in such a way that addition and subtraction problems are given to children almost immediately - and the best time to learn addition and subtraction is in preschool institutions.
How to teach a child addition and subtraction: first steps
Begin your acquaintance with elementary mathematical operations using visual objects - cubes, counting sticks or other child-friendly ones:
- disassemble number 2 - show the child that if you add one object and another object, you get 2;
- similarly, we analyze the remaining numbers within 10;
- make sure that the child understands the principle of analysis and independently adds objects without errors;
- Once you have mastered addition, move on to subtraction using the same visual aids.
Addition and subtraction on fingers
As your child learns to add and subtract objects, move on to finger addition and subtraction, or skip this step if your son or daughter can add and subtract all objects around him intelligently and safely. In any case, make sure that the child gradually weanes himself from counting on his fingers - teachers note that the habit of counting on fingers prevents children from learning to count in their heads.
How to teach a child to count on fingers:
- When you find interesting puzzles for your child, start with the five fingers of one hand. For example, a difficult task: “You have 2 cars, so straighten two fingers. Brother has 3 cars, straighten three more fingers. You have a total of 5 cars."
- We suggest solving subtraction problems. For example: “Mom has 4 lollipops, spread out four fingers. Mom gave you candy, bend your finger. Mom has 3 candies left.”
- When the child begins to add and subtract within five without errors, proceed to similar actions with connecting all ten fingers.
How to teach a child to count in his head
Addition and subtraction of thoughts is one of the most useful skills for a preschooler, which will greatly facilitate learning mathematics at school. Before you teach your child to count mentally, make sure that he can add and subtract objects and that he has at least twenty.
How to teach a child to count in his head:
- Create a clear connection for your child between a number and a visual picture - combine games with dominoes and math cubes. You can use a mathematical set using the Zaitsev method - a set of cards connecting a number and a geometric figure. Children take lessons well using Zaitsev’s method: gradually, in this way, they can learn addition and subtraction even within a thousand.
- Teach your child, if he does not yet know, what “plus”, “minus”, “equals” are, with reference to visual examples.
- Spend enough time analyzing the number. To add 4 and 3, a child needs to know that those numbers “fit” into the number 7. The same principle works with subtraction: to subtract 5 from 8, you need to know that 5 and 3 “fit” into the number 8.
- Introduce your child to the rule “the amount does not change depending on the location of the terms.”
- Include in learning all the gaming devices that your child will like: cubes, tables, counting sticks, cards, themed board games.
What else to read: Master class “Circles of Lull” methodological development on the topic
How to teach a child to count backwards
If a child can count to one hundred and understands what units and tens are, there is usually no difficulty counting columns.
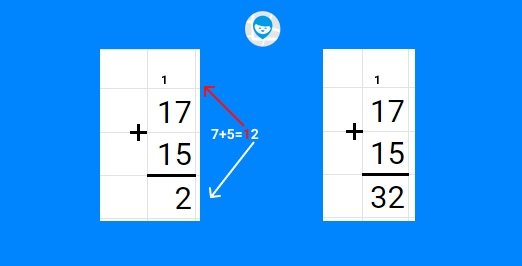
How to teach a child to count with a column:
- Explain that numbers are added and subtracted in one column by category: ones - separately, tens - separately.
- Show the sequence of actions if, when adding ones, the number is greater than or equal to 10: you need to write only the second digit, and you need to remember the first. For convenience, the resulting first digit can be written above the tens digit. Parents probably remember the expression from school: “We write two - one in our minds” (or other numbers from 0 to 9). Example: 17 + 15 = 7 + 5 = 12 (you write two, one gives tens) = 1 + 1 + 1 = 3 (sum of tens) = 32 (first digit is sum of tens) place, second digit is sum of units place ).
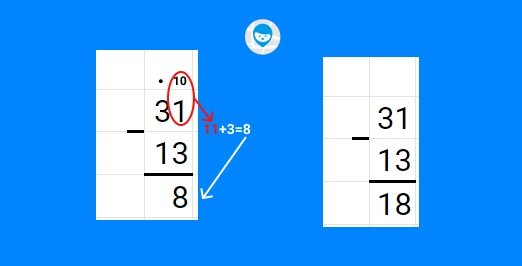
- Teach your child to subtract columnar. The principle of operation is almost the same as with addition, only if the upper digit in units is less than the lower one, the missing unit must be “borrowed” in tens. For example: 31-13 = 11-3 = 8 (digit 1 is “borrowed” from tens) = 2-1 = 1 (digit 3 from tens is reduced by a “borrowed” unit) = 18.
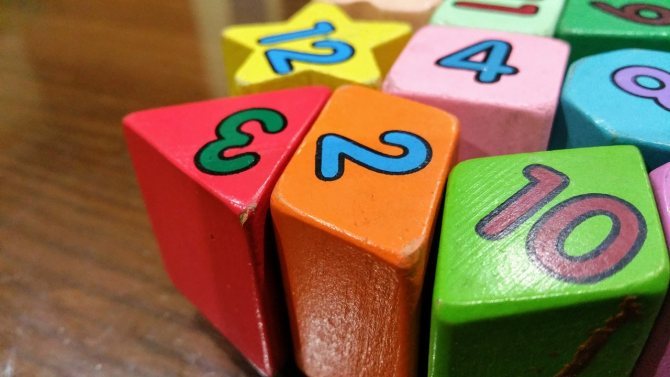
Counting material for teaching children
In order for a child to successfully comprehend the basics of mathematics, adults often have to use various visual aids. Among them, a special place is given to counting material. When choosing it from a huge variety, you need to choose the option that will be convenient for you and interesting for children.
In mathematics classes, objects are elements of sets with which certain actions must be performed. Regarding them, a specific question about their quantity can be raised. Some points that may be of interest in classes in another subject are not specified here. For example, if we are talking about birds on a branch, then it does not matter what kind of birds they are.
In mathematics, attention is paid only to quantity and quantitative relationships. In order for children to understand the material, counting material is often used.
This type of visual aids includes counting sticks, abacus, counting boards, or, as they are called differently, abaci, an arithmetic box, geometric mosaics, various sets of thematic or geometric figures for counting, and cash registers of counting materials.
Choosing the right means for teaching children will make learning fun and exciting. The importance of this is due to the fact that children, right up to the start of primary school, learn and remember new things much more effectively if they are interested.
Among the factors that determine your choice should be the materials from which the sets are made, the appropriate age of the children, and the preferred shapes.
A variety of materials are used to make counting material sets. These can be cardboard cards, high-strength plastic or wooden figures, or magnetic elements. When making a choice in favor of a particular material from which the counting material is made, you should first of all take into account its safety and environmental friendliness.
Thus, aids made of wood are considered environmentally friendly and pleasant to the touch. They are typically hand painted with safe, non-toxic paints. High-quality plastic figurines can last longer and are lighter in weight than wooden ones. You should choose only high-quality, high-strength plastic that has no foreign odors. It’s easy to make the necessary materials yourself from cardboard, and you can even involve your child in this process. Magnetic cards are convenient for teachers to use on the board to demonstrate to a large number of children. They are also suitable for those who have a small magnetic board at home.
We offer an overview of the most popular and popular sets for teaching counting to young children.
It is very convenient to store the kit at home or in the classroom in the plastic pencil case included in the kit. The counting material itself is wooden, which makes it absolutely safe. The kit includes:
- counting sticks (20 pcs);
- squares – green, red and blue colors;
- circles of red, yellow, green colors;
- squares (two types and colors);
- plates: numbers and signs (28 pcs).
This set can be used in classes with children 5-10 years old at home, in kindergarten and school. With its help, the baby will be able to get acquainted with the basics of geometry, numbers, and learn to perform simple counting operations. The child will be able to put together fancy pictures from geometric shapes, developing imagination and fine motor skills. He will also be able to learn to find patterns and continue the sequence, which will contribute to the development of logical thinking, teach him to compare, reason, classify and draw conclusions.
A good set that can be used from the age of five. The set includes 132 elements made of high-quality plastic - geometric shapes, counting sticks and numbers, which are packed in a convenient plastic case.
With its help, you can introduce your baby to numbers and geometric shapes. Children will be able to form numbers and learn to solve examples and problems.
The kit is designed to work on a magnetic board in the following sections:
- an account with a change in the basis of the account and according to the conceptual measure;
- development of the ability to classify;
- the ability to divide a whole into equal parts;
- relationship between the whole and the part;
- sets, union of sets;
- problem solving;
- composition of numbers.
The set includes geometric shapes made from laminated cardboard - red, yellow, green and blue. The magnets must be attached to them yourself.
Set contents:
- circle division (diameter 20 cm) – 1, 1/2, 1/3, 1/4, 1/5, 1/6, 1/8, 1/9, 1/12.
- A square with a side of 12 cm and dividing it into parts in two ways: 1, 1/2, 1/4, 1/5, 1/8, 1/9.
- Circle, diameter 8 cm – 12 pcs. one color, 6 pcs. – other, 1 piece – 1/2+1/2.
- Counting sticks up to 10 in length in increments of 2.5 cm and up to 7 in width in increments of 1.5 cm.
- Geometric shapes: square, equilateral triangle, circle in two colors, 10 pieces each.
- Numbers and signs.
- Additional geometric shapes: rhombus (1 piece), trapezoid (2 pieces), equilateral (3 cm, 1 piece), obtuse (1 piece) and rectangular (1 large and 2 small) triangles, circle with a diameter of 3 cm (10 pieces) .
The set includes such geometric shapes as square, circle, rectangle, hexagon - 10 pcs each, triangles with angles of 30° and 45° - 20 pcs each. There is also a set of numbers from 0 to 9 - 2 pcs each, signs and counting sticks - 20 pcs.
To work with counting material in kindergarten, you should choose bright and colorful aids. With the help of an interesting design, it is much easier to attract the attention of preschoolers and make learning a fun, interesting game. It needs to be changed periodically so that the children are constantly engaged in the learning process. Today you can work with hedgehogs; in the next lesson, count how many birds have arrived.
For younger children, choose beautiful bright figures and sets with which you can teach your child to count to 20. Older preschoolers are already eager to go to school as soon as possible. At this age, children may like sets in a beautiful pencil case, because it is a necessary attribute of school education.
Children 6-7 years old and elementary school students who have already become acquainted with the basics of counting in the preparatory groups of kindergarten can be offered various sticks, cash registers, and abacus. Using them, you are no longer attached to gaming activities. The manuals help the child visually and make it easier to understand the mathematical operations that need to be done. With their help, it is easier for a primary school student to navigate the connections between the abstract and the concrete.
For children under 5 years old, counting material in the form of various figures is suitable. These could be apples, mushrooms, nesting dolls, various vegetables, transport, animals. With the help of such forms, you can play out many different situations to teach your child to count. Today the hedgehog will bring mushrooms, and the squirrel will bring apples. Tomorrow you will count how many vegetables you will add to the soup. Later, distribute the carrots to the bunnies. The most important thing at this age is play, which should not be forgotten by an adult working with a child.
It is also necessary to use three-dimensional numbers so that the baby correlates the concept of number and numbers. He will remember each number much better if he can touch it, run his finger along each line. After all, tactile perception plays a huge role in the development of a baby from a very young age.
Children of senior preschool age and primary school students can already be offered various geometric shapes as counting material, which can also be used as mosaics. This way, the child will be able to remember the name of the shapes, learn the main colors, and will lay out various pictures from the details.
Also, children of this age may like sets with 1 cm cubes. Such sets can be used not only for counting. With their help, the child will learn to sort, construct graphic images, and become familiar with the concepts of “perimeter,” “volume,” and “area.”
Counting sticks are a universal educational tool for children of all ages. The youngest will need strict adult supervision. With their help, you can begin to develop a child as early as 9 months. They will help develop fine motor skills, learn colors, many different concepts, such as “one-many”, “wide-narrow”, “long-short”, etc.
They help teach a child to compare, find similarities and differences, promote sensory development, develop logic, imagination, and the ability to think outside the box. With the help of sticks, the child will be able to get acquainted with the basics of geometry. And, of course, they will help in teaching your child to count and become familiar with basic mathematical operations.
Any parent can make counting material with their own hands, which will significantly save the family budget. You can make it from improvised materials that are at home:
- Numbers
- Counting from 1 to 10
- Number composition
- Subject pictures
- Geometric figures
- Math puzzles
You can also use beads, clothespins, fabric appliqués, and various waste materials.
There are a lot of different options, all an adult has to do is turn on their imagination and express themselves. You can cut and glue from cardboard, you can sew and knit, you can draw - do what you like. For a child, aids that are made with love by his mother will be the most beloved.
In order to teach a child to calculate, you can use a wide variety of counting materials: abacus, abacus, sticks, cards, various ready-made sets of counting materials, etc. In primary school lessons, teachers also use all these aids to teach children various counting operations.
Advantages of using counting materials:
- visual demonstration of the computational actions performed;
- accessibility of understanding the meaning of arithmetic operations;
- the use of counting materials helps in the development of fine motor skills;
- accessibility - you can always find counting material at hand without purchasing anything special.
Disadvantages of using counting materials:
- the habit of using any objects for counting sometimes complicates the child’s transition from an objective environment to an abstract mental form;
- There is a wide choice of different counting materials. For adults who are not specialists, it is sometimes difficult to understand the teaching methods of a particular manual.
The abacus is somewhat reminiscent of the Soviet abacus. It is a wooden frame with knitting needles, on which 5 dominoes are strung. The number of knitting needles may vary. The knitting needles pass through a bar that separates the knuckles. There is one domino above the knitting needle, and four below it.
When counting on the abacus, the ability to work with the thumb and forefinger is very important. With the help of repeated repetitions it is necessary to bring it to automaticity. Keep in mind that this skill is quickly forgotten without regular training.
Arrangement of number lines: Each digit occupies its own spoke. The domino below the dividing bar indicates 1, above the dividing bar - 5. Let's look at a specific example. The number 3 on the abacus will be marked like this:
Here, one domino is raised on the tens digit, and on the units we lower the domino, which represents 5.
Thus, numbers are deposited on the abacus and various counting operations are performed. With it you can add, subtract, multiply, divide and even raise to a power. However, such complex operations are already the basics of mental arithmetic, to get acquainted with which it is better to attend a course of relevant classes.
Counting material is necessary when teaching children mathematics at home, in kindergarten and school. It is presented in a wide variety in stores. But it is not always convenient to use purchased items. Among your things you can find something that your baby will like best. Learn the basics of mathematics with your little one with pleasure and always by playing, then the learning process will be much easier.
For information on what counting material is, see the following video.
o-krohe.ru
Learning to count
How to teach a child to count.
As practice shows, a child’s memory is selective and children remember only what they want to know and what they need to know, and memorizing numbers does not seem to be specifically included in their plans. But what interested them, surprised or frightened them, they remember with pleasure.
Go to
Keep reading
Let's learn to count with Peppa Pig.
We develop attention and thinking, visual memory, remember writing numbers.
- Learn to count from 1 to 5 puzzles.
- Math puzzle from 1 to 10.
- Count and stick with Peppa Pig.
Download and print on a heavy-duty color printer. Then chop and mix everything.
Fun games with Peppa Pig.
Go to
Keep reading
Let's learn to count with the Paw Patrol.
Games will help your child remember numbers, develop attention and thinking.
- Math puzzle
- Counters with clothespins
- Counting puzzle
- Puzzles and icons Counting flies
- 4 piece puzzle
Download and print on a heavy-duty color printer. Then chop, mix everything and let the baby assemble.
Go to
Keep reading
Cards with numbers. Lacing + Clothespins.
Fine motor skills take practice and learning numbers takes practice, so take this idea to heart, print out the number cards and practice!
This game will help your child develop fine motor skills, sensory perception, introduce numbers up to 10, teach counting, and also promote logical thinking.
Go to
Keep reading
We count together with the Fixies.
- Counting game
- Puzzles Fixies Figures
By playing the Counting game, your child will quickly learn how to count simple examples.
you need to add a couple so that the example has the correct answer. If the child does not answer correctly, riddles will be asked. If the pair is formed incorrectly, the blocks on the puzzles will not fit.
Play the game Numbers - Puzzles and your child will quickly learn to count, diversify the learning process, and Fixies will always ask you questions and help you with the answer!
Go to
Keep reading
DIY game “Learning to count unicorns with clothespins.”
Use our templates for educational games with your child.
Using the example of the game “Learning to Count,” we can easily and quickly create such a wonderful and educational game.
We need:
Go to
See the rest
Let's play school.
Sometimes, for some reason (it may be poor health or the wishes of the parents), a child does not go to kindergarten or preschool group at school before school. This can cause a serious delay in the child's start to school.
Go to
Keep reading
Demonstration material for mathematics in kindergarten, counting aids, cards, laptops, etc.
Teaching numeracy, systematized and methodologically justified by the Federal State Educational Standard (FSES), is included in the system of work with preschoolers in kindergarten. However, the age characteristics of children require particularly careful preparation of visual aids. The most important role is given to the counting material. We will look at the types of counting material used in mathematics classes in different age groups, and give advice on how to make it yourself as a demonstration and handout.
The validity of using visual counting material in kindergarten
In a preschool educational institution, children begin to master counting at the age of three, and this is their main mathematical activity. Learning takes place with the indispensable support of visual aids, since abstract logical operations performed during counting (merging and dividing sets, comparing quantities and numbers, comparing sets) are difficult for children to understand and require “objectification.” Visual counting material is a comprehensive didactic tool aimed at developing basic ideas about counting as part of targeted learning.
Famous teacher K.D. Ushinsky said: “Children’s nature itself requires visual learning.”
Such benefits are very diverse, and their application in each case depends on:
- specific content of educational material (for example, teach children of the second youngest group to distinguish between the concepts of many and few);
- methods used (more precisely, certain gaming techniques, for example, illustrations for a fairy tale in which characters learn to count);
- the age of the children (if in the second younger group there may be cards with pictures of the same animal, then in the older group the pictures depict different animals, that is, the essence of the phenomenon being described becomes more complex).
Counting in kindergarten is mastered along with other didactic skills and concepts, for example, learning about colors: distribute the mushrooms into baskets of the corresponding colors and say which one has more/fewer of them
Visual material must meet the following requirements:
- scientific (correspond to scientific data on counting);
- pedagogical (carry an educational, developmental, educational load);
- sanitary and hygienic (do not contain harmful substances, do not cause eye strain;
- aesthetic (beautiful design, bright and clear images)
Features of demonstration and handout material for different age groups
Calculating material in mathematics, like other visual aids, can be of two types:
- large, that is, demonstration, which is used by the teacher to explain and show how to operate with it (magnetic boards, posters, paintings, etc.);
- small, that is, handout (cards, laptops, etc.), using which all children perform certain tasks at the same time, which allows organizing independent activities of children to develop the necessary mathematical skills and abilities.
Visual mathematical material differs in the type of counting activity, which is a priority for a specific age category.
- Second junior group. To form the concept of singularity and multiplicity, you can use, for example, puzzle pictures, cubes in which numbers are surrounded by elements with the same number of fruits (vegetables, animals, etc.) or pictures with dots that need to be correlated with the number. By the way, the same material with dots is still used, only there are more numbers.
- Middle group. Children must be able to give an accurate assessment of a set of objects, in this case counting to 5. For this, pictures depicting objects and numbers corresponding to their quantity are actively used, as well as a combination of a toy and a three-dimensional number. For example, to recognize the graphic image of a number, the task could be as follows: help the bunny find the number 3. Place a moth on a flower with five petals.
- Senior group. Kids count to 10 and can add or subtract one at a time. For clarity, they use, for example, the game of dominoes, matching a number with a picture with the same number of objects.
- Preparatory group. Children can compare numbers “more and less”, and make up given numbers from two smaller ones - 5 from 2 and 3, for example. The demonstration material becomes more complex. These could be tasks for comparing the number of objects in pictures, composing a whole image after sequentially folding numbered cut parts, etc.
Counting sticks are a universal visual aid: they allow you to demonstrate and practice all types of counting activities.
Thus, the first manuals are aimed at ensuring that children learn to correlate the visual image of a number and the number of objects it denotes. In the middle group, this work is no longer on “recognizing” the image of a number, but on quantitative counting up to 5. In the older group, children learn to perform basic addition and subtraction operations, and in the preparatory task materials are comparative in nature, since children already know how to correlate quantities , indicated by numbers.
At any stage of training, it is necessary to think over a way to get acquainted with the graphic image of a number, for example, in the form of creating an application
Types of handouts
As already mentioned, manuals can be demonstration or handout. And there are also those that can be used in both cases (for example, Dienesh blocks). The teacher chooses the types of handouts depending on the age of the children. So, already in the first junior group, children get acquainted with cubes and counting sticks. True, so far the assessment level is “a lot or a little.” Typically, the gradation of the use of types of handouts depends on the age of the children: the younger, the more toys, and the older, the more drawings and diagrams. In general, the following counting aids are actively used in kindergarten:
- Cuisenaire sticks (multi-colored parallelepipeds of different sizes made of wood or plastic are used mainly in the second junior and middle groups, when the concept of quantity is introduced);
- Dienesh blocks (a set of geometric shapes of different sizes, which can be used by analogy with Cuisenaire sticks, as well as to introduce rectangles, triangles, circles, squares);
- cubes (in the younger group they practice the concepts of “many and few”);
- pyramids (as a budget, more affordable version of Cuisenaire sticks and Dienesh blocks);
- beads, buttons (in junior and middle groups);
- pictures, puzzle pictures, cards (for all ages);
- fan with numbers (for senior and preparatory groups, in which the children already clearly associate a number with its graphic image);
- lapbooks, tasks in which can combine all of the above manuals, etc.
Please note that there is no clear age division in the use of counting materials, since their use must be justified from the point of view of the educational goal. And yet, in the senior and preparatory groups, the emphasis is on cards, so that children get used to working with clarity “like at school.”
Photo gallery: examples of counting handouts
The capabilities of counting cubes allow them to be used up to the preparatory group. To master the skill of counting to 5, it is convenient to use special pyramids. A fan with numbers is a tool for school, but can also be used in kindergarten. On the blocks you can practice mastering basic geometric shapes and counting objects in groups Learn You can count on sticks completely unnoticed: for example, by laying out figures from them
Lapbook for FEMP “Quantity and counting”
A laptop is a folder that contains material on a specific topic. The organization of the material in such a manual is that the teacher arranges the visualization in the form of mini-books, accordion layouts, gift boxes, windows or pockets, etc. In addition, the lapbook necessarily includes tasks of a creative nature.
Lapbooks are also used to form elementary mathematical concepts (EMPs) - the fruits of the teacher’s creative approach to the implementation of learning tasks. Benefits are calculated for a specific stage of training. Since lapbooks were originally made by parents to teach their child, these manuals, put on a “methodological stream,” are now used for individual work, as well as for working in pairs or threes.
How to make didactic materials for a preparatory group with your own hands
First, you need to determine the goals of the Quantity and Counting lapbook.
- Strengthen the ability to count to 10.
- Practice ordinal and quantitative counting.
- Practice the skill of comparing numbers with the number of objects.
- Learn to write numbers.
- Develop the ability to add, subtract and compare numbers within 10.
- Develop active vocabulary, logic, memory and thinking.
- Work on the ability to independently solve assigned problems.
- Cultivate responsiveness, self-confidence and self-confidence.
After the organizational stage, you can proceed directly to production. This process begins with the preparation of the necessary materials. Moreover, methodological questions are developed first, and only then a suitable design is selected for them.
Typically a lapbook includes:
- pictures with numbers for visual perception of their graphic image;
- cards with numbers and objects (either separately or 2 in 1);
- puzzles (cut numbers or pictures, each piece of which shows a number, etc.);
- pictures of fairy tales with numbers in their titles;
- coloring books;
- copybook;
- riddles, counting rhymes, etc.
It is most convenient to organize materials into files, which, in turn, are stored in a folder. The cover of this manual frame should also be brightly designed. But with such packaging, it is troublesome to work with the materials: before use, part of the manual will have to be laid out. So you can take advantage of the experience of your colleagues and make the pages of the lapbook cardboard, and on these sheets you can attach files, pop-up books, and boxes with surprises.
Photo gallery: example of a homemade laptop
For a lapbook, using a folder is the most durable Cards with dots and numbers can be put in bright envelopes so that the child becomes interested in their contents When making such a manual, it is assumed that children know how to write By laying out numbers from elements, children remember the graphic image of numbers, and also train their eye With the help of a lapbook, children quickly and easily understand the essence of the comparison. Having solved the example in the garage and in the car, the child must correlate the same answers. Children, as a rule, get excited about playing dominoes.
Individual cards in mathematics for the second junior, middle, senior groups
Learning to count is something that requires maximum concentration and constant practice from a child. The latter is designed to provide individual cards - methodological aids for working on a topic one at a time or in mini-groups (2-3 people).
- In the second younger group, to practice the concept of one-many, for example, a card may have a picture of a steam locomotive. The child receives a stack of trailers and distributes them according to the card. At the same time, the adult focuses the child’s attention on the fact that at first there were no carriages, then one appeared, and then “many.”
- In the middle group, counting to 5 is very effectively trained by correlating elements of pictures (for example, dots on the back of a ladybug) and a graphic image of the number.
- In the older group, to practice counting to 10, you can use tables with dots and small cards with numbers that children must correlate with each other. Or cards with numbers to restore counting order. By the way, the skill of writing numbers is trained in the same way.
- In the preparatory group, the cards can be graphic examples of addition and subtraction: the child counts the number of objects to the left of the + or - sign and writes the result in the cell provided for this.
For practical reasons, it is better to laminate cards. Then, even if the child needs to write something on an assignment (for example, the answer to the solution to an example), he will be able to do it with a marker that can be easily wiped off the cellophane.
To ensure that the numbers are always in the children’s field of view, you can install a “Fun Counting” folder in the group. She will introduce the kids to both numbers and the number of objects in a group.
Photo gallery: examples of individual cards and a picture for a mobile folder
In the younger group, children learn to evaluate sets by attaching different numbers of cars to locomotives. In the preparatory group, children perform addition and subtraction in the range from 1 to 10. A child in the middle group must count the spots on the back of a ladybug and connect it with the appropriate number. In the older group, children learn to perform simple arithmetic operations ranging from 1 to 10 Bright and beautiful pictures from the sliding folder will attract the attention of the children and teach them to relate the number to the number of objects
Pictures for teaching counting in senior and preparatory groups
There are no particular differences in the form of the pictures, only the tasks, that is, the content, differ.
Photo gallery: individual cards for the senior group
Cards with numbers can be made at home. By rearranging the number of balls, the child will learn to count to 10, as well as sort things according to the “new/old” principle. An individual card can contain a creative task: fashion a number from plasticine. Such houses help children learn the composition of numbers.
It is worth noting that cards do not always represent a drawn/pasted image. An individual card may consist of individual elements that are laid out on a sheet. A kind of overlay applique.
Photo gallery: counting aids for the preparatory group
This is how children are presented with the principle of variability of terms with the same sum. This is a dynamic card, that is, it comes with a pocket with balls with examples, as well as cards with answer numbers. In the preparatory group, children easily cope with the task of entering the neighbors of numbers in the windows of the house. Such a benefit is not only trains mathematical skills, but also develops fine motor skills.
Demonstration counting material is a manifestation of the teacher’s imagination, aimed at ensuring that children learn the basics of mathematical operations while playing. Lapbooks have proven themselves very well, as the children enjoy playing with such large applications, which include pictures, puzzles, and coloring books. When preparing this manual, two important points must be taken into account: the laptop must be strong, that is, not crumble during use, and entertaining, so that with its help the teacher can realize the set training, developmental and educational goals.
melkie.net
Methods for teaching counting created by famous teachers
Try linking one or more effective teaching methods to learning numeracy:
Peterson
Peterson's method teaches children mathematics exclusively in a playful way: with the help of cubes, drawing, and logic games.
Glen Doman
Glen Doman's method is entirely based on visualization: children see numbers and the corresponding number of points on cards, gradually mastering counting:
- Prepare cards from cardboard: write a number on one side, and on the other, draw the number of dots corresponding to this number.
- Show your child the card with a dot and clearly indicate the number “One.”
- Proceed to other cards in the same way. Don't delay - the card should take as long as it takes to pronounce a certain number.
During the first lessons, the child can act as an observer. Don't ask him to repeat it. After showing all the cards (10, 20 numbers depending on age), be sure to praise the child, tell him how much you love him and how you love to teach him. You can treat your math future to something tasty because physical rewards are an integral part of Glen Doman's methodology.
From 3-4 lessons you can start shuffling the cards, that is, showing them not in a clear numerical order. Remember the main thing - we show quickly, we praise generously.