How to make a children's educational presentation yourself? Part 1
If until now you have been searching and selecting children's presentations, then this guide will allow you to become their author.
Let's start from scratch. And you will see that making presentations is interesting and not at all difficult. Make presentations about your family, how your child is growing, his favorite toys. It will be great if he becomes an assistant and consultant.
One of the programs that allows you to make presentations is MS PowerPoint, which is part of the Microsoft Office package.
The basis of the presentation video is the so-called slides. The slides contain text, illustrations, video clips, and sound. Slides can be viewed automatically or you can set their sequence.
So, let's begin.
Let's try to create a small interactive (that is, responsive to user actions) educational video for a preschooler.
Let this be a presentation on speech development.
To begin with, let’s define the topic and the age of the children the work is aimed at.
If the presentation is educational, it should include learning tasks.
They can be viewed in the “Program for raising and training children in kindergarten.” (In the school program).
The main tasks for kindergarten can be downloaded here Kindergarten program.doc (1691 Kb) in doc format.
Without thinking through the tasks, you may encounter the fact that your presentation will seem too difficult to the child or, on the contrary, easy, and therefore uninteresting.
As an example, let’s take a training presentation on speech development for children of the middle group (4 - 5 years old) on the lexical topic “Furniture”.
The next step is directly related to our tasks: we are looking for pictures of furniture. We need images of furniture both in single quantities and in large quantities. You will also need images of children's furniture.
Attention! When searching for illustrations on the Internet, do not forget that each picture has an author! If you plan to use your presentation for purposes other than home viewing, it is important to obtain the author's consent for publication.
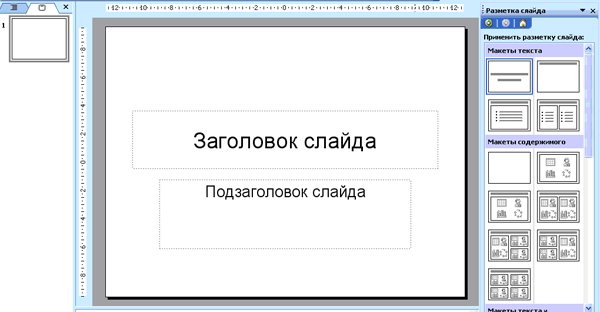
The preparatory stage has been completed. Open PowerPoint. When you start the program, a new presentation is created. On the working field we see a slide template: on the left is a menu of slides participating in the presentation, on the right is a list.
On the right in the list we find the icon - “New presentation” and click on it with the mouse.
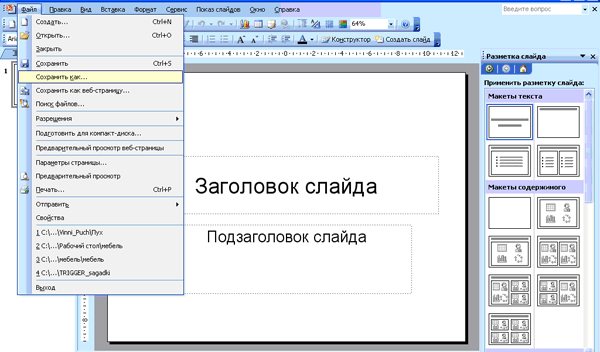
Now let's save the presentation file. There may be nothing in it yet, but it will be calmer this way. To do this, go to the “File” menu and select “Save as...”.
Select a location to save, come up with a name and click the “Save” button.
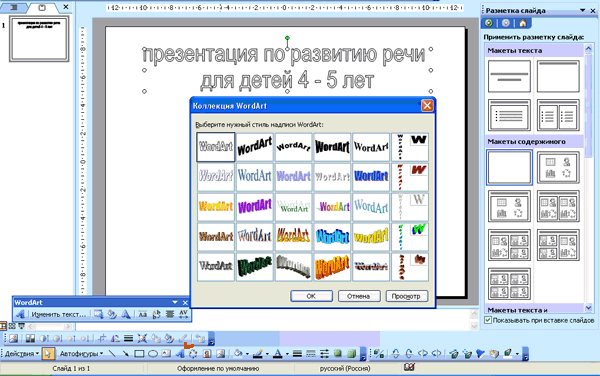
Let's get to the presentation itself.
On the right menu “Content Layouts”, click on a blank white sheet and write the title of the presentation on the first slide. To do this, we will use the WordArt collection. At your request, you can make (change) the font color, size, text direction, etc.
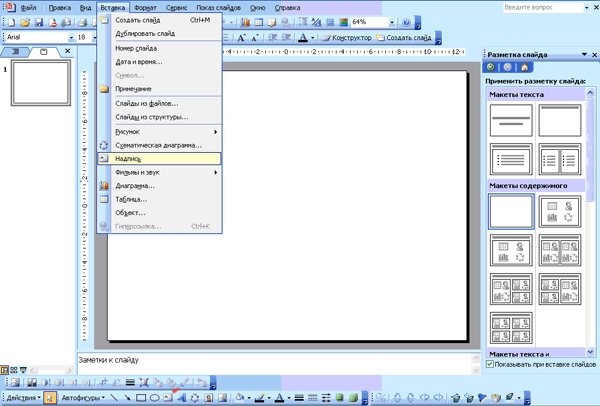
In order to put text on the page, go to the top menu “Insert” and select the “Inscription” item. Or find the icon on the bottom toolbar.
We click on the page in the place where we want to see the signature and type the required text. All text blocks are placed within frames. Grabbing the green dot allows you to rotate the selected object. Corner marks help you change dimensions. If the object is a text block, then its size can be changed by clicking on the “Increase font size” or “Decrease font size” buttons on the toolbar.
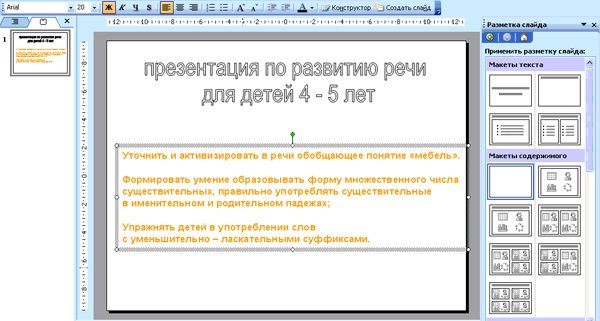
Let the slides in our presentation somehow open when demonstrated. It's very easy to do. We enter the “Slide Show” menu, select “Change Slides”.
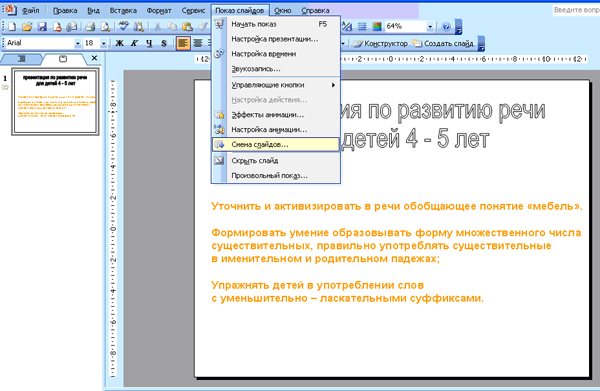
The settings menu appears on the right. Now we find the “Corners to the left - down” effect. You can see what this effect looks like by clicking on the buttons at the bottom right: “view” or “slide show”.
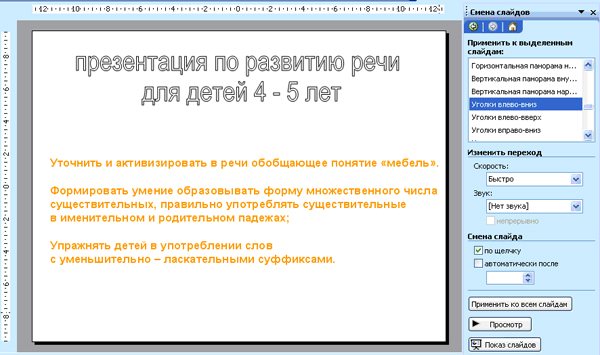
Click on the “Apply to all slides” button.
Now you can press the “F5” key on your keyboard to test the page.
If the verification was successful, then we proceed to creating pages. Insert the next slide. To do this, right-click under the image of the second slide in the list on the left and press the “Enter” key.
We begin to place pictures on the pages of the presentation.
In the top panel "Insert"
select “Drawing” - “From file”.
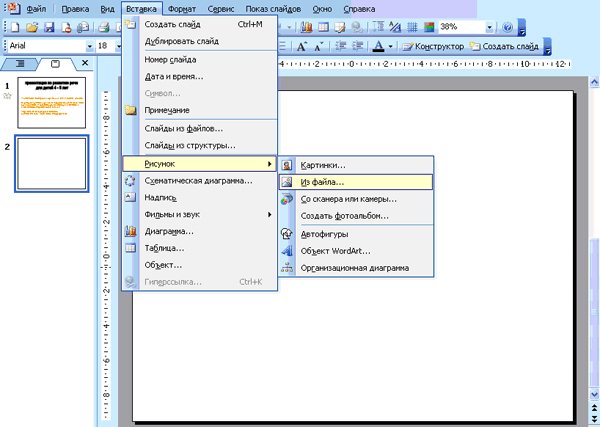
We find the directory with our prepared images and select the desired file with a mouse click. After that, click on the “Insert” button.
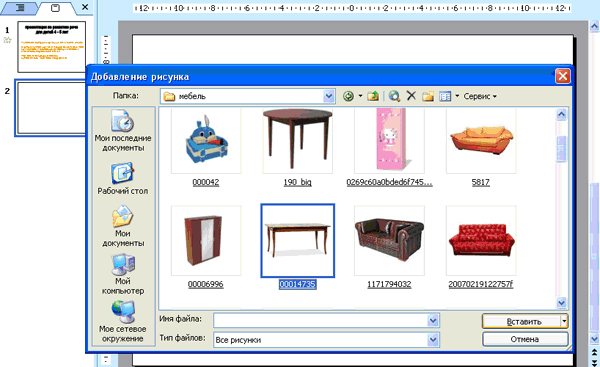
The picture appeared on the page. Quite small, isn't it? We need to increase it. This is easy to do by grabbing any corner mark and stretching the drawing to the required size.
From the WordArt collection we will select the desired font and write the text and adjust the size. Let the child see the object and the word that represents it.
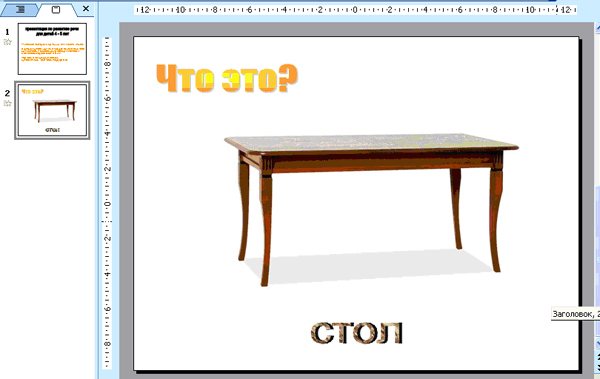
We fill all the slides with pictures and inscriptions.
In our example, these are images of furniture. First, the child uses nouns in the nominative case in the singular and plural.
(To help the child focus on the learning task, I used the same pictures. One sofa - many of the same sofas. By copying and reducing the size, you can quickly solve the problem).
According to our idea, the child should combine specific concepts into a generic one - “furniture”.
Next, there are grammatical exercises on the use of the genitive case, the formation of diminutive - affectionate suffixes of nouns.
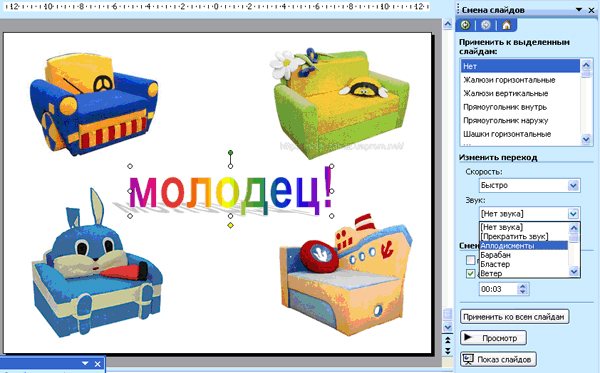
The last slide of the presentation is encouragement. This is the result of our work on the topic. I picked up original children's sofas and wrote the word “well done!” in the middle.
Now, in order for everything to move, change and switch, we need to make animation.
In the top panel, open “Slide show” - “animation settings”
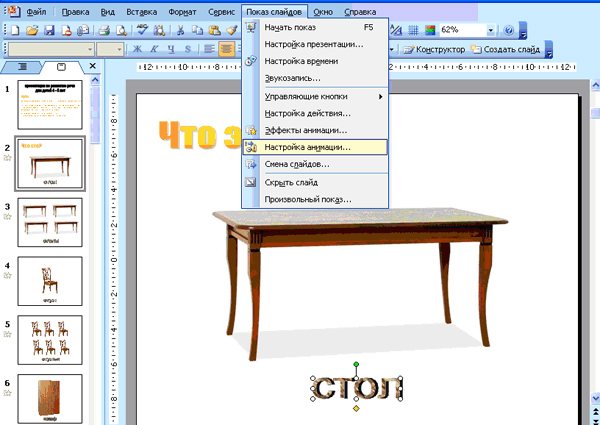
If we want to attract the child’s attention to the text, we can create blinking, increasing size, swinging, etc. effects.
Let's highlight the question “What is this?” right-click and click on the “Add effect” function. 3 types of actions will appear. Select “Selection” - “short-term expansion”.
The beginning of the effect is “after the previous one”. Speed – “Medium”.
What happened?
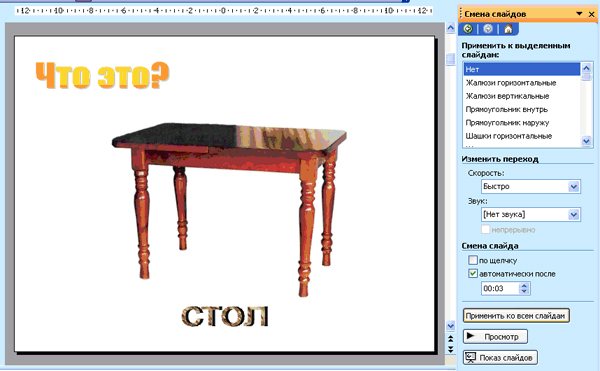
A picture of a table opens and the words “what is this?” flashes.
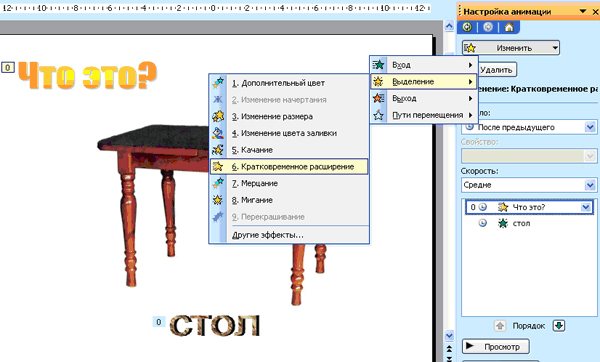
The word “table” should now appear under the table image.
Open the tab on the right “Add effect”, select “Input” - “fade”.
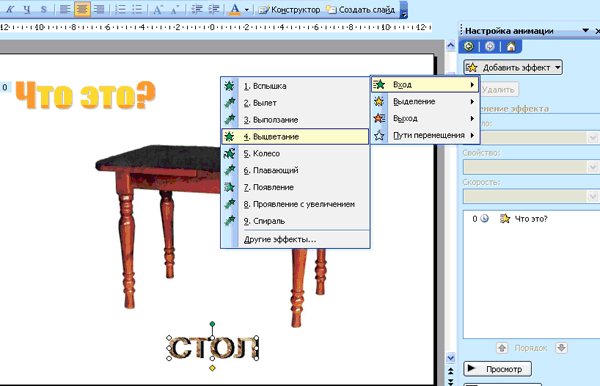
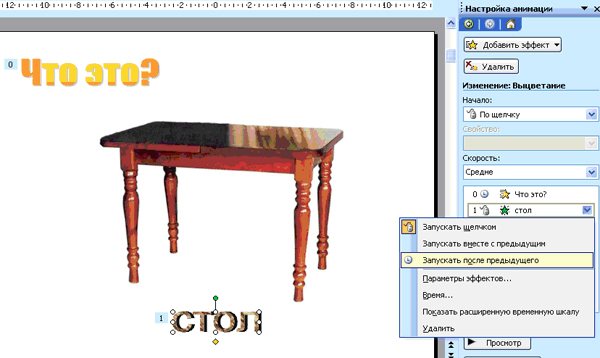
By default, it is indicated that this effect will begin on a mouse click. We don't need this. Let's do it - “After the previous one”, set the average speed of action.
In the same Animation Settings panel at the bottom right there are Preview and Slide Show functions. You can see the result of our work.
The next task will be more technically complex.
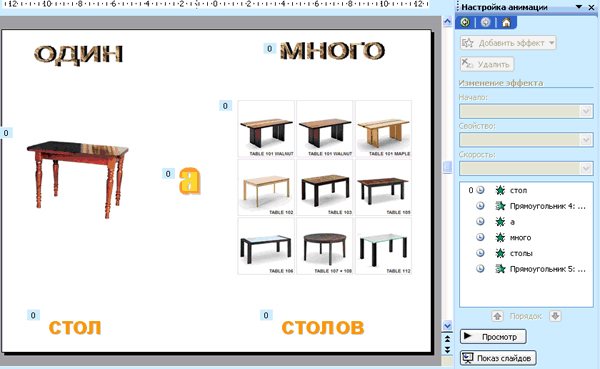
We work with grammatical forms: “One table, but many tables.”
First, on the slide the child sees the word “one” and a picture of a table appears, then under it is the inscription “table”, then in the middle is the conjunction “a”, on top is the word “many”, below it is a picture of “tables” and below is the inscription “tables” .
We configure the “entrance” effects in the sequence we need.
Let's make a game "Guess what's missing?" to practice changing a noun in the genitive case.
The child remembers all pieces of furniture. (4-5 objects), on the bottom slide one object disappears, then an inscription appears and only after it does the object itself.
So that this action is not very fast, and the child has time to think, we will delay the appearance of the answer.
To do this, select the word “sofa”, then on the right side of the “animation settings” tab, find this object and right-click on it. Let's choose "time".
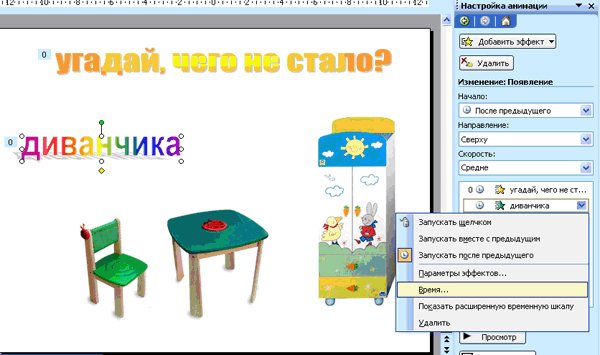
In the window that opens, set the delay time to 2 seconds.
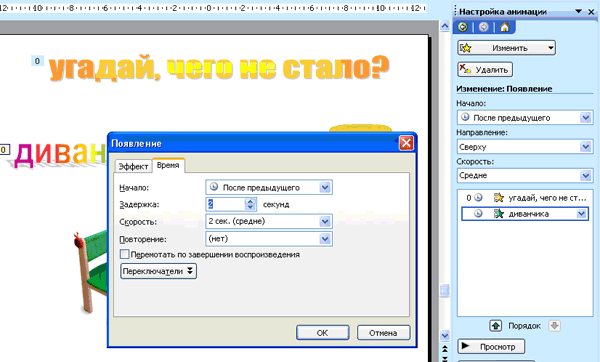
Now we need this word to disappear, and in its place a picture appears - the answer.
On the right in the Animation Settings, add the “exit” - “disappear” - “after previous” effect.
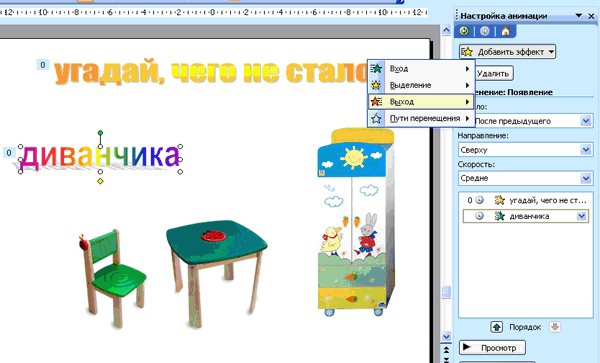
We will do the same with other objects in the next similar game exercise.
The last slide is encouragement. I chose to spin the word “well done.” If you don’t like the effect, by clicking on it in the list of effects, you will be able to change it.
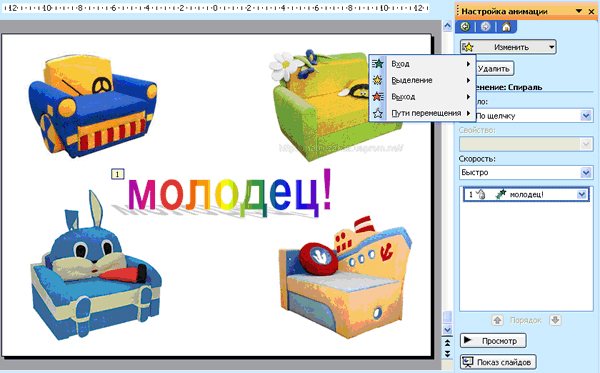
So, we did some pretty painstaking work: we set up animation in each slide of our presentation.
Now let's think about how the sweets will replace each other. (By default, slides change on mouse click).
We would like the child to sit and watch the presentation, and the slides would change automatically.
On the top panel, open the “Slide Show” - “Change Slides” tab.
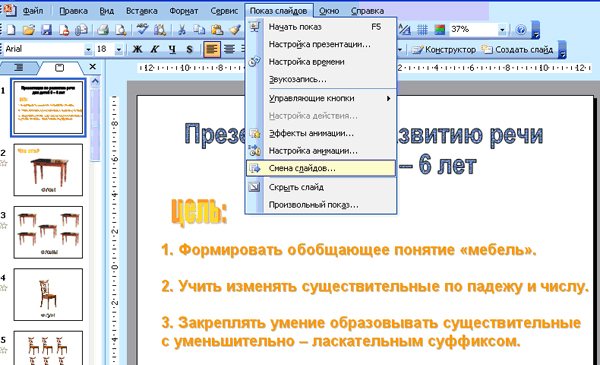
Let’s uncheck the “On click” option and check “automatically after” 3 seconds.
And click on the “Apply to all” presentation slides button.
Let's check how it works, whether the child can keep up with all the tasks. Click on the bottom right "Slide Show" button again.
If you need to set different times for changing slides, you will need to do this for each slide separately.
The work has come to an end.
The child sees the word encouragement and hears applause.
Where can I get them?
There on the right in the slide change settings. Open the “Sound” tab and select “Applause.”
If there is something more original in your music library, then select “another sound” and put it into the presentation from your folder.
Attention! The sound must be in WAV format! When sending your presentation, this sound file must be attached to the folder with the presentation.
Let's save the results of our work.
We can review what we have done at any time. To do this, press the “F5” key on the keyboard. She starts playing the presentation video. To exit playback, double-click on the free field with the left mouse button.
You can view the finished presentation again here: https://u-mama.ru/files/mebel.ppt
I think that once you start making presentations on your own, it will be difficult to stop.
Of course, the capabilities of MS PowerPoint for creating presentations are extensive. You can study the program using the “scientific poke” method, since the program is not anything overly complex. Or you can purchase specialized literature and become an ace in making presentations.
Creative success, interesting ideas! Good luck!
Soon:
How to make interactive games - presentations.
Also on u-mama: How to make a voiced presentation, Multimedia presentations in teaching preschoolers
Author of the article and screenshots:
Osmakova Marina Vasilievna - teacher of the highest category at Tyumen Pedagogical College No. 1
