Furniture made from paper using the origami technique is convenient for furnishing ready-made doll houses or homemade roomboxes. It is difficult to find a more affordable and, at the same time, effective way to create toys. Paper models bring aesthetic pleasure to the child, while simultaneously developing his talents, intelligence and creative thinking. And the fact that the furniture turns out to be durable and functional is an additional bonus that fuels interest in it. Some furnishings will be useful for adults, for example, practical multi-tiered chests of drawers, in which you can put any small thing: from stationery to jewelry.
Table
The main disadvantage of purchased toy furniture is the price. However, no one guarantees that the doll table and bed will not break from too much pressure or an accidental fall. For daily children's games, it is better to make your own furnishings using the most “waste” material - paper. If such furniture is torn, it will not be difficult to replace it with new one. And to extend the service life of a paper product, it is better to take durable craft packaging for it. In addition, it has a shade of natural wood, looks stylish and holds folds well.
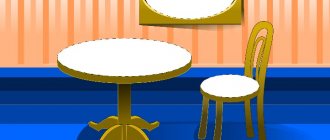
The best place to start furnishing is the table. You can come up with a lot of different scenes with it. The table should be proportional to the doll for which it is being made, but items that are too large become flimsy and quickly deform. The optimal square for a toy is 15 x 15 cm.
The simplest diagram of a paper table:
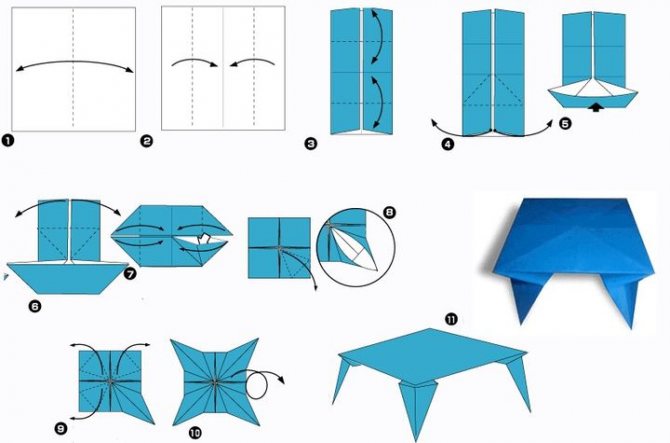
Step-by-step instruction:
- Fold the square sheet in half. Let's reveal.
- We bend the sides to the central axis outlined in step 1.
- Fold the top and bottom edges towards the middle. Let's straighten it out.
- We open the lower part, folding it along the diagonals indicated by the dotted line.
- Press the trapezoidal valve.
- Repeat steps 4 and 5 for the top half of the figure.
- We straighten the triangular “pocket” from the inside and flatten it, giving it a square shape. Repeat the same action for the remaining three sides.
- We fold the lower right square along the dotted lines indicated in the diagram. Open from the center outwards, forming the basic “Bird” shape.
- We do the same with the remaining three squares.
- Turn the product over to the front side.
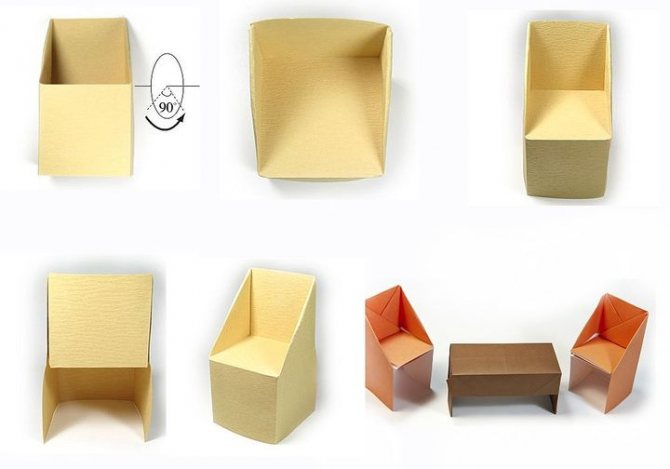
All that remains is to form the table legs. There are two ways to do this: lower the bottom half of the Bird and fold it 90° or bend the corners. The diagram shows the first option.
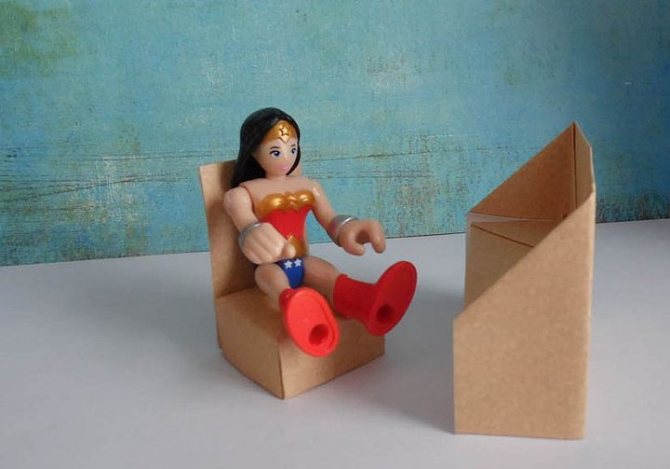
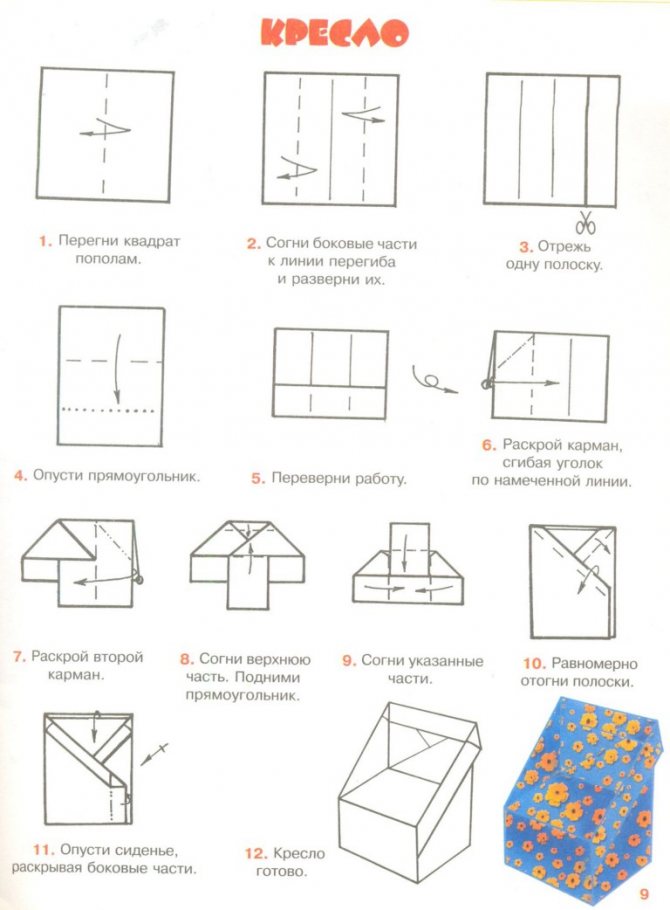
Chair
A chair is one of the most popular pieces of furniture. There are several well-known models of varying degrees of complexity. One of them looks like a classic chair with a cover. Therefore, it can be made from paper with a textile print. The model is based on the basic “Pancake” shape.
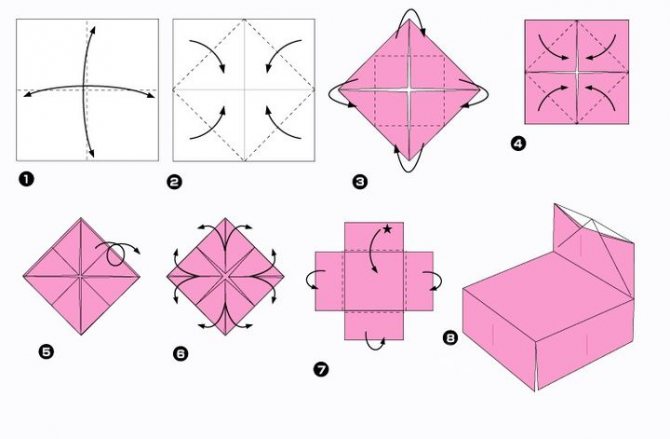
Step-by-step instruction:
- We outline the central axes of the product.
- Fold all four corners towards the center.
- We make mountain folds along the dotted lines.
- And once again fold the corners towards the center.
- We turn the figure over.
- Open from the inside along the arrows and flatten.
- We lower three sides down and raise one, this is the back of the chair.
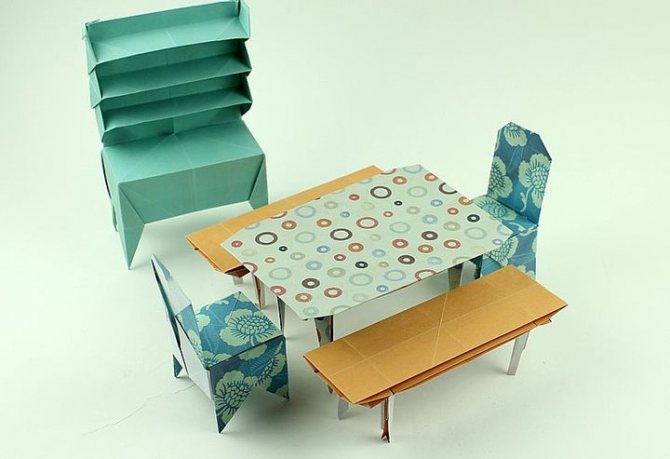
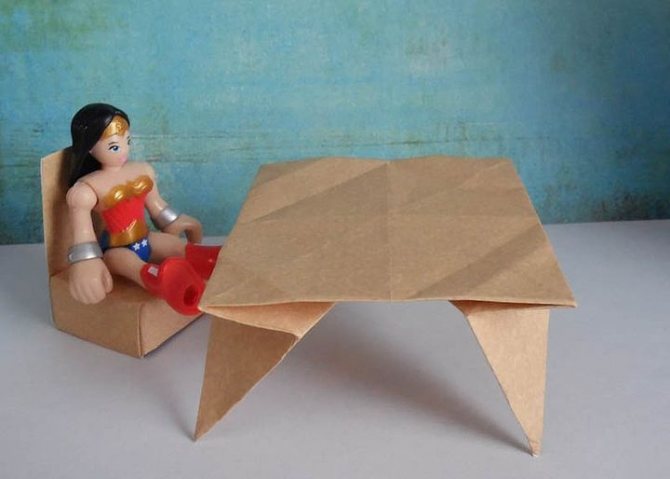
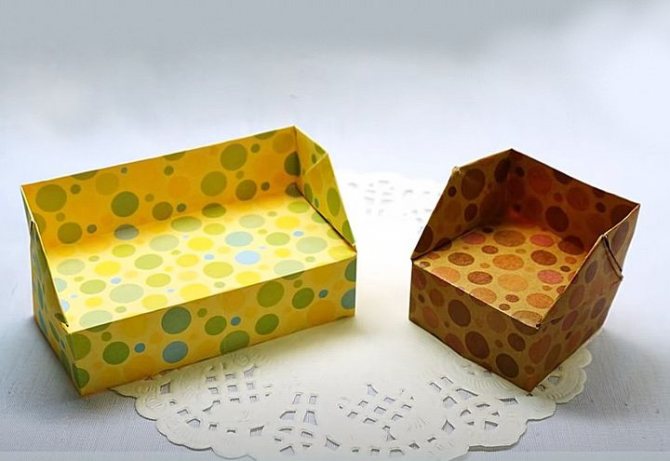
The first mini furniture set is ready. It is quite suitable for a small plastic doll. You can additionally glue the furniture using a heat gun, PVA or double-sided tape.
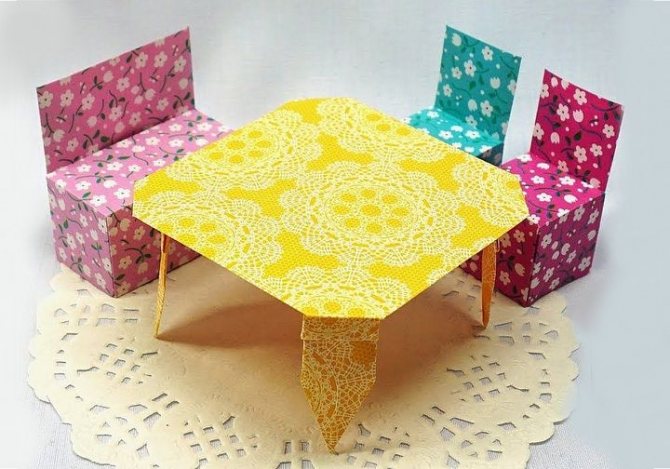
Another option for doll furniture:
Decoration methods
Decorating finished products is a separate stage in the production of paper furniture.
For finishing you can use:
- self-adhesive paper for furniture (it is easy to cut, and the adhesive layer will help you decorate the surface without any problems);
- acrylic, water-based or gouache paints mixed in a 1:1 ratio with PVA glue;
- fabric imitating the structure of furniture;
- glitter and stickers;
- colored tape;
- templates;
- ribbons, lace.
You shouldn’t limit yourself to just the options listed; to create truly original furniture you need to give free rein to your imagination.
Piano
This model can also be used as a desk. If you take a square for it, measuring at least 21x21 cm and stop at step 6, you will get a decoration-house for a puppet show.
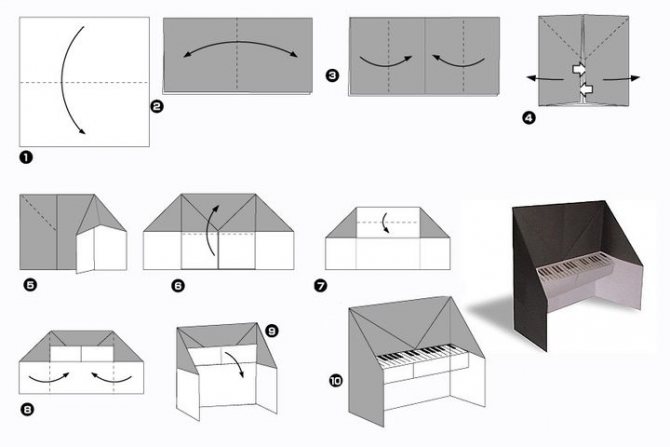
Step-by-step instruction:
- Connect the top and bottom edges of the square sheet.
- We mark the center of the figure.
- We add the right and left sides to it.
- We make folds along the dotted lines. We open both parts from the inside according to the arrows.
- Flatten the resulting folds.
- We get a decorative house. However, we don’t stop at this point and continue assembling the piano. Raise the central part of the workpiece.
- Bend down the top edge.
- We fold the sides at right angles.
- We give the central part a horizontal position. Paste on a pre-printed image of the keys.
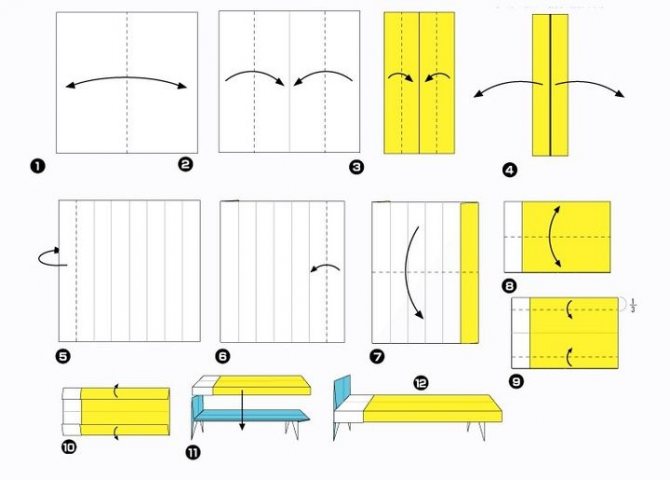
Bed
A bedroom set is an integral part of a modern home. It usually includes a bed and two paired bedside tables. Let's start with the main piece of furniture. The most popular bed model consists of two parts: the body and the mattress.
Step-by-step instruction:

- For the body we use a 15x15 cm square. We outline the central axes.
- Fold the bottom and top edges 1/3.
- And bend it towards the central axis.
- We fully open all the folds, and then assemble the figure with a zigzag in the direction of the arrow.
- We outline the diagonal folds.
- We open the sides from the inside, as shown in the diagram.
- And flatten it.
- We bend the right edge of the workpiece.
- We place the triangular “legs” at right angles to the base of the bed.
- Raise the left side up. This is the headboard.
- We put the bed on legs.
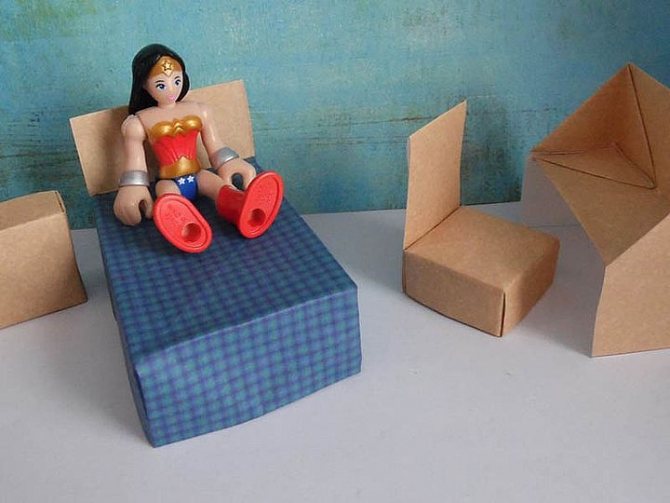
Mattress:
- We outline the vertical axis of the square.
- We bend the right and left edges towards it.
- Let's turn it over again.
- We open all the folds.
- Fold the left side back along the dotted line.
- We fold the right edge in the same way, but forward.
- Bend the figure in half from top to bottom.
- We outline the horizontal axis.
- Fold the top and bottom 1/3.
- We lower the sides at a right angle.
- The mattress is ready. We place it on the base of the bed.
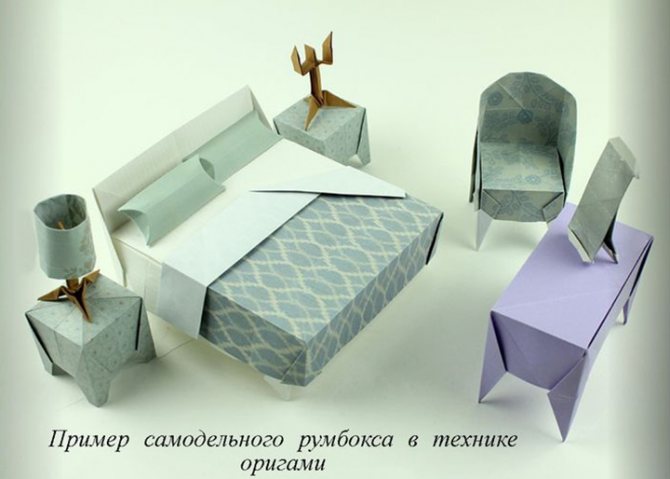
Origami bedside tables are assembled according to the principle of Japanese “masu” boxes. Place them vertically, with the open side inward.
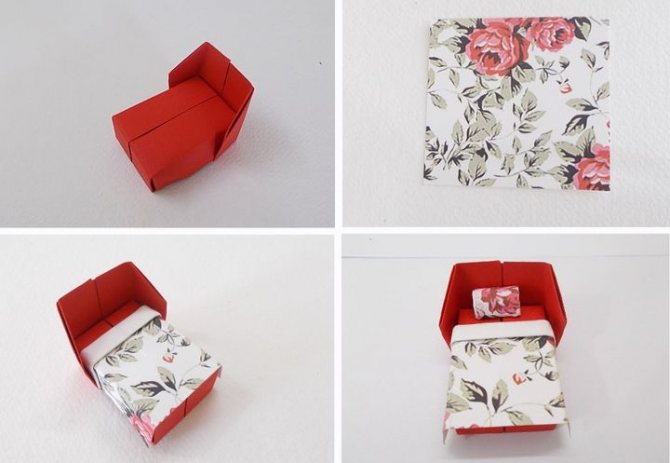
Model No. 2
The second type of bed is made from one sheet. It comes with a blanket and pillow, which makes the model surprisingly realistic and elegant. For the bed you will need a sheet of paper 15x15 cm, as well as a ruler and pencil.
Detailed instructions are in the video tutorial:
For the blanket we use a square of 8x8 cm. It is advisable to take paper with a beautiful contrasting pattern. We will also make a pillow from it, loosely rolling a strip measuring 4x8cm.
Master classes on furniture making
The recommendations below discuss in detail how to make paper furniture. Based on the instructions, you can make other interior items.
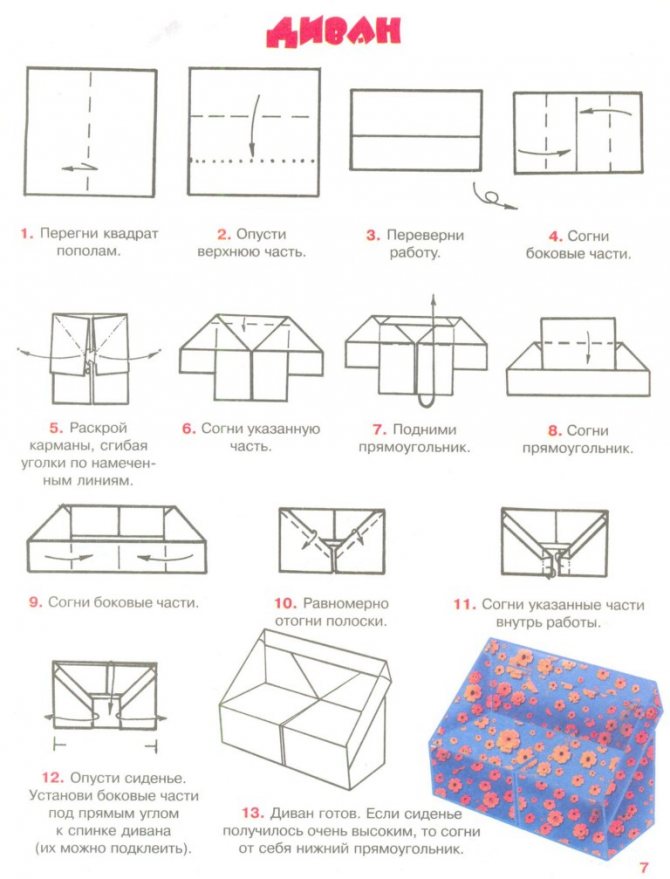
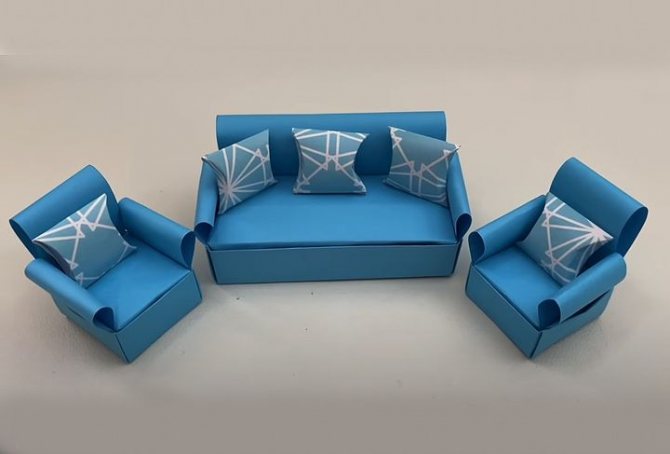
Sofa
A paper sofa will fit perfectly into a doll house; before following the instructions, think about the size of the product, its color, and how it will fit into the concept of the interior as a whole.
To make an origami sofa out of paper, you should:
- Fold the square sheet in half, then open it and fold it again perpendicular to the first fold.
- Next you need to do some additional hemming. Fold the bottom edge to the middle fold line, then fold the same edge in this way again. The result is three folds, excluding the central one.
- Fold the bottom strip over the first fold, then set aside two identical triangles by folding the side pieces diagonally.
- Bend the upper part of the workpiece to the middle line, and fold the lower accordion to the end. Turn the product over.
- Fold the top corners down diagonally, and fold the bottom corners up.
- Turn the workpiece over, bending one corner inward, forming the back.
- It is necessary to form the legs of the sofa by turning the product over.
The sofa will become an original art object or decoration for a toy living room, and if it is made of thick paper, the furniture will easily support the weight of the toy.
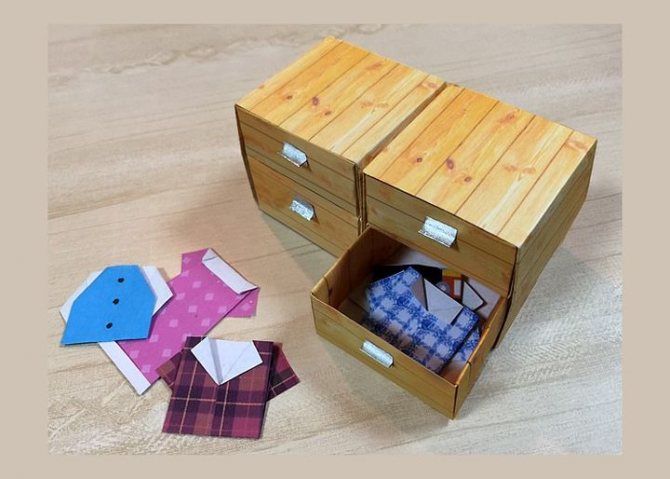
Dresser
An origami chest of drawers would also be appropriate in a dollhouse and will serve as an ideal place for storing small items.
In order to create this product, you need:
- Fold the square sheet diagonally twice and unfold it.
- Fold each corner towards the center.
- Bend the top corner and bend it to the other side. Turn over. Bend the side of the resulting triangle to the base of the nearest side of the square.
- Bend the other side of the triangle to the same base of the square. You need to do this so that you get a small triangle.
- Turn over. The folded corner should be at the bottom. Fold the left and right sides towards the center. Open the paper.
- Fold the bottom and top edges to the center line. To uncover.
- Make a diagonal fold in the small bottom left and right corners. Turn over. Make a fold in the small squares above the previous left and right. Turn over.
- Gather the side halves towards the center. Fold the paper along the small folds.
- We lift the remaining valves to the walls. We turn it over, apply the valves, forming a sharp triangle, which we hide in a pocket, and do the same on the other side.
- You need to fix the protruding valves using the paper sticking out at the top - fold it inward. The valve on one side must be bent upward. The result is a box with a handle.
This is one of the parts of the chest of drawers - a drawer. The other part will be the container for this box.
In order to do it, you need:
- Fold the square diagonally and in half again.
- Bend the upper corner of the triangle slightly. Open the paper.
- It turned out to be a square inside. Fold the corners of the larger one to each corner of this small square.
- Fold the bottom and top to the center line. To uncover. The same needs to be done with the sides. To uncover.
- Make a diagonal in the small right and lower left squares. Turn it over.
- We make diagonals in squares higher on the left and right.
- Turn over. Fold the left and right sides towards the center.
- Open the paper.
- Raise the remaining valves to the walls. Turn it over, attach the valves, creating a sharp triangle, which must be hidden in the pocket, and do the same on the other side.
- It is necessary to fix the protruding valves using the part of the sheet that sticks out at the top - fold it inward. The valve on one side must be bent upward. You will get a box.
The number of boxes and boxes for them should be the same, but their number is not limited.
Armchair
Making a comfortable and stylish chair for dolls and other toys will not take much time, but will add color to the interior of the dollhouse.
Following simple instructions, you can easily make an origami chair out of paper, for this you need:
- Fold the square sheet in half twice to form a cross fold.
- Fold all corners towards the center of the sheet, pointing them forward.
- Fold the corners of the resulting square towards the center on the reverse side.
- Once again fold the corners towards the center, but from the front side of the figure, and then turn the craft over.
- Unfold and straighten the folded corners to form rectangles.
- Bend one of the rectangles forward and the other three backwards.
You can decorate the chair with upholstery made of embossed wallpaper, fabric, ribbons, fur.
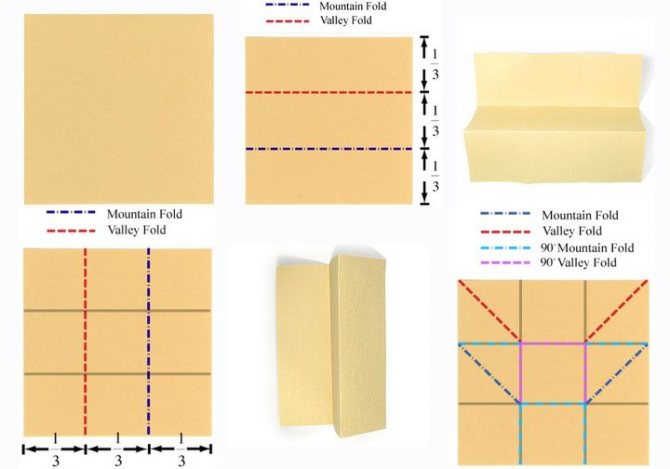
Armchair
Among the pieces of paper origami furniture for children, the chair occupies a special place. It creates an atmosphere of comfort both in a real house and in a doll house. It’s hard to imagine a living room without an armchair; it would also be appropriate in a bedroom or office. For the most common model, you will need a square sheet of 15x15 cm.
Step-by-step instruction:
- We start from the underside of the sheet.
- We make a zigzag fold “mountain and valley” as shown in the diagram.
- In this case, the square is divided into 3 sections.
- We open the product.
- We make a similar zigzag fold, but now vertically.
- We open the sheet. We apply preparatory folds diagonally, following the diagram.
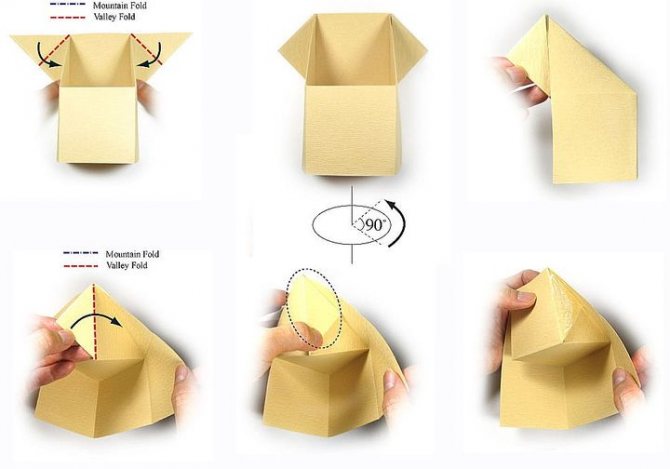
- Using the lines outlined in step 6, we assemble a three-dimensional figure.
- We bend the protruding triangular valves along the dotted line.
- Rotate the product 90° to the right. In front of us is the left side of the model.
- Open the right valve.
- Glue the area outlined by the ellipse.
- This is what should happen.
- We close the right side. Turn the model to the other side.
- Repeat steps 10 – 13.
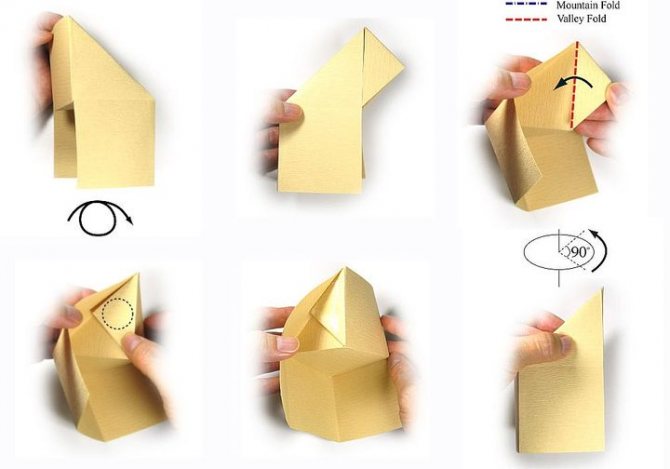
The chair is ready. This is what it looks like from different sides. The model can be combined with a coffee table, sofa and other furniture, creating elegant ensembles.
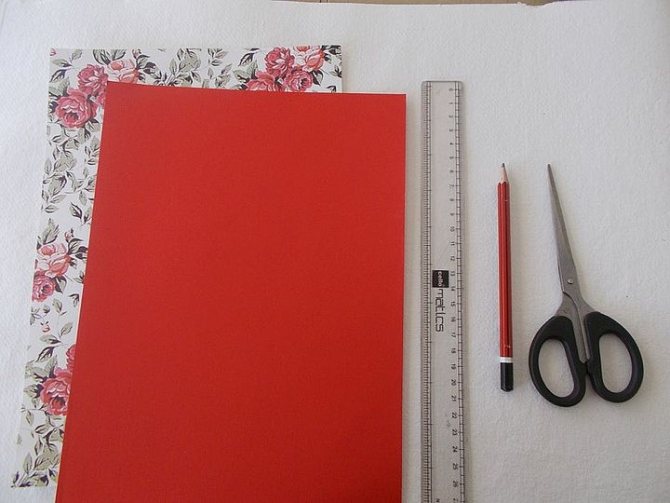
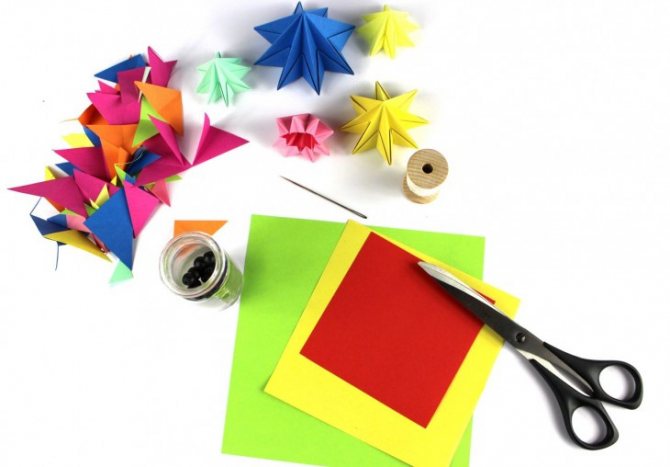
Tools and materials
The materials used in this technique are as accessible as possible and can be found in every home. If you wish, you can purchase specialized and professional accessories, but this is not important.
To make origami furniture with your own hands, you will need the following materials:
- paper (printer paper 70-90 g/m² and thicker, to create more durable products, specialized - “kami”, “washi”, foil - “sandwich”, textured);
- scissors;
- a simple pencil or pen;
- PVA glue, silicate or any other, designed for working with paper;
- elements for decoration (pieces of fabric, rhinestones, paints, colored tape and others).
Depending on the level of difficulty, other materials may be required. It is also necessary to take papers as a reserve so that in case of failure you can redo the work. Decorative elements can include a wide variety of materials; their range is unlimited.
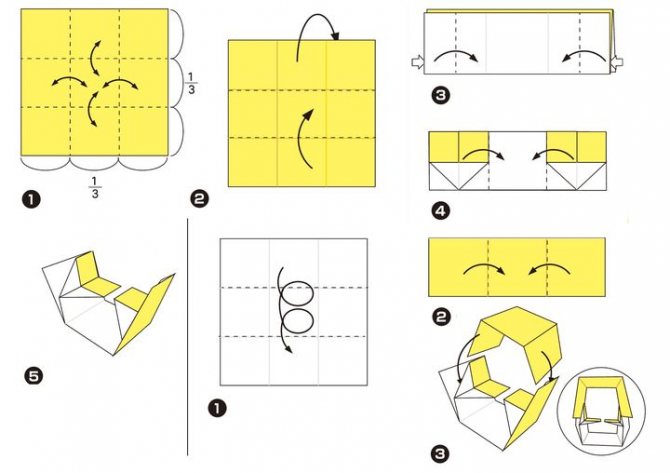
Sofa
The simplest sofa model is assembled in just 11 steps. We use a standard 15x15 cm square for it.
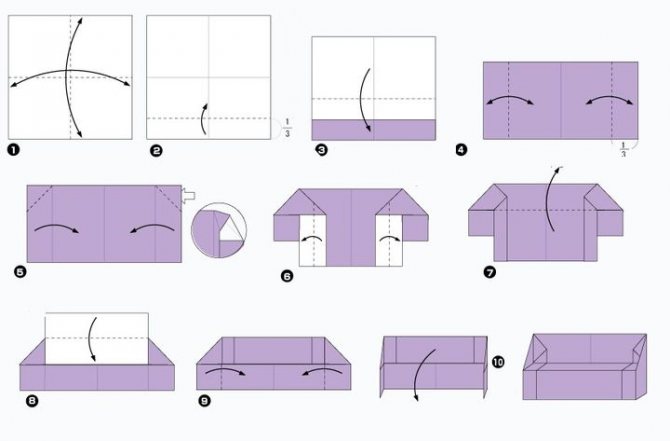
Step-by-step instruction:
- We outline the horizontal and vertical axis.
- Fold the bottom edge 1/3.
- Fold the product in half.
- We bend the right and left edges by 1/3. Let's reveal.
- We repeat the technique we used for “House”: straighten the side “pockets” and press.
- Fold the figure along the dotted lines.
- Raise the central lower part.
- We bend it in half.
- Fold the sides.
- We omit the central part from step 7. This is the seat of the sofa.
You can make “soft” origami furniture in another way:
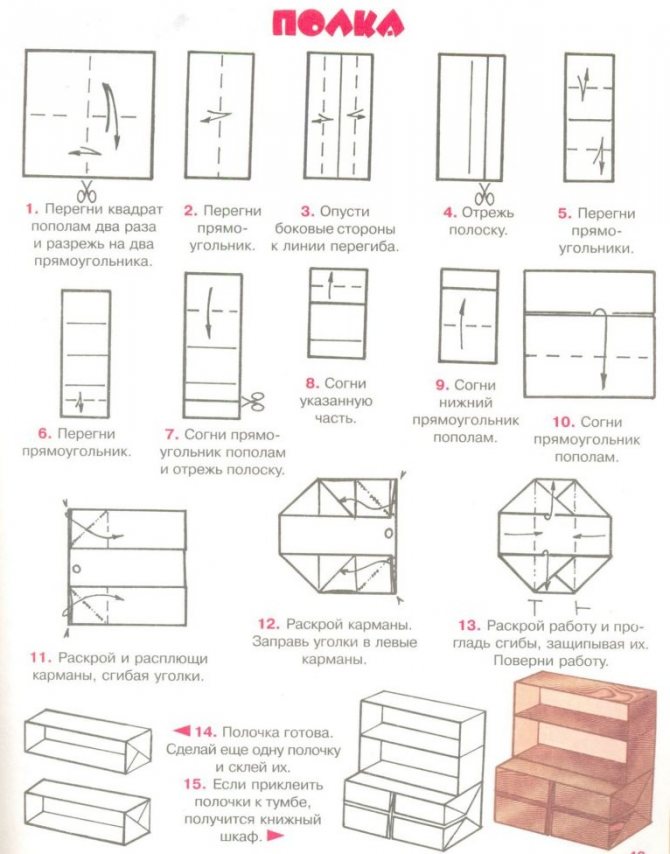
Cabinet
Cabinet furniture made using the origami technique is no different from the real thing. The cabinets or chests of drawers are equipped with convenient drawers, and the closet is equipped with a real barbell. An ideal place to store your collection of origami clothes.
For an original cabinet based on the model of origamist Fumiyaka Shingu, you will need three squares measuring 21x21 cm.
Step-by-step instruction:
- Divide the first square into 3 parts vertically and horizontally.
- Bend the top part back. We fold the bottom one forward.
- We mark the fold lines with dotted lines. Open the sides, flatten and smooth.
- Fold the sides along the dotted lines.
- The first piece of furniture is ready.
For the second one you will also need a square of 21x21 cm.
- We divide the workpiece into three parts and roll it into a strip.
- We make vertical folds - 1/3 on each side.
- We connect both parts together.
All that remains is to put the boxes in place:
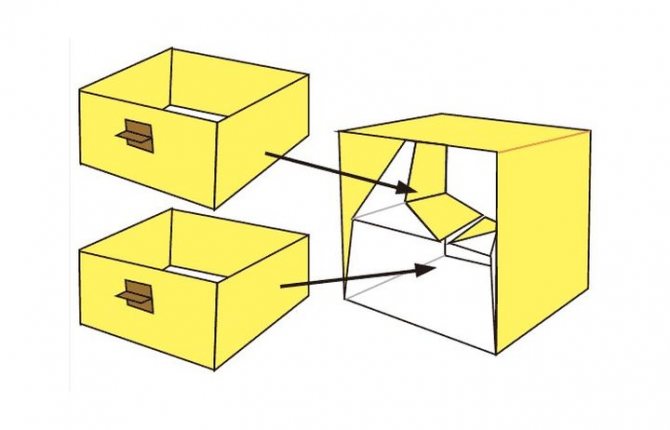
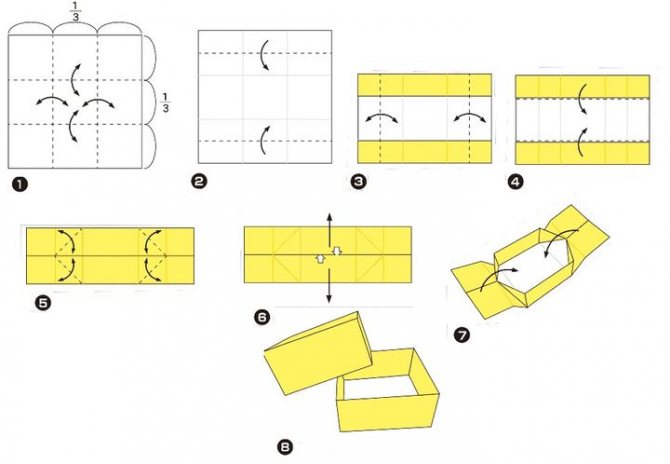
Instructions for assembling the box:
- We divide a square of 21x21 cm into 3 parts in both directions.
- Fold the top and bottom edges.
- We make folds along the dotted lines.
- Fold the top and bottom edges again.
- We outline the diagonal folds.
- We open the workpiece from the inside according to the arrows.
- We form a box by stretching the side walls. We glue the product for strength.
- Repeat steps 1 – 7 to make another box.
We make handles so that the cabinet can be easily opened.
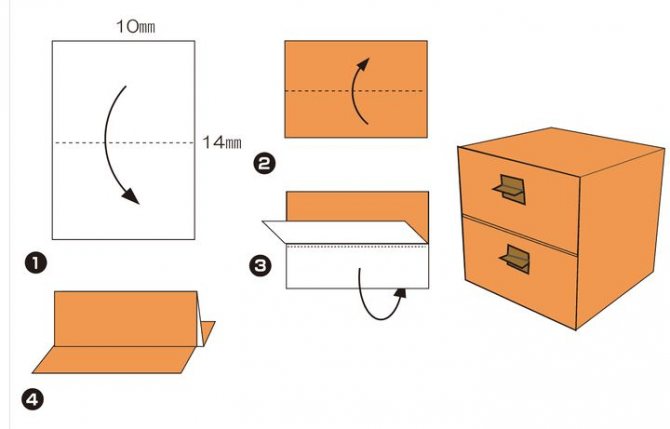
Instructions for the pen:
You will need a strip of golden or dark brown paper 1x1.4 cm.
- Let's start from the inside out. We bend the strip in half along the long side.
- Fold the product along the dotted line.
- We repeat the action in the other direction.
- Glue the handles in place.
Advantages of origami technique
The main advantage of origami is that working in this technique involves limited use of materials. The absence or minimal use of glue and other improvised means in this technique greatly facilitates the work and also guarantees the cleanliness of the workplace. Fans of origami are also attracted by the simplicity of the forms and method of execution.
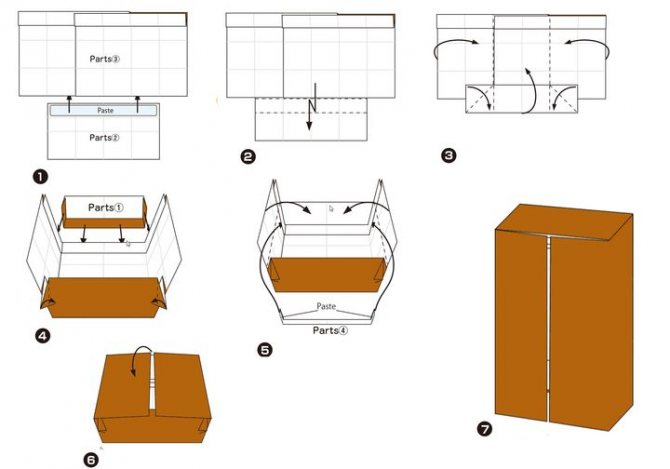
Closet
As a rule, dolls have an extensive closet and it needs to be put away somewhere. An origami cabinet is perfect for this purpose.
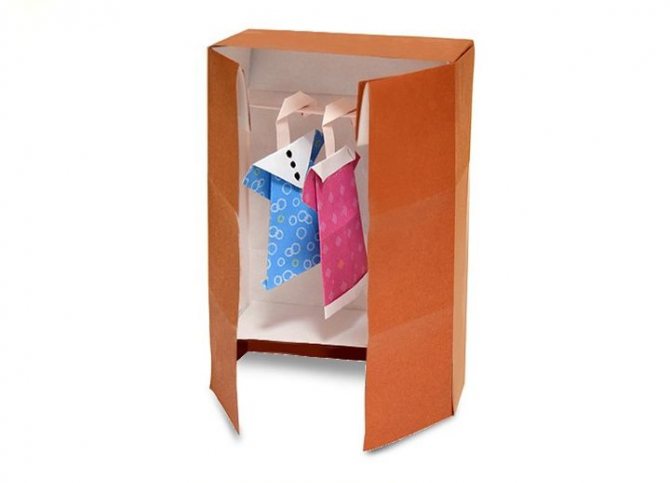
Such furniture made of wrapping paper looks good. It requires two squares with a side of 21 cm.
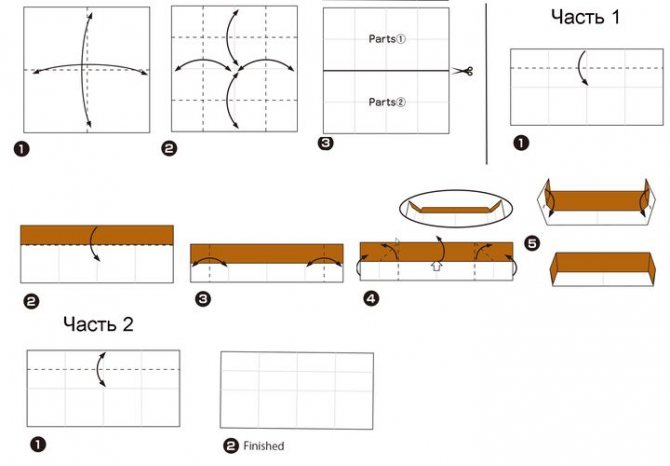
Step-by-step instruction:
- We divide the first square in half in two directions.
- Then we bend each part in half again.
- Cut the square in half.
Part 1:
- We bend the top edge towards the middle.
- Let's turn it over again.
- We fold the outer sections in half. Let's reveal.
- Raise the upper part in the direction of the arrow.
- Fold the sides.
- We form the corners of the half-box.
Part 2:
- We bend the second half of the square to the middle.
- Open the fold.
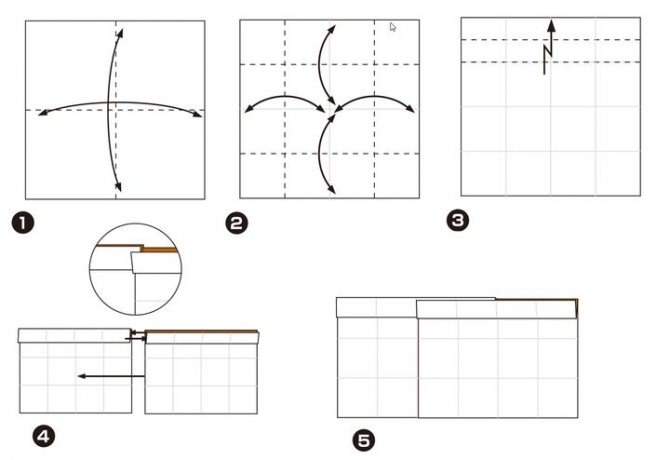
Part 3:
- Divide the square in half.
- And then into four parts lengthwise and crosswise.
- Fold the first section from the top in a zigzag manner.
- We process another square in the same way.
- We connect both blanks along the arrows.
Part 4, bar:
- We bend a strip of thin cardboard 15x1 cm in half, marking the middle. Let's reveal.
- Fold lengthwise.
- We divide the strip into 4 sections.
- Fold in the sides.
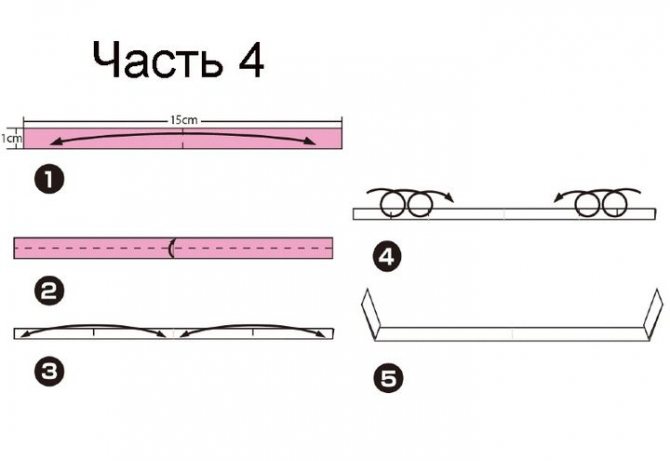
General assembly:
All the parts are ready, it's time to connect them together.