How to draw furniture with a pencil step by step?
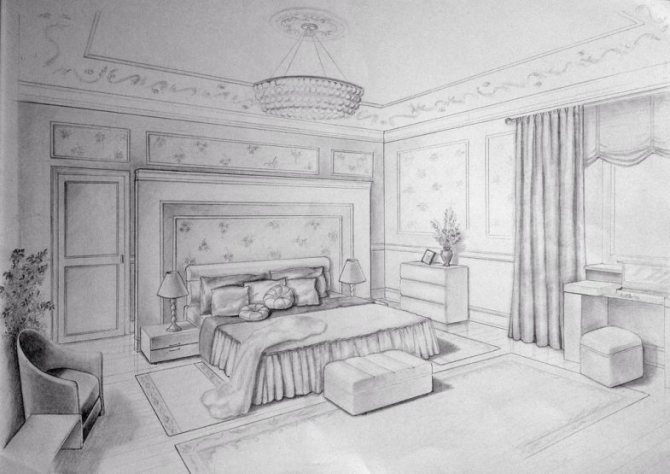
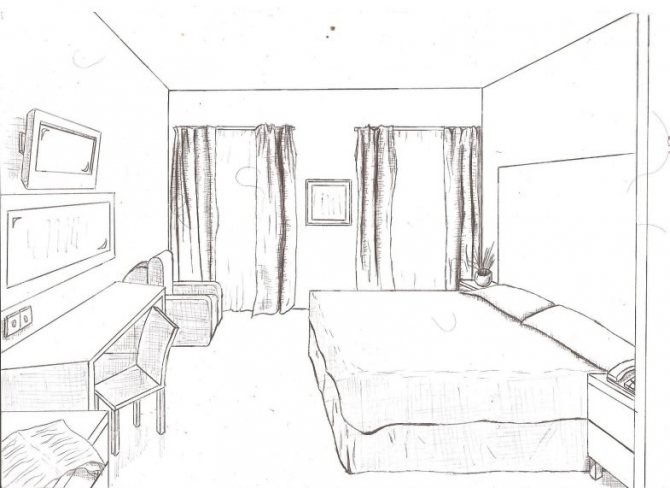
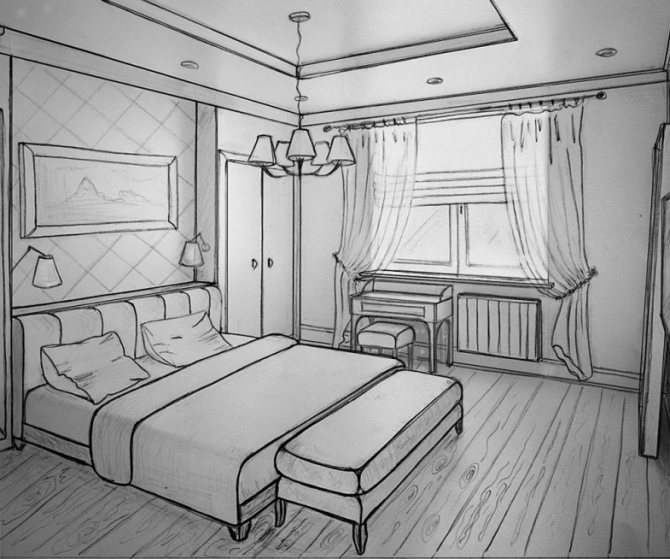
I suggest learning how to draw furniture using the example of a room furnished with furniture. Let's take this drawing as a basis, for example.
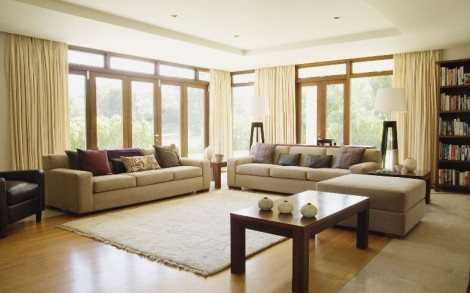
You can learn to draw windows, there is a wardrobe in the corner, sofas from different angles, a table, a pouf, an armchair on the side. Carpet.
This drawing is quite simple. Look at the basis there are simple lines. You can arm yourself with a ruler. But it is better to make sketches with a light movement of the hand without pressing on the pencil.
First of all, you need to draw the horizon and auxiliary lines.
Actually, now we are arranging the furniture around the room.
As you can see, furniture is not at all difficult to draw. The main thing was that there was a pencil, a piece of paper and the desire to do something with your own hands. Good luck!
In order to draw furniture, you need to decide on a general style, otherwise the drawing will look ridiculous, where the chair is completely different from the table, etc. although it may be creative, who knows, it all depends on the artist himself and his tastes.
Article on the topic: How to make canopies for doll furniture
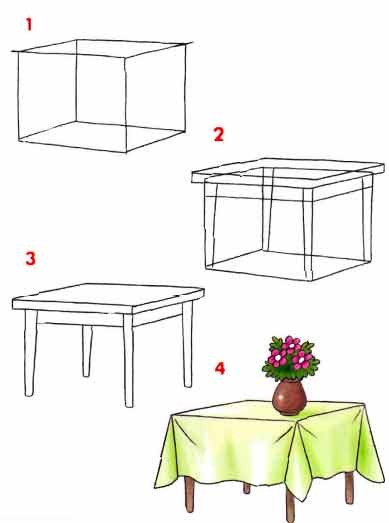
And so, to draw furniture , you can (and should) use drawing diagrams, in which everything is shown step by step:
- draw a bed:

- draw a table:
- draw a chair:
- draw a sofa:

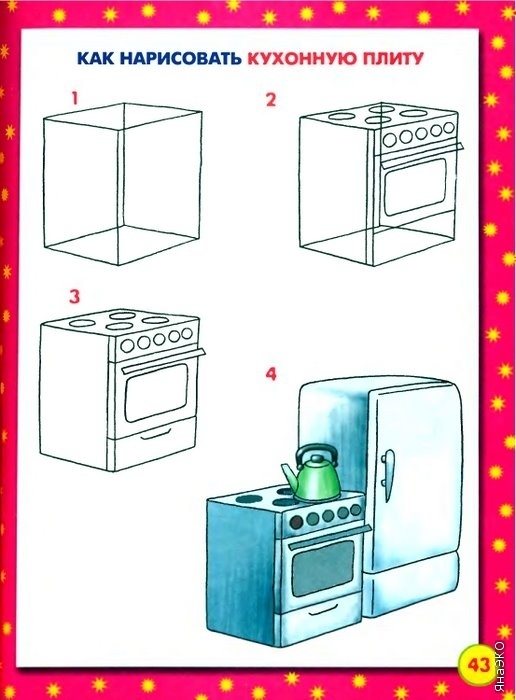
- draw a kitchen stove:
- draw a table lamp:
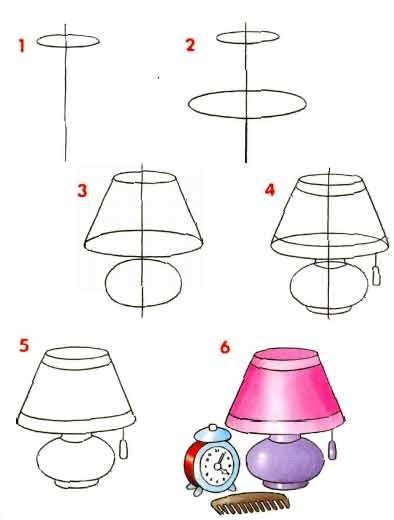
I think that there is no point in explaining each stage of drawing when everything is clearly shown, the main thing is that you can combine it all together, as well as choose a color for painting completely to your taste.
Initially, draw a rectangle and divide it into three parts. The first line divides the figure into two halves and will separate the back of the sofa, and the second - the boundaries of the pillows.
Already on the very back of the sofa we draw a sketch of the pillows and draw several segments that will become the armrests. In the middle of the sketch we draw lines that will become pillows (those on which they sit). We draw three lines from below: a long horizontal one and two small vertical ones.
Now it’s the turn of the pillows - we draw them along the edges of the sofa. We draw a line for the seat on the pillows, complete the pillows, and add legs to the furniture.
Draw a wavy line on the seat cushions.
Now we just erase the auxiliary lines and the drawing is almost ready.
Coloring the drawing is not difficult.
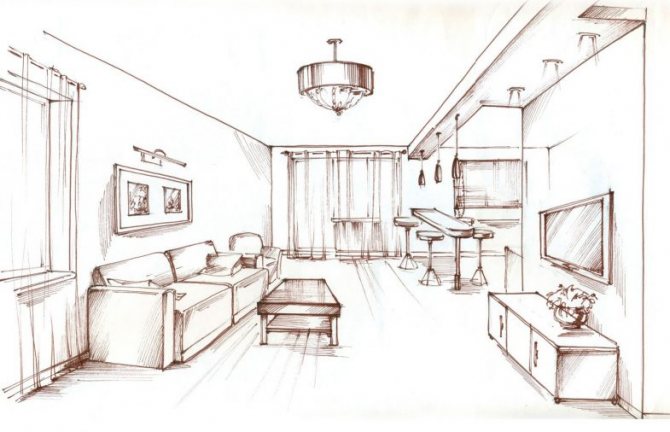
You can draw furniture three-dimensionally, taking into account the laws of perspective.
If the object is located directly in front of you, then we will draw a perspective with one vanishing point.
Let's try to create a voluminous sofa together.
Start your drawing by drawing a horizontal rectangle.
This will be the back of the sofa.
At the bottom we will draw a rectangle of smaller volume - this will be the seat.
Divide both rectangles with a vertical line in the middle - this will be the division of the sofa cushions.
On the lower rectangle we indicate the thickness of the pillows with a horizontal line.
Next, draw the body of the sofa and its depth.
We will also draw thickness on top of the pillows. Let's round the corners of all the pillows and the body of the sofa and draw decorative pillows.
Article on the topic: What wall color goes with white furniture
Summary of GCD for drawing in the senior group of preschool educational institutions
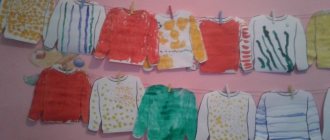
Abstract of the GCD in the senior group on the topic “Decorating furniture for dolls.”
Goal : To introduce children to a new element of Fedoseev painting - velor. Objectives: 1. Continue to acquaint children with the nature of Fedoseevskaya painting - its color, its constituent elements. 2. Teach children to draw a new element - velor. 3. Strengthen the ability to work with a brush and felt-tip pen. 4. Develop aesthetic perception, a sense of beauty. Tools: Parcel Doll Furniture templates Gouache paints Brushes Felt pens Simple pencils Sippy cups Methods: Game situation - the arrival of the postman Guessing riddles Artistic word Questions Demonstration of drawing velours Examination of samples Physical education Finger gymnastics Reflection Progress of
GCD
There is a knock on the door.
The postman enters. P. - Hello guys. It was me, postman Pechkin, who brought you a parcel (leaves). V. - Guys, on the parcel it is written: “You can open the parcel if you guess the riddles.” The first riddle: “She wears a dress and a bow, She doesn’t ask for food at all, If you put her to bed, she will sleep, For a day or two, and even five.” D. - This is a doll. (the teacher takes a doll out of the box) V. - Oh, what a beauty the doll is! Do you guys like it? What do we call the doll? Think, guys. Dasha, Masha, Katya, Ira, and maybe Nata? D. - Masha. Q.- Our doll has a name, But there’s nowhere for it to sit! She needs to make a chair, a sofa, a table so that she has somewhere to eat. - But first, guess one more riddle. Second riddle: “Under the roof there are four legs, And on the roof there is soup and spoons.” D. - This is a table. (the teacher opens the second box and takes out stencils of a bed, chair, sofa, table) V. - And here is the furniture, only it is white, ugly, I’m afraid that the doll Masha and her friends will not like it. What should we do, guys? D. - Furniture for dolls should be decorated with a pattern. Q.- What pattern will we decorate the furniture with? D. - We will decorate the furniture with the Fedoseevsky pattern. Q.- What elements does the Fedoseev painting consist of? D. - Fedoseevskaya painting consists of flowers, buds and leaves. V. — What colors do Fedoseev’s artists use in their painting? D. - Artists use yellow, red and green colors. V. - Guys, today I will introduce you to one more element - velor. The velor or curl is drawn in black, with wavy movements like this (demonstration). — Try to draw velor on leaves. (children try to draw velor) V. - To make the pattern look more expressive, the artists supplemented it with velor. (showing and examining samples) V. - Now it’s time for us to rest. I suggest you dance with the doll Masha and her friends. Physical school “Wider the circle, wider the circle - clap in front of you
Music calls All friends, all girlfriends -
turn to the right, right hand
In a friendly round dance.
to the right, also to the left side
Hands on the belt
hands on the belt
Let's put them first, Left and right
tilts to the left - to the right
We'll swing our shoulders Foot to heel
in turn right and left feet Let's put
forward,
heel forward
Let's turn together
around ourselves
We'll turn.
Well, now it's deep. deep breath
Let's all take a breath, Let's sit down together and
exhale
And sing a song.
Wider the circle, wider the circle, clap in front of you
Music calls All friends, all girlfriends -
turn to the right, right hand in
a friendly round dance.
to the side, also to the left. Practical work V. - We’ve had a rest, now we can work. Go to the table and choose the furniture that you will paint. (children come to the table and take the pieces of furniture they like) V.- Before we start working, I suggest warming up our palms and fingers. Finger gymnastics “One, two, three, four, five The fingers went out for a walk. One two three four five. They hid in the house again.” V. - Tanya, how will you decorate your table? Ilya, where will you draw a flower? Nikita, what element will you add to your pattern? What will you use to paint the velor? Vika, do you like the table that you decorated with Fedoseev’s paintings? Reflection V. - What beautiful furniture. I think the dolls will like it. -Artyom, what did you do especially well today? -Nastya, what didn’t work out for you today? -Vika, do you think your velours turned out well? -Gera, would you have gotten such an expressive pattern without the velor? V. — Guys, you are real masters. The dolls are very happy, because now they have very beautiful furniture that you decorated with love.
We recommend watching:
Summary of educational activities in the senior group “Journey to a Fairy Tale” Summary of a mathematics lesson for children of the senior orthopedic group Summary of educational and gaming activities in the senior group in the section of the “Childhood” program Synopsis of educational activities for the perception of music in the senior group of kindergarten
Similar articles:
Lesson in the senior group of kindergarten on the topic of February 23
Lesson notes for children of senior preschool age. Topic: Invisible air
Summary of organized educational activities for children of the senior group
Notes for mathematics classes in the senior group
Lesson summary on the topic “Reserve” in the senior group
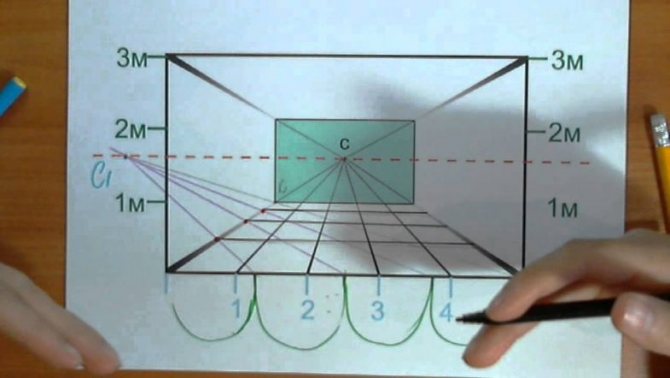
Terms you need to know
There are three components of perspective that every aspiring artist or architect should know about in order to understand how to draw a room easily and without unnecessary edits.
Let's look at them in detail:
- The horizon (more precisely, a perpendicular line) is marked with a thin strip at the eye level of the viewer or artist. You can place it anywhere on a canvas or regular sheet of paper.
- The vanishing point is the beginning on the horizon line where all parallels meet.
- Orthogonal lines are diagonals that artists took from geometry. In fact, they are often imaginary; in rare cases, they are transferred with a thin pencil so that they are almost invisible. They help achieve aesthetics in a bitmap.
Even if these components seem unimportant now, they will play a major role in the drawing process.
How to draw your room
Before work, be sure to look around, find out what shape the room has.
Next, you can start drawing the space step by step with a pencil:
- First, draw the horizon line - it is better to do this closer to the middle of the page.
- Then you need to draw the back wall of the room using only the same lines.
- What exactly it will be (square, triangular or rectangular), the artist decides for himself.
- The main thing is not to make the figures too large, as you need to leave room for additional furniture and objects.
- You also need to remember about the distance for the ceiling and floor.
- Next, you need to determine the vanishing point - you need to add a vanishing point anywhere in the room along the horizon line.
- Be sure to look at the drawing from the viewer's side.
- After this, you can proceed to the walls - a new rectangle is drawn at any point of one of the orthogonals.
- In this case, the artist uses verticals and horizontals that will intersect at one point.
Article on the topic: What is teak furniture
The draft of the room is ready, then the space is “furnished” with furniture and other details, following the rules of perspective. This step-by-step instruction for children will help them quickly master the skill of perspective.

Nod move:
Introductory part. Organizing time.
Educator. Guys, we received a letter today.
"Hello guys! Little gnomes from a fairyland are writing to you. We're in trouble.
The evil witch turned our furniture and household appliances into sand. But she has bewitched the inhabitants of our country, and no one remembers what kind of furniture and household appliances . We sleep on the floor, we also eat on the floor, and our plates are also on the floor. Help us".
Educator. Well, guys, let's help the little gnomes? Children's answers
What kind of furniture do you know ? Children's answers
Educator. Guys, tell me, why do we need furniture ? (chair, table, etc.)
Children's answers
Educator. the furniture has ? (Show corresponding pictures)
The table has a tabletop and legs. A chair has legs, a seat, a back.
The chair has a soft back and seat, armrests, and legs. At the bed - base, mattress, headboard, footboard (foot end)
.
The sofa has a soft long back and seat, armrests, legs.
The cabinet has walls, shelves, doors, legs. The chest of drawers has walls, drawers, and doors.
Physical education lesson. Playing with a ball: “Which one? Which? Which? Which?"
Educator. I will name the furniture and ask you a question , and you will answer me.
For example. What kind of chair? Wooden, comfortable, hard, tall. Etc.
Educator. Well, guys, you know everything about furniture . How can we help the little gnomes?
Educator. Yes guys, that's right. We can draw furniture for them and send them in a hot air balloon to a magical land.
Educator. Guys, close your eyes and imagine little gnomes. Think about what kind of furniture you will paint . Now let’s get to work, because the gnomes are waiting for your help. AND
try to draw so that the furniture is painted in joyful, bright colors, so that the gnomes are no longer sad. Independent work of children.
Educator. Guys, you are great! The gnomes will be very happy.
Summary of a correctional and developmental lesson for children with visual impairments on the topic “Autumn” (senior group) Purpose: To expand children’s understanding of the seasons (autumn). Objectives: Educational: Remember the signs of autumn. Develop children's attention and memory. GCD summary for drawing with a fork “Asters” (senior group) GCD summary for non-traditional drawing using the technique of drawing with a fork “Asters” in the senior speech therapy group Prepared and conducted by: teacher. Notes on drawing in an unconventional technique “Apple tree with golden apples” (senior group) Drawing “Apple tree with golden apples”. Integration of educational areas: “Speech development”, “Social communicative development”, “Cognitive. Notes on drawing "Cosmic distances". Senior group Goal: To consolidate and expand children's knowledge about space. Objectives: To clarify children’s knowledge about space: planets of the solar system, modern aircraft. Notes on drawing on the topic “Bus” (senior group) Objectives: - consolidate children’s knowledge about transport and its types; convey the shape of the main parts of the parts, their size and location - form.
Source
Professional room drawing
If the master is going to draw on paper, be sure to draw light lines that can be easily erased. For these purposes, choose a thin HB pencil (hard-soft version).
Now you can consider the main steps of the master class for beginners, which will help you draw a small project for your living space.

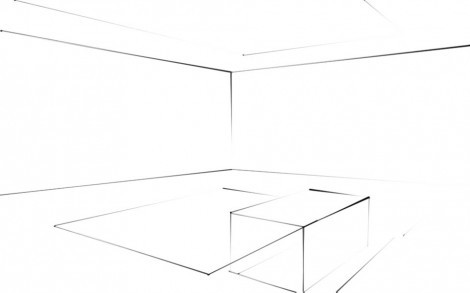
Drawing the base of the room
The basis or sketch begins with drawing the horizon line (it is advisable to do this with a ruler). Be sure to remember eye level.
It's worth remembering that this is a line from the viewer's point of view in relation to the scene (also known as the horizon line). We determine the vanishing point directly on this horizon, focusing it exactly in the middle.
How to beautifully draw the remaining details:
- Then you should draw out the back wall (in this case it is a simple rectangle).
- From the vanishing point, draw straight lines passing through each corner of this figure to the edges of the drawing area.
- After the artist has finished applying the guidelines, he erases the perspective lines inside the figure, leaving only the horizon line.
Important! At all stages you need to use a professional pencil of medium softness. In this case, erroneous lines can be easily removed.
On the topic: methodological developments, presentations and notes
Notes on mathematics.
Summary of direct educational activities for the implementation of the educational area “Cognition” (the child and the world around him) in the middle group for children with general speech underdevelopment.
Integrated lesson: Cognitive development with Artistic and aesthetic development. "Furniture for a bear."
Summary of a lesson in a preparatory school group for children with STD.
OOD of drawing in the middle group for children with mental retardation on the topic “Furniture”.
Learn to draw furniture from geometric shapes.
Source
Adding items
To place all objects correctly, you need to fully draw out the shape of each object, even if it is partially obscured by other furniture or a figurine in the room.
A good place to start is by drawing the objects/furniture at the back of the room.
- To do this in specific examples, you simply need to draw the front side of the object first, and then project perspective lines onto each corner separately.
- After this, you need to form the back part along the perspective lines.
- Next, we continue to draw the general shapes of other furniture in the room until all objects are arranged in perspective. You shouldn't draw the details right away.
- First you need to place all the main shapes correctly to avoid the need to erase/remove.
Article on the topic: Where is the furniture reviews 2016
Even though the pencil can be easily removed, the work still runs the risk of being aesthetically untidy.

Drawing the details of the room
In this step, you need to use perspective guidelines to place the pieces on the furniture.

Simple drawing technique:
- To draw doors on a cabinet (or to properly place a dividing line between them), you need to draw an "x" shape on them, going from one corner to the other opposite. Where they intersect will be the dividing line between the doorway;
- To place the doors on the cabinet, you can first draw a small rectangle on them in perspective.
At the corners of the rectangle, draw parts where the handles are attached.
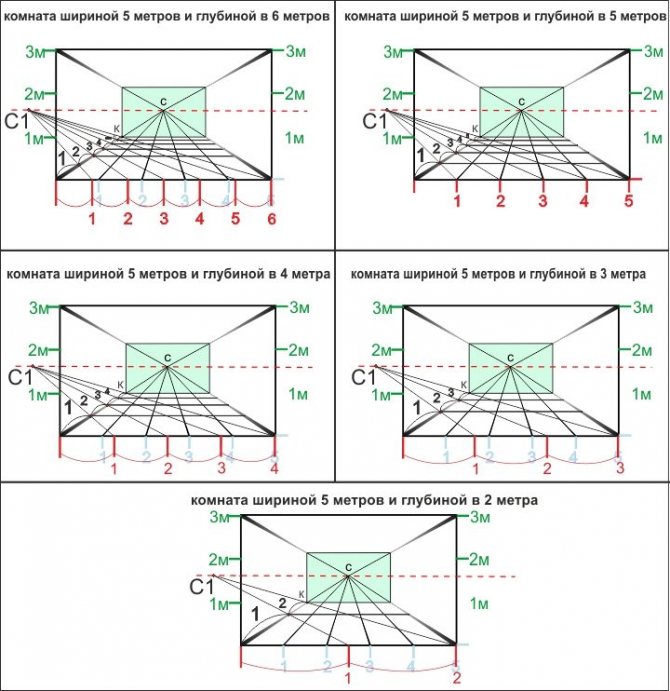
How to draw a room step by step: the basic subtleties of creating a sketch in pencil and on the computer
In order to draw a room, you will need knowledge of several drawing methods or a special computer program. Which one to choose depends on your goal. If you need to figure out how best to arrange furniture to fit, you'll need a scale plan of the room.
If you want to work out the interior design in detail, then frontal and angular perspectives will help with this. If you don't want to draw by hand or, on the contrary, want to make your sketches digital, turn to interior design programs.
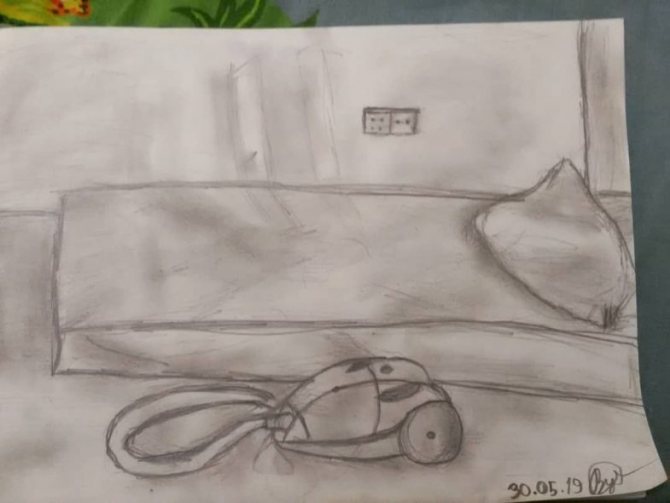
Adding a bed and a window
Based on the shape of the rectangular prism filler (3d rectangle), we draw a bed. We round the corners and draw out folds. Finally you can start working on the windows and curtains.
Since the window and curtains don't actually require drawing perspective, in this case you can simply draw them as you see them as an artist. This was the basic information on how to easily draw your room or small space.
As long practice has shown, the process of studying perspective drawing takes a lot of time.
First, the artist uses a ruler and eraser, then tries to draw the lines himself.

Without understanding perspective, you won’t be able to draw more complex pictures or scenes. Even if the master plans to draw ordinary manga or anime, without experience, the drawings will turn out less realistic.

The highlighted tips will help a beginner draw a room step by step, giving it volume and realism.