Summary of a design lesson for the senior group of kindergarten
Summary of a design lesson Topic: “The guys rush to the aid of Smeshariki.”
Topic: “The guys rush to help Smeshariki.”
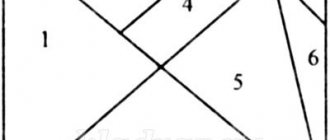
Program content: 1. Learn to sequentially analyze a contour diagram: 1) recognize the depicted object; 2) determine the locations of its main parts; 3) “try on” (i.e. correlate with the space of the diagram and with each other) the building details proposed to reproduce the building; 4) Dissect the contour diagram in accordance with the idea of the possible design of the object. 2. Learn how to build using a ready-made graphic model. 3. Continue to teach how to independently complete the object, using familiar construction techniques. 4. Continue to teach children to analyze an object, highlighting the details of the building material and their spatial arrangement. 5. Reinforce the correct use in speech of words such as front, back, front, side, etc. 6. Develop attention, memory, imagination. 7. Cultivate friendly relationships and a desire to help comrades. Methods and techniques: Game, examination, questions, comparison, encouragement, musical accompaniment. Material: Demonstration: Contour diagrams of objects on a larger scale than children’s diagrams, dissected diagrams of the same objects; Handout: Construction set for each child, contour diagrams, small toys, 2 pencils (simple and colored). Differentiated approach: 1 subgroup - an undivided diagram of the object is given. Subgroup 2 - a partially dissected diagram of the object is given. Individual work: Help Nikita Sh., Alena S., Tanya P. with the construction of a building; help Ksyusha, Katya, Vadim in analyzing the scheme. Preliminary work: Reading “Builders” by S.Ya. Marshak, looking at photographs of various houses, excursions along the streets of the microdistrict to examine buildings, building houses from building materials, getting acquainted with unfinished schemes. Connection with other types of activities: Speech development: introduction to the active vocabulary of the names of construction parts, gaming activity: role-playing game “Construction”.
Progress of the lesson:
— Guys, today we have a design lesson.
There is a knock on the door. - Oh, guys, someone is coming towards us. Yes, it was the Postman who brought us a letter. Something must have happened. I'm reading the letter. - Guys, this letter came from Smesharikov. Nyusha and Barash write that they wanted to build new houses, but it rained and some lines on the drawings were blurred. Smeshariki really ask you to help them understand the drawings and build new houses. Shall we help you guys? — Guys, look carefully at the diagrams and think about what it is? — Which part of the house is shown in the diagram? I'm inspecting the circuit. - This is a house (I trace the entire diagram with my hand). — What parts might the house depicted consist of? (Pointing to the lower part). - Right. Well done! What goes behind the foundation? — What is on the walls? - Fine. What else does the house have? — Guys, our diagrams, as you already said, show only the facades of houses, i.e. front view, what else does the house have that we don’t see in this diagram? — Could there be windows on the side walls? — What could be on the back wall? - That's right, guys. - Guys, let's remember what parts of the construction set we used to build houses with you in class. - Think about what parts the house shown in the diagram might consist of: What parts can be used to build a foundation? — What parts can you use to build the walls of a house? - Fine. What can the ceiling be made of? - Well done! What part is needed to build a roof? - Guys, now I suggest you complete the details that make up the house on your diagrams with a simple pencil. I check and help children who find it difficult to complete a task. Clarifications are made to the diagram with a colored pencil. I invite one child to come out and tell what the house shown in the diagram consists of and complete the diagram (child of the 2nd subgroup). — Nikita, tell us what the house shown in your diagram consists of? - Well done, you explained everything in detail, completed the diagram, and all the guys checked whether they completed the task correctly. - Okay, now let's rest a little. Physical education minute. We planed, we planed. The boards became smooth.
We sawed, we sawed, so that everyone would be even. We stacked them in a row, nailed them down with a hammer, and it turned out to be a new house. - Well, now we have completed plans and construction can begin. Just don’t forget that our diagrams show only the facades of houses, and we will build entire houses. - Let's start building houses. - Guys, if all your houses are the same, then Smeshariki will be bored living here. Design decorations for your home. During construction, I help with questions and advice. I draw attention to the quality of the construction. - What wonderful houses we have turned out to be. All different. So we built and built. Finally, we built. Look what kind of house everyone will feel comfortable in it. Come, come, live in our house. - Well done, guys, you tried very hard and helped Smeshariki. Look how happy they are (showing toys). Now let’s resettle the city residents into their homes and have a housewarming party. Smeshariki will also give you colorful circles. Whoever succeeded will place a red circle near his house, a yellow circle - the construction was not entirely successful, a blue circle - they did not cope with the task at all. The teacher picks up Smesharik. “I’ll go see what kind of house Nikita built.” Nikita, how many floors are there in your house? How can you get to the second floor? Who will you place in your home? Why did you put a red circle near your house? -Which of you guys has the longest house? What parts did you use to build the longhouse? Why did you make such a long house? What kind of circle did you put near your house? Why? — And I also want to go visit Lera. What do you think is interesting in Lera’s house? With the help of Smeshariki, the teacher helps the children play with the buildings. - Yes, we will help. We need to help everyone. Especially those who have had a misfortune. - These are house plans. — The diagram shows the facade. — The lower part of the house is the foundation. - These are walls. — There are windows on the walls. — The house has a roof on top. — The house still has side walls and a back wall. - Yes. — There may be a door on the back wall. - From cubes, plates, bricks, triangular prisms, bars, half-cubes. — The foundation can be built from plates. — The walls of the house can be built from cubes or bricks. — The ceiling can be made of plates. — To build a roof you need a triangular prism. Children complete the details on their diagrams. — This diagram shows a house. The foundation of this house consists of a plate. The walls stand on the foundation. They are also made from plates. There is a plate ceiling on the walls. A roof is placed on the ceiling - a rectangular prism. — This diagram shows a house. The foundation of this house consists of bricks. There is a wall on the foundation. The wall is made of two bricks and a cube. There is a brick ceiling on the wall. The roof is a rectangular prism. There is a path leading from the house to the mailbox. It is also made of bricks. There is a mailbox near the house. It is made of bricks and cubes. Jerks your arms up. Jerks your arms to the sides. Bend forward, hands on the belt. Walking in place. Squats. Walking in place. Jumping in place. Children complete the task. Children sort out the circles of the desired color. - Two floors. The second floor can be reached by elevator. There is an elevator in my house. - Because everything worked out for me. — I extended my house using bricks and cubes. My house can accommodate many guests. — This house is interestingly decorated. Let's repeat together where we will start construction. - Where do we start building ours - Let's start building from the foundation. — Are we going to build the foundation from a long house? - What will we build the foundation from? — How are we going to install the plates? — What will we build next? — What is located on the ceiling? — Guys, what can you use to build the side and back walls of a house? - Okay, now let's rest a little. plates. I'll put it on the wide, long side. Then we will build walls from plates. — We will place two plates at the edges on the short narrow sides and we will place one plate in the middle also on the short narrow side. — Next we will build a ceiling from a long plate. Let's put it on the walls - plates with a wide long side. — We will put a roof on the ceiling. Let's make it from a triangular prism. - From cubes, from plates. Download Summary of a design lesson for kindergarten
We recommend watching:
Summary of a design lesson on the topic “Making toys.” Senior group Three-dimensional design from paper in kindergarten. Master class Construction game for children of senior preschool age Notes on cognitive development (construction) in the 2nd junior group
Similar articles:
Consultation for parents “Construction from building materials”
Constructive activities in the senior group
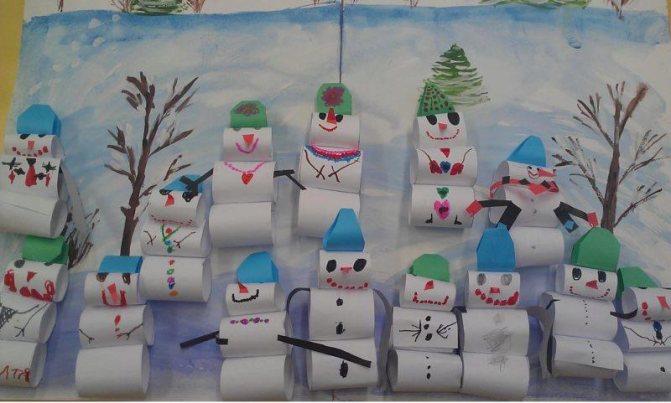
Summary of a lesson on paper construction “Funny Snowmen”
Prepared by: Tamara Kalugina
The most magical and fabulous holiday, the New Year, is coming, the guys and I also did not stand aside and would like to present to your attention our cheerful snowmen.
Target
: Make snowmen from colored paper and cardboard with the children.
Tasks;
Educational:
Teach children to make cylinders from a rectangle by gluing them, cut out parts for a snowman according to a template, and consolidate techniques for working with scissors.
Educational:
Develop the ability to independently decorate a product, observe proportions, and children’s constructive abilities.
Educational:
Foster a love of winter nature and interest in New Year's themes.
Materials:
White and colored cardboard, colored paper, scissors, felt-tip pens.
Progress of the lesson:
Greetings
"Good morning"
Good morning, little eyes!
You woke up?
(Rub your eyes, make binoculars out of your fingers and look at each other).
Good morning, ears!
You woke up?
Stroke the ears, place your palms behind the ears (represent the ears of an elephant)
.
Good morning, pens!
You woke up?
Stroke hand in hand, clap your hands.
Good morning, legs!
You woke up? Stroke your legs, get on your knees, place your hands in front of you and tap your toes on the carpet.
Good morning, children!
We woke up! (Raise your hands up)
Mystery:
Three balls on top of each other (show the balls with your hands)
The kids rolled them up (Children pat themselves on the head)
Lastly, very cleverly, they stuck a carrot on the nose (they alternately touch the nose with their index fingers,
No, why should he be cold (they shake a finger,
The carrot nose is already sweating,
And he got used to snowstorms (Children perform circular movements with their hands,
Who is this?
Yes, that's right, snowman.
Viewing the fairy tale “The Snowman-Postman”
Conversation based on a fairy tale. Answers on questions.
Didactic game “Find a pair for a mitten.”
Target:
Teach children to find objects based on similar characteristics.
Didactic game: “Snowflakes”
Goal: To consolidate the concepts of big and small, to teach how to build logical chains.
Educator:
Guys, you are great, we played together and now let’s get down to business, help me make snowman friends so that we can help Santa Claus bring gifts for the guys on time.
Progress:
1 Using the templates, cut out the hat and rectangles.
2 Glue a hat on your head.
3 Use a felt-tip pen to draw in the eyes, mouth and glue on the nose.
4 Glue the rectangles into cylinders and decorate it with buttons.
5 Our helpers for the snowman are ready!
Educator
: Guys, thank you very much, now we will definitely have time to bring gifts for the guys. For your efforts, I will play a game with you.
Physical exercise - game "Snowman"
One - hand, two - hand (children extend one hand, then the other)
We are making a snowman (they imitate making snowballs)
We will roll a snowball - (palms make circular movements on the thighs)
Like this one (they spread their arms to the sides, showing how big it is)
And then make a smaller lump (rub your chest with your palms)
Like this (show the size of the coma less)
And we’ll put it on top (they stroke their cheeks with their hands)
Small lump (join fingers together, show small lump)
So the snowman came out.
(put your hands on your sides, turn left - right)
Very cute fat guy! (Imitation of walking from side to side).
Result of the lesson: Exhibition of snowmen.