Every insect is busy, wants its own good and life
Master Class. Modeling insects.
Author: Chepeleva Tatyana Aleksandrovna The material is intended for children of preschool and primary school age, teachers and educators.
Quite recently, on occasion, I purchased a bundle of soft, fluffy wire called “chenille”. And they also gave me a whole package of paper-based film for laser printers (such as lamination film). So I started thinking, how to use this “wealth”?
Materials:
chenille, transparent paper-based film for laser printers, plasticine, toothpicks, CD marker, scissors.
Purpose:
making plasticine crafts and toys.
Objectives:
Show the possibilities of new materials (chenille, transparent film) in modeling. Diversify the technique of working with non-traditional materials in modeling. Improve the skills of modeling, manual labor, and drawing. Clarify and enrich children's knowledge about insects; Form stable ideas about the color, shape, size of the insect proposed as a sample. Introduce children to poems, riddles, and sayings about insects. Develop eye, fine motor skills, speech, attention, thinking. Cultivate interest in the world of insects and nature.
Spring the artist
(abbreviated) Vesna Krasna started working.
She didn't get down to business right away. At first, I thought: what kind of picture should she draw? Here the forest stands in front of her - still gloomy and gloomy like in winter. “Let me decorate it in my own way, in spring!” She took thin, delicate brushes. I touched the birch branches with a little greenery, and hung pink and silver earrings on the aspens and poplars. Day by day the picture of spring becomes more and more elegant. Everything comes alive all around. Sensing the warmth, insects and spiders crawl out of various cracks. May beetles buzzed near the birch branches. The first bees and butterflies fly to the flowers. And for each of them, Spring is Red, she came up with an important task. (Georgy Skrebitsky) Today we will sculpt insects. Which ones? Let's consider. No. 1 Dragonfly
You see everything, dragonfly - your eyes are big!
Your chirping flight is like a helicopter in the sky. During an “emergency” landing, you boldly put out your paws. - Let's look at her body parts. How many are there, what do they look like? 1. We sculpt the same ones - head, torso, tail. 2. We connect them, for strength, using a toothpick and smearing. 3. Cut the chenille wire into equal parts, according to the number of legs. Draw wings on film. 4. Bend the wire for the legs and cut out the wings. 5. We connect all the parts. 6. Add eyes (ready). But my daughter doesn’t like them: “It doesn’t look like it!” 7. Add plasticine green balls - great eyes! No. 2 Green beetle
(unfortunately, I didn’t see the name) I’ll put the bug in my palm - let it sit there for a little while.
Oh oh oh! How he tickles! He wants to get out quickly! (Svetlana Bogdan) 1. Consider a green beetle. 2. Roll 2 balls, a small one for the head, a larger one for the body. We select chenille. The green one is missing, take the blue one. 3. Flatten the ball for the body, forming a similarity. We string the head and body onto a toothpick. Bend the chenille into 6 equal parts and cut. 4. We bend the “legs” like a ladder and stick them into the body. Adding eyes. Ready! No. 3 Spider – tarantula.
There is a spider in the corner, It has woven both a house and a net.
Now he’s resting, waiting for Mushka. - We are considering. We count the number of legs, there are 8 of them. 2 more antennae. 1. Roll large, medium, small balls. 2. We put all 3 on a toothpick sequentially. 3. We cut the smallest one with a knife - we get eyes. 3. We measure, chenille into 8 equal legs and 2 small antennae, cut. 4. We stick the legs into the body. Wow, so similar! No. 4 Fly
An annoying fly. Yuri Entin
The annoying Kruzha Fly is buzzing in your ear. An annoying fly buzzes around your ear. Annoying Fly - No voice, no hearing. No voice, no hearing - Annoying Fly.
1. Daughter Yulia categorically does not want to sculpt a green fly. We agree that there are yellow ones too. We sculpt 3 balls - for the body, head, eyes. We select chenille. 2. Roll out the larger ball into a “dumbbell”, shape the ball-head like a barrel. Secure with a toothpick. Adding eyes. We cut the chenille and bend it. 3. On the film we draw wings as similar as possible. Let's cut them out. 4. We connect all the parts into a single fly. When the modeling is finished, it is necessary to remember the story of Georgy Skrebitsky “Spring the Artist”. Ask the question: “What important thing did Vesna Krasna come up with for insects?” Let the guys think and express their assumptions.
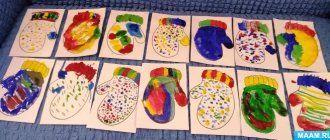
Ladybug is a simple and bright model for modeling with children from plasticine. This insect enjoys good fame among all nations. Our closest neighbors - Belarusians, Ukrainians, Slovaks - affectionately call her “Sun”. Tajiks call her “Redbeard Grandfather”. In English-speaking countries - England, USA, South Africa - the name of this bright beetle is “Lady Bird”. In South America it is called "St. Anthony's Cow", and in Germany and Switzerland "St. Mary's Beetle". Such respectful or affectionate names were given to the ladybug for a reason. People have long noticed that where there are a lot of these beetles, there is a good harvest. The fact is that the ladybug is not only a beautiful, but also a very useful insect. Both the adult beetle and its larvae destroy the crop pest - aphids. To combat this field pest, it was even brought from Europe to America. Ladybug was not found there before. We offer you two options for modeling a Ladybug from plasticine. The first - simple - option is suitable for working with preschool children in the senior or preparatory group of a kindergarten. The second option is for older guys.
A simple plasticine ladybug - modeling insects with children from 5 years old
For work we will need black and red plasticine. You will need a very small piece of white plasticine. We roll a ball out of red plasticine and, pressing it firmly against the table, give it the shape of a hemisphere (gingerbread).
Roll a ball out of black plasticine and apply it to the body. Using a stack, draw a line on the shell, dividing it in half and forming two wings.
Let's roll a sausage out of black plasticine, divide it into six segments and make the legs of a ladybug out of them.
Roll six small balls from black plasticine and stick them onto the wings, slightly flattening them. Let's mold the antennae and eyes. The plasticine ladybug is ready!
Ladybug from plasticine - modeling insects with children from 5 years old.
Ladybug from plasticine - modeling insects with children from 7 years old
This model is a little more complicated than the previous one. Here the Ladybug “opened” its wings. For work we will need red, black and white (a little) plasticine. Roll a ball out of black plasticine and flatten it into a cake.
From a piece of black plasticine we roll a long thin sausage-flagellum and, dividing it into three parts, stick it to the black pancake base.
Let's turn the figure over and “put” it on the legs we just sculpted. Roll a ball out of black plasticine and apply it to the body. This is the head of a ladybug.
Roll a ball out of red plasticine and, pressing it from below with your fingers, form a hat, as when sculpting mushrooms from plasticine. The diameter of the “hat” should approximately correspond to the base of the ladybug’s body. Cut the resulting “hat” into a stack in the middle. Let's stick the red wings to the base of the ladybug.
All that remains is to revive and decorate our ladybug. Let's roll up the flagellum, “curl” it and make antennae. Roll six small black balls, flatten them and stick them on the wings. From two pieces of white plasticine we will make two false eyes. Here is another Ladybug made of plasticine!
Ladybug from plasticine - modeling insects from plasticine with children from 7 years old.
Ant from plasticine - modeling insects with children from 6 years old
You can make ants from plasticine with children aged 6 years and older. As you know, ants do not live alone - they are social animals and form entire colonies - anthills. Strict order reigns in anthills. Each ant knows exactly its duties and fulfills them. No matter how small the ant is, it is one of the most powerful inhabitants of our planet. After all, he can lift ten times his own weight! If people had such strength, then two not very large men could easily carry a car from place to place. And a preschool child could carry his tired mom and dad home from a walk without any problems. Ants are also great builders. After all, compared to their size, an anthill is a real skyscraper. When working on this craft, you can use natural materials. And not only to make legs for ants from twigs, and not from plasticine. Create your own small anthill by sketching sticks and straws. And then “populate” it with cheerful and hardworking ants.
Stages of modeling an ant from plasticine
Divide the plasticine block in half. Make an elongated ellipsoidal egg from the half. You can even make one end pointed. Divide the remaining piece in half and form a ball and a short carrot cone.
Connect all three parts to each other.
Roll long black sausages from black plasticine. Make six legs out of them: four short ones and two longer ones. And two short and thin mustaches. Both legs and antennae can be made not only from plasticine, but also from wires or twigs.
Stick the legs to the ant's chest and the antennae to the head.
Make eyes. Cut through the mouth with a stack.
Ant from plasticine - modeling insects with children from 6 years old. Our plasticine ant is ready to hit the road or start working for the benefit of his native anthill! If you mold a dragonfly from plasticine, you can act out Grandfather Krylov’s famous fable “The Dragonfly and the Ant.”
Basic techniques for working with plasticine
Modeling animals from plasticine is a step-by-step process. There are basic shapes that serve as the basis for creating various elements.
These are the ball, cube, pyramid, cake, drop and strip. A cube is formed from a ball by squeezing and pressing it on four sides, and then it can be rolled out using a rolling pin, or left in the shape of a cube, finally aligning the edges with a flat stick. Or, for example, the “drop” shape is also created from a ball. In this case, the round workpiece from one edge begins to be gradually compressed and stretched to the desired size.
Caterpillars made of plasticine - modeling from plasticine with children from three years old
Plasticine caterpillars are an easy craft to make with kids. Funny caterpillars can become one of your baby's first sculptural masterpieces. We present two different models. Both of them are created using the simplest modeling techniques from plasticine. Even if the balls for the first or the “sausage” for the second caterpillar turn out to be uneven, the work will still be successful and will be decorative. And for kids this will serve as an excellent exercise in working with plasticine. You can make small details - eyes, antennae - yourself or use ready-made options. For example, plastic eyes for soft toys and wires - regular or chenille - for antennae. All caterpillar decorations can be made from plasticine, but this is difficult for small children. Therefore, we recommend using ready-made beads and seed beads.
Plasticine caterpillar - modeling with children from three years old
Let's roll six or more multi-colored balls.
Let's connect the balls together. For convenience, you can use a cardboard base.
We decorate the caterpillar with ready-made beads or seed beads. We make antennae from pieces of wire or toothpicks. The plasticine caterpillar is ready!
Plasticine caterpillar - modeling with children from three years old.
Caterpillar-worm made of plasticine - a craft for children from three years old
Let's make a long carrot cone. With kids, just make a sausage cylinder. If it turns out lumpy, it’s not a problem.
We decorate the caterpillar with ready-made beads. You can make the eyes yourself or use industrial ones. Let's cut the mouth with the stack.
Let's turn the worm into a centipede caterpillar. Cut the cocktail stick into pieces and stick these pieces into the abdomen. From the same sections we will make antennae-horns. The plasticine worm caterpillar is ready! Now you can turn it into a plasticine butterfly!
A caterpillar made from plasticine and cocktail sticks - a craft for children aged three years and older.
What you need for work
In addition to the plasticine itself and your own fingers, you will also need some tools, such as a modeling board, a special knife, and a roller for rolling out the plasticine. Stacks will also help you in this matter. They are special plastic knives with which you can not only cut the plasticine mass, but also crush it or create grooves and dents of various shapes on the surface. You will also need matches or toothpicks to connect the individual parts together. Among other things, wet wipes will be useful for cleaning your hands while working, as well as a diagram for sculpting animals from plasticine, which explains the whole process step by step, instructions or a master class. Guided by such material, you can easily master the entire process of sculpting an animal, both wild and domestic.
Butterflies from plasticine - modeling insects with children from three years old.
A plasticine butterfly is an interesting craft for preschool children. The main difficulty children may have when depicting a butterfly is sculpting the wings. But if you use additional material to create the wings - cardboard - then this problem will be immediately solved. In this form, the craft immediately becomes so simple that it is suitable even for three-year-old children. This is exactly the kind of butterfly we propose to make in the first version. And for children 5-6 years old (senior and preparatory groups of kindergarten) and older, butterflies can be made more complex and interesting. All other options are suitable for this age. We provide templates for cutting out wings from cardboard, but, of course, you can easily draw the wings yourself.
A plasticine butterfly with cardboard wings is a simple craft for children aged three years and older.
Let's make a sausage-cylinder.
Cut out the wings from cardboard in advance. This needs to be done by an adult.
Wings template for a simple craft with children - plasticine butterfly with cardboard wings. Let's decorate the wings with a simple plasticine molding. For example, roll up multi-colored balls and press them, flattening them onto the wings.
Stick the cardboard wings into the plasticine sausage body. In principle, the work can be completed here.
If you want, you can make butterfly antennae from straws, twigs, or chenille wire. The plasticine butterfly is ready.
A plasticine butterfly with cardboard wings is a simple craft for children aged three years and older.
A plasticine butterfly with cardboard wings is a simple craft for children aged five and over.
This model is very similar to the previous one, but we will sculpt the body in more detail. In addition, children will be able to show their imagination and artistic taste by designing wings. Shape the sausage into a cylinder. Roll it in the middle with your finger to make a butterfly “waist”.
Let's roll a round ball. Using your fingers, pull out two small horns - antennae - from plasticine. This is the head of a butterfly.
Let's press the parts together.
Let's take cardboard wing blanks (the template in the previous model) and decorate them with plasticine molding as your imagination dictates.
We stick the finished wings into the plasticine body.
If you want, you can make beautiful antennae from thin plasticine flagella.
A molded plasticine butterfly is a craft for children aged 5 years and older.
This option is primarily decorative. We do not sculpt, but rather draw with plasticine. Such a butterfly is convenient because it can be hung on a ribbon or glued to a group composition. Cut out the silhouette from cardboard.
A molded template for a butterfly made of plasticine - crafts for children aged 5 years and older. We start by creating the body. We make a head from the ball. The two sausages make up the body, and their thin flagella make up the antennae.
Let's decorate the butterfly as your imagination suggests.
We attach a ribbon to the back side with tape - now the plasticine butterfly can be hung.
A molded plasticine butterfly is a craft for children aged 5 years and older.
Plasticine butterfly - sculpting insects with children
You can make a butterfly entirely from plasticine. Below we provide diagrams for sculpting two butterflies.
Sculpting patterns with children using butterflies in their plasticine.
COMPLEX LESSON IN A SENIOR GROUP.
Topic: “These amazing insects”
Goal: expand children's understanding of different types of insects.
Tasks:
- Cultivate an interest in insects, a desire to learn something new about them.
- Strengthen the ability to depict butterflies on a sheet of cardboard.
- Reinforce the techniques of rolling, flattening, and smearing.
- Develop aesthetic taste and color perception.
Material for the lesson.
- Projector for showing slides.
- Pictures depicting various insects;
- Thick cardboard;
- Plasticine set;
- Modeling board;
- Stack;
- Artificial butterfly.
- Recording the sounds of the forest.
PRACTICAL PART.
The teacher offers to depict these amazing butterflies and discusses the stages of completing the work with the children.
1) Torso. We roll balls out of plasticine, flatten them into flat cakes and place them side by side (side to side)
2) Head. Similarly to the body, roll out one ball, flatten it and place it in rows with the body.
3) Wings. We take small pieces of plasticine and smear it on the drawn wings, without going beyond the boundaries of the contour.
4) Decorate the butterfly with beads and sequins
Physical school
| It will fly up | (Children wave their arms and jump up from a half-squat) |
| And then suddenly it drops, | (Waving their arms and then squatting.) |
| What are you looking for here? | (They get up and look around.) Larisa Anischenko Program content: to arouse interest in the natural world, to form a realistic idea of it; teach how to depict a cockchafer and a leaf ; consolidate the techniques of rolling and flattening; develop color perception, aesthetic taste; develop hand coordination and fine motor skills; cultivate a caring attitude towards nature. Materials and equipment: plasticine set; modeling board ; Preliminary work: looking at illustrations of various insects on plants |
My secret
Sculpting lesson notes
in
the senior group
"
Insects
."
Maam.ru > Summary of a modeling lesson
Sculpting lesson notes
"
Insects
. Methodical…
Methodological development for applique, modeling
(
senior group
) on the topic: A comprehensive lesson in
the senior group
on the topic: “These amazing
insects
.” Integration of educational areas: cognitive development, artistic and aesthetic development, speech development...
Lightinfom.ru > Summary of a modeling lesson
senior
group
) on…
with older
children
.
Topic: " Insects
".
Modeling
"Ladybug".
Compiled by a teacher: First qualification category.9. Modeling
"Ladybug".
Listen to the riddle, what is the next insect
we met on our way: Which one has dots all over its back?
Nsportal.ru > Lesson plan for
Summary of a lesson on modeling
insects, senior group
.
with older
children
.
Topic: " Insects
".
Modeling
.
Summary of a modeling
in
the senior group
on the topic: “Summer.”
Thick white cardboard A4, a set of plasticine, a stack, a modeling
, an illustration of
insects
.
Rusmig.ru > Summary of a modeling lesson
Modeling
insects made from plasticine, senior group
.
Complex lesson in the senior
group
.
Topic: “These amazing insects
.”
Goal: expand children's understanding of different types of insects
.
Modeling
insects
from plasticine with children over 7 years old.
Kalinark.ru > Modeling from plasticine
Sculpting lesson notes
in
the senior group
“
Insects
.
Plasticine ladybug - modeling
from plasticine
insects modeling
“Three Bears” (
senior group
)
modeling
“Three Bears” (
senior group
) Goal: Create…
Tdsl.ru > Summary of a modeling lesson
Sculpting lesson notes
on the theme “Butterfly on a leaf...”
Summary of GCD in the senior
group
.
Modeling
“Butterfly on a leaf”.
Goal, tasks. artistic creativity ( modeling
). Preliminary work: conversation, reading poems about
insects
, viewing presentations and slides with butterflies, drawing with pencils, looking at illustrations...
Kopilkaurokov.ru > Summary of a modeling lesson
Teach children to convey in modeling
characteristics
modeling
) in
the senior group
on the topic:
Characteristic sculpting insects
Sad51.nakhodka-edu.ru > Teach children to transmit
OOD on the topic: “ Insects”
"in
the senior
compensating group
in the senior
group, modeling insects
Infourok.ru > OOD on the topic: “Insects” in
Lesson summary
in
the senior group
"Tea Party at Mucha's..."
insects
, toys - analogues, patterns
for sculpting insects , sculpting Insects
.) Educator: Who are you?
Soloveva-ppds10.edumsko.ru > Lesson notes: modeling in
Sculpting lesson notes
"
Insects
. Methodical…
Modeling
in
the older group
.
Modeling insects modeling
Cok24.ru > Summary of modeling lessons
sculpting
(
senior group
) on…
Sculpting lesson notes
in
the senior group
“
Insects
.
Summary of a lesson in kindergarten for children 5-6 years old on the topic: “ Insects
” (
senior group
).
Goals: EDUCATIONAL: Expand and consolidate children’s knowledge about insects
, introduce children into their active vocabulary...
Tofp.ru > Lesson plan for
Summary of GCD for modeling
"
Insects
" (
senior group
)
( senior
group
).
Goal: To develop skills in the unconventional method of modeling
from plasticine.
insects
for ?
Are all insects
beneficial?
Look, guys, while you and I were in the meadow, a butterfly flew into our group
!
Prodlenka.org > Summary of GCD for modeling
OOD on the topic: “ Insects”
"in
the senior
compensating group
in the older
group
of compensatory orientation.
Artistic and aesthetic development ( modeling
) “Meeting with the ant Kuzya.”
GoalsTeacher: Ants are insects
. They come in red and black. Ants are very small and hardworking.
Infourok.ru > OOD on the topic: “Insects” in
Summary of GCD in the senior
group
.
"The magical world of insects
.
Modeling
in
the older group
.
Modeling
from polymer clay. Before sculpting a bee, you need to tell the children that these
insects
are not only beautiful and bright creatures. The beauty
of sculpting
a butterfly is that the child can choose any colors to create it.
Tmzs.ru > Summary of GCD in senior
Sculpting lesson notes
in
the senior group
“
Insects
.
Plasticine ladybug - modeling
from plasticine
insects
with children from 7 years old.
Using similar techniques, you can sculpt others with your children. Note of GCD on story modeling
“Three Bears” (
senior group
)
Story
sculpting “Three Bears” (
senior group
) Goal: Create...
Tdsl.ru > Summary of a modeling lesson
Teach children to convey in modeling
characteristics
Abstract on the educational field "Artistic creativity" ( modeling
) in
the senior group
on the topic:
Insects
.
"Ladybug". Compiled by teacher of the highest qualification category Maksimova L.V. Program objectives: Teach children to convey characteristic features in modeling
...
Sad51.nakhodka-edu.ru > Teach children to transmit
Lesson summary
in
the senior group
"Tea Party at Mucha's..."
Insect pictures
, toys - analogues, patterns
for sculpting insects
, plasticine, various attributes for
modeling
Children: cockroaches, bees, flies, mosquitoes.
Educator: What should we call them, in one word? ( Insects
.) Educator: Who are you?
Soloveva-ppds10.edumsko.ru > Lesson notes: modeling in
Modeling
Insects »
Modeling
in
the older group
.
Modeling
from polymer clay. Before sculpting a bee, you need to tell the children that these
insects
are not only beautiful and bright creatures. The beauty
of sculpting
a butterfly is that the child can choose any colors to create it.
Sto-avtor.ru > Modeling Topic: “Seasons”
Master classes for children on modeling
on the topic "
Insects
..."
Modeling
in
the older group
.
Modeling
from polymer clay. Before sculpting a bee, you need to tell the children that these
insects
are not only beautiful and bright creatures. The beauty
of sculpting
a butterfly is that the child can choose any colors to create it.
Svoimi-rukami-club.ru > Master classes for children on
Modeling
Topic: “Seasons” Subtopic: “
Insects
”
Modeling
in
the older group
.
Modeling
from polymer clay. Before sculpting a bee, you need to tell the children that these
insects
are not only beautiful and bright creatures. The beauty
of sculpting
a butterfly is that the child can choose any colors to create it.
Sto-avtor.ru > Modeling Topic: “Seasons”
Sculpting lesson notes
in
the senior group
“
Insects
.
Modeling
in
the older group
.
Modeling
from polymer clay. Before sculpting a bee, you need to tell the children that these
insects
are not only beautiful and bright creatures. The beauty
of sculpting
a butterfly is that the child can choose any colors to create it.
Netrs.ru > Summary of a modeling lesson
Outline of a lesson on the world around us ( senior
group
) for…
Lesson outline for appliqué and modeling
(
senior group
) on the topic:
modeling
a plot, collective senior group. Preliminary work: looking at illustrations and photos
of insects
, reading fiction about
insects
, solving riddles about…
Vera-autoservice.ru > Lesson outline for
Modeling is a fun pastime. Both adults and children enjoy making crafts from plasticine, dough, clay and many other plastic materials. For kids, modeling is also an excellent opportunity for all-round development. Kneading the modeling material with your fingers helps improve fine motor skills. Memory, imagination and creativity develop. Children learn to concentrate and concentrate. Classes often have a theme and are accompanied by stories about the subject of modeling, so kids increase their vocabulary and the amount of information about the world around them. The theme of modeling for activities with children can be anything. And of course, it’s more interesting to sculpt something that the kids have already seen, for example, insects. A beautiful multi-colored butterfly or a bright green caterpillar will be excellent models for creating crafts with your own hands. You can sculpt from different materials and adapting any master class to the raw materials that are available is not difficult.
While playing on the lawn, the kids have seen a grasshopper more than once and, no doubt, will want to make one.
Grasshopper.
To make a grasshopper you need:
- Working board or table;
- Plasticine in different shades of green and brown;
- Knife for cutting (stack);
- Wire;
- 2 beans for the eyes.
The grasshopper is ready.
Multi-colored caterpillar.
To make a caterpillar you need:
- Plasticine in yellow, white, red, orange, blue, black and purple;
- Knife for cutting (stack);
- Toothpicks.
In this craft you will need to mix plasticine of 2 colors. Yellow + orange = light orange, orange + red = red-orange and red + blue = light purple.
The caterpillar is ready. All that remains is to plant it on a piece of paper.
Bee.
Before sculpting a bee, you need to tell the children that these insects are not only beautiful and bright creatures. They are beneficial. They provide honey and pollinate flowering plants so that fruits can ripen on them. Even the smallest children can create a bee. The tools and materials you will need are the same as in previous cases.
The bee is ready.
Ladybug.
All children know what a ladybug looks like. Even the smallest sculptor can sculpt it.
The ladybug is ready.
Butterfly.
Older kids can be asked to make a butterfly. Before this, you can go for a walk and carefully observe how butterflies flutter from flower to flower. The beauty of sculpting a butterfly is that the child can choose any colors to create it. The brighter the merrier.
To create a butterfly you will need:
- Work surface (board or table);
- Plasticine of different colors;
- Knife for cutting (stack);
Form:
Elena Levenkova
Summary of educational activities for visual activities (modeling) in the preparatory group “Dragonfly”
Theme: Dragonfly
Tasks:
1. Continue teaching children how to sculpt insects - dragonflies;
2. To develop in children the ability to creatively use a variety of modeling techniques to create an expressive image of a dragonfly;
3. Develop the ability to convey the shape of parts, their proportions, expressiveness of poses, movements, details;
4. Cultivate a sustainable interest in visual arts - modeling.
Materials and equipment:
Plasticine, planks, stacks, pieces of coarse fabric, small beads or beads, autumn leaves made of cardboard, wet wipes, audio recording.
Preliminary work:
Looking at dragonflies in the encyclopedia and on a laptop, talking about insects
Integration of educational areas
— health
– maintain and strengthen the physical health of children;
— communication
– continue to improve dialogical speech, the ability to argue one’s position when analyzing crafts;
— music
– introduce children to the world of classical music;
— socialization
— cultivate the ability to kindly evaluate the work of peers and rejoice in their successes;
— work
– consolidate the ability to independently prepare materials for class, maintain your workplace in order.
Progress of the lesson:
Part I – Conversation, examination of the sample
(bell rings)
Attention! There is one minute left before the opening of the Workshop of Good Deeds. Craftsmen can take their places in the workshop. Please check if everything is ready for work: plasticine, board, stack. Dear masters! What good deed will we do today? (to sculpt dragonfly sisters for the Dragonfly from I. A. Krylov’s fable “The Dragonfly and the Ant”).
Children, look, there is such an exhibit in the workshop’s exhibition hall. I want to show it to you. (The sample is being examined) What parts can you identify in a dragonfly? What shape is a dragonfly's head? What does the torso look like? How many wings does a dragonfly have? What are they like? Guys, look what a beautiful pattern on the wings. How can you depict it on your craft? (in a stack) I will tell you one secret of how you can make a beautiful pattern. (the teacher demonstrates the “coarse cloth imprint” technique) What color of plasticine can be used for wings? For the torso and head? Guys, you and I know that dragonflies have very big eyes. How can you depict them? (make balls from plasticine) And on the sample, the eyes are made of beads: large and shiny.
Real masters of their craft create their own crafts, unlike others. I am sure that you will sculpt many different interesting dragonflies. Your dragonflies may take off, land, look around, get scared. You will find the material necessary to decorate your craft on this table. And to make our crafts bright and expressive, I suggest the craftsmen turn into dragonflies for a minute and do a warm-up. Stand near your chairs.
Physical education minute
Dragonfly-dragonfly, / turns the head to the right, left /
Large-winged beauty. / arms forward, up and downwards /
Blue eyes, / clapping /
Lace wings, / hands up, down /
You fly over the water, / tilt to the right, left, arms to the sides /
You scare the mosquitoes.
Part II - Children doing work
During the work, the teacher provides assistance to those who need it, using leading questions: “How will you connect the wings to the body?”, “The head to the body?”, “What will you make the eyes from?”, “Are the head and body the right size?” ?", "Head and eyes?" etc. If necessary, the teacher individually shows some techniques using his material.
Part III – Analysis
Children, now the earth is already cold, plant your dragonflies on leaves so that they do not freeze (on the common children's table) (Children, standing around the table, look at crafts, talk about who likes which craft and why). (The teacher notes the correctness of the transfer of forms, proportions, beautiful color combinations, expressiveness of the pose, the beauty of the pattern on the wings)
I think that our dragonfly will no longer be so lonely, because she now has a big friendly family and many beautiful sisters. But winter will come soon, they may freeze. How can I help them? (You can make a house for them). Think of what you can use to make a dragonfly house and make it at home. Ask your dad, mom, older brother or sister to help you. When the house is ready, bring it to the group and we will place your dragonfly in your house.
How kind you are: you took pity on the dragonfly and responded to its request for help. She won’t be lonely and cold, she still needs to cheer her up. How can we do this? (You can sing or dance a funny dance)
Children dance the dance "The Guilty Cloud"
Compensatory school preparatory group with children with disabilities.
The area is artistic and aesthetic development. Modeling, collective composition “Miracle Tree”
.
Goal: learn to create a composition on a given topic.
Tasks:
- learn to plan your actions (what’s in the beginning, what’s later)
when creating an image from plasticine; - use different methods and techniques of sculpting to create an image
- use or not use the proposed material depending on the chosen image
- enrich and activate the child’s vocabulary
- activate the child’s life experience: repeat the body structure of insects
- develop fine motor skills, imagination, compositional skills.
Material: multi-colored plasticine “Ray”
or
“Gamma”
, stacks, modeling boards, whole walnuts, halved walnuts.
Preliminary work: looking at illustrations and photos of insects, getting acquainted with the life of insects and their structure on GCD, getting acquainted with the surrounding area - the area of cognition, reading fiction about insects, solving riddles about insects, constructing insects from waste material: from bee bushings, from a plastic spoon and paper-dragonflies, from paper-butterflies. Multimedia – cartoon “The Adventure of Maya the Bee”
. Making a miracle tree.
Demonstration material: photos and illustrations of insects, demonstration material by I.A. Lykova “Colored palms”
step by step.
Modeling from plasticine “Insects in the meadow”
.
Reading a poem by V. Leonov.
There are many different insects, some eat grass, some take pollen from a flower, some drink blood,
Someone eats fruit, In general, there are different types of insects. We all know them!
The teacher asks what insects the children know. After the children's answers. The teacher asks: “What parts does an insect consist of?”
. Expected answers from children: body, wings, eye, antennae, 6 legs. If the children find it difficult to answer, the teacher points to this part in the photo or illustration, and the children answer independently.
Reading a poem by V. Leonov.
A grasshopper is chattering in the meadow, A butterfly is soaring in the sky, A furry, loud, striped bumblebee is buzzing on a flower.
Insects fly, jump, crawl, soar, surprise us with their beauty, and also bring benefits.
Phys. just a minute.
"Centipede"
A centipede walked along a dry path (children walk rhythmically)
Suddenly the rain started dripping: drip, drip, drip, oh, forty paws got wet.
(they sit down)
I don’t need a runny nose, I’ll go around the puddles!
(children walk, raising their knees high)
I won’t bring dirt into the house, I’ll shake it with each paw
(children stop and shake their legs one by one)
.
The teacher invites the children to choose the insect they like.
Guys, if you are sculpting a ladybug or some kind of beetle, you will need half a walnut peel; for the body, if you chose a bee or bumblebee, you will need a whole walnut. And if you chose a dragonfly, a butterfly, a fly, do you need nuts or shells? Children's answers: no.
The teacher tells you how to prepare the shell and nut for the chosen image (coat the shell with plasticine in the same color as the insect you have chosen)
.
The teacher asks: how will we make wings? How to make the paws? If the children find it difficult, the teacher begins the phrase and gives the children the opportunity to finish it.
According to the verbal instructions of the teacher and demonstration material I.A. Lykova children begin to work independently. Demonstration material is on a magnetic board with modeling diagrams. Children come up freely and look at the diagrams; if they wish, they can take them to places to sculpt according to how many people there are.
When ready, we place the insects on the miracle tree in accordance with the child’s wishes.
Summary of a lesson in kindergarten for children 5-6 years old on the topic: “Insects” (senior group)
Objectives:
EDUCATIONAL: Expand and consolidate children’s knowledge about insects, introduce the general concept “insects” into the active vocabulary of children. Continue to practice composing sentences of different constructions using the conjunction because. Continue learning to compose a short story based on a series of paintings. Activate and enrich children's vocabulary on the topic. Continue to teach how to solve riddles and justify your answer.
EDUCATIONAL: Cultivate a kind attitude towards our little neighbors on the planet. DEVELOPMENTAL: Develop visual and auditory memory. Develop coherent speech. Develop figurative speech. To develop children’s verbal and logical thinking, the ability to establish cause-and-effect relationships, reason, draw conclusions, eliminate the fourth extra object with justification for their answer. Develop gross motor skills and coordination. Equipment:
subject pictures of insects (butterfly, bee, grasshopper, ant, caterpillar, ladybug, dragonfly). Flower, didactic game “The fourth odd one”, D / and “What first, what then” (story pictures showing the transformation of a caterpillar into a butterfly). A table covered with a green cloth on which there are flowers, a letter, insect toys - a bee, a ladybug, a dragonfly, an ant, a beetle, a fly, and insect caps.
Progress of the lesson:
1. Kinesiological exercise “Cross steps” Educator:
- Today we will go to visit the small inhabitants of the forest clearing - insects.
Let's prepare for the journey: “We went out to the forest clearing, raising our legs higher, Through bushes and hummocks, through branches and stumps. Who walked so deftly without tripping or falling?” 2. Organizational moment. Children approach a table covered with a green tablecloth, on which there are only flowers and a letter. The teacher draws the children’s attention to the fact that there is no one in the clearing. There is a letter there (turn on alarming music) from which the children learn that the evil spider has bewitched the insects and they can be saved if we complete all the spider’s tasks. Educator: - Look, there is no one in the clearing, I don’t see a single insect. There’s just a letter lying there, I wonder who it’s from? He reads the letter: “Dear guys, we are in trouble, the butterfly writes, the evil spider has bewitched us, please help us!” Draw the children's attention to alarming sounds coming from the forest clearing. - Children, can you hurt insects? Why? (children's answers) 3. Introduction to the topic. Educator:
- Guys, something happened to the six-legged babies, are you ready to help?
The teacher reads the text: Once upon a time, an evil spider flew over the insects In a multi-colored clearing He bewitched everyone. So that the butterflies flutter, the ant works. And so that the wasps buzz, you help quickly. Take knowledge with you, and take kindness, and help these six-legged babies! Educator:
- And to help our six-legged kids, you and I will also turn into insects.
I have a magic flower that will help us. The teacher takes a magic flower and says the words together with the children: - Close all your eyes and repeat after me: - Help us, flower, turn us into insects! (put on hats) So you and I have turned into insects, and we will go to a forest clearing. Come on, insects, sit down. And here is the first task from the spider (in an envelope): “You need to solve riddles and find answers.” 4.Riddles. Conversation on the topic. The teacher reads the riddles, the children guess, and the child who has the hat of the named insect gets up, finds his picture and puts it on the board.
She has four wings, her body is thin like an arrow. And big, big eyes, They call her... (dragonfly). Educator: - How did you guess that it was a dragonfly, what words helped you find the answer? He drinks the juice of fragrant flowers and gives us wax and honey. She is sweet to all people. And her name is... (bee). Educator: - What words helped you guess that it was a bee? He is a real worker
Very, very hard working. Under a pine tree in a dense forest, he builds a house from needles. (ant). Educator: - What words helped you guess that it was an ant? She is bright, beautiful, graceful, light-winged. She looks like a flower and loves to drink flower juice. (butterfly). Educator: - What words told you that it was a butterfly? She is sweeter than all the bugs, Her back is scarlet. And on it are circles, little black dots. (Ladybug). - And in this riddle, what words suggested that it was a ladybug?
I know for sure, everyone knows, Among the green grass there is one of the insects - Legs higher than head! (Grasshopper) - The nose is long, The voice is ringing, Much smaller than a cat, And worse - fleas. (Mosquito) - Flies all day long, Everyone gets bored, Night will come, Then it will stop. (Fly)
Educator:
— How can you call in one word those depicted in the pictures? —What is the main characteristic of all insects? (All insects have 6 legs.) - Is a spider an insect? - Name insects that are predatory (dragonfly, grasshopper, ladybug) - Why are they called predators? (Because they hunt other insects.) - Name the beneficial insects. (butterfly, bee, ant.) - What benefits do bees, butterflies, ants bring? (Bees pollinate flowers, give us honey and wax. Ants carry the seeds of many plants throughout the forest. Butterflies pollinate flowers.) - Name the harmful insects. (A fly carries germs, a caterpillar eats plant leaves, a mosquito carries infections.) - Well done, we guessed all the riddles, and we saved the dragonfly and the bee (put the dragonfly and the bee in the clearing), but other insects are also waiting for our help, let's move on . 5. Physical exercise “Centipede” 1. A centipede walked (children walk with a rhythmic step, slightly springing) along a dry path.
2. Suddenly it began to rain: Drip-drip-drip! (the children stop and crouch.) - Oh, forty paws will get wet!
3. I don’t need a runny nose (children walk with their knees high, as if they are walking through puddles). I’ll go around the puddles!
4. I won’t bring dirt into the house (the children stop and shake one leg), I’ll shake it with each paw! (shakes the other leg).
5. And then I’ll stomp (children stomp their feet) - Oh, what thunder from the paws! Educator:
- Let's move on, there are other insects waiting for our help.
- Look, guys, another envelope with tasks. The children stop and sit at the tables. The task must be completed independently (individual work) 6. Game “4 extra”. Making sentences with the conjunction “because”. Educator:
- Look carefully at the pictures and tell me which picture is superfluous here and why do you think so?
An extra spider because it is not an insect. There is an extra ant because it does not fly, while other insects fly. There is an extra butterfly because it flies, but other insects do not fly. An extra butterfly, because other insects are predatory. Educator:
- Having completed this task, you and I also saved an ant (put an ant in a clearing).
Let's continue our journey. Logorhythmic exercise “Insects over the meadow”
.
Children read poetry while performing various movements. Ju-ju-ju - the bee is buzzing, I'm flying from afar. (Children wave their hands rhythmically) Z-z-z - the mosquito squeaks, It is in a hurry to bite. (Extend your index finger and make rhythmic throws of your arms forward). Phew-phew-phew, like a steam locomotive, the Bumblebee puffs, bringing pollen. (They stamp their feet rhythmically) The beetle hums: goo, goo, goo. I’ll wake anyone up (they clap their hands rhythmically). - Let's continue our journey. We walked to the lawn and found an envelope. – What an unusual envelope, it is different from others. (the teacher takes out the diagrams from the envelope) - Let’s look at these diagrams and make up a story. 7. Children's stories in a chain: A butterfly laid eggs on a flower. Then the caterpillars appeared. The caterpillars ate the leaves and grew quickly. Then the caterpillars turned into pupae. Butterflies emerged from the pupae. Their wings are wet. Butterflies dry their wings in the sun. As soon as the wings dry, the butterflies begin to fly. Finger gymnastics:
The flower was sleeping and suddenly woke up and didn’t want to sleep anymore. He moved, perked up, soared up and flew. — We helped disenchant the butterfly (put the butterfly in the clearing)
8. Breathing exercise “Put a butterfly on a flower” (at the table). Educator:
- The back ones are difficult, you need to be careful, take a deep breath of air through your nose and blow a quiet breeze on the butterfly so that it ends up on the flower. The salvation of the next insect depends on this. (put a grasshopper and a beetle into the clearing). Educator: Our journey has come to an end, what a great fellow you all are for helping the insects. The insects thank you all. Look how beautiful the clearing has become. Let ants and beetles crawl on the ground, let grasshoppers jump on the grass, let butterflies and dragonflies fly, and let the world we live in always remain blue and green! It's time for us to go back to kindergarten. But first we need to turn into children again. - And in order to turn into children, we need to guess the insects by sound and show them. (Insect children fly, jump, flutter, and make characteristic sounds). The teacher takes a magic flower and says the words: Close your eyes and repeat after me: “You are a flower, help and turn us into children!” — Did you like being insects? (children's answers) - And if you had such an opportunity to turn into insects again, who would you like to turn into and why? We rested in a clearing in the forest, and it was time to return to kindergarten, but before returning, the fairy wants to know whether it is good or bad to be an insect. - What will happen to the meadow, forest, to our nature if insects disappear? Children come to the conclusion that if insects disappear, plants will disappear, animals and birds will die: some cannot exist without the others. Insects are part of nature, and nature must be protected, loved and protected. - You were all great today! 12. Relaxation. “The Flutter of a Butterfly” - Guys, today we traveled a lot, we were tired. Let `s have some rest. Sit down on the mat, close your eyes and remember how you were insects. Imagine a beautiful spring day. You are sitting on a green meadow. Everything around is calm and quiet. You feel warm and comfortable, you breathe easily and calmly. Imagine that you are light butterflies with large and beautiful wings. Your arms are light and light—like the wings of a butterfly. And your body also became light, light, flapped its wings and flew. With every inhalation and exhalation you float higher and higher in the air. You feel good and pleased. But now it's time to return home. Stretch and on the count of three, open your eyes. Smile at each other.
Plasticine pets
In order to start sculpting animals, you must first decide what kind of animal you want to depict.
Try to clearly imagine the image that will be embodied using plasticine. Children, as a rule, choose pets to sculpt. This is due to the fact that they see them quite often, unlike wild ones. Usually, any animal begins to be sculpted from the head. To create it, you need one large ball for the base and two smaller ones for the ears. Next, the required shape is created from these balls.
Eye placement is also important. They should be positioned so that the animal is looking directly at you. Balls are also prepared for the body, paws and tail, if, of course, there is one. An important point will be the connection of all elements into one whole. You can use matches or toothpicks for this. If you use medium-soft plasticine for modeling, you can subsequently play with these animals, creating various storylines involving pets.