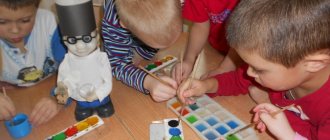
Matches experiment
For the first experiment with water for preschoolers, you will need a glass glass, watercolor paints, a deep plate, and plasticine. An experiment using water will clearly show how air pressure changes during combustion.
- You need to pour water into a glass, add any color of paint to it with a brush and stir, this is necessary for the clarity of the experiment.
- Next, put a piece of plasticine at the bottom of an empty plate, into which insert two matches.
- Pour colored water from a glass into a plate.
- Under adult supervision, you need to light these matches and cover them with an empty, dry glass.
As a result of a simple experiment, the matches go out, and the colored water begins to rise up. This happens because during combustion the air pressure in the glass becomes less than outside.
Experiment with water of different temperatures
For the next experiment you will need four glass beakers and paints. This water experiment for preschoolers shows the properties of water at different temperatures.
- You need to pour cold water into two glasses, warm water into the other two.
- You can add yellow to cold water, and black to warm water.
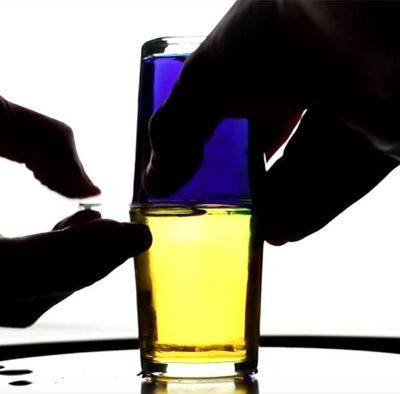
- Place one of the glasses with yellow cold water on a plate. Cover the glass with warm water with a plastic card and turn it upside down and place it in this form on a glass with cool water, that is, the glasses with different water will be mirrored, with a plastic card between them.
- Then you need to very carefully pull out the card, while making sure that the glasses do not move, and hold them in their original position.
Here you can see that cold and hot water have not mixed, this happens because heat tends upward and cold tends downward.
There are still two glasses left, you can try to do this experiment in reverse - put hot water down and cold water up. In this case, the water will mix.
Card file of experiences and experiments with water for the senior group
Svetlana Lazareva
Card file of experiences and experiments with water for the senior group
Experiments with water
Experience No. 1
Subject. “How does water reflect objects?”
Goal: To identify with children the property of water to reflect various objects. Develop fine motor skills and the ability to establish logical connections. Maintain a desire to maintain a neat appearance.
Equipment. Mirror, basin of water , doll in a dress.
Progress: Kuzya comes to visit the children with a dirty face. The adult invites the children to find changes in appearance in the brownie Kuzya: “Guys, what happened to Kuzya? How can I help him? What item helps us take care of our appearance? (Mirror)
. How does water help?
Educator: “Water washes away dirt. Water also has the properties of a mirror. Let's play with water . What kind of water? (Transparent, clean)
.
Let Vanya lean over the basin a little and look at the water. What can you see in a bowl of water ? (Your reflection)
.
What does it look like? (On a dark spot)
.
If Vanya moves to the side, how will the reflection change? (The reflection will move in the water)
.
Why do we see our reflection in water? (The water is clear)
.
Game exercise “Break the mirror”
.Questions: “You threw pebbles into the water.
What happened to the water ? (The reflection has disappeared)
. When can you see your reflection again? When the circles from the object disperse, the water will become calm and you can see again
Game “Show the fairytale animal”
- Using finger movements, children come up with various figures and find them through reflections in the water.
Conclusion. “Water, like a mirror, reflects objects in itself”
.
Experience No. 2
Subject. “How to push the water out?”
Purpose: To form the idea that the water level rises if objects are immersed in water. Develop thought processes, fine motor skills, activate vocabulary (edge, rises, falls, higher, lower)
. Maintain a positive attitude towards your work and the work of your colleagues.
Equipment: Measuring container with water , pebbles, spoons.
Progress: Brownie Kuzya comes to the guys in a sad mood: “I’m sad because I don’t have any toys at all; only pebbles. How to play with them?
Educator: “Let's cheer up Kuzya with a new game. For this game you only need water and pebbles.”
Questions: “How much water did I pour into the jar? Is the jar completely filled with water ? (No, the jar is half full)
.
How to make the water reach the edges of the jar? (children's answers)
.
The teacher suggests immersing pebbles of different sizes into a jar. Questions: “What happens to the water ? (She rises)
.
Why does the water rise? (Because we put pebbles in the water)
.
Game exercise “Catch the pebbles”
— children remove pebbles from a jar using spoons.
Conclusion: “The water in the container rises when objects are immersed in it”
.
Experience No. 3
Subject. “How to color water?”
Purpose: To form children’s ideas about the dependence of the color intensity of water on the amount of food coloring. Develop the ability to distinguish between dark and light shades and establish cause-and-effect relationships. Promote the manifestation of a humane attitude towards the game character.
Equipment: Food coloring of different shades, transparent cups, measuring spoons, a container with water , colored paper squares.
Progress: Brownie Kuzya turns to the children asking for help: “Guys, in the summer I saw a very beautiful rainbow. And I wanted to draw it. The only problem is that I don’t know any flowers. Maybe you can teach me to distinguish and correctly name color shades?
Educator: “Of course, Kuzya, the guys won’t leave you in trouble. And the magician water will help us again. Let's tell Kuza how you can get different shades using water (children's answers)
. Water takes on the color of the paint dissolved in it. Today we will color water and create color shades using food coloring. Food coloring is similar to colored sand and is used to give foods a specific color. For example, they paint eggs for Easter.
Inspection activities: “In one glass of water I will put one spoon of red dye, in another glass of water I will put two spoons of red dye. What happened to the dye in the water? (It dissolves in water)
.
What happened to the water ? What color is the water in both cups? (In red)
.
Are the colors of water in the glasses the same or different? (Different)
. Why? In which glass is the water lighter and in which is it darker? In a glass with more dye, the water is darker. In a glass with less dye, the water is lighter.”
Game tasks: “Choose a square on the tray, turn it over and find out the color. The water should be dyed this color. Remember how many spoons of dye you put in the water.”
Questions: “What color did you color the water? How many spoons of dye did you put in?”
Game task: “Make the shade lighter (darker)
».
Educator: “Let’s tell Kuza what colors we colored the water.”
.
Conclusion: “Water can be colored with food coloring. The more dye, the brighter the color of the water.”
Experience No. 4
Subject. “How do plants drink water?”
.
Goal: To form children’s ideas about the process of water moving through a flower. Develop curiosity and thought processes. Promote caring behavior towards plants.
Equipment: Flowers - white carnations, transparent cups for water, three colors of paint, a container with water , colored pencils, white paper with sketches of cups.
Progress: Part 1 - preparatory. Brownie Kuzya brings a withered flower with dry soil group “Guys, I planted a flower in a pot. I put it in the sun. Every day I admired him and talked to him. But my flower has withered. I can’t understand what he didn’t like?”
Educator: “Why did Kuzya’s flower wilt? How did you guess? Flowers need constant watering. Based on the condition of the soil, you can determine whether to water the plant or not.”
Kuzya: “How does a plant drink water?”
Educator: “To find out how a plant drinks water, you need to prepare multi-colored water. What color is the water? (The water is clear)
.
How to make colored water from clear water? (Dilute paint in water)
.
Three cups will contain colored water and one cup will contain uncolored water . We will put a flower in each glass. What is the name of the flower? (Carnation)
.
What color is it? (White)
."
Sketch of observations: “Paint the cups on paper with the same colors as we colored the water - red, blue, yellow); Do not paint over one glass - the water in it is clear. In each glass, draw a flower with white petals. A little time will pass and we will see flowers drinking water.”
Part 2. In the evening, look at the colors of flowers with the children. “Compare your sketches with the observed phenomenon. What changed? What happened to the flowers? What did the flowers become? Why are flowers different colors? Why did one flower remain white? Explanation: “The flowers changed their color because of the color of the water in which they stood. The stem has conducting tubes through which water rises to the flower and colors it.”
Conclusion: “Flowers drink water; water moves through the flower"
.
Experience No. 5
Subject. “Determining the water temperature”
.
Goal: Identify with children ways to change water temperature. To contribute to the expansion of ideas about the life of natural objects in the water element. Activate children's vocabulary (geyser, steam, temperature, algae , develop curiosity and thinking. Maintain interest in the natural world.
Equipment: Ball, empty cups with hot and cold water , pieces of ice, illustrations of rivers, lakes, seas, geysers.
Move: Brownie Kuzya invites children to play the game “Cold, Warm, Hot”
Educator: “If I throw you a ball and say
“cold ball
,” you must name an object that is always cold.
In response to the phrase “hot ball,”
you need to name objects that are hot.”
Kuzya: “Guys, what can be cold, hot, and warm? (children's answers)
.
Let's play with water today and find out how water changes its temperature."
Game task “Determine the temperature of the water”
Educator: “Water can have different temperatures and can be hot, warm and cold.
How do you know which glass is cold and which is hot? (You need to touch the glass or water with your hands.)
How to get warm water?
Let's mix hot and cold water. What did the water become? (Warm)
.
Now put ice cubes in warm water. What do you think the water will be like? Touch the water with your hands. Why did the water become cold? (Ice was added to the water, it is cold)
.”
Examination of illustrations: “In rivers, lakes, seas, water is of different temperatures - warm and cold. Some animals, fish and plants live only in warm water, others only in cold water. There are places in nature where hot water comes out of the ground. They are called geysers. Steam comes from them. Only algae .”
Conclusion: “Water can be warm, cold and hot. When you pour different water, its temperature changes.”
Experience No. 6
Subject. “What are the characteristics of warm and cold water?”
Goal: Find out in which water (cold or warm)
substances dissolve faster.
Develop the ability to think, generalize the results of experiments , build hypotheses and test them. Promote a positive attitude towards experimental activities .
Equipment: Transparent cups, cold and warm water, granulated sugar, salt, pieces of ice, stirring spoons, shells, pebbles, two containers of water .
Progress: Brownie Kuzya comes to the guys; he has a scarf tied around his throat. “Oh, guys, I’m sick. I drank cold water yesterday, and today I talk a little. What bad water..."
Educator: “Kuzya, the water is not bad, you just need to heat it up, drink warm water. Let's find out today what features warm and cold water have. There are two glasses of water : how do you know which glass has cold water and which one has warm water? (Touch with your finger)
.
I will put a spoonful of sugar in both glasses. What happens to sugar in water? (Dissolve)
. In which glass did the sugar dissolve faster? Which one is slower? Why do you think? Sugar dissolved faster in warm water.”
The same applies to salt.
Educator: “Now let’s add an ice cube to the glasses with warm and cold water.”
water . What happens to the ice? (melts)
. Does ice melt the same way? In which glass?
Does the ice melt faster? Which one is slower? Why? Ice melts faster when it comes into contact with warm water . What was the water like in both glasses? (Cold)
.
Why did the warm water disappear? (Ice was added to the glass, it is cold)
.”
Game exercise: “Arrange the shells and pebbles”
— put shells in cold water and pebbles in warm water.
Conclusion: “Substances dissolve faster in warm water”
.
Experience No. 7
Subject. “How does water give life to a plant?”
Purpose: Show the importance of water in plant life. Develop the ability to express your thoughts using all parts of speech, draw conclusions at the end of the experience . Promote humane treatment of natural objects.
Equipment: Birch branches with buds, two vases (one with water) , pencils, sheets of white paper with drawn vases.
Progress: 1st stage. Brownie Kuzya tells the children his dream. “Guys, I had a dream that water disappeared on our planet: there was no water in the rivers, seas, or in the tap . And then I began to think whether it was good or bad to live without water. How do you think? Who needs water? How does water help a person? Is it possible to replace water with something? (Children's answers)
».
Educator: “Animals need water - for many it is home; a place where you can find food, hide, water quenches thirst. A person needs water for drinking, maintaining cleanliness of the body, clothes, and premises. Plants need water to grow and develop.”
Looking at birch branches. “Look, these are birch branches. What's on the branches? (Kidneys)
.
What are kidneys needed for? (Leaves appear in them)
.
When will the leaves appear from the buds? (In spring, when warmth appears)
.
Let's put one twig in a vase with water and the other in a vase without water.
In a few days we’ll look at our branches and find out what will happen to them.” Sketching observations: “Draw a branch with buds in each vase. Paint one vase blue - it contains water ; Don’t paint over the other one - it’s without water.”
Stage 2 (in one week)
.Questions: “What changes have occurred to the branches?
Are the branches in the vases the same or different? Why different? How do the branches differ from each other? Why did leaves bloom in one vase? Why didn’t leaves appear from the buds in another vase? (In a vase with water, leaves appeared from the buds; the water helped the leaves open).”
Sketching observations.
Conclusion: “Water is essential for plant life; it accelerates the development of plants"
.
Experience No. 8
Subject. “Why does the water disappear?”
Purpose: Show children how water evaporates under the influence of heat. Develop the ability to compare and analyze. Maintain interest in experimental activities .
Equipment: Two identical glasses, a saucer, a felt-tip pen, water.
Progress: 1st stage. Brownie Kuzya tells the children a poem about water.
Educator: “Guys, we got acquainted with the different properties of water. Today let's find out how water can disappear. Fill two glasses with water to the same level and mark with a felt-tip pen where the water ends. Cover one glass with a saucer. Let's put both glasses next to the radiator. Tomorrow we’ll see how much water there will be in the glasses.”
Stage 2. The next day, look at glasses of water . Questions: “What changes have you noticed? Are the glasses the same amount of water? Which glass contains less water? Which one has more?
Explanation: “There is less water in the open glass, and the same amount of water remains in the closed glass. In an open glass, the water evaporates and turns into particles of steam. The water decreases due to the heat of the battery.”
Conclusion: “Water can evaporate into steam.”
.
Experience No. 9
Subject. “How do you get colored pieces of ice?”
Purpose: To identify the property of water to freeze in the cold. Develop the ability to establish simple connections between objects and distinguish primary colors. Arouse interest in making colored ice floes and inanimate objects.
Equipment. Water, small molds, paints, threads.
Progress: Brownie Kuzya brings a piece of ice to the group : “I took this piece of ice from a frozen puddle. Look how handsome he is!”
Teacher questions: “What color is the piece of ice? (Transparent)
.
What does it feel like? (Cold, smooth, slippery, hard)
.
What happens to a piece of ice when we touch it with our hands (Melts)
.
Why is she melting? (From the warmth of our hands)
.
Why did ice form on the puddle? (The water froze in cold weather)
.”
Explanation: “The frost made such a piece of ice. And you and I can make colored pieces of ice. To do this, you need to choose any mold. Paint the water the color you like. Pour this water into the mold and insert the thread"
Question: “What needs to be done to make water freeze? (Take the molds outside)
.
What weather should it be outside? (Frosty)
.
Where else can you freeze water (In the refrigerator)
.
At the end of the walk, the children examine the resulting pieces of ice: “Why does a thread hold on to a piece of ice? (She's frozen)
.
Why are the pieces of ice colored? (From colored water)
.
When can the ice melt? (In warm weather)
.
Conclusion: “Water freezes in the cold and turns into ice”
.
Experiments with sand , earth and clay
Experience No. 1
Subject. “What properties does clay have?”
Target. Give children an idea of clay; help determine its qualities and properties (soft, plastic, wrinkles, breaks and gets wet)
.
Develop tactile sensations and fine motor skills; activate children's vocabulary (clay, hardens, wrinkles, soft)
. Cultivate a caring attitude towards objects of the man-made world.
Equipment. Clay, modeling boards, molded clay figures, balls of wet and dry clay, jars of water , pieces of clay,
1 part. Move. Brownie Kuzya brings the children a box of toys. “Guys, yesterday I spent the whole day making toys for you, doing modeling. What do you think I made all these objects from?” (Children's answers)
.
Educator: “It turns out that you can sculpt not only from plasticine. There is a material called clay. Do you want to know what kind of clay and how to sculpt with it?”
Children, together with the teacher, examine the clay and examine it with their fingers. Questions: “What do you think the clay looks like? (On the sand)
.
What color is it? (Brown)
.
Is the clay hard or soft? (Soft)
."
Comparison of balls made of wet and dry clay: “Let's compare two balls of clay: Kuzya made one a few days ago, and I made the other now. Are the balls the same or different? What is the difference? Which ball can you squeeze? What happens to the balls if you throw them on the floor? (One will change shape, the other will crumble into pieces)
Explanation: “Clay can be wet or dry. You can sculpt from wet clay; it is soft, plastic, viscous; dry clay is hard and can crumble.”
Game task: “Find a ball of dry and wet clay”
.
Game actions with pieces of clay: “Can you pinch off small pieces? (Yes)
.
Will it be possible to roll balls and sausages? Why? (Clay is soft, plastic)
.
The teacher suggests putting the molded products on the shelf.
Conclusion. “Wet clay is soft, viscous, plastic”
.
Part 2. Move. The teacher and the children examine the dried molded clay products and conduct examinations with them. “Touch your crafts. How did they feel to the touch? (Solid)
.
Why do you think (the clay dries out)
.
Has the color of the crafts changed? What has he become? (Light)
Tap your craft a little on the table. What's happening?
(The clay crumbles)
.
Why? (Clay is dry)
Conclusion. “Dry clay is hard, crumbles, lighter than dark”
.
Experience No. 2
Subject. “Why do we need land?”
Target. To form children’s ideas about the properties of the earth (soft, consists of
small lumps, easily passes water, can be dry and wet). Develop speech, the ability to make assumptions and, with the help of the teacher, draw conclusions. Promote a friendly attitude towards natural objects.
Equipment. A container with soil, sticks, a watering can with water , a sieve, a pot of sand and a plant sprout withered in it.
Move. Brownie Kuzya comes to the group and examines the houseplants. “Guys, how many indoor plants do you have in your group ? And they are all so beautiful and green. But I planted the plant in a pot, watered it every day, but it immediately withered and dried up. And I do not know why".
Educator: “Kuzya, show us your plant. Guys, look, why do you think the plant withered? Where did Kuzya plant the plant? (in the sand)
. Where should plants grow? Remember, do plants grow in our sandbox and why?”
Kuzya: “What kind of land? How does she look? Guys, will you tell me?”
Game action “Knead the lump”
Educator: “I poured earth on the table.
The earth consists of different lumps. Let's try to stretch out the lumps. Can you do it? Why? How do lumps feel to the touch? (Soft)
»
Game exercise “Pouring and sifting”
Educator: “Pour the soil into cups.
Is the soil overflowing? The soil is pouring because it is dry. Let's pass the soil through a sieve. Is the soil being sifted? (Not all)
.
What remains at the bottom of the sieve? (Lumps)
. Let’s crush these lumps with our fingers.”
Game exercise “Magic wand”
Educator: “Move the chopsticks along the dry ground.
Does the soil stay on the stick? (No)
. Dry soil does not stick.
Now I will water the earth with water . Where did the water hide? What has the dry land become like? (Dry soil absorbed water and became wet)
.
Now move the stick along the wet soil. What did the wand become? (Dirty)
.
Why? Wet soil sticks. What color is wet soil? (Black)
.
Let's sift the wet soil through a sieve. Is the soil sifting? (No)
. The earth is wet, does not sift and does not crumble.”
Conclusion: “Now Kuzya will only plant plants in the ground. Land is necessary for plant life; Plants get their food from the soil."
Experience No. 3
Subject. “How does dry sand move?”
Target. Continue to introduce children to the properties of dry sand (dry sand can fall at different speeds - quickly and slowly)
.
Reinforce the concepts of “fast-slow”
,
“full-empty”
;
develop gross and fine motor skills of the hand. Maintain friendly relationships in the process of experimental activities .
Equipment. Dry sand, shovels, hourglasses, large and small funnels, plastic bottles with red and yellow circles.
Move. Brownie Kuzya brings an hourglass the group “This watch is unusual, without hands or numbers. And the sand in this watch flows and shows a certain time.”
Educator: “Guys, let’s make our own hourglass. We will pour sand into funnels with different holes and watch how it pours out.”
Questions: “What kind of sand should be poured into funnels? Dry or raw? Why dry? (it's crumbly)
.
Children's play activities with sand.
Questions: “Does sand flow equally in bottles? (No)
.
How does sand flow in a bottle with a red circle? (Fast)
.
How does sand flow in a bottle with a yellow circle? (Slowly)
.
Why do you think sand flows differently in bottles? (Because funnels have different holes)
.
Which funnel makes sand fall faster? (Which has a large hole)
.
Which bottle will fill with sand faster? (With a red circle)
.
Which one is slower? (With a yellow circle)
.
What can you do with the bottle to make it empty again? (Pour sand out of it)
.
Conclusion. “Dry sand flows quickly and slowly”
.
Experience No. 4
Subject. “How to paint sand?”
Target. Introduce children to the method of making colored sand (with the addition of gouache)
. Develop coordination of movements, the ability to denote an action in words, make beautiful Easter cakes; fix the primary colors. Promote a friendly attitude towards the game character.
Equipment. Containers with clear and colored water , sticks for stirring sand, measuring spoons, jars with sand, small molds.
Progress. Teacher: “Guys, for some reason Kuzya is late to visit us today. He probably has important things to do. Let's come up with something interesting for him. What does Kuzya always like to play with? (With sand, water )
. Let’s make him a gift from sand.”
Questions: “Guys, what happens if I pour water into dry sand? Where will the water hide? What will the sand become? (Dry sand will absorb water and become wet)
.
What happens if I add colored water to the sand?” (The teacher pours red water ).
Questions: “Has the sand changed color? (Yes)
.
What has he become? (Red)
.
Why did he turn red? (Because they added red paint)
.
Where did the red water go? (The sand absorbed the red water)
.
Game exercise “Making colored Easter cakes”
Educator: “Take a jar of sand, add any colored water to the sand, stir the sand with a stick and make a cake. Add water with a measuring spoon.”
Then Brownie Kuzya comes and asks the children about the resulting crafts: “Guys, what did you do? What did these Easter cakes come from? Why are they colorful? How to make colored sand? Kuzya thanks the children for the beautiful gifts.
Conclusion. "Sand is colored by colored water "
.
Literature:
1. I. E. Kulikovskaya “Children’s experimentation ”
2. G. M. Bondarenko “Ecological activities with children”
3. O. V. Dybina “The unknown is nearby”
4. N. Ryzhova “Our home is nature”
5. A. I. Ivanova “Children’s experimentation as a teaching method ”
6. L. N. Prokhorova, N. V. Kuznetsova, etc. “Environmental education of preschool children”
: Practical guide. -M.: Arkti, 2003
Rainbow water
To make experiments with water more entertaining for preschoolers, it is better to paint the water in different colors using ordinary watercolor paints. For the next experiment you need paints, granulated sugar, a glass glass, water, a syringe, and four small glass cups.
- There is no need to pour sugar into the first glass, half a teaspoon of sugar should be thrown into the second, a full teaspoon of sugar into the third, and one and a half teaspoons into the fourth.
- Now you need to add water to each glass and stir the sugar.
- For the first, take red and mix it, for the second - green, add black to the third, and add yellow to the fourth.
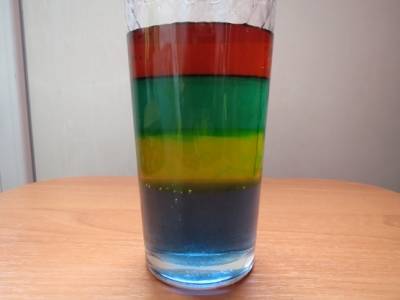
- Then you need to take a syringe and draw water from the first glass of red water without sugar. Pour the contents of the syringe into an empty prepared glass.
- Next, using a syringe, draw green water from the second glass, in which half a teaspoon of sugar is dissolved; the syringe must be lowered to the bottom of the glass with the red water collected and slowly release the water with green paint.
- Now the same procedure should be carried out with the third glass, where the water is black and contains one spoonful of sugar. You need to release it from the syringe in the same way as the previous step.
- And there was a fourth glass left. Everything is the same - water is drawn from it using a syringe and released to the bottom of the glass.
At the end of the experiment, you can notice how the glass turned out to be “rainbow water”; all the colored layers of water did not mix, but were located one after the other, having clear boundaries. The more sugar added, the greater the density of the water, which explains the lack of mixing. The more colors you use, the more colorful and visual the experience will be.
experimentation lesson “Properties of Water” for the older group (5-6 years old)
Principles of preschool education (FSES DO):
building educational activities based on the individual characteristics of each child, in which the child himself becomes active in choosing the content of his education, becomes the subject of education;
assistance and cooperation of children and adults, recognition of the child as a full participant (subject) of educational relations;
supporting children's initiative in various activities;
formation of cognitive interests and cognitive actions of the child in various types of activities;
age adequacy of preschool education.
Principles of education:
formation of a personal style of relationships with peers and teachers, creation of a positive emotional background and an atmosphere of emotional uplift, education through interaction.
Principles of training:
The principle stimulates the experimental activity of a preschooler; the principle of freedom and independence; principle of activity, principle of consistency.
Education methods:
conversation, encouragement.
Teaching methods:
conversation, demonstration, showing, experimenting, explaining.
Speech development methods:
Verbal (conversation), practical (exercise)
Educational means:
visual (illustration), display
Learning Tool:
instructions (experiment sequence diagram)
Equipment:
package, letter, presentation, disposable cups and spoons, jars for drawing, drinking water, tap water, essential oil, dye, brushes, cocktail straws, educational game, pictures (river, lake), several transparent vessels of different shapes.
List of used literature:
— Federal state educational standard for preschool education Order of the Ministry of Education and Science of Russia dated October 17, 2013 No. 1155 “On approval of the federal state educational standard for preschool education”
From birth to school: an exemplary general education program for preschool education/N. E. Veraksa, T.S. Komarova, M.A. Vasiliev "MOSAIKA-SYNTHEZ PUBLISHING HOUSE", Moscow 2022. -340 pp., Federal State Educational Standards of Education
Resolution of the Chief State Sanitary Doctor of the Russian Federation dated May 15, 2013 N 26 “On approval of SanPiN 2.4.1.3049-13 “Sanitary and epidemiological requirements for the design, content and organization of the operating mode of preschool educational organizations.”
Progress of educational activities:
| Sequence of activities | Methods | Contents of the activity Teacher | Children's activities | Planned result |
| 1. Motivational stage. Task: Gather children's attention and motivate them for upcoming activities | Emotional stimulation Conversation Demonstration Illustrations Game situation Promotion | The teacher attracts the attention of children, emotionally includes them in action, and involves them in listening. — Guys, this morning I found a package at the door of our group. But I didn’t open it without you. I wonder what is in this package? Do you want to know? Sample children's answer: Yes -Stand in a semicircle so that everyone can see, and I will open the package. -Guys, look what’s here, it’s the same letter, how could we not notice it right away? Do you want to know what it says and who it’s from? Sample children's answer: Yes "Dear Guys! We are fixists and we invite you to our laboratory to study water. We'll be glad to see you. Everything you need for the experience is in this package.” -How interesting, so guys, let’s go to the laboratory and see the fixers? Sample children's answer: Yes The teacher listens to the children's answers. | Enter into dialogue with the teacher, share impressions, show interest in research activities | Children are motivated and interested curiosity, willingly communicate with the teacher, take an internal position towards the upcoming activities. |
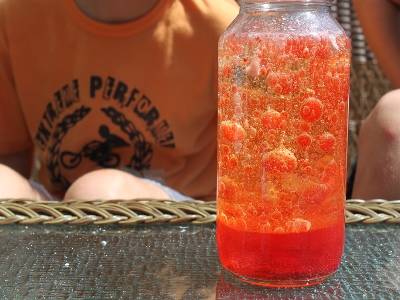
colorful lamp
Such spectacular experiences with preschool children are especially popular.
- Mix half a glass of sunflower oil with the same amount of water, add dye.
- Take an aspirin tablet and drop it into the bottom of the container with the resulting mixture.
The aspirin begins to fizz and mix the oil and water, and the paint droplets begin to dissolve. A very beautiful sight. For illumination, you can direct the beam of a flashlight.
Bringing to a boil
Take a glass of water and place it in the microwave until the water almost boils.
Attention! You should only remove it using an oven mitt; the glass will be hot.
Immediately place a pencil into a glass of boiling water, and you will see how amazingly the water boils until air bubbles form upon contact with a foreign object. In addition to a pencil, you can place anything in the water: it can be a toy dinosaur or an ordinary spoon.
The fact is that in a microwave oven, steam bubbles cannot form in a transparent glass of water; there is simply no room for them. Why? The temperature of a glass container, in this case a glass, which is transparent to microwave microwaves, is much lower than the temperature of the water in it. Therefore, if there are no bubbles in the water, then it can neither cool nor heat up.
But if you place an object there, it heats up to the temperature of the water, while allowing it to cool, due to the thermal conductivity of the water, so it begins to boil. Steam is released.
Such experiments for preschoolers should be carried out with special caution.
Ice Formation
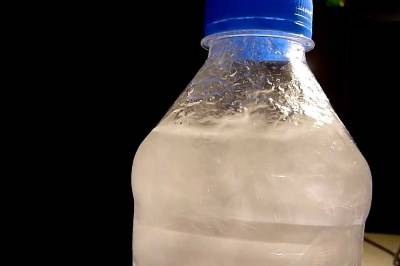
In this experiment you will need a 0.5 liter plastic bottle with a cap containing distilled still water.
- The bottle should be placed in the freezer at -25 degrees for 2 hours.
- After this, take out the bottle and hit the bottom on the table - the water will begin to freeze right before your eyes.
The whole process can be explained by the fact that there are no crystallization centers in distilled water, and moreover, it is at rest in the freezer. But as soon as you shake it sharply, air bubbles appear in the water, which provoke the crystallization process, and the water begins to harden and turn into ice.
We suggest you conduct these simple but interesting experiments for preschoolers at home or in kindergarten. We are sure that they will interest not only children, but also adults.
MAGAZINE Preschooler.RF
Pavlova Luiza Nikolaevna teacher MBDOU Yanshihovo-Norvashi kindergarten Chuvash Republic, Yantikovsky district, Yanshikhovo-Norvashi villageTopic: “Water Sorceress” (experiments with water for older children) Purpose: - Develop interest in natural and weather conditions. To introduce and show the form in which water exists in nature, with the various phenomena of rain, dew, snow, frost, steam, ice and the state of water in the environment; To introduce the different properties of water. Excursion to nature in the summer. "Where is the water?" (in a pond, on a stream and spring, in a well). -Where do we get water from at home and in kindergarten? (children's answers) Conversation about water. Experiment No. 1. Taste of water.
Goal: Is there potable water everywhere? (No) -What does water taste like? Spring water sample. A sample of water taken from the tap in the group. Well water sample. Comparison of the taste of water. CONCLUSION: spring water is the healthiest, the purest, it comes from the depths of the earth. Where else does water exist?
Experiment No. 2. "Warm water"
Objective: Find out by comparing water from different places. Which place has the warmest water? Conclusion: Spring water and well water are the coldest. The warmest water is from the river, because it warms up in the sun. Experiment No. 3. “Dew” Purpose: Where did the dew come from? While exercising on the site, our feet got wet and we learned that dew falls in the morning. We noticed dew on the grass flower beds. It appears to fall out when wet and is able to moisturize nature. Experiment No. 3 Water in vegetables and fruits"
A teacher and children squeeze the juice of tomatoes and tangerines. All children see juice flowing out of them. Conclusion: there is water (in vegetables, fruits). -Why do people need water? (children's answers). Water has a wonderful property; it can dissolve various substances. Once you eat a pie, the water dissolves the pie into small particles and the blood distributes the nutrients throughout the body, to every cell. Water is a real magician. She knows how to transform and change. Experiment No. 4 “Colorless water” Take a glass of water and add salt to it, see what happened? (salt has dissolved). Did the salt change the color of the water? ( No). We taste the water - it is salty. Conclusion: When salt is added, water can remain the same clear, but the taste will change. Experiment No. 4 “Where did the water disappear? “We pour river water into a bottle, close the lid, put it in the sun and leave it for a month, hiding it from strangers. After a month we come back and find out how it decreased. After all, we left a full bottle, but here it is incomplete. Conclusion: Water evaporates in the sun.
Experiment No. 5. "Cold water"
Purpose: Why is the water cold? In late autumn we return to the river. For some reason the water in it became cold. Conclusion: We find out that the state of water in nature changes due to cooling weather conditions.
Experiment No. 6. “Icy water” Goal: “Where did the piece of ice come from?” We return to the river in the cold autumn, when the ground around us is frozen and we see that the river is covered with a thin piece of ice on top. We take a piece of ice from the river and determine what it is? It turns out that the water froze in the river and turned into ice. A piece of ice is like glass and can break very quickly. Conclusion: Water can change its previous shape.
Experiment No. 7. "Ice rink"
Goal: With the onset of winter, we come to the hill with a sled. The former river and the ground are covered with snow. We check, will the ice support us if we step on it? The children and I clean the snow on the ice and check that the ice has become strong. There is nothing to be afraid of, he will withstand us. It is smooth, slippery, you can even slide on ice. Game "Sliding on Ice"
Conclusion: The ice is compacted, it is smooth, cold, hard and slippery.
Experiment No. 8. “Patterns on the window” Purpose: How are patterns on windows created? We spent a long time wondering with preschoolers how patterns appear on windows? They began to observe and found out: steam rises from the kitchen, collides with warm air coming out of the window and, as a result, the steam sticks to the window and from this patterns are created on the windows. Conclusion: The meeting of warm air with cold air can create patterns on windows. Experiment No. 9. “Trees in frost” Purpose: “Where does frost come from?” On a walk with preschoolers, we noticed how the trees were covered with frost. After all, before there was no thin layer of snow cover attached to the tree branches. To clarify this phenomenon, we turned to biology teacher V.V. Lukina for help. She explained to us that the warming of the weather and sudden cold snaps cause frost. Conclusion: Warming weather and sudden cold snaps cause frost.
| Next > |
