Analysis of software drawing tasks according to age group
In the first junior group, drawing tasks are:
- arouse interest in the drawing process as a type of activity that produces results;
- familiarize children with drawing materials and how to use them;
- teach to understand an adult’s drawing as an image of an object;
- teach how to draw straight, rounded lines and closed shapes.
Drawing tasks in the second junior group:
- teach to depict a variety of simple objects, convey their main features - shape, color;
- develop a sense of color - learn to distinguish and name primary colors;
- develop compositional skills - placing the image in the middle of the album sheet;
- improve technical skills.
Drawing tasks in the middle group:
- teach how to depict round and rectangular objects, convey their structure, main parts and details;
- teach to use color as an artistic means of expression;
- develop compositional skills in arranging an object in the center of the sheet;
- improve the technical skills of painting a picture with pencils and paints.
Are you an expert in this subject area?
We offer to become the author of the Directory Working conditions Drawing tasks in the senior group:
- teach how to correctly convey the shape of an object, its characteristics, relative size and position of parts;
- teach how to convey simple movements in a drawing;
- develop and improve the sense of color;
- develop technical skills in working with pencil and paints;
- teach how to draw with crayons, charcoal, sanguine, and watercolors.
Objectives of object drawing in the preparatory group:
- teach to depict the structure, size, proportions, characteristic features of objects from nature and from imagination;
- teach the transfer of a wealth of forms and colors, the creation of expressive images;
- develop compositional skills;
- develop a sense of color;
- develop technical skills - the ability to mix paints to get different colors and shades;
- apply pencil strokes or brush strokes to the shape of an object.
Step-by-step drawing of trees with pencils
When conducting a lesson or drawing class, children need to depict a park, forest and its vegetation.
But it's not as simple as it might seem. Therefore, drawing a tree with a pencil step by step is the very beginning task. If the child wishes, it can be further decorated with paints. If everything is explained correctly, describing each step in detail, then the baby will learn very soon. There is no need to despair if the first image turns out to be clumsy and sloppy.
Everything will work out very soon. Don't forget to constantly praise your child for his successes and gently point out possible mistakes. The best lesson option is a joint lesson with one of the parents.
From this article you will learn
Stages of working on drawing trees
Drawing a tree consists of several stages:
- the first stage is the tree trunk - its basis, so drawing a tree begins with the trunk. The trunk is thinner at the top and thicker at the bottom. If the drawing is done with a brush, then the top of the trunk should be painted with its tip, and the bottom with pressure from the entire brush;
- the second stage is the image of the main, large branches. They are drawn like the trunk - thinner at the top, and thicker closer to the trunk, and they are directed upward with the thin end; it should also be noted that on the trunk the branches are at different distances;
- the third stage is drawing small branches, that is, the crown of the tree. A lot of them. Small branches are depicted to be of equal thickness - they are thin, stretching upward towards the sun. It is better to start working with color in large volumes - from the sky, the ground, and only then paint over the tree trunk and crown. At the final stage, details are drawn.
Finished works on a similar topic
Course work Teaching preschoolers to depict trees of different species in subject drawing 440 ₽ Abstract Teaching preschoolers to depict trees of different species in subject drawing 220 ₽ Test work Teaching preschoolers to depict trees of different species in subject drawing 190 ₽
Receive completed work or specialist advice on your educational project Find out the cost
How to draw a tree: creative tasks for children
— What two groups are tree species divided into? (deciduous and coniferous)
- Name the species of deciduous trees (Rowan, aspen, poplar, linden, elm, autumn, maple, birch and others).
-What tree did you depict? Think about whether it is possible to depict coniferous trees using this technique?
— Try to draw a pine tree using this technique? How can I do that? (For more information about drawing a pine tree, see the article “Drawing Summer”).
- Consider the shape of the tree. Are the crown and trunk dimensions the same at the top and bottom? What is the difference? How can you get this result when drawing a tree?
— Why is autumn called golden?
— Read to children or learn poems about autumn:
If the leaves on the trees have turned yellow, If the birds have flown to a distant land, If the sky is gloomy, if the rain is pouring, This time of year is called autumn. (M. Khodyakova “Autumn”)
Following summer, Autumn comes. The wind sings yellow songs to her, lays red leaves under her feet, flies like a white snowflake into the blue. (V. Stepanov “Autumn is Coming”)
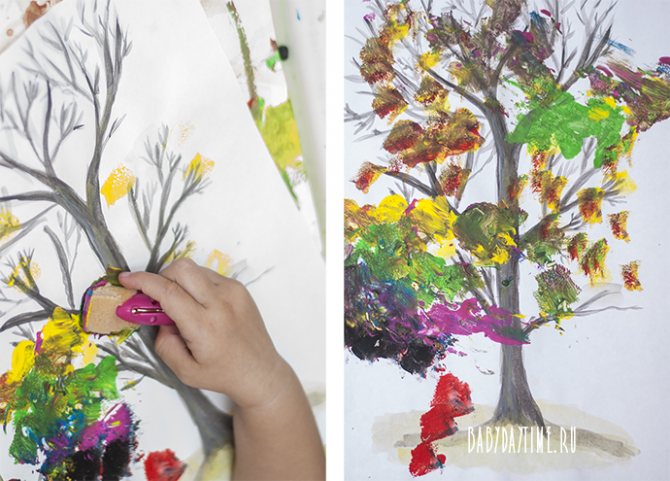
An autumn tree can be drawn not only using the “poke” method, but also using other techniques. How to do this is in the step-by-step master classes below.
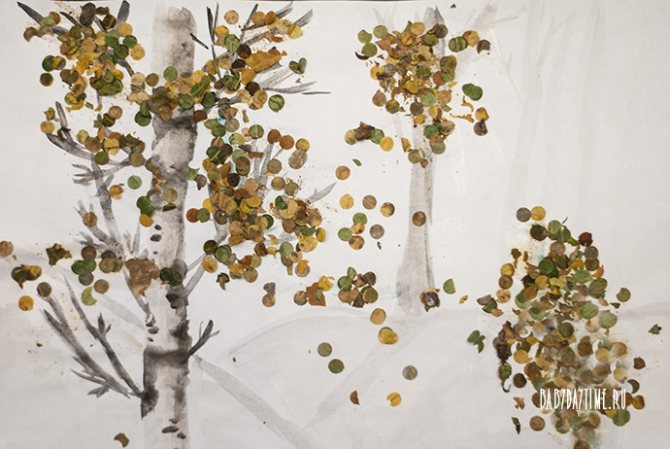
Drawing an autumn tree. Dry leaves and hole punch
Materials:
- sheet A4;
- tassels:
- hole puncher;
- dry tree leaves;
- PVA glue;
- paint: black, brown
I painted birch trees in watercolors. While the birch trees were drying out, my daughter and I used a hole punch to stamp circles from dry tree leaves. Then came the work of the little artist. She herself applied PVA glue to the desired areas of the trees, and then generously sprinkled them with our prepared mini-foliage. The result, in my opinion, came out very nice.
Photo of a painted tree
A tree can be drawn in completely different ways. It can be a bright colorful drawing, or, on the contrary, a black and white picture. It all depends on your mood, on the emotions you want to convey.
By depicting just one tree, you can convey the entire situation around it.

Drawing an autumn tree. Plasticine stamps

Materials:
- sheet A4;
- plasticine;
- bottle cap;
- paints: yellow, green, red, brown, black.
Maybe you remember my article about modeling, where I described many of our plasticine games?! There I already mentioned a simple way to make a plasticine stamp. You just need to mold the desired shape (in this case, a leaf) and press it into an unnecessary bottle cap. Now we dip the stamp in paint and decorate a pre-prepared tree branch with leaves.
Preview:
Municipal budgetary preschool educational institution "Kindergarten of a combined type No. 67"
Engelssky municipal district of the Saratov region
“Step by step drawing of trees with children”
Before you start drawing trees step by step with your children, carefully examine these natural objects and find common features. What is characteristic of any (or almost any) tree? Of course, this is a powerful and straight barrel. The trunk is thick at the bottom, but the closer to the top, the thinner it becomes. Branches extend from the trunk in all directions. Usually the main branches are directed upwards. At the base the branches are long, closer to the top they are short. From large skeletal branches smaller branches extend in different directions, from them even smaller ones, etc. It is these small branches that form the crown of trees. The “skeleton” of the tree is ready. You can depict winter trees in this way - without foliage, just twigs.
Step-by-step drawing of trees with children - a generalized scheme for drawing a tree. We will dress the “skeleton” of the tree with leaves. You can draw them in dots, creating a mass of foliage from individual dots (tree A). When coloring foliage, it is better to choose several shades of green and even yellow for a summer tree. And for autumn - yellow, red, orange and green colors. But it is even easier for children to depict a certain plane of an irregular shape close to an oval (tree B). This method is interesting to use when drawing with young children, or depicting trees in a landscape. In this case, first draw only the trunk and thick skeletal branches, and add small branches after you have painted the green area.
Options for drawing foliage - step-by-step drawing of trees with children This is a tree “in general”. But of course, different types of trees will vary greatly. And, first of all, in our drawing there will be a difference in the trunks. A thick and powerful oak-hero, a slender weeping birch with drooping branches, a rowan or a pine - compare the trunks of these trees with children.
Trunks of various trees. The educational game “Trees, Leaves and Fruits” will help you introduce children to different types of trees.
A very simple tree - step-by-step drawing with children from 4 years old.
This is really a very simple way to draw a tree. Of course, it is unlikely to be able to determine its species. It is only clear that this tree is deciduous. Here we depict with the children only a trunk and a few large branches. Foliage is oval. You can color such a drawing not only with pencils and paints, but even with felt-tip pens.
A simple deciduous tree - a step-by-step drawing scheme for children from 4 years old. Although this tree drawing is very simple and generalized, it provides quite rich soil for creativity. See what trees you can draw based on our picture.
Tree crown design options.
Oak – step-by-step drawing of trees with children from 6 years old.
This oak tree is similar to the simple tree we drew above. But still, much more detail has been added here. This is a hollow, and the texture of the bark, and branches of complex shape. It's okay if your child leaves something out and simplifies the drawing. If his oak tree turns out to be powerful and stocky, then the artistic goal will be achieved!
Oak - a step-by-step diagram for drawing a tree with children from 6 years old.
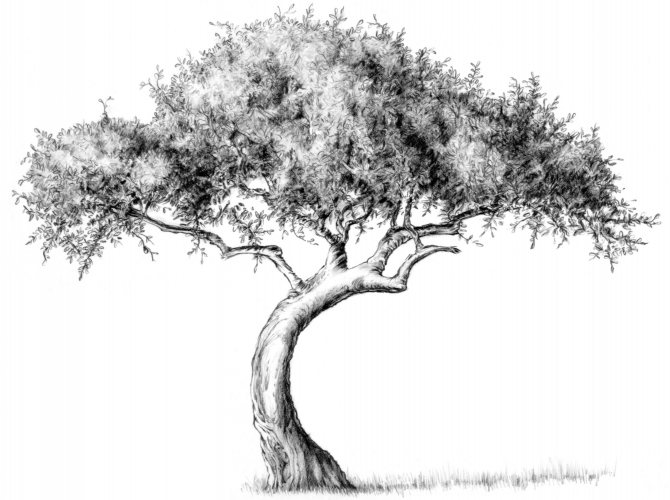
Birch – step-by-step drawing of trees with children from 8 years old.
Drawing such a tree for children is quite a difficult task. This image is already close to a realistic image, replete with details and complex lines. Therefore, such work is not suitable for preschoolers. And younger schoolchildren will most likely simplify this drawing. Draw the children's attention to the position of the birch branches - they are leaning down.
Birch - a step-by-step diagram for drawing a tree with children from 8 years old.
Pine – step-by-step drawing of trees with children from 6 years old.
We move from deciduous trees to coniferous trees. Remind the children that pine is an evergreen tree. Therefore, it doesn’t matter whether you draw it in a winter or summer setting - the crown will always be the same. Pine is drawn according to the same principle as deciduous trees, but the green spots-needles need to be clearly “tied” to the branches. And the “bare” part of the trunk of this tree is much larger than that of deciduous trees.
Pine - a step-by-step diagram for drawing a tree with children from 6 years old.
Christmas tree - step-by-step drawing of trees with children from 4 years old.
There are many ways to draw the second well-known coniferous tree, the Christmas tree. Here we present only one - a realistic coniferous tree for fairly adult children.
Christmas tree - a step-by-step diagram for drawing a tree with children from 6 years old.
Palma – step-by-step drawing of trees with children from 7 years old.
Before this, we gave diagrams for drawing trees that grow everywhere in our country. Now let's look at the exotic palm tree. A fairly simple and decorative tree for drawing with children is a palm tree. The name “palm” comes from the Latin word “palma”, which means “palm”. Such associations were obviously born from palm leaves spread out like fingers. We present two options for drawing this tree. The first one is more “cartoonish”, the second one is more realistic. In terms of difficulty, both drawings are approximately the same. They can be recommended for working with children aged 7-8 years.
Palm tree No. 1 – diagram of step-by-step drawing of a tree with children from 7 years old.
Palm tree No. 2 – diagram of step-by-step drawing of a tree with children from 7 years old.
Source
Simple tree: drawing lesson for children from 4 years old
This is actually a very easy but fun way to draw a tree. Of course, it is impossible to determine its type. Yes, this is not required here. The main thing is that we know for sure that the tree is deciduous.
1. Together with your child, draw a trunk and several voluminous, large branches. The foliage must be made in the shape of an oval.
2. Color your drawing with colored pencils, markers or paints. Everything depends only on your imagination.
At first glance, it seems that such a drawing is very simple and ordinary, however, it provides rich soil for creativity and allows you to embody the most original ideas. Take a close look at the picture below and see for yourself what variety of trees you can draw using this technique.
Drawing an autumn tree. Sponge
Materials:
- sheet A4;
- sponge;
- paints: yellow, green, red, brown, black.
Here I again drew a tree trunk. I used a clothespin (for convenience) to hook a round piece of sponge and we began stamping the foliage. True, in this drawing we used all the paints that we had in our arsenal. The artist's desire is the law! Why shouldn't the foliage be black and purple?!