Collective creativity in the visual activities of preschool children
Preschool childhood is the most important stage in a child’s development. During this period, all the general abilities needed by an adult in any type of activity develop.
In order to introduce children to the spiritual values of society, it is necessary, first of all, to form the moral and aesthetic qualities of the individual. Therefore, many domestic and foreign teachers consider the processes of moral and patriotic education of children in close connection.
Moral and aesthetic education can be achieved using different means, one of the important ones is the visual activities of children, including drawing, modeling and appliqué. As a rule, in kindergarten classes, children perform the image individually, each with their own work. But the children get special satisfaction from creating common pictures, compositions where the images of all the children in the group are combined; such pictures are called collective. Children are especially pleased by the overall result, which in this case is always richer in content and makes a more vivid impression on them than work done individually; they understand that together they can get a more significant image than each individual. In the process of collective activity, favorable conditions are created for children to communicate with each other and the teacher about what they are creating and how best to do it. Upon completion of the image, the children all rejoice at the results of their joint activity; joyful feelings unite them. Collective work evokes admiration among the children, truly, as in the poem by V. Mayakovsky: “What one cannot do, we will do together.”
The inclusion of children in collective creative work activates, which is expressed in independent reasoning, develops the desire to control their own actions, joint activities contribute to the formation of positive relationships in children with peers, and teaches them to provide help to those who need it.
A feature of visual activity that distinguishes it from other types of artistic creativity of children is that its result (drawing, sculpture, appliqué) does not disappear the moment the child stops the actions of creating an image, as happens in musical, theatrical and other types of artistic creativity of children . The image created by children remains, it can be examined, evaluated, compared, and improved. In collective activities, not only the overall result is assessed, but also the contribution of each participant in the overall work. All this requires careful consideration of the organization of the collective form of image creation, the selection of content that is interesting for all children.
The use of collective forms of work in artistic creativity will be most effective if collective activity is made emotional, easily feasible, promotes the development of imagination, and awareness of one’s contribution to the overall result. Entertaining game situations, artistic and pedagogical dramatization techniques promote interest in collective activities.
An important circumstance determining the need to introduce a collective form of organizing art activities is that preschool children really like this kind of work. Here everyone feels involved in the resulting common product, which makes the children very happy, and as a result, the picture created together is the most impressive, affecting the children emotionally much more strongly.
The collective form does not reduce the importance of each child’s activity, does not ignore his own efforts, and the overall result depends on the quality of each student’s work: after all, the better the child performs his part of the image, the more beautiful and interesting the overall composition will be. And the most important thing is that children understand that everyone together can create a more significant image than each individual. In the process of collective work, favorable conditions are created for children to communicate with each other and the teacher about what they are creating and how best to do it, and upon completion of the image, everyone rejoices at the results of their joint activity, joyful feelings unite them.
To solve the problem of developing collective creativity, the teacher needs to be based on the following principles:
– creative realization of each student as a condition for the development of collective co-creation;
– taking into account the individual characteristics of children when determining their role place in collective interaction;
– managerial direction in staging the process of collective activity;
– the child’s comfort in a group of peers.
When organizing collective activities, there is a 3rd stage: the preparatory stage, which allows children to deepen their own knowledge on the topic of future work, to form in them vivid images that generate a desire to embody them in their own visual activities. For this purpose, you can use excursions, conversations, viewing reproductions, etc.
The main stage is the work execution stage, which includes planning, executing and evaluating team work. Its goal is to provide children with the opportunity to embody images of the surrounding world in compositions, to create, during collective visual creativity, conditions for the creative interaction of children, promoting not only the aesthetic and artistic development of children, but also the formation of their skills to work in a team.
The final period is the period of interaction between children and already completed work.
The guidance of the teacher at different stages of the implementation of the plan for collective creative activity has its own distinctive features. At the first stage, when collective actions are planned, the teacher strives to create motivation - the emergence in each child of a desire to get involved in a collective activity.
The next step is to distribute the roles of the upcoming activity among the children.
There is another option for organizing children’s cooperation; it lies in the fact that the common goal of the activity is carried out by several subgroups and the result depends on the quality of the work of each of the subgroups. Such activities give children a feeling of satisfaction; each child has a feeling of usefulness and personal contribution to the common cause.
The final stage of collective creativity is associated with the achievement, awareness and assessment of the significance of the result obtained. At the same time, the teacher draws the children’s attention to everyone’s personal contribution to the common cause, emphasizing that without common efforts, the implementation of the collective plan would be impossible.
Children's collective artistic activity should be closely related to play. This connection is determined by the commonality of play and visual activity: both activities reflect the impressions children receive from the world around them. The use of gaming methods and techniques in collective classes increases the effectiveness of collective activities.
For the successful introduction of collective visual activity into the pedagogical process of kindergarten as one of the important forms of creative activity, a practical classification of the types of its organization is needed. This will allow teachers to understand the essence of children's collective activity and the form of its organization in each specific case. Soviet psychologists dealing with the problems of joint activity (V.G. Aseev, F.D. Gorbov, A.I. Dontsov, etc.) identified three main forms of its organization:
- Joint-individual (a child participating in an activity performs part of the work individually, and at the final stage it becomes part of the overall composition).
So, before conducting a combined lesson on the topic “Zoo”, at the first stage the children and I got acquainted with different animals from books, drawings, photographs, some visited the zoo. When planning, during the conversation we found out who liked which animal best, who would like to draw whom. In advance of the lesson, we prepared sheets of colored paper with vertical slits, which we glued onto white sheets of different sizes, since everyone’s animals will be different. When the children drew the animals, they cut them out and carefully glued them under strips of colored paper - and as a result, a zoo was born. The work ended with the game “Excursion to the Zoo”, during which the children told interesting facts about their animal, how they live, what they eat, etc.
- Collective visual activity based on a jointly sequential form of organization (the result of an action performed by one becomes the subject of the activity of another).
During a lesson on the topic “Fairy Tales,” the guys and I decided to come up with our own fairy tale. At the beginning of the lesson, all children were given sheets of paper - pages of the future book. During the collective discussion, the main character was identified, the plot was outlined, then the first child named his sentence, for example: “In a magical land there lived a lonely prince,” the second: “He was very rich,” the third: “Once he met a poor old woman on the road.” . Then the fourth, fifth, and so on, all the children in the group take turns continuing the story.
We wrote down the proposals expressed by the children on sheets of paper, and the pupils drew their own pictures on them in accordance with the invented proposal. The pages were assigned the corresponding numbers -1, 2, 3, etc. Then a group of children was assigned to make a cover, after drawing, all the pages were stapled and the result was a book, written and illustrated collectively.
- Collaborative-interacting (it is possible for all participants to work simultaneously, coordinating actions at each stage).
At a lesson in visual arts (modeling) on the topic “Road Signs,” the children were divided into pairs, for each of which blanks were made from sticks and paper circles. The couple’s task is to fashion their own specific road sign, which they previously met. In this case, children in pairs decide who will sculpt which parts. At the end of the work, the guys themselves placed all the signs on the “City” model.
Thus, the choice of different forms of conducting collective classes gives the teacher the opportunity for creativity in the field of specific pedagogical tools - choosing topics, developing content, methods, techniques.
Collective creativity helps children gain experience in creative cooperation, promotes the formation of patience, the ability to take into account the opinion of a friend, and a respectful attitude towards the work of others. In the process of collective work, the child’s emotional background is enriched, which is based on the expectation of an unknown effect from the completion of the work being created, and the sphere of emotions in preschool age plays a significant role in the development of creative activity.
The need for collective activity is always associated with pronounced positive emotions, therefore, for its development it is necessary to create, strengthen, and develop a feeling of pleasure and joy from creative activity. Creative abilities in collective activities help to formulate their own point of view, instill in children confidence in their own strengths and interest in other opinions, are complex, active in nature, ensuring the subjective position of each participant and develop important organizational, communicative, constructive, analytical skills, also forming children responsibility, initiative, independence. Introducing children to the creativity of their comrades makes them kinder, more sympathetic, and more attentive to each other and to the entire world around them.
From the above we can conclude that preschool age provides excellent opportunities for the development of visual creativity. And the creative potential of an adult will largely depend on the extent to which these opportunities were used.
Educators and parents face a task of extreme importance: to ensure that each of those who now goes to kindergarten is raised not only as a conscious member of our society, not only as a healthy and strong person, but also - necessarily! - an initiative, thinking person, capable of a creative approach to any business he undertakes. An active life position can have a basis if a person thinks creatively, if he sees around him an opportunity for improvement. Collective work in the field of visual activities can give children the opportunity to gain practical experience of moral relations.
Literature:
- Vygotsky L.S. Imagination and creativity in childhood / L.S. Vygotsky. - M.: Pedagogy, 1991. - 276 p.
- Grigorieva G.G. Development of a preschooler in visual arts. - M., 2004. - 193 p.
- Doronova T.N. Development of children in visual arts // Child in kindergarten. - No. 4. - 2008. - 21-29; No. 5. - 2008. - 3-13.
- Komarova T.S., Antonova A.V., Zatsepina M.B. "Beauty. Joy. Creativity": Aesthetic education program for children aged 2-7 years. - M.: Pedagogical Society of Russia, 2009.-128 p.
- Komarova T.S., Savenkov A.I. Collective creativity of children. Tutorial. M.: “Russian Pedagogical Agency”, 1998. -106 p.
- From birth to school. Basic educational program of preschool education / Ed. N. E. Veraksy, T. S. Komarova, M. A. Vasilyeva. — 3rd ed., revised. and additional -M.: MOSAIC - SYNTHESIS, 2016. - 368 p.
- Sakulina N., Komarova T. Visual activities in kindergarten. - M., 2007. - 202 p.
How to play up the beginning of a lesson in an interesting way
At the age of four or five years, children do not yet separate play from direct educational activities, therefore, in order to interest them in a creative activity as much as possible, the teacher must think through an exciting start to the lesson. For example, a group may receive a letter from a good wizard. He has a wonderful garden with unusual trees, on which fabulously beautiful flowers bloom and delicious fruits grow. But due to the tricks of the evil witch, the flowers did not bloom this year. The kids should help - decorate the trees with their strange flowers.
Another option is that a girl Masha comes from a fairyland to visit the children (a doll is on display). She tells an interesting story. One day she went for a walk in a wonderful forest to admire its beauty: all the trees there were bright and elegant. And so she walked and met one sad tree: it was worried that it did not have beautiful flowers and fruits. Masha felt very sorry for the tree, but she didn’t know how to help it—she couldn’t do it alone.
When telling preschoolers such stories, it is necessary to provide them with illustrations for them - pictures depicting magical nature. These can be gardens and clearings where apple trees with huge fruits grow, trees with soft lilac foliage, bizarrely shaped plants, among which fairy-tale characters (fairies, unicorns, anthropomorphic insects, etc.) walk.
Photo gallery: pictures depicting magical scenes of nature

A tree with huge roots and wonderful fruits
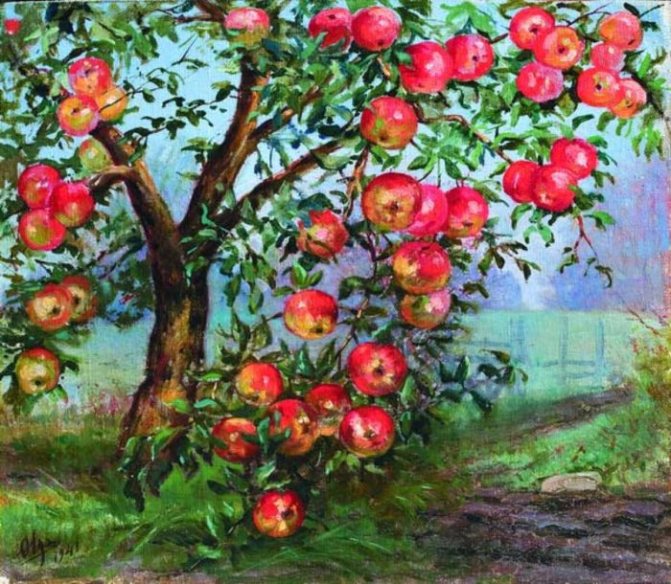
Apple tree with huge delicious apples
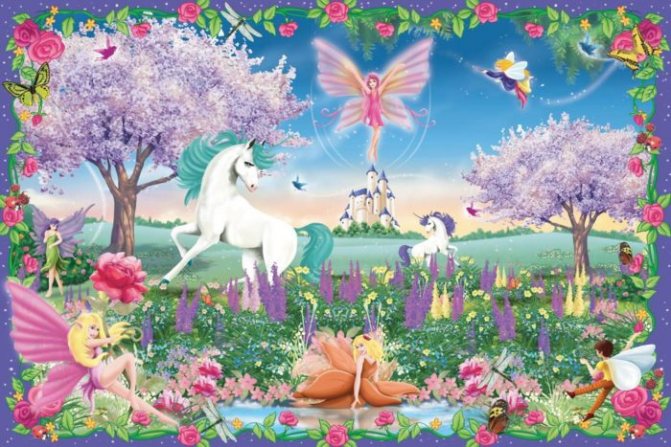
Fairies and unicorns are located between the delicate trees
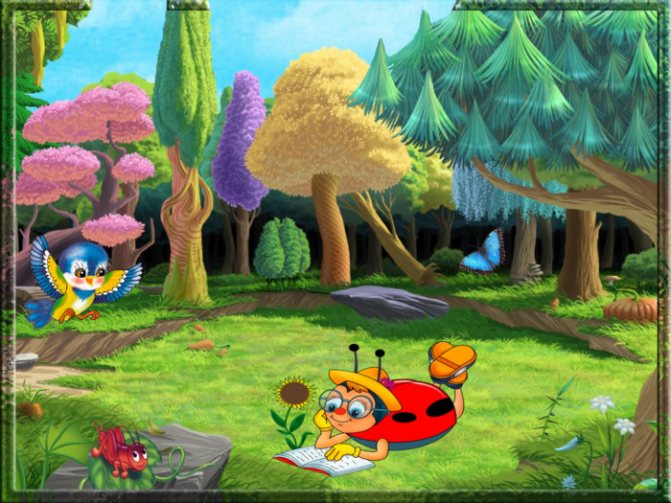
Multi-colored trees, among which cute bugs and birds rest
Kids always love to transform into representatives of some profession, fairy-tale heroes. Therefore, they will enthusiastically accept the teacher’s offer to become wizards for a while and create the image of a magical garden, which they can populate at will with unusual trees, flowers, birds, beetles, and butterflies.
On the eve of the lesson, it is good to invite the children to complete puzzles on the theme “Garden”.
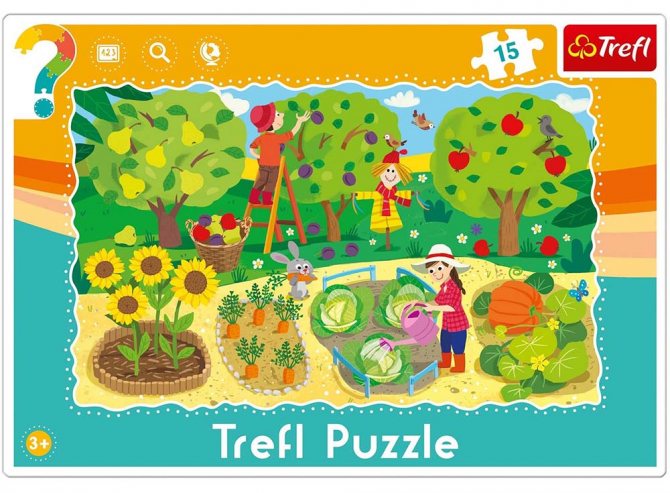
Before a creative activity, it is good to offer preschoolers puzzles on the relevant topic.
You can start a visual arts activity with a short fairy tale or an episode from a suitable work (after all, too long a story will tire the children). For example, in the fairy tale story “The Magic Garden” by Elena Zheryakova, the girl Lilya has a dream in which she goes to a wonderful castle and meets her cat there. It turns out that the animal can talk and invites its owner to take a walk in the garden. Lilya sees beautiful flowers: some her mother grew at the dacha, and others she has never seen before. There was a wonderful smell in the garden, and a bright rainbow shone in the sky. The girl's mood became simply wonderful. The cat told her about the names of flowers and various interesting facts from the life of plants (it was not for nothing that in the summer they took her with them to the dacha). She also told Lila that this garden is magical: if you look at the flowers and inhale their wonderful aroma, then all the bad things will be forgotten.
The following fairy tale with the same name, which was invented by schoolgirl Margarita Efimova, is also suitable for the lesson. One family had a large garden where various fruit trees grew: apple and pear trees, plums and apricots. And one day beautiful birds flew there. The son grabbed a stick and began to drive them away. The father scolded the boy. And the next day the garden became sad, and all the fruits became bitter. It turns out that the birds were magical and sang magical songs to the trees, but now they are offended and no longer come. Mom told her son that he should go into the forest, find the birds and apologize to them. The boy did so, and then the garden came to life again and the fruits became tasty.
The story of Elena Pishchulina-Volkova “A Tale of Love” also deserves attention. Magic Garden" (intended for children and adults). Here we are talking about a wonderful, kind garden that talked with the sun.
“Sunlight took Joy and Warmth by the hands (although a little warmth always remained to warm the conversation) and walked quietly and calmly through the Garden. The warmth caught up with them a little later, having already warmed the communication between the Garden and the Sun, it hurried after Joy and Sunlight. Oh, my God! How wonderful it was in this Garden - everyone loved each other in it: trees, flowers, cheerful bees and light-winged butterflies, carefree dragonflies, bugs, and spiders - after all, the Sunlight was nearby, and the Warmth entered the Soul of the Garden and warmed her, and the Joy that the guests brought filled the hearts of all its inhabitants.”
After reading such works, you can invite the children to create images of anthropomorphic trees inhabiting an unusual garden: glue on them, among other details, eyes and a smile (the teacher provides the details).
To convey imagery and expressiveness, it is good to include artistic words (riddles, poems, sayings) in the lesson.
Birds, bees, flowers, trees, They all live in our wonderful garden, We invented this garden ourselves In our little kindergarten. We all worked together and now, this garden on paper is blooming. Very bright, beautiful, wonderful, Made by our skillful hand.
Novruzova A.L.
https://mbdou6-krop.ru/?p=3043
Kids love outdoor games and dynamic physical education. They must be used in class, choosing the appropriate topic.
Physical school
| Trees have grown in the field. It's good to grow in freedom! | Stretching - arms to the sides |
| Everyone is trying, reaching for the sky, reaching for the sun. | Hands stretching up |
| A cheerful wind blew, the branches began to sway, | Children waving their hands |
| Even the thick trunks bent to the ground. | Forward bends |
| Right and left, back and forth - This is how the wind bends the trees. | Tilts left and right, forward and backward |
| He turns them, he turns them. When will there be a rest? | Torso rotation |
| The wind died down. The moon has risen. There was silence. | Children sit at tables |
| They raised their hands and shook them - These are trees in the forest. | smooth swaying of arms raised up |
| Arms bent, hands shaken - The wind knocks down the dew. | shaking hands in front of you |
| Let's wave our hands to the sides, smoothly - These are the birds flying towards us. | horizontal, simultaneous movements of the arms to the right - left |
| We’ll also show you how they sit down – the wings are folded back | Children sit down and fold their hands behind their backs |
Finger gymnastics “The hazel tree bent its branches...”
| The hazel tree bent its branches and gave nuts to all the animals. | stroke their hands |
| Here's a nut for the little squirrel, Here's a nut for the mouse, Here's a nut for the hamster, Here's a nut for the chipmunk, And here's a nut for me. | alternately massage fingers |
| He cooked it friends | rub your palms together |
Physical school
| The stems were straightened and the branches were stretched out. | Raise your hands up |
| They straightened out the leaves and rustled the leaves. | Wiggle your fingers |
| Gymnastics for the stem | Torso tilts left and right, forward and backward |
| Gymnastics for the roots | Stretched the right leg - rotation of the feet, extended the left leg - rotation of the feet |
| Washing leaves and stems in the rain | Raise your hands up, spread your fingers, expose your palms to the rain, spin around |
Outdoor game "Living Flowerbed". Children are divided into three teams: Golden Balls, Daisies, Marigolds and Marigolds. In the center of the flowerbed there are golden balls - they are the tallest. The guys raise their hands up and spin around themselves. The second circle is the marigolds; they form a dance around the golden balls. And the third circle is baby marigolds: they squat down because these flowers are the shortest.
The wind blew, the flowers came to life and moved: golden balls were spinning, marigolds were moving in a circle in one direction, and marigolds were moving in the other.
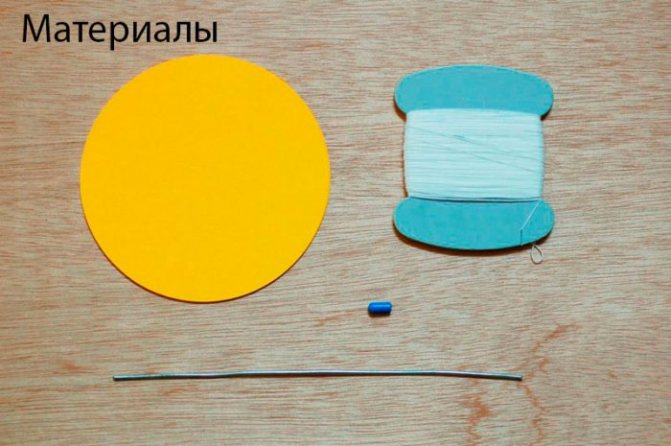
Volume umbrella
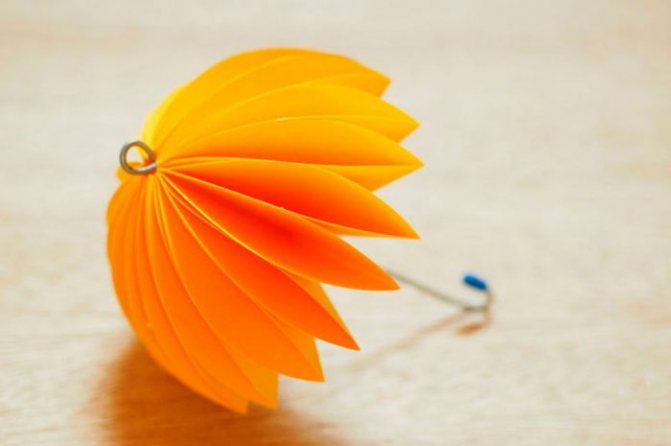
You will need: double-sided colored paper, a compass, a simple pencil, scissors, a glue stick or adhesive tape, thick wire, thread.
Master Class
- Cut out 16 circles of the same diameter from colored paper.
- Fold each circle in half twice.
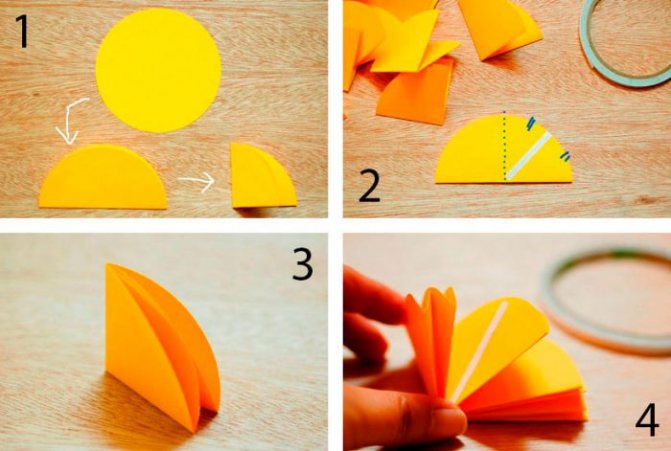
- Secure each piece in the upper round part with glue so that it is opened only at the bottom and does not open at the top.
- Take 2 blanks and glue them at right angles to each other.

- Glue the remaining pieces together in a circle, forming the upper part of the umbrella.
- Form an umbrella handle with a wire loop, then attach it.

- Prepare a piece of string and hang the umbrella by the loop.
A voluminous umbrella made of colored paper is ready! I recommend watching this video!
Class notes
| Author's full name | Title of the abstract |
| Selishcheva T. | “Magic Garden” (collective application) Educational objectives : learn to create a collective picture, independently choosing the content of your image (tree, flower), consolidate the ability to cut with scissors in a straight line, round the corners of a square and rectangle. Developmental tasks : develop figurative representation, imagination, compositional skills, color perception, continue to practice the ability to carefully glue parts to the base. Educational objectives : to cultivate interest in the natural world and art. Integration of educational areas : “Artistic creativity”, “Cognition”, “Communication”, “Socialization”, “Health”. Handouts: brown rectangles (for the trunk), green and yellow squares of different sizes (crown and fruits), glue, glue brushes, scissors, oilcloth. Progress of the lesson: The teacher invites the children to close their eyes and mentally find themselves in a magical garden, where fabulous apple trees with golden apples grow, and wonderful birds fly next to them. The teacher recalls with the children the structure of the tree (trunk, crown, leaves, fruits), the color of each part. Techniques for cutting a triangle from a rectangle to obtain a crown are demonstrated (fold the rectangle in half and cut off the corners from the middle to the edges). The part is decorated with cloves. Apples are cut from a square by rounding the corners. Finger gymnastics “The hazel tree bent its branches...” is carried out. Before children work independently, the teacher reminds them how to hold scissors correctly in their hands. Productive activity of preschoolers. Examination of the finished composition: analyzes what the trees have in common, and how certain details were cut out. The teacher invites the children to come up with a story for their application. |
| Shornikova E. | "Magic Garden" (collective application) The teacher invites the preschoolers to remember what they saw during a walk in the kindergarten. The children are invited to look at a branch of a plant with blossoming flowers. The teacher asks a riddle about the garden:
Conversation with children on the topic: how they imagine a magical garden. A picture with a suitable image is shown and questions about it. The teacher explains techniques for cutting out and arranging flowers (they need to be glued to the crowns of trees). Independent work of preschoolers. Kids who quickly complete the task are additionally invited to cut out butterflies, bugs and flowers for the grass). |
Autumn leaves
You will need: double-sided colored paper, scissors, glue stick, ruler.
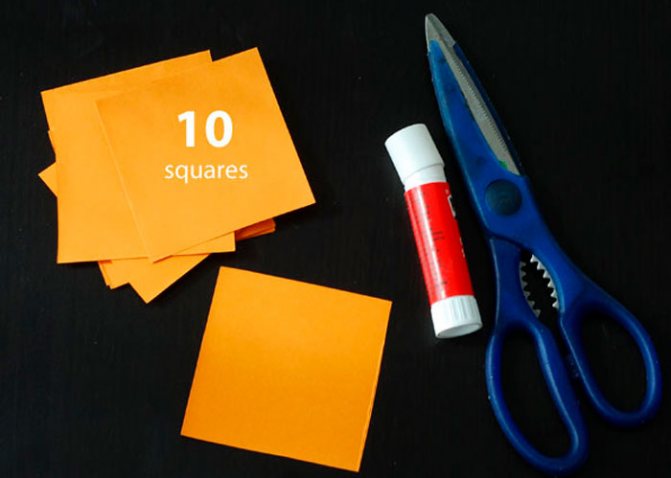
Master Class
- Prepare 10 squares of colored paper measuring 8x8cm.
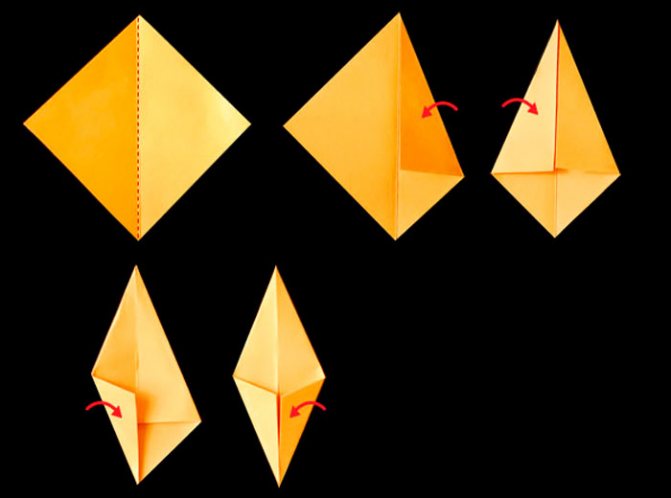
- Take one square and fold it as shown in the photo instructions. It should look like a rhombus.
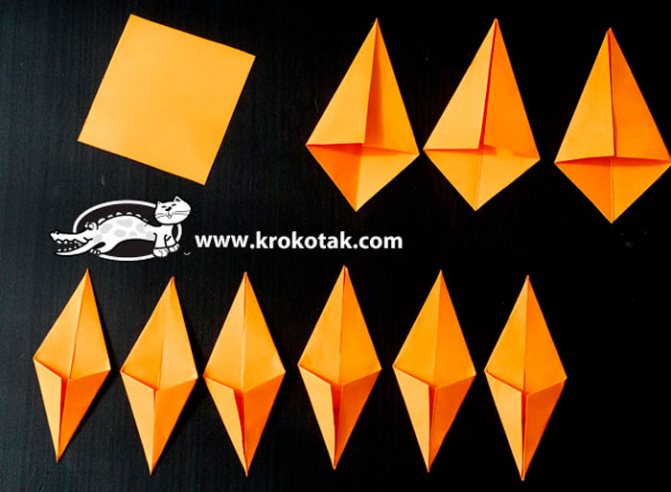
- In this way, fold a total of 6 blanks.
- Take 3 squares and fold them to form triangles.
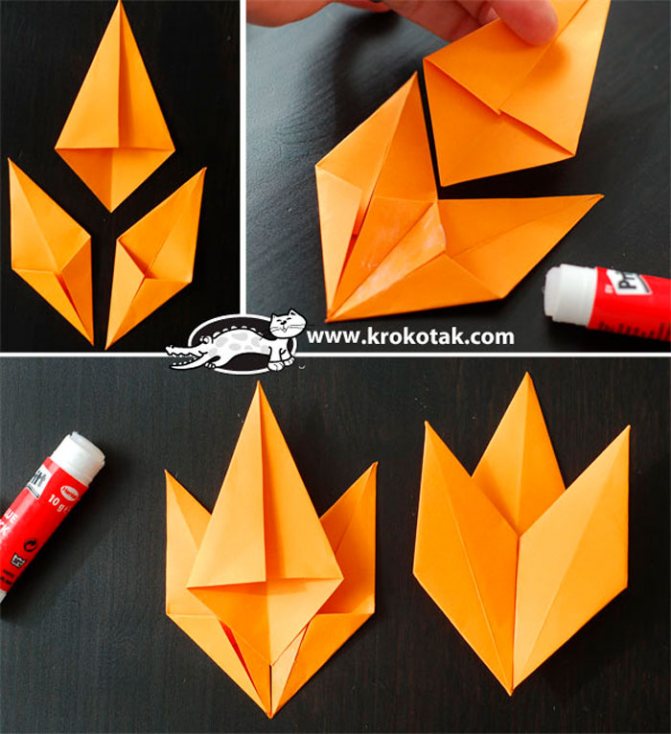
- Glue 2 rhombuses together and one triangle in the center.
- Do this process with all the parts.
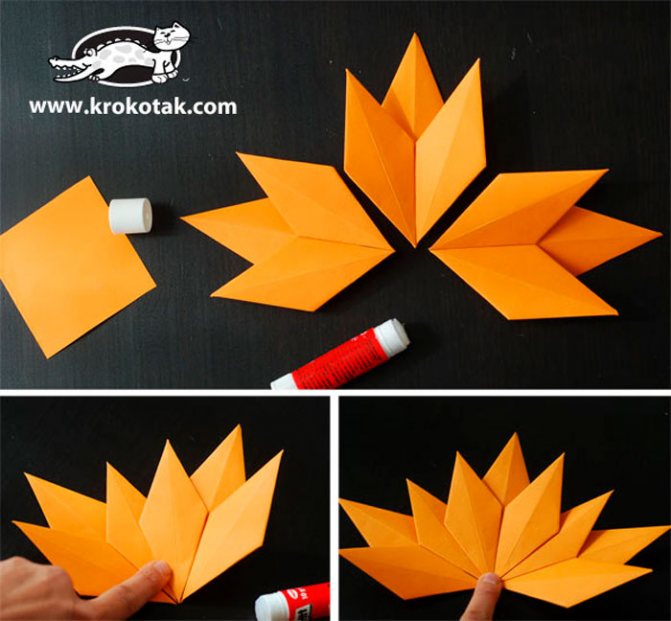
- Glue the blanks together to form a leaf.
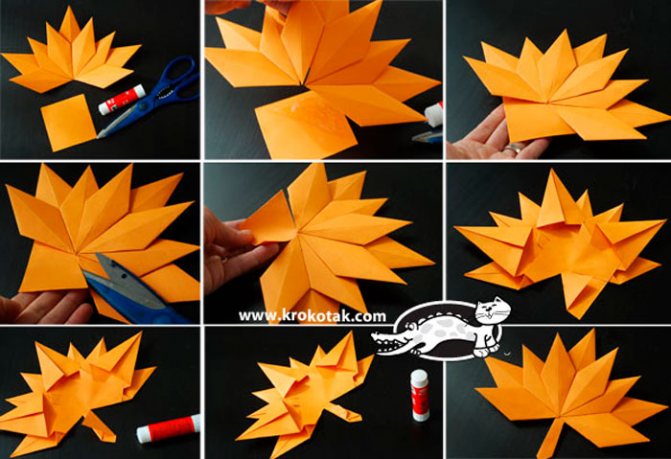
- Make a total of 8 leaves of different colors in the same way.
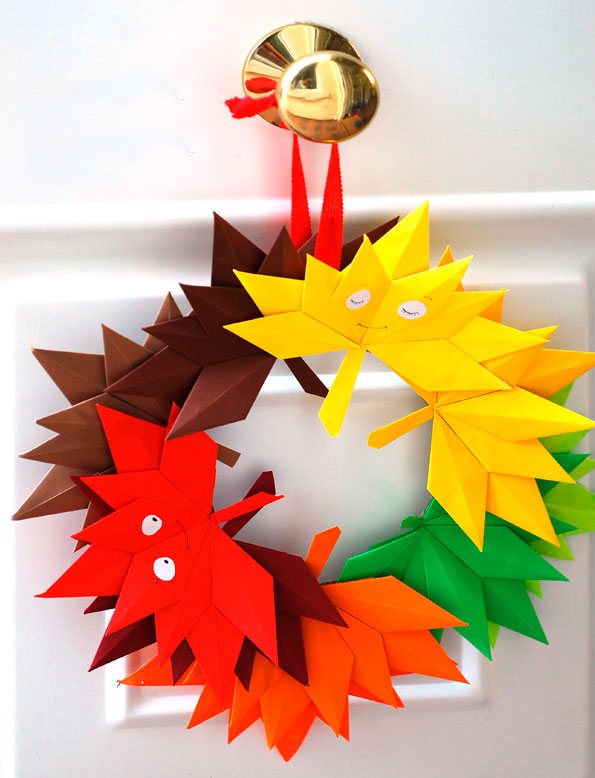
- Glue the leaves together in a circle, then decorate a couple of them by making a face.
Bright autumn leaves made from colored paper are ready! I recommend watching this video!
Garland of leaves
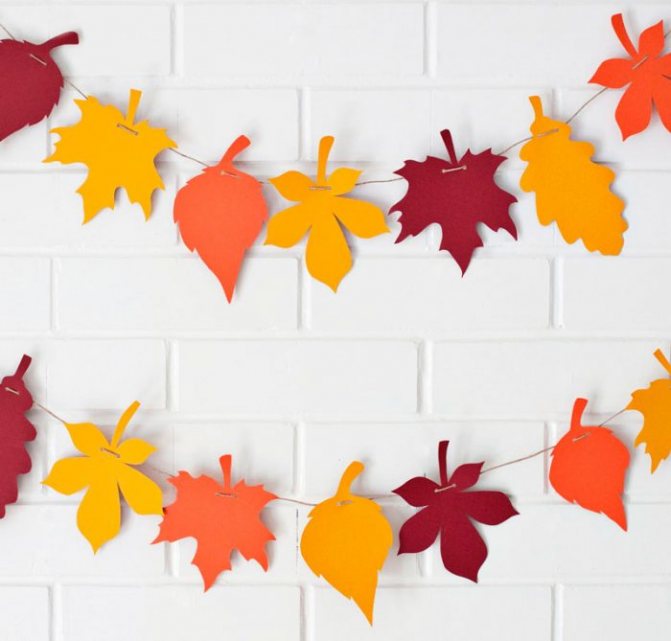
You will need: colored paper or cardboard, a simple pencil, leaf templates, scissors, a needle, tape, thin rope.
Master Class
- Transfer the leaf templates onto colored paper.
- Cut them out.
- Thread the leaves onto a string through a needle.
- The number of leaves and the size of the garland depends on your desire.
- Hang the garland on the wall, securing it with tape.
The garland of autumn leaves is ready!
Pumpkin

You will need: rolls of toilet paper or paper towels, scissors, twine or rope, stick, pva glue, for decoration - glitter or book pages.
Master Class
- Cut the sleeve into circles.
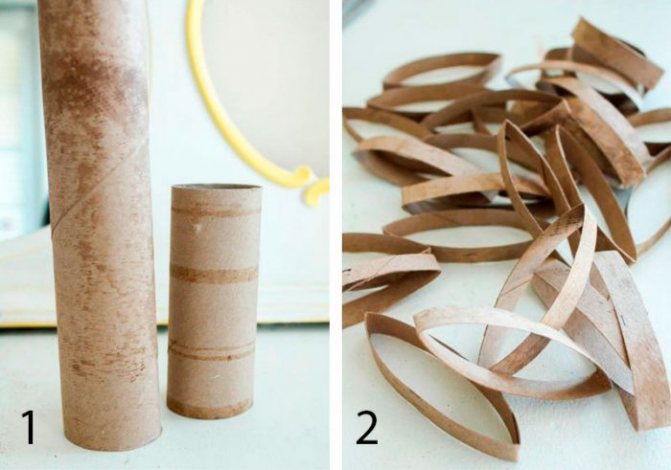
- Apply glue to one piece, sprinkle with glitter or glue a piece of page and leave to dry.
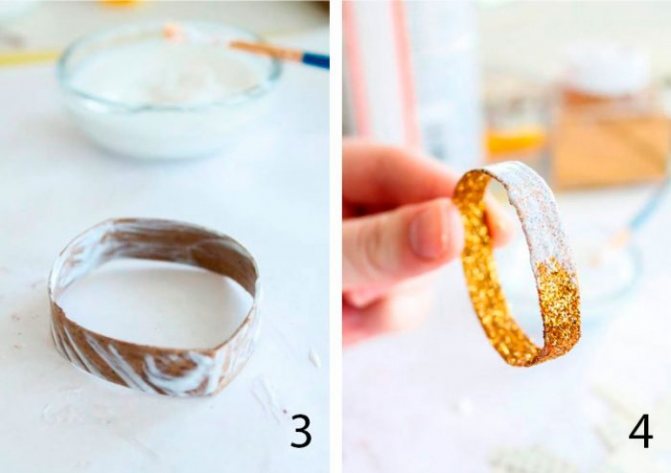
- Decorate with glitter or book pages with every detail.
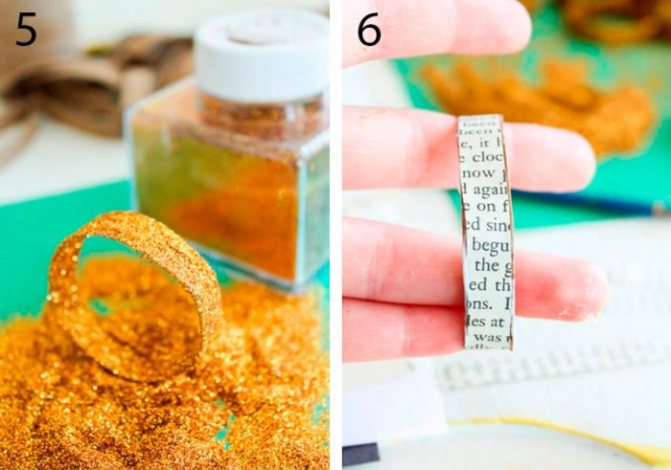
- Gather the circles onto twine to form a pumpkin.

- Glue the stick into the middle of the pumpkin.
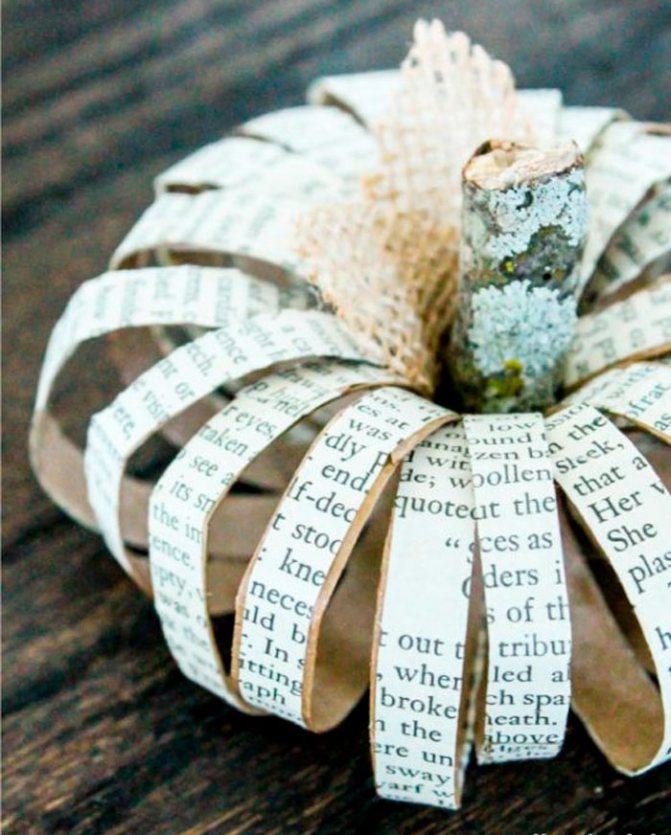
The pumpkin made from bushings is ready! You can find even more crafts made from bushings HERE.
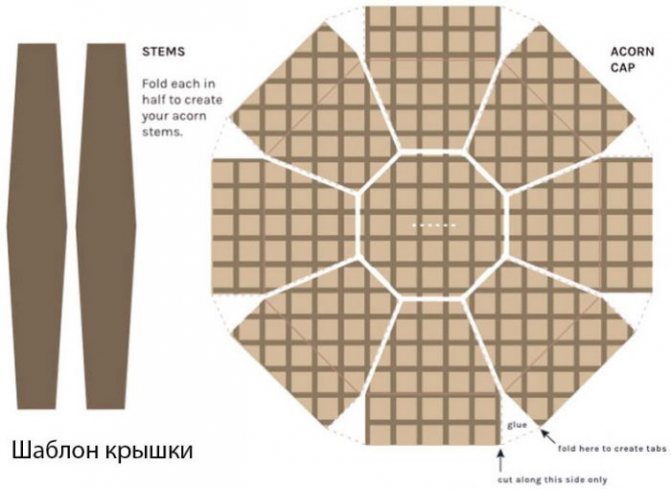
Acorns
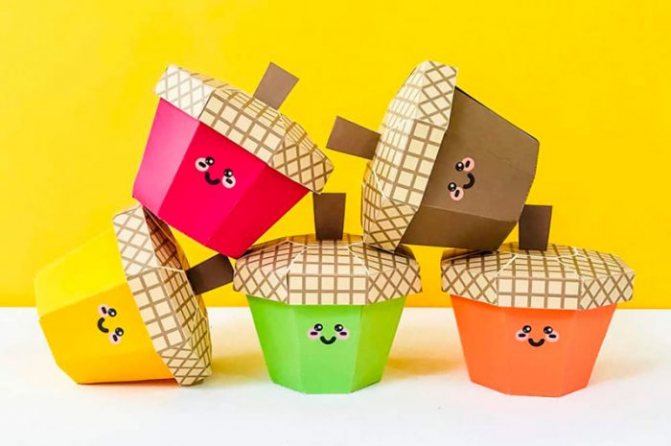
You will need: cardboard, scissors, glue stick, marker, templates.
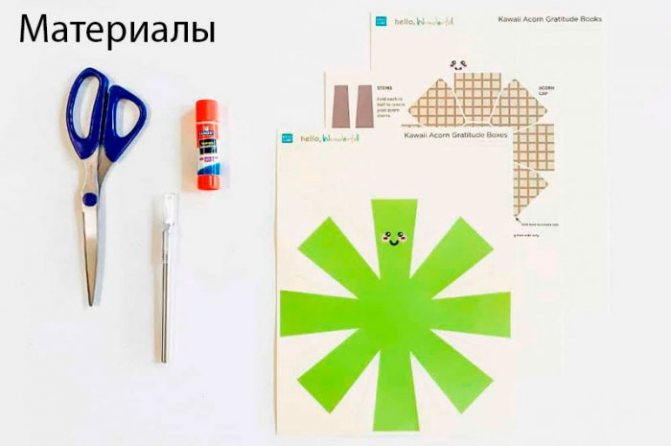
Master Class
- Print out the lid template.
- Print out the box template.
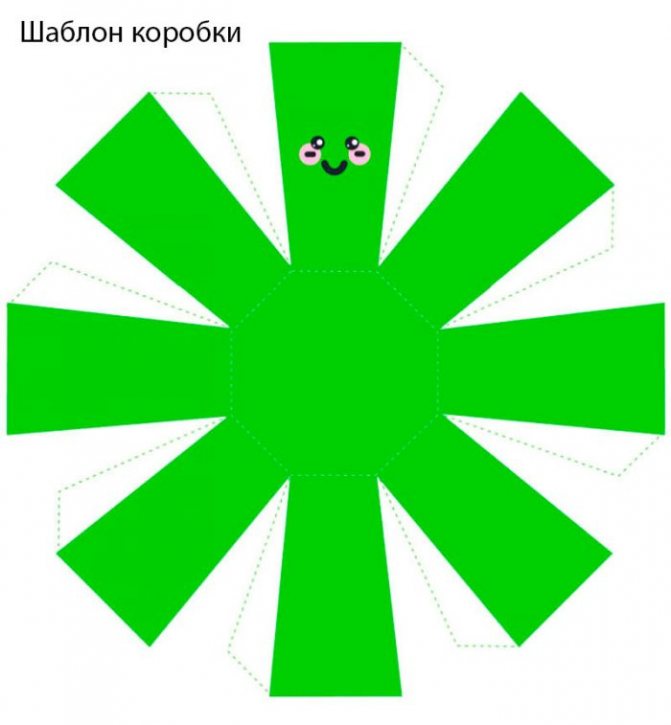
- Cut them out.
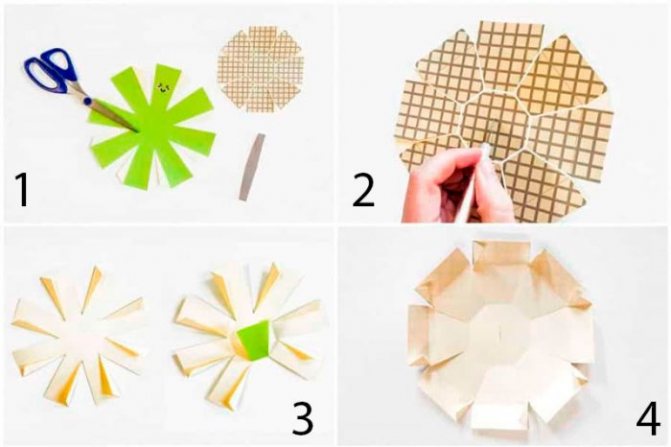
- Make folds in the marked places.

- Fold the box and lid as shown in the photo instructions.
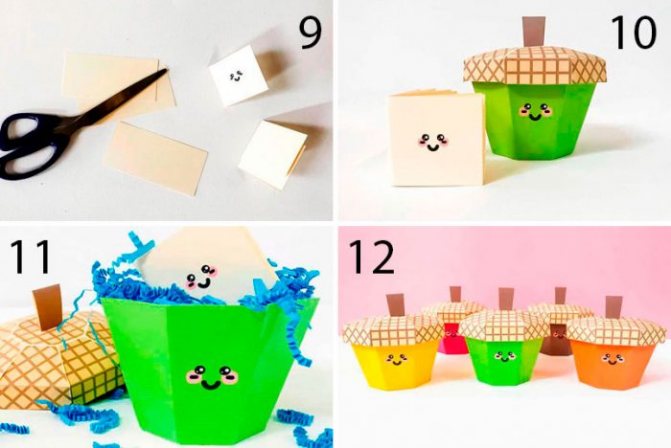
- Secure with glue.
- Make a small leaflet out of paper and draw a face for it.
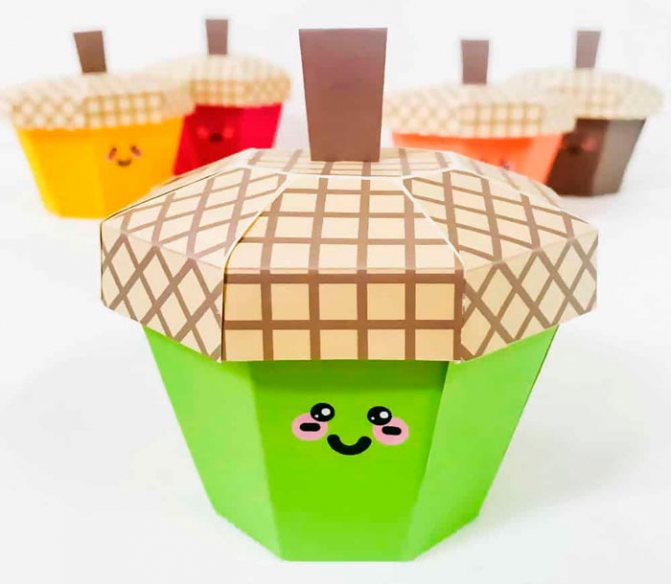
- Make a whole collection of brightly colored acorns.
Acorn boxes are ready! I recommend watching this video!
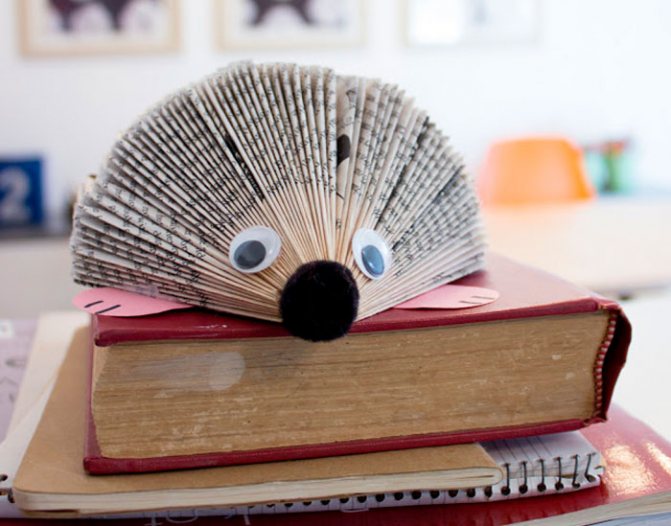
You will need: a thin book without a cover or a magazine, colored paper, scissors, black marker, glue, pompom, decorative eyes.
Master Class
- Fold the top and bottom corners of the first page as shown in the photo. Repeat this process with all pages until the middle of the book.
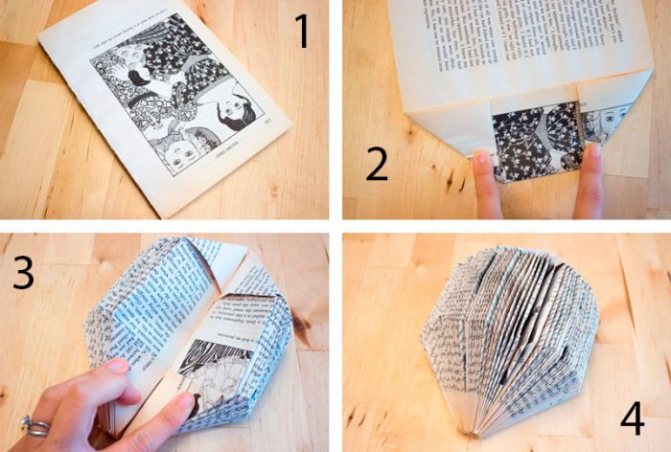
- Fold the corners of the pages, changing their direction on the second half of the book.
- Cut out 4 paws from colored paper and mark the claws with two stripes using a marker.
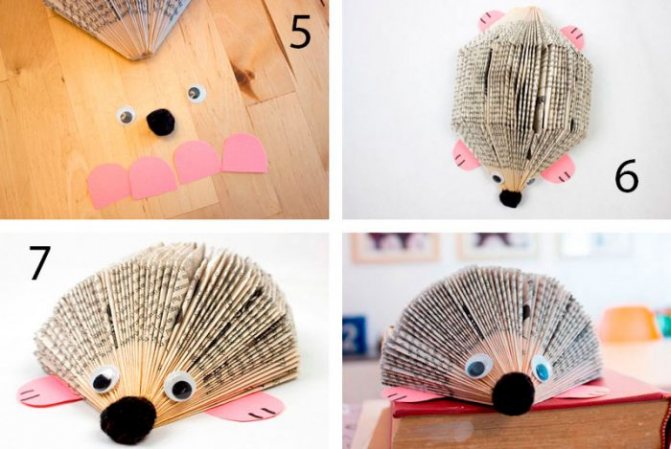
- Glue the paws at different corners.
- Make a face for the hedgehog by gluing eyes and a pompom nose.
The hedgehog from the book is ready!
Corrugated paper mushrooms
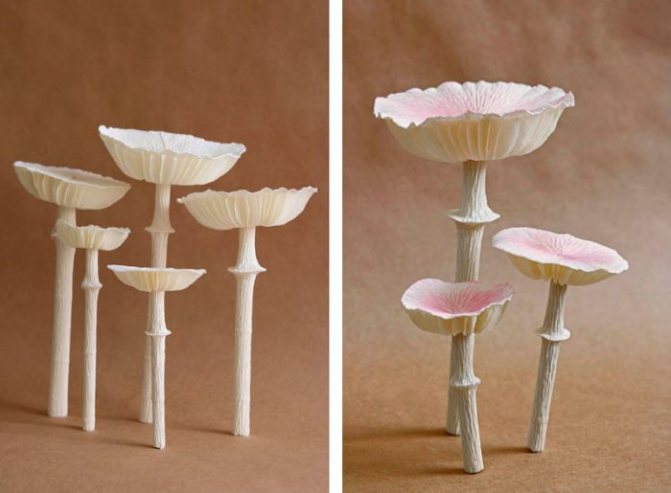
You will need: corrugated paper, scissors, glue, paper straw, honeycomb paper, paints as desired.
Master Class
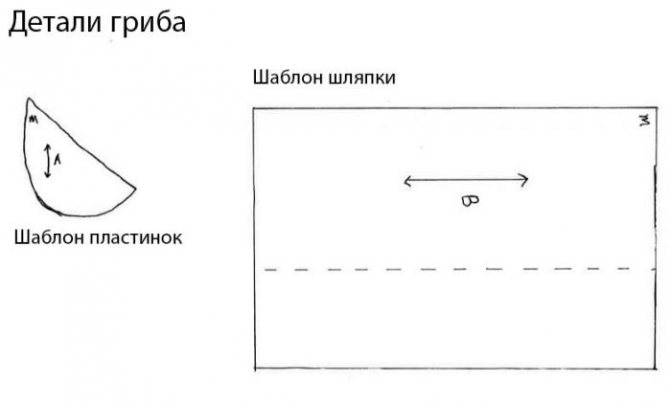
- Check out the mushroom template.
- Cut 2 rectangles from corrugated paper.
- Form a mushroom cap by gluing them together as shown in the photo.
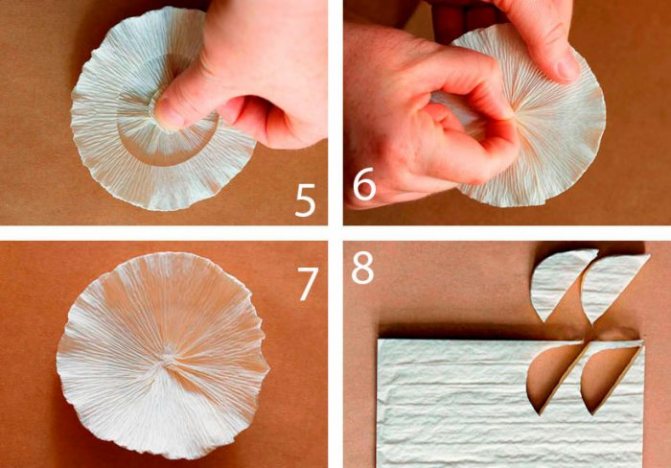
- Cut out a small circle of corrugated paper and glue it in the center, covering the hole in the cap.
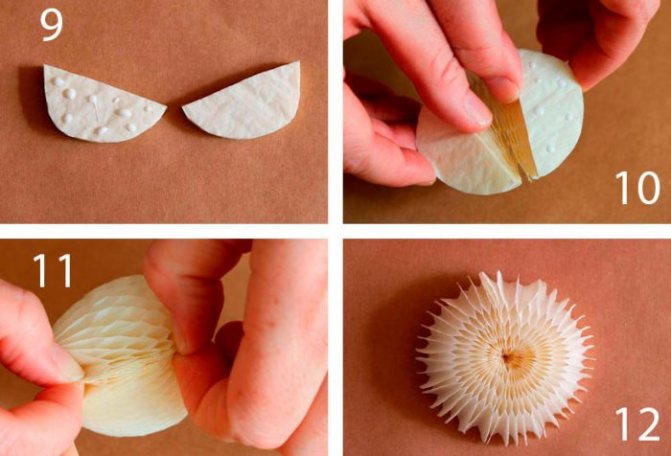
- Take honeycomb shaped paper, fold it several times and cut out a semicircle. Make 2 of these multi-layer blanks.
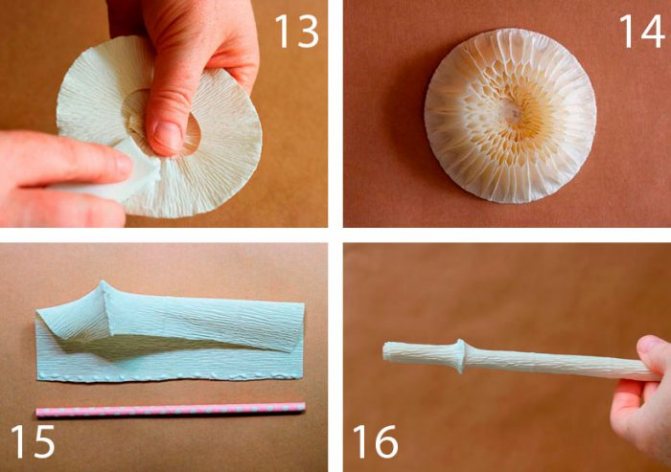
- Glue the semicircles together and form mushroom plates as shown in the image.
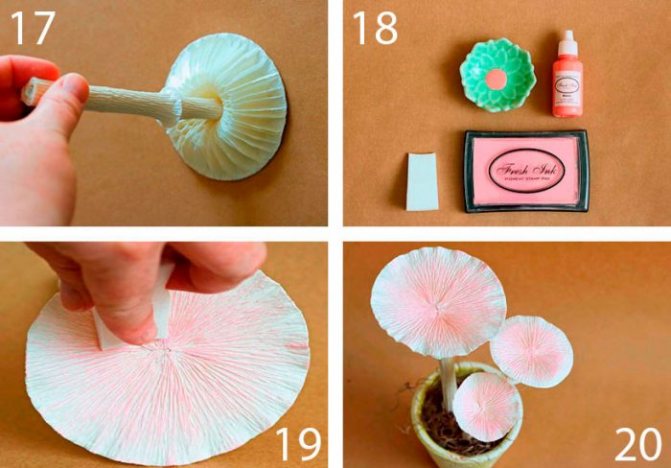
- Glue the plates to the bottom of the mushroom cap.
- Cover the straw with corrugated paper and glue it as a mushroom stem.

- Make a whole collection of mushrooms of different sizes.
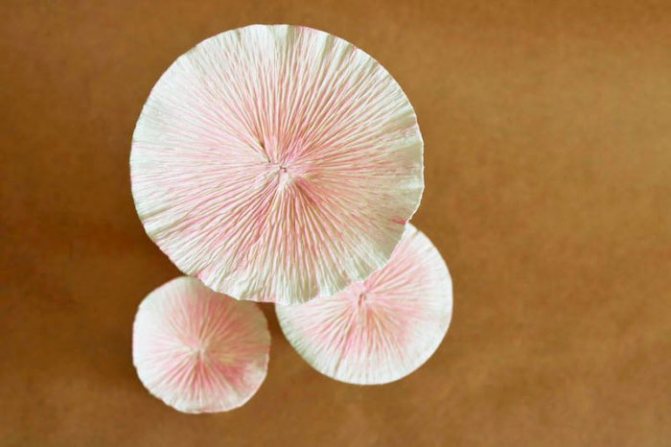
- If desired, paint or tint them.
Corrugated paper mushrooms are ready!
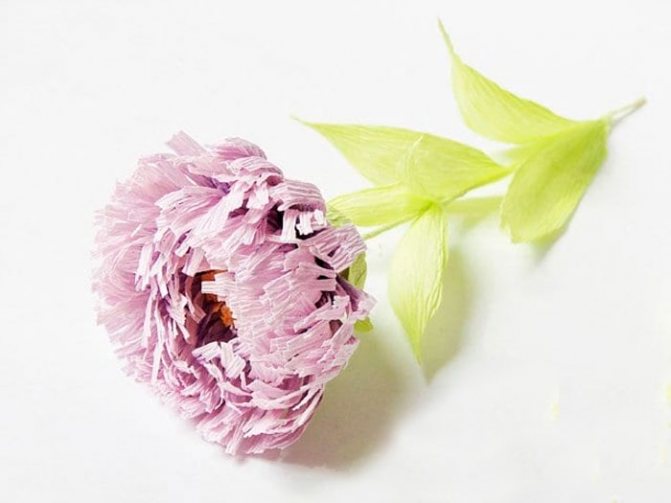
Corrugated paper aster
- Secrets of builders: working with couplings

DIY New Year's crafts - 9 best options
- Crafts from cocktail straws for children
You will need: corrugated paper of purple, yellow, green and light green, scissors, wire, glue gun, pencil, ruler, watercolor paints, brush.
Master Class
- Prepare a strip of purple corrugated paper 4 cm wide.
- Tint one edge of the strip with purple paint and set aside to dry.
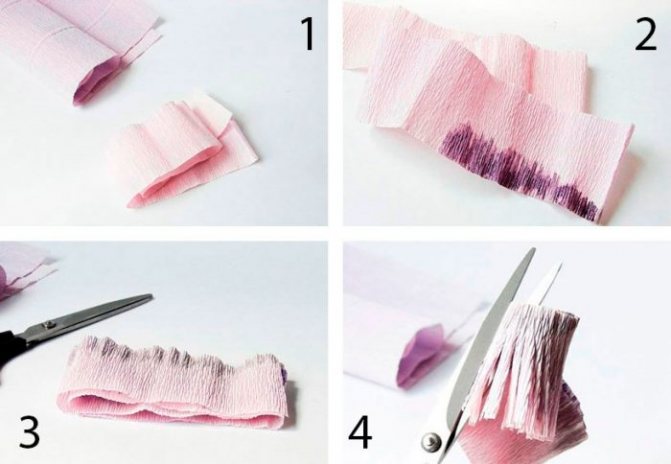
- Fold the strip several times.
- Make cuts along the unpainted edge. The first blank is ready.
- Make the second blank in the same way, only take a purple strip 6 cm wide.
- Prepare a strip of yellow paper 3 cm wide.
- Fold the yellow strip several times and make cuts.
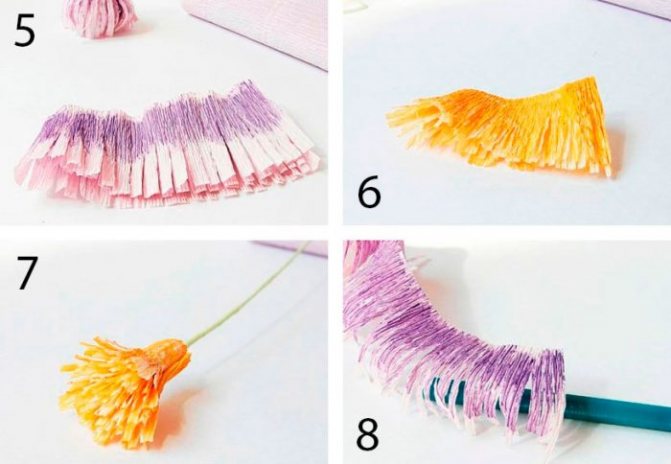
- Wrap the wire with a light green piece of corrugated paper and secure with glue. This will be the stem.
- Wrap a yellow blank around the end of the stem - these will be the stamens.
- Twist the ends inside the purple piece, which is 4 cm wide, using a pencil.
- Step back from the base of the stamens and glue the petals.
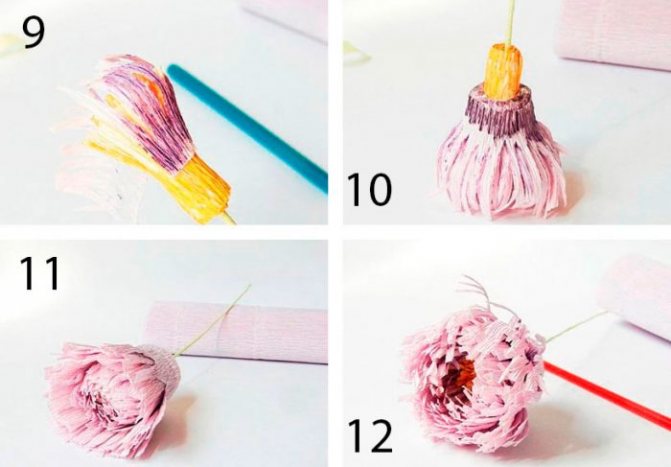
- Take a 6cm wide purple blank and wrap it around the bud as shown in the photo.
- Twist the ends of the petals and straighten the middle.
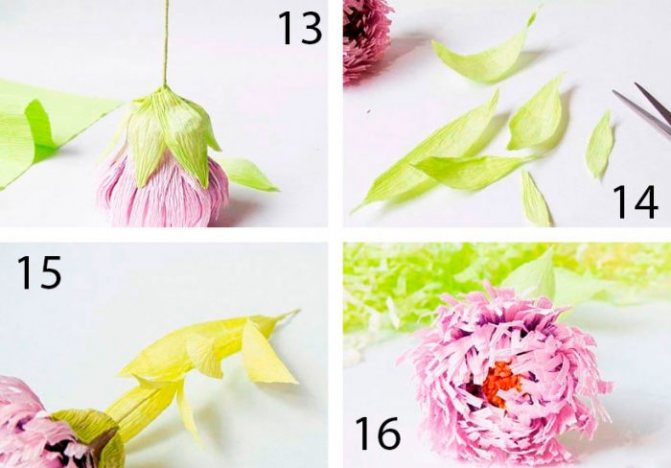
- Cut out 6 sepals from green paper, then glue them on.
- Cut 6 long leaves of different sizes from light green paper and glue them to the stem.
The corrugated paper aster is ready! You will find even more flowers HERE.
I recommend watching this video!
Note! Paper clown craft