Corrugated paper aster
- Secrets of builders: working with couplings
DIY New Year's crafts - 9 best options
- DIY helicopter craft
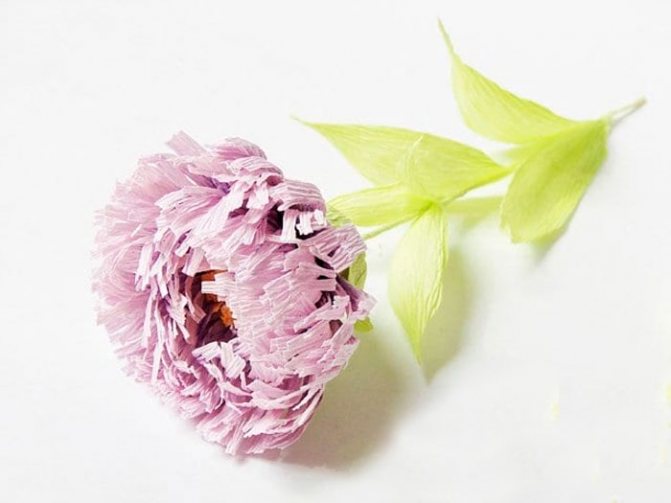
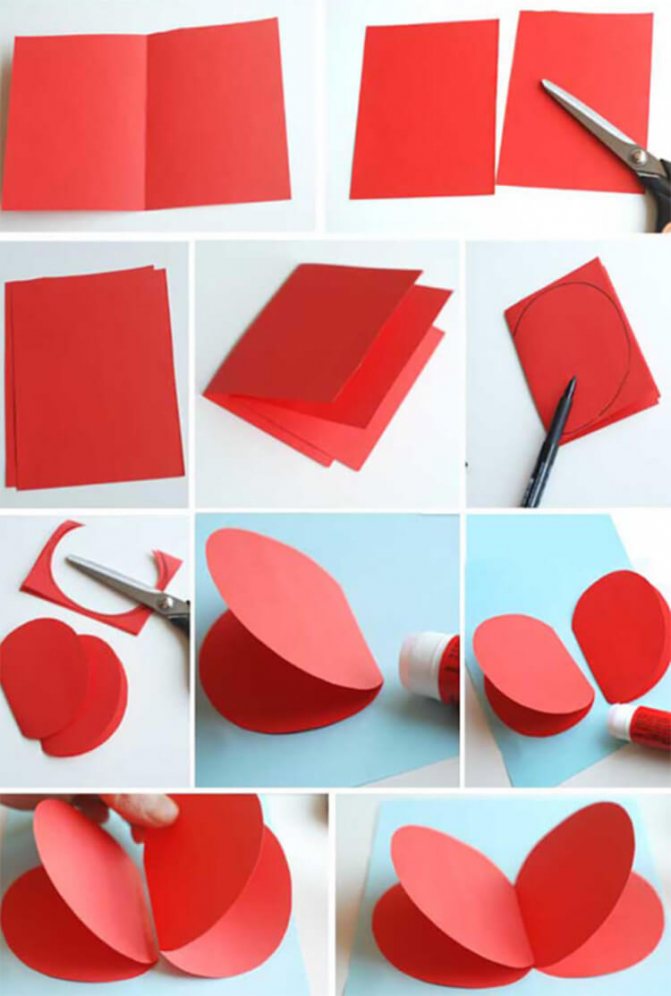
You will need: corrugated paper of purple, yellow, green and light green, scissors, wire, glue gun, pencil, ruler, watercolor paints, brush.
Master Class
- Prepare a strip of purple corrugated paper 4 cm wide.
- Tint one edge of the strip with purple paint and set aside to dry.
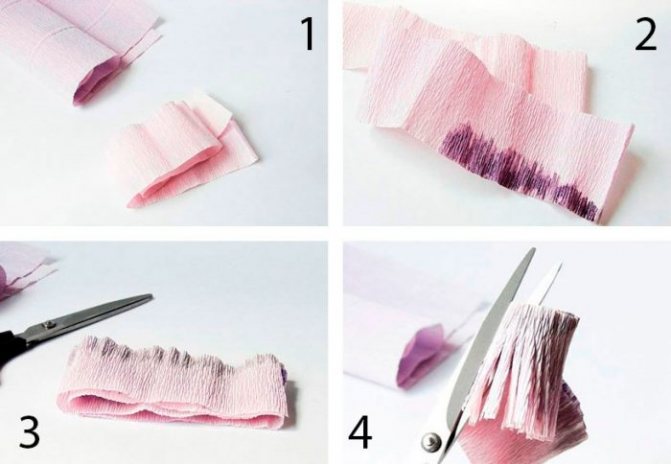
- Fold the strip several times.
- Make cuts along the unpainted edge. The first blank is ready.
- Make the second blank in the same way, only take a purple strip 6 cm wide.
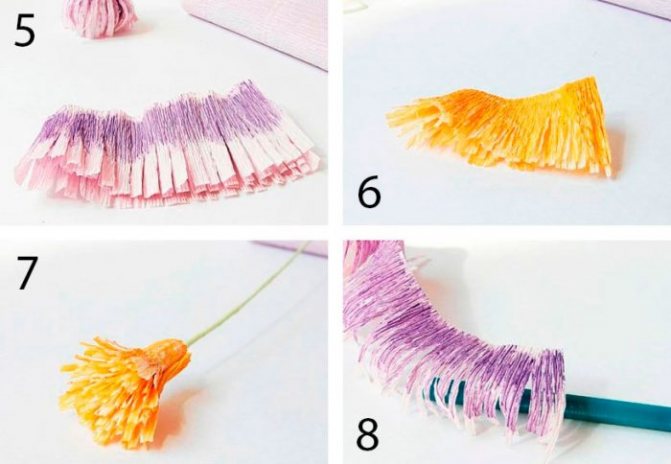
- Prepare a strip of yellow paper 3 cm wide.
- Fold the yellow strip several times and make cuts.
- Wrap the wire with a light green piece of corrugated paper and secure with glue. This will be the stem.
- Wrap a yellow blank around the end of the stem - these will be the stamens.
- Twist the ends inside the purple piece, which is 4 cm wide, using a pencil.
- Step back from the base of the stamens and glue the petals.
- Take a 6cm wide purple blank and wrap it around the bud as shown in the photo.
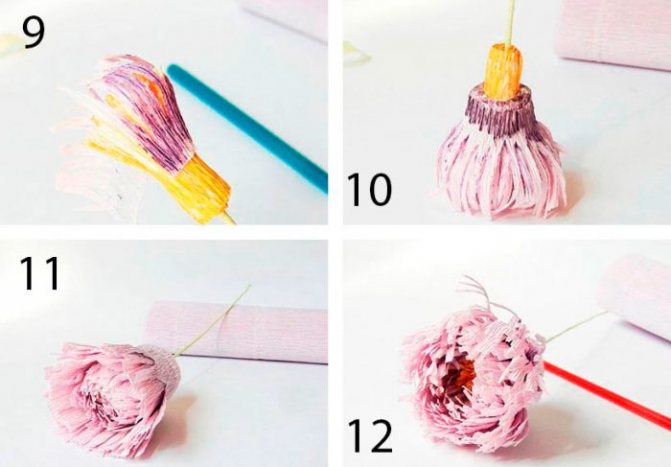
- Twist the ends of the petals and straighten the middle.
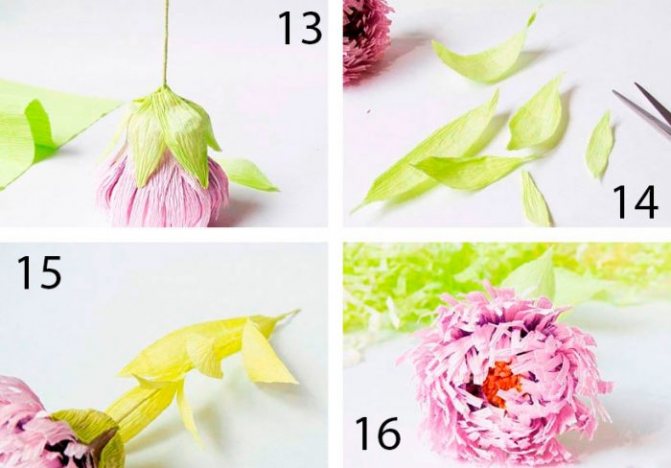
- Cut out 6 sepals from green paper, then glue them on.
- Cut 6 long leaves of different sizes from light green paper and glue them to the stem.
The corrugated paper aster is ready! You will find even more flowers HERE.
I recommend watching this video!
How to prepare leaves
In order for the application to be neat and stored for a long time, the leaves must be prepared in advance. Drying in a loose position will not help; as moisture evaporates, the material will curl. Gluing such leaves is much more difficult, as is cutting out even shapes for a modular applique of leaves.
There are two options for drying natural material. You can put the leaves under a press, for example in a large book. But we must take into account that the pages are deformed, even if they are additionally padded with a napkin - the reason is evaporating natural moisture. Such drying is a long process, taking at least a month. Solid large veins should be cut lengthwise in advance so that they dry and do not begin to rot.
Express drying with an iron is much faster. It is enough to place the leaves on a newspaper and iron at medium temperature. In this case, the natural color may be distorted. To prevent this from happening, it is worth drying in several stages and not setting the iron to maximum.
To prevent the material from deteriorating before class, you can store it in a box with salt or rice sprinkled on the bottom. The absorbent will absorb residual moisture and prevent rotting.
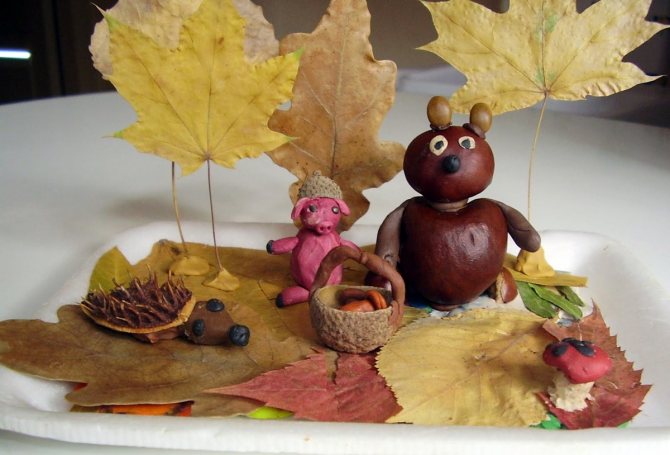
Autumn applications: preparatory group
Applications made from natural materials in kindergarten occupy a large part of the children's development program. Autumn gifts of nature open up many possibilities for activities with children. Therefore, autumn fairs are a place where you can show off your talents.
You can invite the children to come up with a real composition of leaves.
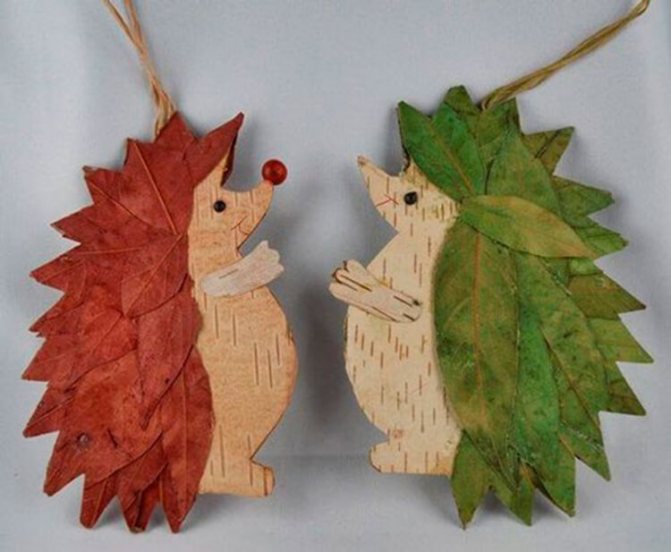
If you combine drawing and applique, you can make such a cute hedgehog from seeds.
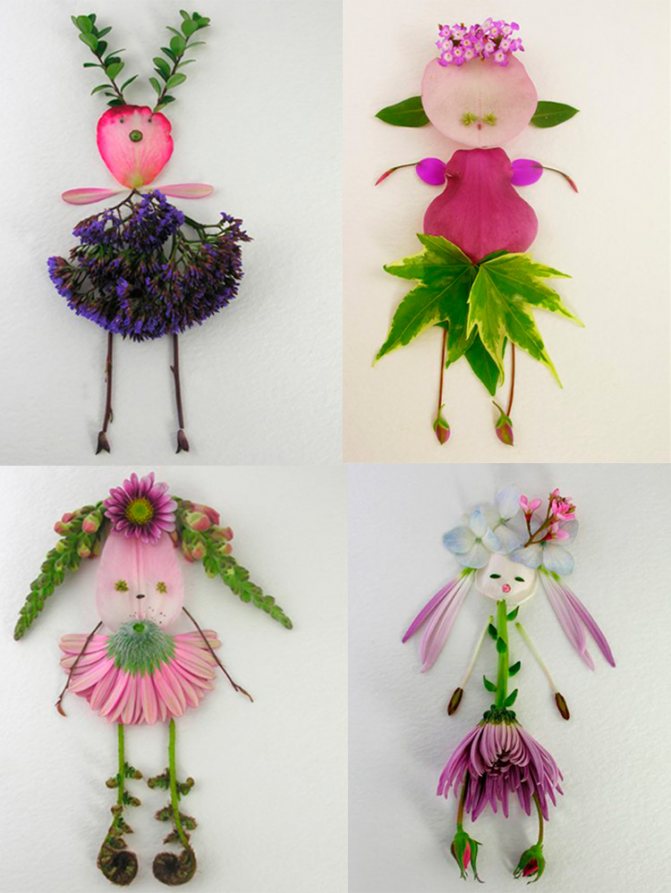
Using flower petals and grass sprigs, you can make beautiful applications
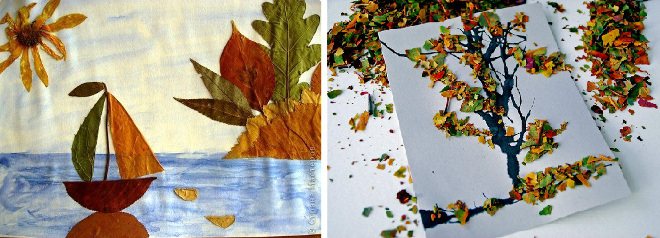
Applique Autumn bouquet
This craft is quite suitable as a gift for a teacher or mother from a schoolchild. After all, such a bouquet of leaves will last much longer than a fresh bouquet of real flowers.
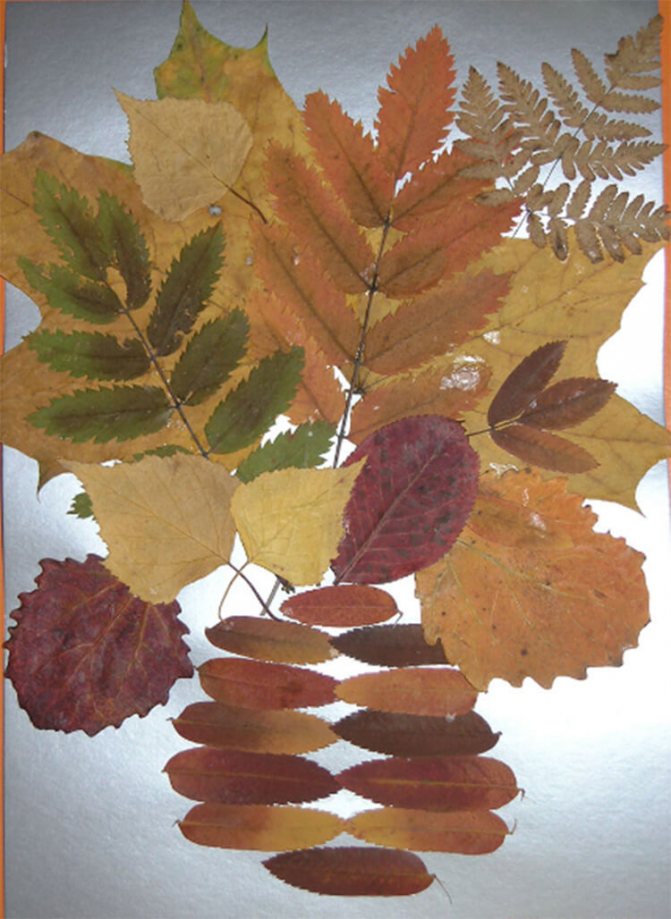
Pre-dry leaves from different trees. Prepare glue, scissors and a sheet of cardboard.
Form a vase from the leaves by gluing them onto cardboard. And then help your child create a beautiful bouquet of leaves. To make it bright and neat, use light leaves for the craft, without holes or stains.
A vase for an autumn bouquet of leaves can be made from colored paper, or you can create a bouquet not only from leaves and do without a vase.
Rainbow in the clouds
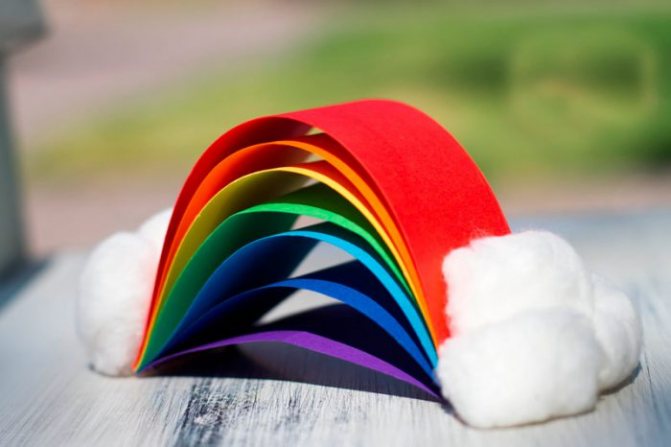
You will need: colored cardboard, scissors, glue stick, cotton wool, stapler.
Master Class
- Cut 7 strips of paper of different colors so that each piece is shorter than the previous one. The red stripe should be the largest and the purple stripe the smallest.
- Arrange the stripes in the following order: red, orange, yellow, green, blue, indigo and violet.
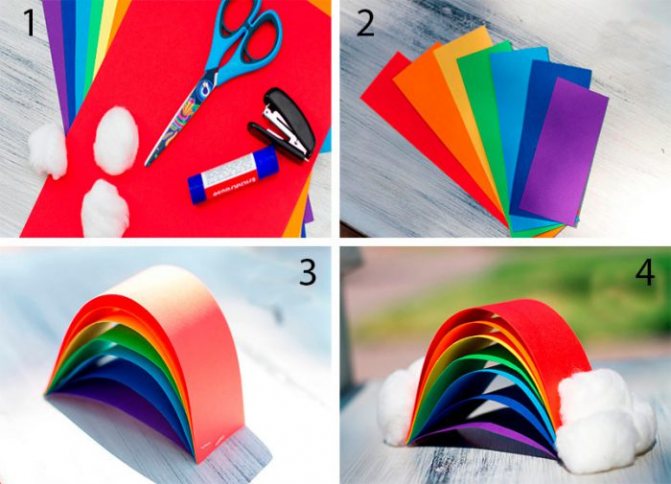
- Fasten the strips of paper together using a stapler.
- Roll 6 cotton balls.
- Glue 3 cotton balls at the base of the rainbow as clouds.
Rainbow in the clouds is ready!
Volumetric applications of vegetables and fruits in the preparatory group
Every child will be interested in making a variety of fruits and vegetables out of paper, which they eat from an early age. They can be made as appliqués on paper or in volume.
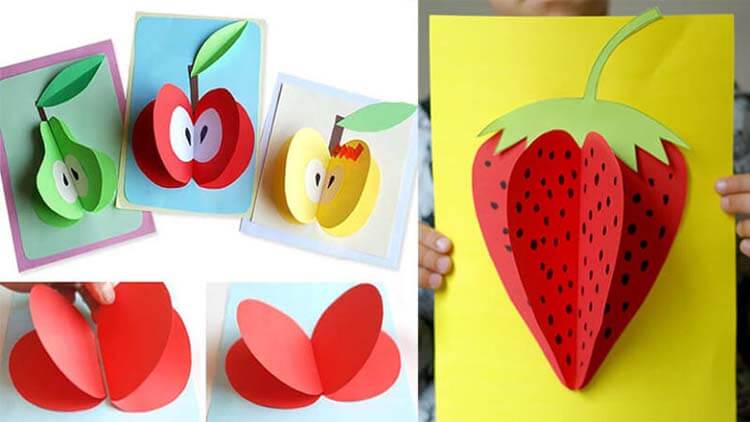
How to make an apple out of paper
We will need a sheet of red double-sided paper. Fold it in half and cut it. We also fold the halves in half and draw the silhouette of half an apple with a pencil.
Glue the apple halves onto a piece of paper and create a core, stalk and leaf.

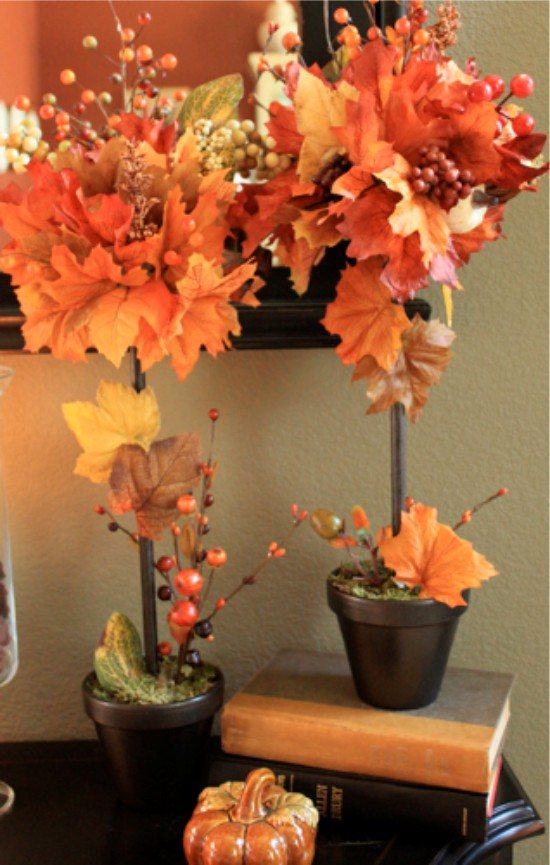
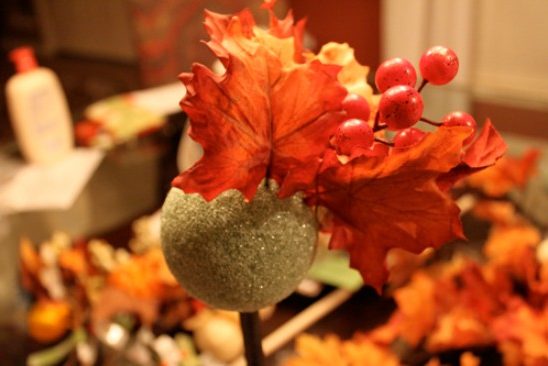
Idea 1. Autumn topiary
Topiary is a decorative tree that can be used to decorate a dining table, mantel, or front door area. To make it, you can use natural or artificial materials, for example: leaves, berries on twigs, acorns, cones, chestnuts, flowers, dried citrus slices, as well as felt, sisal, linen and whatever your imagination tells you. In the next slider you can see several examples of such autumn crafts.
Next, we present to you a simple master class on making an autumn decorative tree from artificial leaves and berries.
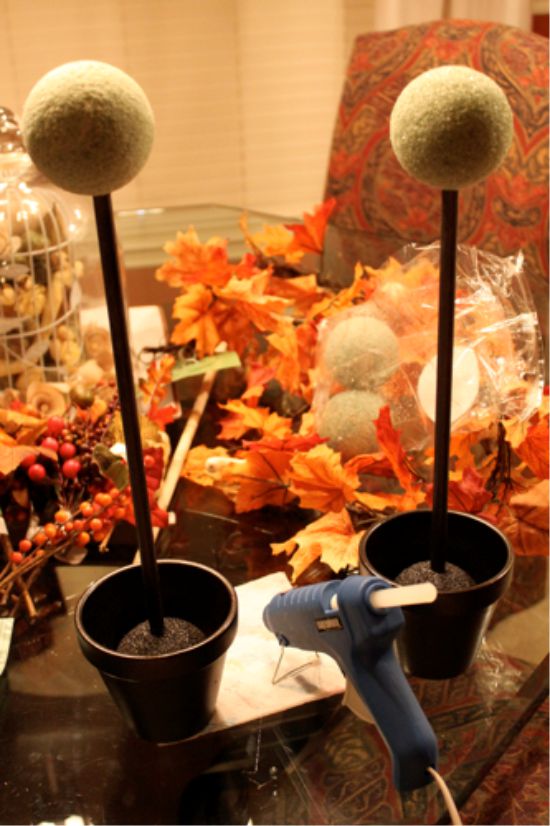
- Clay pot;
- Wooden stick or branch;
- Two polystyrene or floral foam balls;
- Materials for decorating the crown;
- Dry moss (you can replace it with sisal);
- Glue gun and several glue sticks;
- Scissors;
- Side cutters or pruning shears;
- Acrylic paints for painting the trunk, ball and pot (optional).
Step 1. Cut a hole in the base ball with a sharp tool for the barrel, about a third of its diameter deep. Place a drop of hot glue into the hole and insert the barrel into it.
Step 2: Insert the second ball into the pot. If the ball does not sit tightly enough in the pot, place newspaper around it. Cut a hole in the ball for the trunk, 2-3 cm deep. Insert the trunk with the crown into the hole and adjust its length. Next, drop glue into the hole of the ball, place the barrel in it and begin to fill the hole with glue, placing small pieces of paper around the barrel. This is necessary so that the hot glue does not deepen the hole too much.
Step 3: Paint the pot the color you want if you don't like the original look. In this project, the pot was painted with spray paint in a dark bronze shade from Rustoleum (sold in construction stores, for example, in Leroy Merlin).
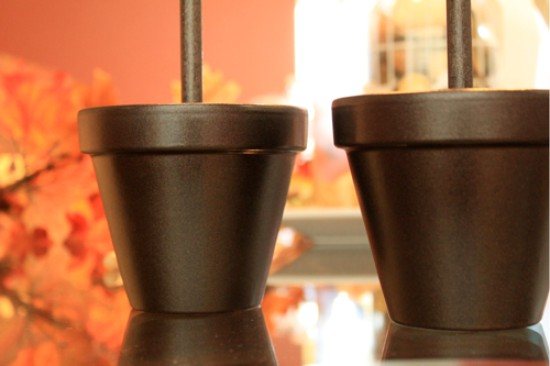
Remember that the design of the pot should be simple and unpretentious so as not to distract attention from the crown. If necessary, paint the barrel and/or balls at this stage. It is advisable to paint the balls so that the gaps between the decorative details are invisible.
Step 4. While the paint on our blank is drying, sort the decorative parts by type and size. If you use artificial leaves, flowers and berries with a wire base, then when cutting them, leave “stems” about 2 cm long. This is necessary in order not only to glue the parts, but also to stick them into the ball - then they will hold more securely . If the “stems” do not have wire, then it is better to cut the parts “at the root”.
Step 5. Now it's time for the fun part - creating the crown. First, evenly distribute and glue the largest parts onto the ball, then the middle ones. Finally, fill in the gaps with small embellishments.

Step 6. Well, that's all, all that remains is to decorate the ball in the pot with dry moss or sisal, after treating it with glue.
Crafts with natural materials
Natural materials can also be used to create applications. Most often, they are collected leaves of various trees, which are perfect for such purposes. For crafts, it is important to choose only the most beautiful ones. This will help improve the quality and beauty of the future product.
Golden autumn
Children need to be taught creative work from a very early age. In kindergarten, for these purposes, various crafts are used from natural material that has been collected and properly dried.
An application on the theme of autumn in the younger group involves the use of multi-colored autumn leaves, which the children themselves chose and brought. It doesn’t matter what size or shape they are. To try to make a beautiful craft, you need to prepare:
- glue and a brush for applying it;
- cardboard or thick paper for the base;
- scissors;
- natural natural materials (leaves, twigs, flowers);
- small decorative elements.
For this craft, it is advisable to collect leaves from different trees. This will not only help make a more beautiful picture, but will also allow educators to teach children to distinguish them from each other.
The golden autumn applique is made following the following sequence of actions:
- First, the children collect the leaves and other natural materials they like.
- Then only the highest quality and most attractive specimens are selected from the total mass. All rotten, dried or damaged leaves are removed and disposed of.
- Selected specimens are laid out on the work surface and dried from excess moisture. It is important not to overdo it, so as not to end up with pieces that are brittle and unsuitable for application.
- After this, a cardboard base is taken and a rectangle of the required size is cut out of it.
- Then the brush is moistened in a jar of glue and the leaves are coated one by one.
- Immediately the image details are attached to the base. This should be done chaotically and in random order.
- The finished composition is transferred to a warm place for the glue to dry completely.
- At the very end, the applique is supplemented with various decorative elements.
Fruit applique: senior group
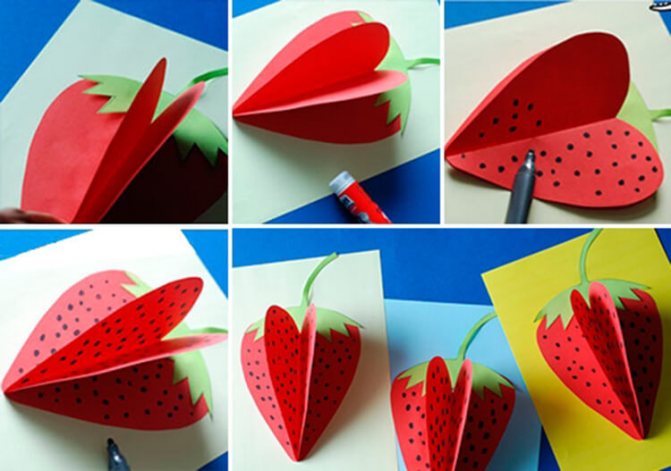
Making strawberries out of paper
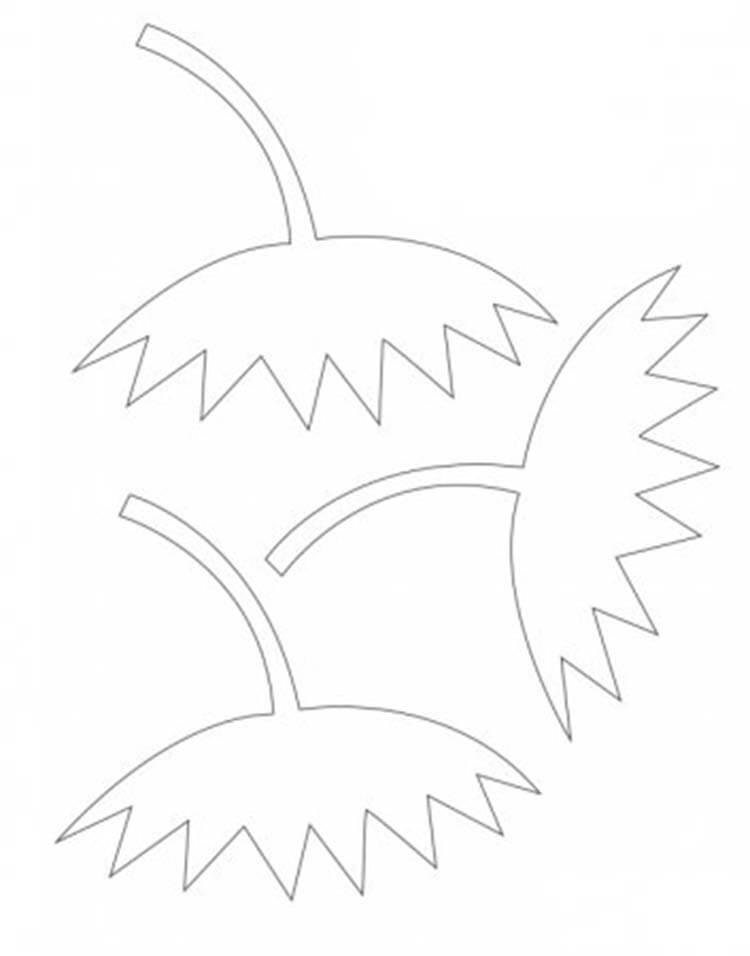
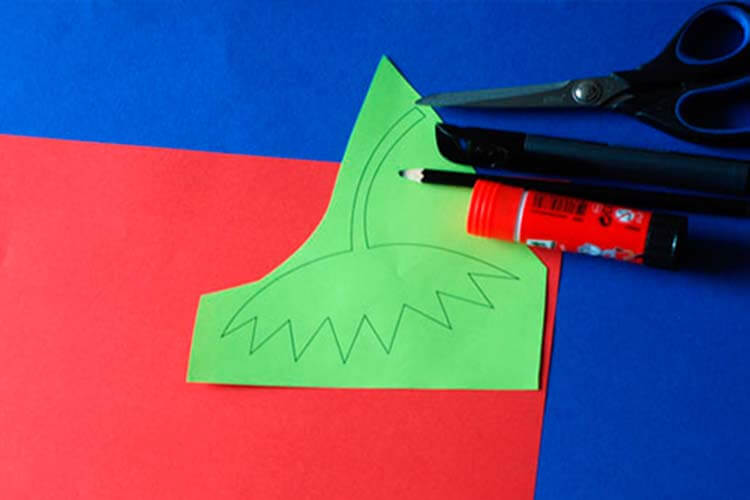
Cut out tails from green paper.
Fold two pieces of red paper in half and cut out a heart.
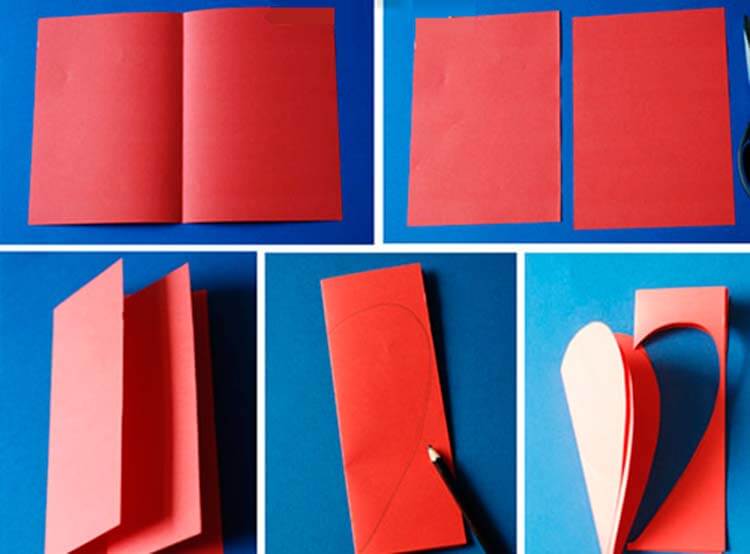
Glue one part to the base of the sheet, and glue the second along the fold line.
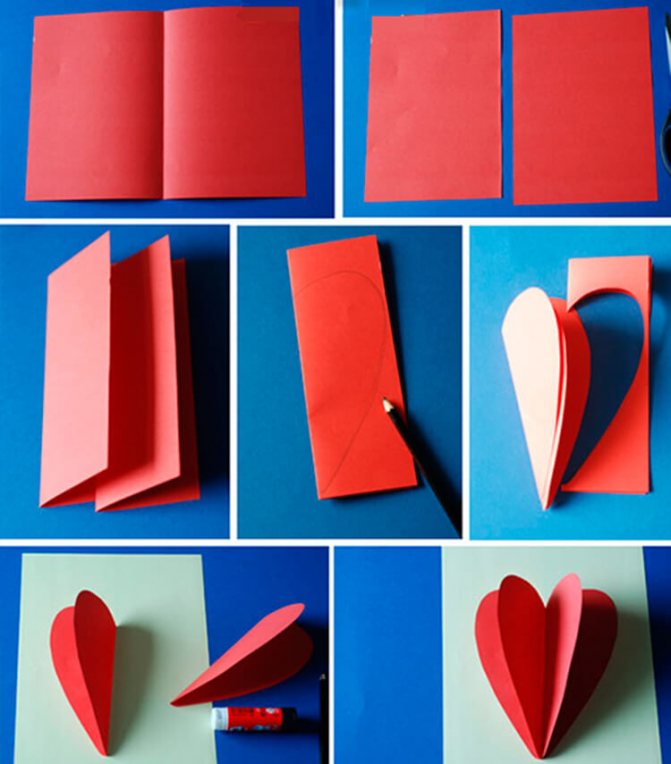
Glue a green tail cut from a template on top and draw dots with a black felt-tip pen.
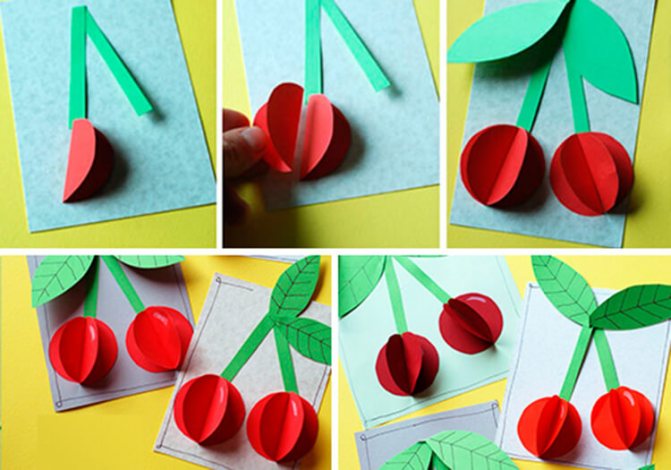
Volumetric cherries made of paper: applique
From red paper you need to cut 4 circles (diameter 5-6 cm).
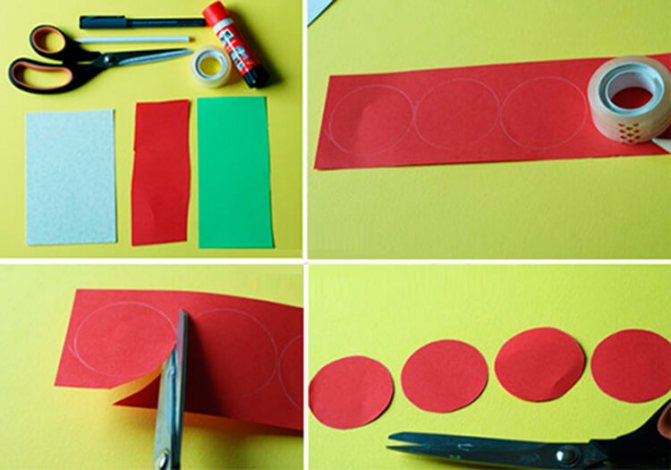
Fold the circles in half and cut out the green strip.
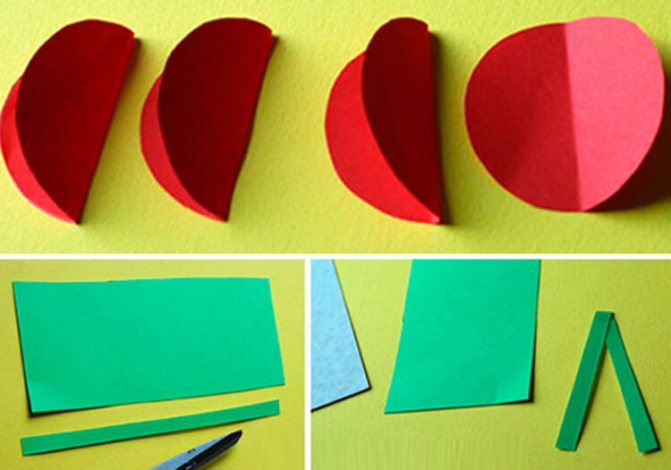
Take a green sheet 12*6 cm and cut out the leaves by folding the paper in half

Glue a strip folded in half onto a sheet of cardboard. Glue leaves on top and a cherry on each branch.
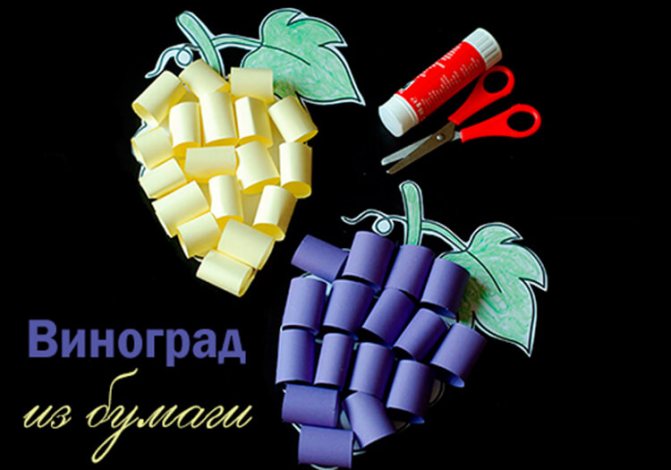
Bunch of grapes made of colored paper