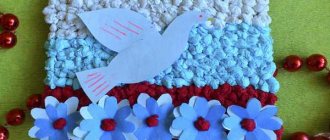
Working at home with children and developing them is a pleasure if the activity is exciting and has a lot of advantages. Crafts made from salt dough are just what you need, because it is a pleasant pastime for mom and a useful exercise for little children’s hands. In addition, modeling from salt dough is very affordable: the ingredients can be found in every home.

How to make salt dough?
You will need: a glass of wheat flour, a glass of extra salt, half a glass of cold water, a bowl.
Recipe
- Take a bowl.
- Pour in a glass of flour.

- Add a glass of extra salt.
- Fill with cold water.
- Knead the dough.
The finished salted dough should not stick to your hands or crumble. It should be cool and easy to sculpt. I recommend watching the video master class!
SALT DOUGH | How to make your own salted play dough | A simple salt dough recipe.
How to make salt dough
There are many recipes for such a dough, and to make a plastic mass with your own hands, choose the one that suits you, but first read some clarifications:
- flour - without additives (not “pancake”);
- salt – fine, “Extra” (not rock, not iodized);
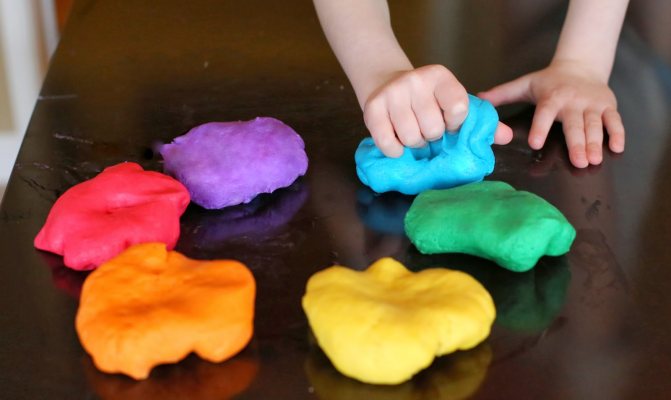
- if the dough is colored, it needs to be divided into parts during the process;
- dyes - beet juice, spinach, raspberry, blueberry juice, dry food coloring, gouache.
Recipe for simple and colored dough
Ingredients for a simple test:
- 200 gr. flour;
- 200 gr. salt;
- 125 ml ice water.
Preparation:
- Mix flour and salt in a large bowl.
- Add water in small portions, kneading the dough until smooth.
- Place it in a bag and put it in the refrigerator to rest for half an hour.
Ingredients for color dough:
- flour - 300 gr.;
- salt - 300 gr.;
- cold water - 200 ml;
- sunflower oil - 1 tbsp. spoon;
- dyes.
If the dye is liquid:
- mix flour with salt;
- add vegetable oil;
- add water in portions, knead the plastic dough;
- divide the mass into several parts and mix the dye into each part, knead until a uniform color is obtained;
- put in the refrigerator for 30 minutes.
If the dye is dry:
- divide all ingredients into equal parts;
- each dye must be dissolved in approximately 1-2 tablespoons of water from the total volume;
- mix flour, salt, butter, add water and dye, knead thoroughly;
- We do this with each color;
- put it in a bag and put it in the refrigerator for half an hour.
Little tricks
Experienced housewives know that the more flexible the dough, the more elegant the crafts are. To do this, vegetable oil is added to the mixture. It can be replaced with hand cream in the same amount.
For thin parts, you can make a special dough by adding a little starch or wallpaper glue: 1-2 tbsp. Mix dry spoons with water and add to the mixture of flour and salt.
The dough can be stored in the refrigerator for 1-2 weeks.
How to dry salt dough?
There are two most common ways to dry salt dough. The first method: the finished craft will dry on its own. The main thing is that it should not be exposed to direct sunlight, otherwise it will crack. The craft can be placed on a flat surface and wait a few days. Second method: dry the finished craft in the oven for 3 to 6 hours (depending on the size of the craft). Drying occurs in batches with breaks. One approach is 1-2 hours. For quick drying in one go, set the oven to 75-100 degrees, and then the craft will dry in an hour. At a temperature of 120 degrees, the craft will dry in 30 minutes, but it is better to dry it naturally.
How can you dry items?
In addition to the process of sculpting a figure from a salty mass, drying the dough is also an important point. You can perform this operation in the following ways:
- Drying the product in the oven. To do this, place the products on parchment and place them in an oven preheated to 50–80 °C for an hour. The temperature depends on the size of the craft. Then cool without removing from the oven. If you immediately pull out the craft, there may be cracks on the surface.
Oven drying
- Dry at room temperature. This is the simplest but longest process. Thin and delicate crafts are best suited for this. Drying time 1–2 days. After making the item, you need to place it on parchment, away from batteries and electrical appliances. This technique will only harm the product, leaving cracks and uneven drying of the dough.
How to color salt dough?
There are two most common ways to color salt dough. The first method: after drying, paint the finished craft with acrylic paints or gouache using a brush. Second method: food coloring is diluted in water, then added while preparing the dough. When the craft is completely painted and dried, it must be coated with transparent manicure or furniture varnish in 2-3 layers. Each layer must dry before applying the next. This way the craft will last for a long time.
Why dough?
Dough has many advantages over conventional modeling materials: plasticine, clay or plastic.
- This material has a large number of special properties:
- It's easy to make at home with common ingredients.
- It is inexpensive and suitable for families with any budget.
- It can be eaten without harm to the health of even a small child
- It's nice on the hands and kids just love it.
- Allows you to create any shapes
- Easy to dry and does not deteriorate after drying
Thanks to these properties, the dough can be used for games with children from one year old and without fear for their health or safety.
Salt dough star
You will need: colored salt dough, glass, clear manicure polish, toothpick.
Master Class
- Roll into a ball.
- Make a flatbread out of it.
- Cut out a star using a stack.
- Brush the corners of the sprocket with a wet finger to make them smooth.
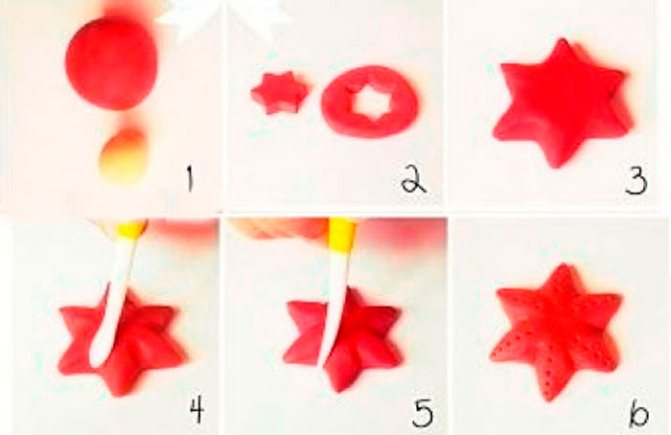
- Make dots with a toothpick.
- Make a smile with your eyes.
- Attach small flat balls of a different color using water to decorate the star.
- Dry the craft.
- Apply varnish and wait until completely dry.
The salt dough star is ready!
Bracelet for a young fashionista
A little dandy will wear an elegant trinket, made on her own, with pleasure.
Prepare:
- Multi-colored dough
- Cooking skewers
- Cookie cutters, harsh threads
Progress of creativity:
Roll the dough into balls and cut out the stars using cookie cutters. Use a skewer to make a hole in the parts and dry the pieces in the oven.
Now let the children color the beads as they like, all you have to do is thread them and you can put on the decoration.
Salt dough caterpillar
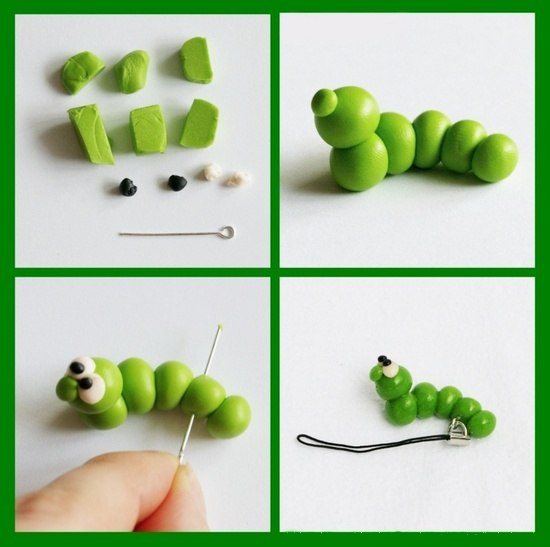
You will need: colored dough, knife, PVA glue, toothpick, pendant, clear manicure polish.
Master Class
- Roll out the sausage.
- Cut it into 6 equal parts.
- Roll into balls.
- Glue 5 balls together.
- Glue the head.
- Make a nose and eyes, then glue them on.
- Poke a toothpick into the hanging area.
- Dry the craft.
- Apply varnish and wait until completely dry.
- Attach the pendant.
The salt dough caterpillar is ready!
Salt dough apple

You will need: colored salt dough, PVA glue, clear manicure polish.
Master Class
- Make half an apple, make the inside flat, pressing it onto a flat surface.
- Make a thin flat center and glue it to the main part.
- Roll 6 seeds and a stick, then glue to the apple.
- Blind the leaves, then glue them.
- Dry the craft.
- Apply varnish and wait until completely dry.
The salted dough apple is ready!
Salt dough elephant
You will need: colored salt dough, PVA glue, clear manicure polish.
Master Class
- Make the elephant's body by rolling an elongated ball.
- Make 4 legs in the shape of plump sausages.
- Make a proboscis.
- Make the elephant's ears in this way: roll out 2 flat cakes, glue flat cakes of the same shape of a smaller size and a different color to them.
- Make a small ponytail.
- Blind your eyes.
- Assemble the elephant in the following sequence: glue the legs to the body, then glue the proboscis, then the ears, eyes and tail.
- Dry the craft.
- Apply varnish and wait until completely dry.
The salt dough elephant is ready!
Salt dough roses
You will need: salt dough, foil, a candy vase or similar plastic container, gouache, a brush, clear manicure polish, a modeling board, a knife or a stack.
Master Class
- Fill the vase with foil.
- Roll into balls. For one rose you will need 5 balls, for a leaf - 1 ball.
- Make leaves and draw stripes in a stack.
- Make cakes from the balls and form a rose. Roll one cake into a tube, then attach it to different sides of the cake, forming petals.
- Attach roses and leaves to the foil.
- Dry the craft.
- Paint the craft and wait until it dries completely.
- Cover the craft with varnish and wait until it dries completely.
Salt dough roses are ready! I recommend watching the video master class on how to make a rose!
Master class: Modeling a rose with thin petals from salt dough. Master class for modeling rose.
Hedgehog made from salt dough
You will need: salt dough, nail scissors, PVA glue, acrylic paints or gouache, brush, manicure polish.
Master Class
- Make an oval-shaped hedgehog body.
- Make an elongated tip.
- Make 2 small balls and glue them in place of the eyes.
- Roll the ball a little larger and glue it as a nose.
- Make needles by cutting the dough. The cuts should be made in rows, the needles should be placed in a checkerboard pattern.
- Dry the craft.
- Paint and wait until completely dry.
- Apply varnish and wait until completely dry.
Salt dough hedgehog is ready!
Salt dough toys for children
You can start with simple flat products. Let these be cookies for dolls or other toys; they will last a long time and fit perfectly into a toy tea party. These cookies can be made right away from colored dough, or they can be made from white dough and then painted. You need to glue small parts to the main product and connect the parts of the craft to each other using a damp brush: the parts to be joined are moistened with a brush and glued together.

"Ginger cookie"
Making salty cookies step by step:
- Roll out a small piece of dough with a rolling pin into a thin layer (5-7 mm) on the table;
- using cookie cutters or plasticine, cut out figures;
- we decorate the figures with seeds, beads, small buttons;
- You can place small dough decorations on top of the cookies - circles, hearts, flowers.
Application "Caterpillar"
Using the same principle, you can make an applique craft from colored dough on thick cardboard. We will need a sheet of cardboard, dough of different colors (yellow, pink, blue, green), a plasticine knife.
Execution steps:
- take pieces of yellow (head), pink and blue, roll out to a thickness of 7-10 mm;
- cut out circles from dough;
- grease the cardboard with PVA glue, glue the circles (the body and head of the caterpillar);
- cut out eyes and decorations for the caterpillar with a knife (beads, flowers, bows - optional);
- using a toothpick, draw a smile, make a pattern on the caterpillar (dots, notches, waves);
- glue the eyes and decorations onto the caterpillar’s body using a wet brush;
- cut out leaves and grass from green dough and glue them to the bottom of the cardboard;
- we complement the picture with elements to suit your taste: the sun, flowers in the grass, legs for a caterpillar;
- dry the craft in air or on a radiator.
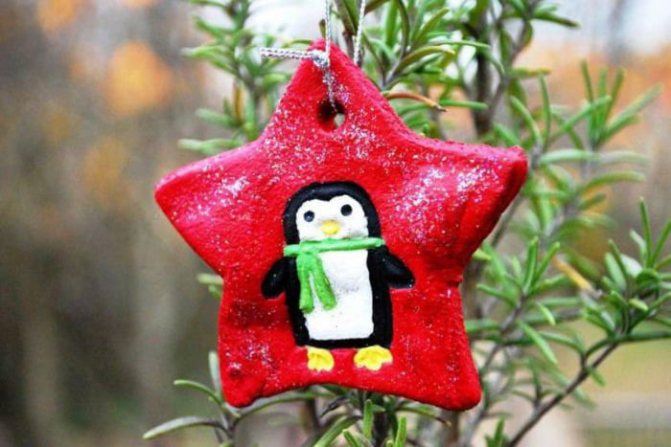
Christmas decorations
On New Year's Eve, you can make your own Christmas tree decorations from salt dough. This is a reason to start a pleasant tradition - every year to make a new toy with your child. Even a simple toy in the shape of a star or a heart, or maybe some kind of animal (symbol of the year), decorated with beads, bows, and ribbon is already a masterpiece. You can make a snowman, a Christmas tree, or Santa Claus's mitten.
New Year's decorations are made on the same principle as cookies. We need to roll out the dough and cut out the shapes of the desired shape. If you don't have a stencil, simply cut out a sample from cardboard, place it on the dough, and then trace it with a knife. Don't forget to make a hole for the ribbon. Decorate the toy now or after drying, paint it, varnish it, and it will serve you for many years.
After the child has learned to decorate flat figures, you can begin to master three-dimensional figures. To make the crafts light, a ball of crumpled paper or foil is placed inside the product, which is “covered” with dough. This technique reduces drying time.
Before you move on to sculpting three-dimensional figures, teach your child to roll sausages, roll them into snails, make balls of different sizes, shape them into cubes, and flatten them into flat cakes. These basic skills are necessary for independently sculpting even the simplest animal figures.
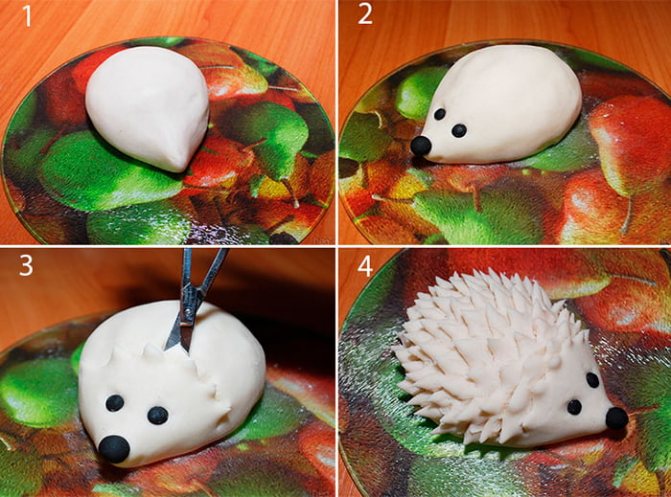
Making a hedgehog
A hedgehog made from white salted dough can become the first three-dimensional figure made by a child’s hands. Let's sculpt a hedgehog step by step:
- We roll a ball out of foil, and then form the body of a dough hedgehog around the ball - a figure similar to a pear. If you don't put foil inside the body, drying will take a long time and the hedgehog will be heavy.
- We make eyes and a nose: you can take black dough for the nose and peppercorns for the eyes, you can make everything from white dough, and paint it with paint after drying.
- Now we take nail scissors (adult help is needed) and make needles for the hedgehog. We start with the head, then cut the dough all over the body to make sharp triangles. Just cut the dough and you will understand how to do it. If you do the rows in a checkerboard pattern, it will be more beautiful.
- When our hedgehog is dressed in quills, he can be sent to dry and then painted.
Let's make a lamb
You can try making a figurine of a lamb or sheep together with a 5-6 year old child. For this craft you will need the simplest white dough. Next, follow the step-by-step instructions:
- We make 4 balls - these are the legs of a lamb, and place them next to each other in the shape of a square.
- We make a flat cake from a piece of dough, roll a tight ball out of foil, and place it in this flat cake. We “tighten” the foil ball with mass, we get the body of our lamb, and then we put it on the legs.
- Roll a piece of dough into a ball - this is the head, glue it to the right place.
- We make eyes from two small koloboks and place them on the head.
- We roll two sausages, twist them into snails - these are the horns of a lamb, attach them to the head and body with a wet brush.
- We make ears: we fasten a dough cake at one end, we get something like a petal, we do the same with the second, glue them to the head.
- Finally, you need to make curls. To do this, roll many, many small balls (0.5 cm in diameter), place them on the body (back, sides), and flatten them with your finger. We do this until the entire craft is covered with “curls”.
- The workpiece is ready. All that remains is to dry it, paint it and varnish it.
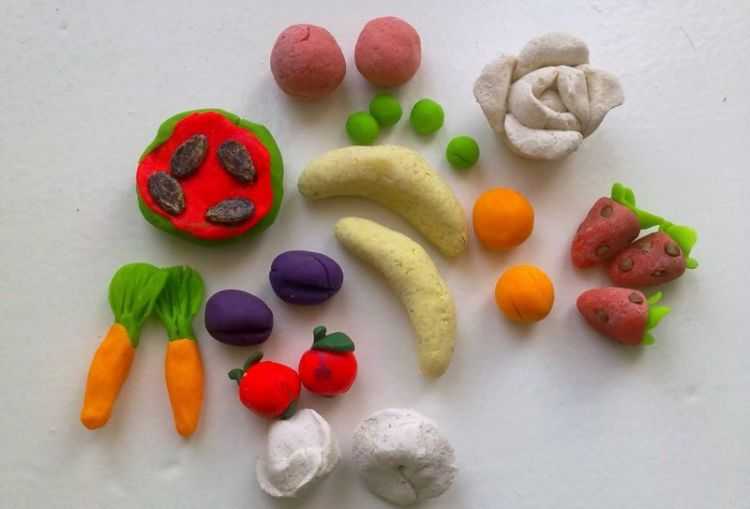
Making counting material for children
Dough figures can be used for beauty, as a gift, or you can make counting material for doing math with children in a playful way. To do this, you will have to work hard and stick a lot of objects of the same shape, at least within ten, but how fun it will be later! You can sculpt vegetables, fruits, confectionery, toy sausages, loaves, mushrooms - whatever your imagination allows. Here are just a few examples.
Beads "Mushrooms"
In order to stick mushrooms, we take ordinary salted dough, roll the sausage, cut it into small cylinders - these are the legs of the mushroom. Now roll a small ball and press the dough from one edge, giving it a hat shape (you can use a pencil).
We make 10-15 such “leg-hat” pairs. Then we make a hole in the legs of such a size that a cord can fit through it; you can use a wooden kebabs skewer or an awl. We connect the caps with the legs with water, dry them in the oven, and paint them.
Such mushrooms can be strung on a string, or you can stick skewers into a piece of foam plastic or a cork board and string them onto the resulting rod.
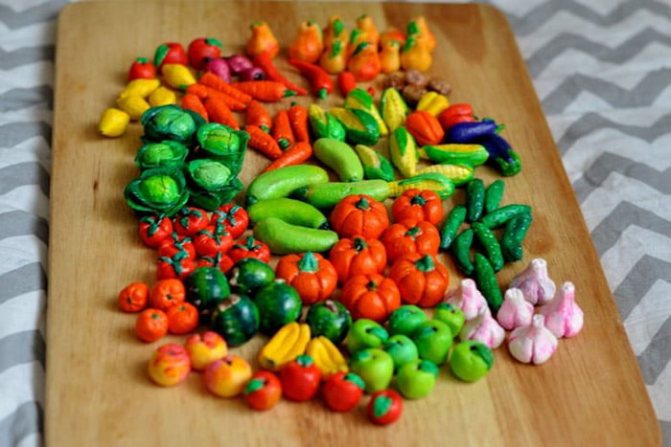
Vegetables and fruits
Making vegetables or fruits from dough for games and activities is no more difficult than fungi. Choose crops according to your taste and performance capabilities: cucumbers, carrots, tomatoes, corn or even cabbage. You can use colored dough, or you can make it from white dough and paint it after drying.
Playing with your baby with such toys is a pleasure. You can feed the little animals, divide vegetables between them, and at the same time learn to count, put them in baskets - one more, the other less, you can come up with a lot of games. The most important thing is that the child will not even think that you are trying to teach him, because the game is fun.
Lacing "Ladybug"
From the dough you can make an educational lacing toy - this is a plate with holes into which the child inserts the end of a lace or rope. The toy is useful for developing fine motor skills.
Making such a craft is not difficult. Roll out a layer of white dough about 8 mm thick, take an oval-shaped object (for example, slightly flattened tape, but other options are possible) slightly smaller than your palm. Then, using a stick or pencil, we make an arc-shaped indentation, marking the ladybug’s head, and draw a straight line dividing its wings. Using a felt-tip pen cap, we make dot-holes - the excess dough falls into the cap, and we get a hole. 3-5 holes on each wing is enough. We dry the future lacing, then paint it. The toy is ready.
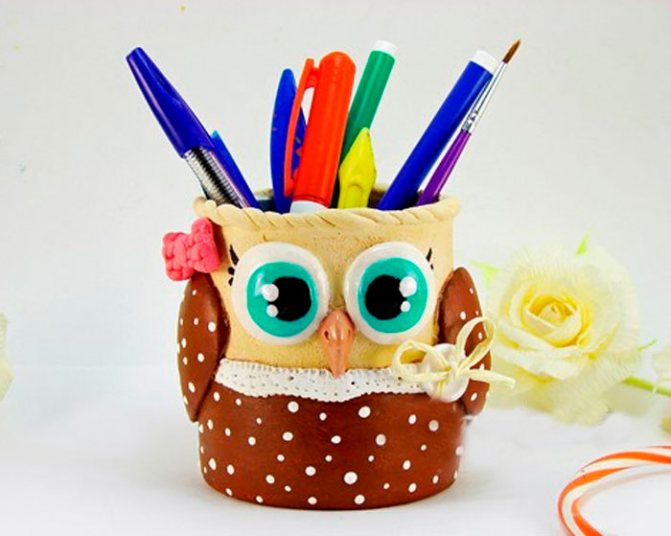
Owl (eagle owl) made from salt dough
You will need: salt dough, pva glue, nail file, manicure scissors, acrylic paints or gouache, brush, wooden board with a pendant, transparent manicure varnish.
Master Class
- Make an oval shaped body of the owl.
- Blind the eye in this way: make a round cake and glue it on, then take a piece of dough, form a small strip, wrap it in a tube and glue it as a pupil.
- Blind the second eye in the same way.
- Using a nail file, make small stripes from the pupil to the outer shell.
- Make rays around the eye by pressing the nail file onto the dough.
- Take scissors and make cuts to form the owl's feathers. This process is painstaking, the main thing is not to rush.
- Place the cuts in rows. The feathers should be staggered.
- Glue the craft to the board.
- Make the owl's paws and glue them on.
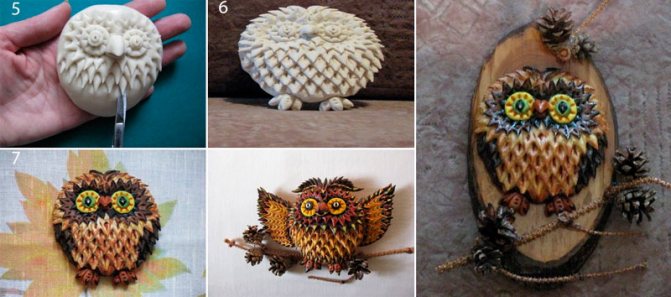
- Make the owl's wings, use scissors to make feathers and glue them on.
- Using the same principle, attach the “hairstyle”.
- Dry the craft.
- Paint the owl and wait until it dries completely.
- Cover the craft with varnish and wait until it dries completely.
The salt dough owl is ready!
Test features
The soft mass does not stick to fingers, has no irritating odors and is a hypoallergenic mixture. Contamination that appears on clothes and objects during the creative process is easily washed off and does not leave stains. Despite the edible ingredients, salt dough should not be eaten.
This material consists of available ingredients and is affordable, which allows you to do plenty of modeling with children of preschool and school age. It is easy to sculpt various shapes from it, since the material is very pliable, which allows even weak children’s fingers to cope with the task.
Motor development
The main secret to the safety of products is the presence of a large amount of salt in the workpiece. It acts as a natural preservative and, after drying, keeps the products in their original form for a long time.
Salted dough fruit basket

You will need: salted dough, a base on which the craft will be attached, such as a board or plate, a glass or a knife, a sheet of paper, a simple pencil, a garlic press, a rolling pin, PVA glue, acrylic paints or gouache, a brush, clear manicure polish, cloves.
Master Class
- Draw a basket on a piece of paper or print out a template.
- Roll out the dough into a thin layer.
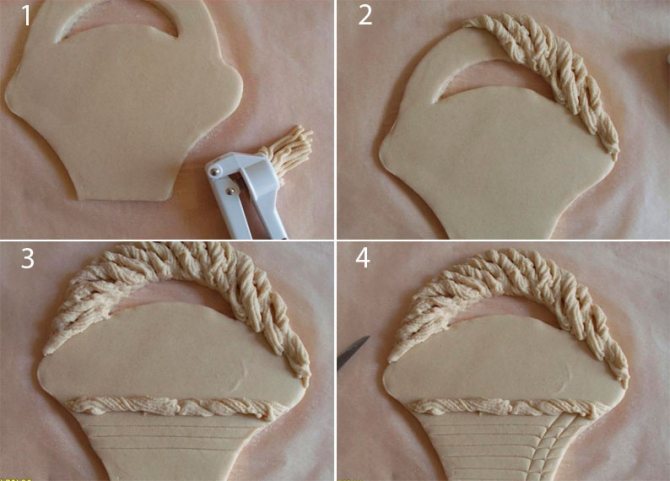
- Glue the central part of the layer onto the board.
- Attach a paper template.
- Cut out the basket with the tip of a knife.
- Pass the dough through a garlic press to create stripes, then twist into ribbons.
- Lubricate the handle of the basket with glue and place the flagella on it.
- Glue the flagella onto the rim.
- Using the tip of a knife, draw a mesh on the basket, making it look wicker.
- Roll out the layer and cut out 9 leaves with a knife.

- Using the tip of a knife, draw stripes on the leaves.
- Glue 3 leaves on the sides and top center of the basket.
- Make 4 large circles and glue them on as apples.
- Make a small indentation with a stack in the center of each apple and glue a clove.
- Make 3 small circles and glue them on as plums.
- Make about 20 small balls and glue them like a bunch of grapes.
- Dry the craft.
- Paint and wait until completely dry.
- Apply varnish and wait until completely dry.
Salted dough fruit basket is ready! I recommend watching the video master class!
#Salt dough/ Basket with vegetables.
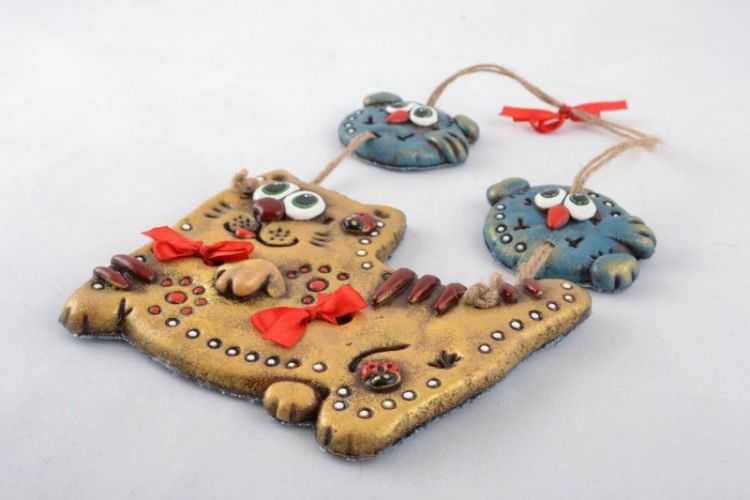
Salt dough cat
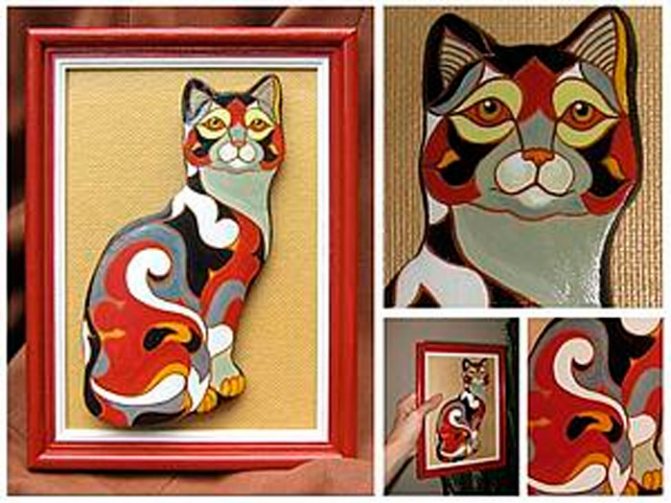
You will need: salt dough, a knife, a rolling pin, a simple pencil, a sheet of paper, sandpaper, acrylic paints or gouache, a brush, transparent manicure varnish, a glue gun or pva, a base for crafts, for example: a board with a frame, transparent manicure varnish.
Master Class
- Draw a cat or print a template.
- Roll out the dough into a thin layer.
- Attach the template and cut out the cat.
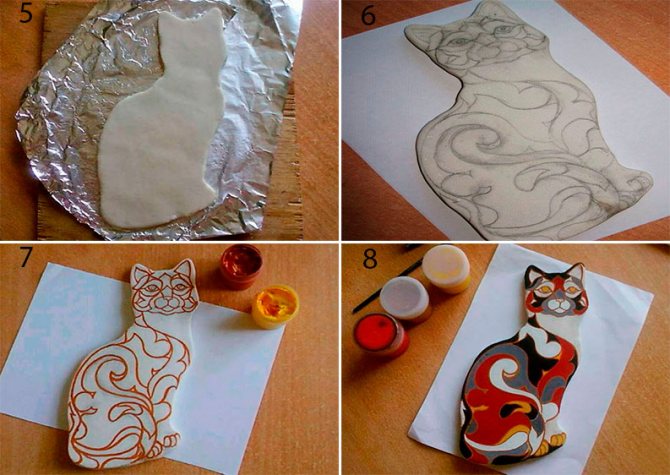
- Dry the craft.
- Sand the craft with sandpaper, removing any unevenness.
- Using a simple pencil, transfer the desired design onto the cat’s body.
- Paint with paints and wait until completely dry.
- Cover the craft with varnish and wait until it dries completely.
- Glue the cat onto the base with the frame.
The salt dough cat is ready! I recommend watching the video master class!
Cat souvenir (Laskutok) | Salt dough modeling part 1
How to paint crafts
After the products have dried, they need to be painted. And then they will finally acquire their brightness and beauty. To do this, you can take ordinary acrylic paints or gouache for drawing. The paints are easily diluted with water, after which they can be used to paint the craft. This activity will be no less exciting than modeling dough.
There is another way to color crafts - to tint the dough itself and sculpt it from colored pieces. The question of how to make dough for crafts colored is solved very simply - add paint or diluted food coloring to it.
But this technique will not be very convenient for small children, since in this case the dough cannot be eaten, and kids love to taste everything. Food coloring for children about one year old may also not be very useful. In addition, the colored pieces will mix with each other, causing the drawing to become unclear.
Salt dough pencil
You will need: water, flour, extra salt, a cardboard jar for the frame, PVA glue, scissors, a piece of decorative rope or corrugated paper, gouache, a brush, a button, stacks, acrylic varnish for crafts, a toothbrush.
Master Class
- Knead the salted dough in this way: add a glass of flour, a glass of salt, add water, then knead until the desired consistency of the dough. Separate part of the dough, add beige gouache, then knead.
- Roll out the cake to a thickness of 10-15 mm.
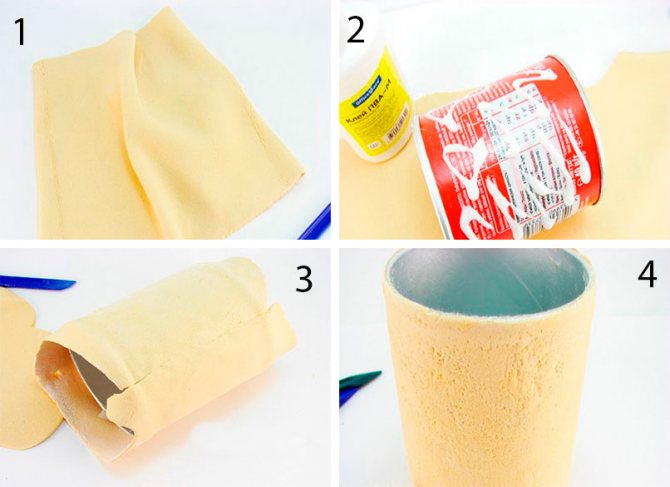
- Apply PVA glue to the outer rim of the jar and wrap it with dough. Cut off the excess with a stack and smooth the joints with a damp brush.
- Create a small dotted texture with a toothbrush on the surface of the dough.
- Knead the brown dough, roll it into a flat cake 10-15mm thick.

- Cut a 5cm wide strip of brown pastry and glue it to the bottom of the jar.
- Make 2 large owl eye bases from white dough, then glue them on.
- Make a beak out of brown dough and glue it on.
- Make eyes from turquoise dough and glue them on.
- Roll out 8 strips of pink dough, twist them into 4 flagella and make a bow, then leave it to dry for 2 hours.
- Make droplet-shaped owl wings using brown dough, then glue them on.
- Weave ropes of beige dough and glue them onto the neck of the jar.
- Roll out a sausage from white dough, draw the texture of the lace with a stack and glue it as a collar under the beak.
- Place the craft in a warm place for a day.
- Paint the bottom and wings with brown gouache and decorate with white dots.
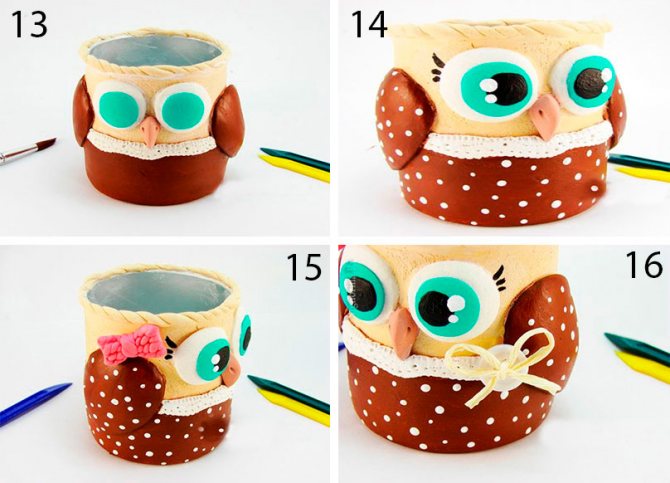
- Draw the pupils and eyelashes with black gouache, wait until the paint dries, then paint white highlights on the eyes.
- Glue a pink bow above the wing.
- Glue a button with a bow from a corrugated strip onto the lace.
- Cover the craft with varnish and wait until it dries completely.
The salt dough pencil is ready!
Why is it useful for children to sculpt with dough?
Close cooperation with modeling dough allows the baby to develop fine motor skills, which, in turn, contributes to the rapid and high-quality development of speech. In addition, modeling has a beneficial effect on the nervous system in general.
For activities with younger children, it is recommended to use salt dough, and not plasticine or industrially produced dough.
Firstly, salt dough, prepared independently, is completely devoid of any chemical additives or preservatives that are harmful to the baby’s health.
Secondly, it is much softer and more pliable, does not stick to your hands like plasticine, does not stain clothes and, if prepared correctly, will not crumble.
For the very first masterpieces of a little sculptor, a small amount of flour and coarse salt will be enough, so that when hot water is added, a cool mass will be obtained. Do you want to diversify your creativity and make an even more impression on your child? Add natural dyes to the mixture (beet juice, coffee, carrot juice or gouache), and then the joy of the little master will know no bounds!
Salt dough dachshund
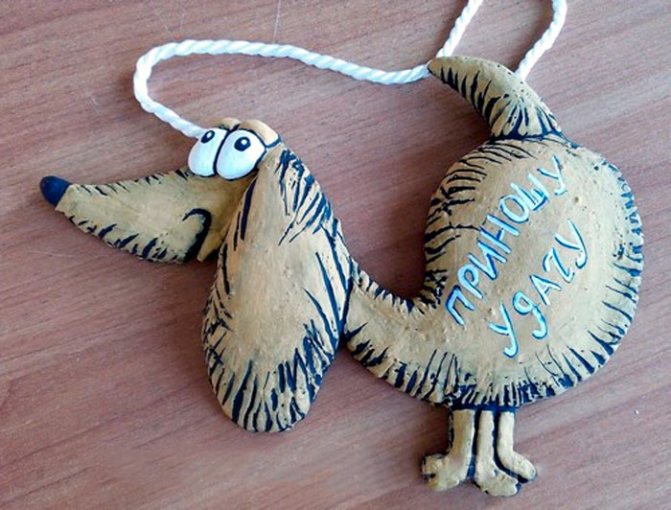
You will need: salt dough, a simple pencil, scissors, cardboard, paints, a brush, rope, toothpick, foam sponge, clear varnish, PVA glue.
Master Class
- Draw a dachshund on the cardboard as shown in the image.
- Cut out the template.

- Roll out the dough to a thickness of 5 mm and cut out the dachshund according to the template.
- Roll out the oblong eyes, then glue them on.
- Blind the eyelids and glue them onto the eyes.
- Use a toothpick to outline the paws, nose, mouth, ear and body contours.
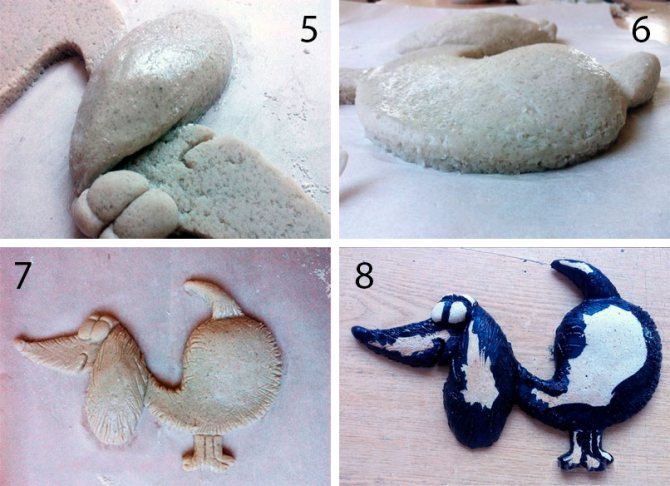
- Roll out an oval, then glue it onto the ear and smooth the seam with a wet finger. Use the same method to add volume to the dachshund's back and tail.
- Mark stripes in different directions around the entire perimeter of the dachshund, so that the stripes resemble wool.
- Dry the figurine.
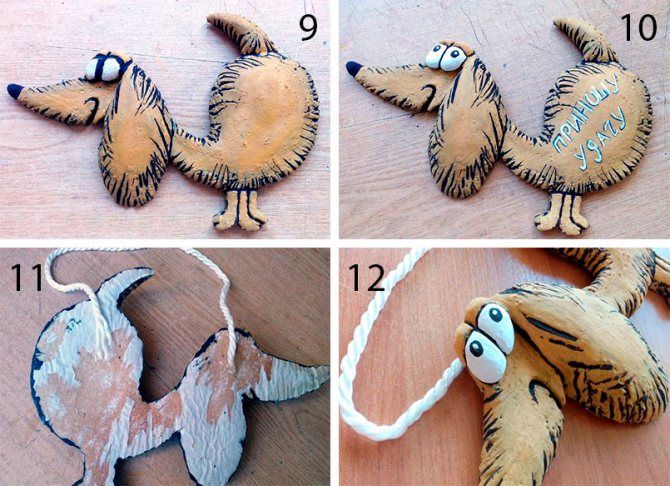
- Paint the figurine, then leave to dry.
- Glue a piece of rope to the back of the craft for further hanging.
- Cover the craft with varnish and wait until it dries.
The salt dough dachshund is ready!
Boletus mushroom made from salt dough
You will need: salt dough, light bulb, paints, brush, foil, cardboard, masking tape, superglue, PVA glue, paper napkins, clear varnish, stack.
Master Class
- Cover the light bulb with tape, then cover it with dough and dry the workpiece.
- Cut a ring out of cardboard and place it on the light bulb as a base for the hat.
- Form a hat from crumpled napkins, then secure with tape.
- Wrap the hat with foil.
- Roll out the dough to a thickness of 5 mm and stick around the cap.
- Remove the cap from the stem, cover the bottom with dough and make stripes in a stack.
- Glue the hat onto the leg.
- Mold the mushroom's arms, legs and nose, then glue them on PVA.
- Make a caterpillar and glue it to the hat.
- Dry the figurine.
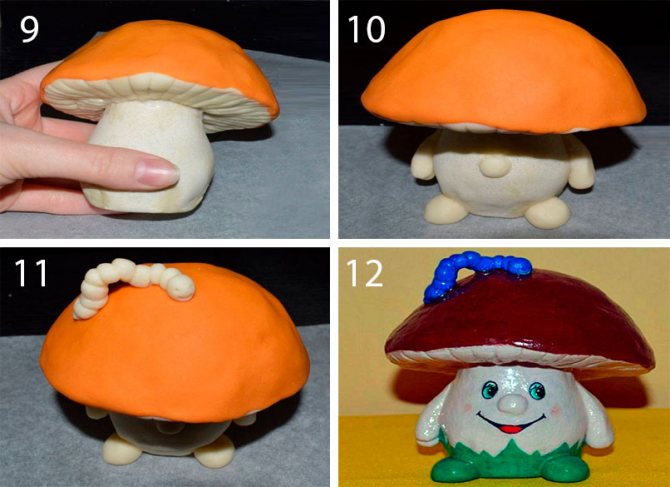
- Paint the figurine, then leave to dry.
- Cover the craft with varnish and wait until it dries.
Boletus mushroom made from salt dough is ready! I recommend watching this video!
Modeling from salt dough: Basket with mushrooms. Master class for adults and children.
What is salt dough
Salt dough is an excellent material for sculpting a great variety of different figures, inscriptions, numbers and much more, which only you have enough imagination for. Using this simple material you can make beautiful, interesting, and most importantly durable toys.
This type of art is very easy to learn. Crafts made from salt dough are easy to make, not dangerous to health, and most importantly, even a child can make them.

This is not only a fun process that develops fine motor skills, creative thinking and perseverance, but also a great way to add a special touch to your home interior.
After all, thanks to salt dough you can make photo frames, book stands and much more. After all, the finished salt dough figurine is quite strong and durable.

You can go through the process of sculpting, coloring and drying the dough together with your child, or make a pleasant surprise for him and make him happy. You can gather the whole family around the table, and together engage in the fun and interesting process of making crafts from salt dough.

We recommend reading:
Crafts from plasticine: the best master class for children at school or kindergarten. 90 photos of the best ideas for creating plasticine figures
Felt crafts - the best patterns and templates. Step-by-step instructions and master class for beginners (130 photo ideas)

DIY crafts from egg trays - the best step-by-step master class, with description. TOP 100 photos of original ideas for crafts
First, let's look at how to get salted dough for crafts?
Funny salt dough pigs
You will need: salt dough, paints, brush, foam sponge, stack, thin rope, toothpick, black helium pen, PVA glue.
Master Class
- Roll 2 balls for the snout and use a toothpick to make the nostrils.
- Make a muzzle, glue a snout and eyes above it.
- Make triangular ears, glue them, then mark stripes with a stack at the junction of the ears and head.
- Make a heart and glue it to the bottom side.
- Make indentations along the edge of the entire circle.
- Using a toothpick, make 2 holes on the top for attaching the rope and 2 holes on the bottom for the legs.
- Roll up the arms and glue them in such a way that they hold the heart.
- Make the hooves and make holes in them for the rope.
- Dry the workpieces.
- Paint the blanks with black paint and let them dry.
- Wash off the paint from the convex parts of the workpiece under running water with a sponge and wait until it dries.
- Prime the figures with a sponge and white paint.
- Color the piglets.
- Draw small details with a black gel pen.
- Cover the craft with varnish and wait until it dries.
- Glue wool threads as hair.
- Make a pendant out of rope.
Funny salt dough pigs are ready! I recommend watching this video!
Salt dough cat
Salt dough fish
You will need: salt dough, baking sheet, rolling pin, knife, sheet of paper, acrylic paints, brush, ribbon, water, shoehorn, pencil, sandpaper, clear manicure polish.
Master Class
- Draw a fish or print a template.
- Sprinkle a baking sheet with flour.
- Roll out a sheet of dough on a baking sheet.
- Place the paper fish template on the rolled out dough.
- Cut the fish along the contour with a knife, remove the excess dough to the side.
- Make a thin strip and attach it with water in a semicircle, separating the face and body.
- Make a heart and attach it with water as the lips of the fish.
- Blind the eyes and attach with water.
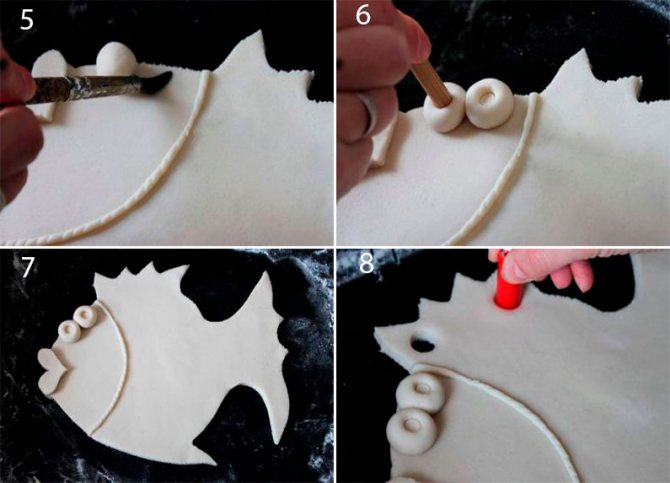
- Form the pupils by pressing the back of a pencil into the dough.
- Make 2 holes using a suitable round object on the fin of the fish.
- Shape the scales of the fish using a shoe spoon.
- Make eyelashes and stripes on the fins with the tip of a knife.
- Dry the craft.
- Smooth out any imperfections in the craft using sandpaper.
- Paint the craft and wait until it dries completely (about a day).
- Cover the craft with varnish and wait until it dries completely.
- Attach ribbon for further hanging.
Salt dough fish is ready! I recommend watching the video master class!
Dough fish.wmv
I recommend viewing a photo gallery of ideas for creating crafts from salt dough!
Crafts made from salt dough are perfect as a gift for any occasion. Think about what your relatives and friends love most, then make it and make a pleasant surprise for your loved ones with your own hands.
Everything for a child's development
The best and proven recipes for modeling dough (mass) for children's creativity. Ideas for using homemade plasticine in children's games and crafts.
Salt dough recipes for modeling
Homemade salted dough is an ideal material for starting modeling lessons with 1-2 year olds. It is soft, plastic, pleasant and natural. In addition, the process of preparing the dough is quite simple and does not take much time.
Simple salt dough for kids:
- 300 gr. flour;
- 300 gr. salt (not rock salt or iodized salt);
- 200 ml. cold water;
- 1 tbsp. l. vegetable oil;
- dye (optional).
Elastic salted dough with starch:
- 150 gr. flour;
- 150 gr. corn starch;
- 300 gr. salt;
- 200 ml. cold water;
- 1 tbsp. l. vegetable oil.
Soft salty dough with cream:
- 300 gr. flour;
- 150 gr. fine salt;
- 100 ml. cold water;
- 1 tbsp. low-fat cream;
- dyes.
Flavored play dough
For scent, add essential oil or spices to the dough: vanilla, nutmeg, allspice, cinnamon.
How to make salt dough
First, mix the dry ingredients well in a bowl. Gradually (in parts) add liquid and knead a soft dough. Knead the dough for about 10 minutes, adding a little flour if necessary. As a result, the dough should be elastic, pliable, soft, but not liquid. Before modeling, let the dough rest for 15-20 minutes.
How to make Play-Doh
Recipe:
- 1 tbsp. flour;
- 0.5 tbsp. salt;
- 2 tsp. citric acid;
- 1 tbsp. l. vegetable oil;
- water (no more than 0.5 cups);
- food colorings.
Mix all dry ingredients in a saucepan, then add vegetable oil. Place the mixture over medium heat and add water little by little. Stir until the mixture thickens and becomes homogeneous. Dyes can be added to all the water at once. Or you can make the dough thicker, divide it into several parts and add a small amount of food coloring diluted in water to each. Place the mixture on a table lightly sprinkled with flour. Stir until smooth for 5 minutes.
Natural dyes for dough
If you add dyes to the modeling compound, you can get the following colors:
- emerald – 5-10 drops of brilliant green;
- coffee – strong coffee or cocoa powder;
- scarlet – pomegranate or cherry juice;
- purple – beet or black currant juice;
- yellow – turmeric powder.
Modeling mixture recipes
The modeling mass, unlike dough, is more elastic, pliable and stretches well. DIY Lego at home using simple ingredients.
Air mass for modeling
An easy-to-prepare modeling mass based on starch and shampoo (liquid soap or shower gel).
Proportions 2:1, for example:
- 400 gr. potato or corn starch;
- 200 gr. aromatic shower gel;
- dyes, spices or glitter (optional).
Add shower gel to the starch, mix well and remember the mixture until a homogeneous consistency is obtained. Knead for about five minutes and let it rest for a few more minutes. The mass should be very soft, roll out well and keep its shape.
Store the mass for 2-3 days in a container or zip bag in the refrigerator.
Yogurt mass for modeling
Easy to prepare and safe. Aromatic and airy yoghurt modeling mass is a real tactile pleasure for children.
Ingredients:
- 3/4 tbsp. corn starch;
- 1 tbsp. yogurt (uniform consistency without pieces of fruit, etc.);
- dye (optional).
Mix all ingredients in a container. When the mixture stops sticking to your hands, roll the mixture into a ball. If the mass is still too sticky, add a little starch. And vice versa, if the mass has become too dry - yogurt.
The mass holds its shape for several hours; it should not be stored longer.
Snow mass for modeling
The snow mass is incredibly pleasant to the touch, very soft, like a cloud in your hands. Games with mass will give the child new tactile sensations and will captivate him for a long time.
Ingredients:
- 3 tbsp. baking soda;
- 1/2 tbsp. shampoo;
- 5 tbsp. l. water (~1/4 cup);
- 1/8 tbsp. liquid watercolor or 2-3 drops of food coloring (optional);
- 1/4 tbsp. citric acid.
Place baking soda in a large container and knead all the lumps with your hands (you can trust this process to your child). Add food coloring or liquid watercolor to the shampoo and mix thoroughly until the color is uniform. Combine colored shampoo with baking soda and knead the mixture with your hands or using a spatula. Add water to the resulting mass and knead until a crumbly structure is formed that easily holds its shape.
From the snow mass you can make Easter cakes using molds, build towers, snow caves and much more. When your child gets tired of playing, sprinkle the mixture evenly with citric acid or lemon juice, stir and you will see how it begins to sizzle and becomes more and more loose. The reaction will last about an hour.
WE RECOMMEND ON LABYRINTH.RU:
Self-curing modeling compound
Ideal for children's creativity, as it has a natural composition, is plastic, does not stick to hands, is hard after drying and can be painted with paints.
Ingredients:
- 1 tbsp. baking soda;
- 1/2 tbsp. corn starch;
- 3/4 tbsp. cold water.
Place starch and baking soda in a small saucepan. Pour in water and mix the mixture thoroughly. Place over medium heat and cook the mixture, stirring continuously, until it has the consistency of mashed potatoes. (It is important not to overcook the starch, otherwise you will end up with a sticky, sticky mass!) Place the mixture on the table. When cool, knead until it turns into a soft, elastic, non-sticky mass.
Leave the finished crafts to dry for several hours at room temperature. After drying, the products become hard and white. Large pieces may develop cracks. Cover them with fresh dough or paint over them.
How to store dough and modeling mass
Homemade plasticine should be stored in the refrigerator in a closed container or in a plastic bag. Shelf life is several days.
Ideas for crafts and games with children
(The text contains links to online stores to make it easier to find the product you need).
Thematic game Space
To play you will need: dough, foil balls, glass decorative pebbles, a star-shaped mold and space-themed figures (Aliexpress). To make space dough, add black dye and silver glitter with stars (Aliexpress).
Source: theimaginationtree.com
In search of pirate treasure
To play you will need: modeling dough, a small chest, various “jewels” (decorative stones, gold coins, beads, jewelry, etc.), a small spatula. Make play dough according to any recipe by adding yellow-gold dye (turmeric) and gold glitter (Aliexpress).
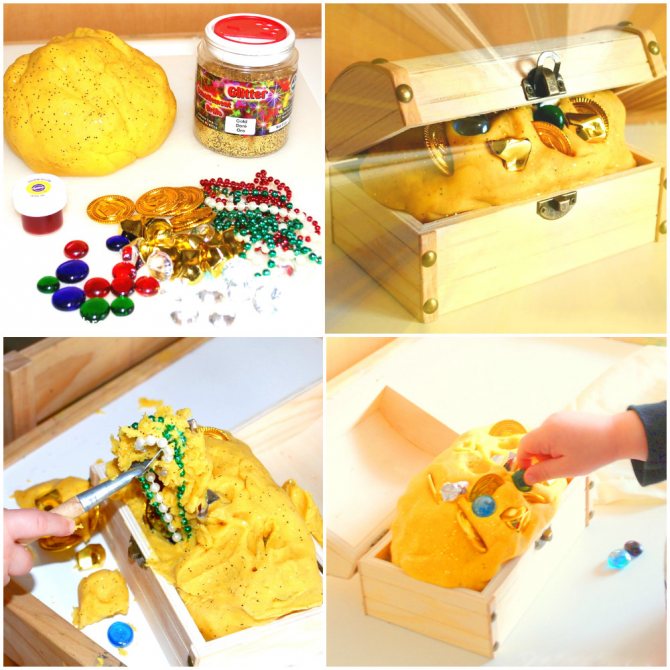
Source: onetimethrough.com
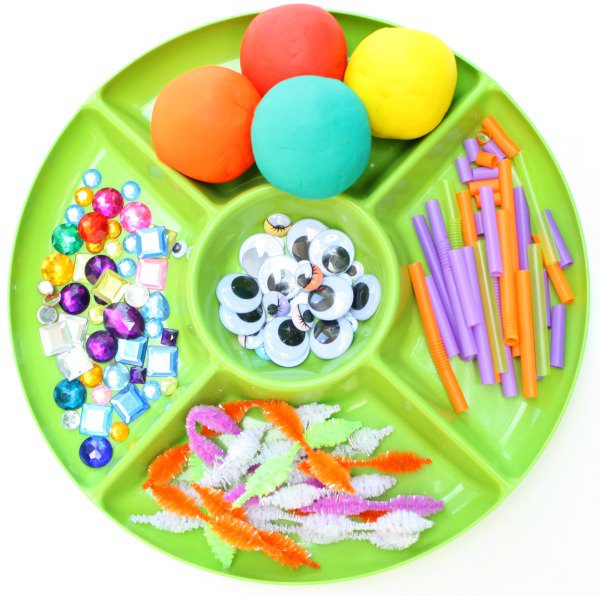
Crafts from salt dough “Monsters”
Make play dough in several colors. Prepare various materials for creativity: plastic eyes (at My-Shop, Aliexpress), chenille wire (at Aliexpress), decorative stones, cocktail tubes, etc.
Source: fantasticfunandlearning.com
Construction set made from colored pasta and homemade plasticine
For the game you will need: colored modeling dough, pasta of various shapes, gouache. Paint the pasta with gouache in advance. Using the dough, hold the pasta together and build any structures.
Source: kidsplaybox.com
The magical world of fairies
To play you will need: dough of several colors (as in the photo), fresh or artificial flowers, small figurines of fairies (Aliexpress), forest animals and insects (Aliexpress).

Source: littleworldsbigadventures.com
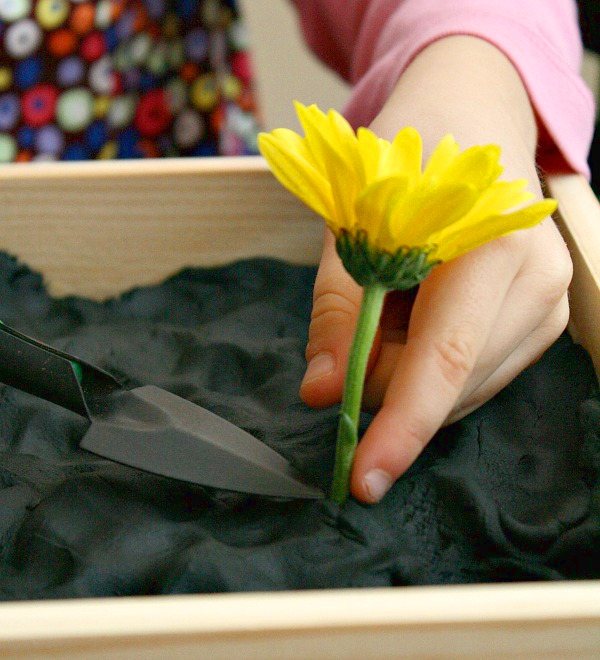
Flower bed made from play dough
You will need: black dough, fresh or artificial flowers (Aliexpress), tools.
Cooking sweets
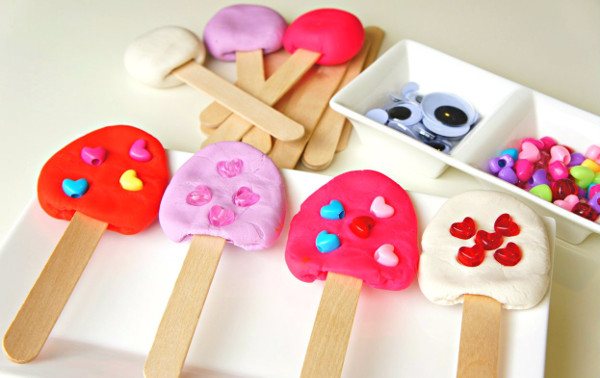
Let's make popsicle. You will need: modeling dough, ice cream sticks (from Aliexpress), creative materials: beads, buttons, etc. (Aliexpress).
Source: seekingshade.com
We bake cupcakes. You will need: modeling dough with glitter, silicone molds for baking cupcakes, materials for creativity: beads, rhinestones (Aliexpress), etc.
Source: plainvanillamom.com
Application "Ice cream". Download the modeling template here, print on a color printer and laminate for reusable use. Prepare the dough, prepare various little things for decoration (in My-Shop) and start creating.

Source: picklebums.com
Prints
Homemade play dough is great for making prints with all sorts of objects. Roll out the dough with a rolling pin and experiment!
Play archilogists. To play you will need: a magnifying glass, tweezers, insect figures (in My-Shop, Aliexpress).
Making numbers, studying counting
Download the printable template here, print on a color printer and laminate for repeated use. Model and study numbers and counting.

Source: lifeovercs.com
WE RECOMMEND
The book “Secrets of Plasticine” by Roni Oren (on Ozone: activate the discount code OZONBDJ91B , in My-shop).
This book will help you properly raise and get to know your child better. Children will be happy to make figures of different animals; learn to mix colors, experiment, imagine and come up with new toys. While working on a kitten, cockerel or turtle, a child will be able to create his own world - not a virtual one, as is customary these days, but a real one, made with his own hands.
If you liked the ideas, share them with your friends on social networks by clicking the button below!
SIMILAR ARTICLES:
- study counting
- modeling,
- fine motor skills,
- recipes,
- templates