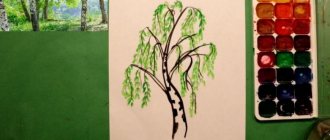
Still life for children 4-6 grades
Children of middle school age are already more diligent, their fingers are well developed, and their ability to concentrate is quite high.
A still life with fruit for children in grades 4-6 may consist of a larger number of items, for example:
- 2 watermelon slices;
- orange (whole and slices);
- apple;
- pears.
The drawing steps are as follows:
- Make a pencil sketch on which the positions of all elements of the future still life will be outlined, taking into account their sizes.
- Choose an orange (circle) as the central figure, followed by 2 watermelon slices. To the left of the orange is an apple (circle), to the right is a pear (2 circles of different diameters, the smaller one above the larger one). Before the orange – 2 orange slices (2 semicircles).
- Draw small details (leaves, cuttings), indicate future highlights, remove unnecessary lines and draw the contours of objects more clearly. The sketch is completely ready, you can take out colored pencils or gouache, watercolor.
- Color the orange and its slices yellow and orange. Be sure to leave a small area unpainted to imitate a glare of light. To depict the pulp, apply radial strokes with a yellow pencil, leaving the zest white. A little white will give the slices a slight wet shine.
- Color the watermelon, not forgetting the seeds, as well as the apple and pear.
- Draw veins on the leaves, decorate the fruit with cuttings, add shadows, and the drawing is ready.
So, step by step, you can complicate the compositions by adding new, more complex details to them. The acquired skills in drawing still lifes with fruit will be useful to children in adulthood, developing their powers of observation and accuracy, even if the chosen specialty has nothing to do with drawing.
Master classes
It is recommended to create drawings of fruits and vegetables after preparing the materials and tools. If you follow the steps correctly while drawing, the result will surprise even a novice artist.
Tomato
One of the frequent objects of still life is a tomato. It is not difficult to depict this vegetable. Thanks to its spherical shape and uniform color, it is easy to paint.
Displaying a tomato on paper involves the following steps:
Draw a circle. In its upper part add a small branch, which can be represented by a pair of short, slightly rounded lines connected at the top.
Add a few green leaves near the branch
Notice that the leaves look like a star.
Color the vegetable. The tomato should be red, and its twig and leaves should be green
There should also be highlights on the surface of the vegetable. They may be represented by small white circles. The easiest way is to leave the areas where the highlights should be unpainted.
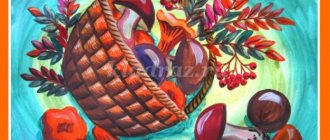
Techniques for making fruit appliques
A child of both preschool and younger age will always respond with enthusiasm to the idea of making an unusual applique of fruits from colored paper. Various working techniques are suitable for this, because each work will look unique, especially if made by the hands of a child. They can be made in the form:
- A regular paper applique on a cardboard base. To make them, you need the usual set of colored paper and stencils that imitate the original in shape and size. At first, it is worth starting with simpler shapes - apple, pear, grape, plum, apricot, cherry. Indeed, in this case it will be easier for the child to make them, since he often sees them.
- Volume applique. While working with this technique, the child develops a perspective view of objects. He remembers better, and in the future he will recognize these objects in the surrounding reality. For example, making vegetables from the garden - carrots, beets, cucumbers, etc. - will be an excellent workout, after which you can start working on rarer, exotic fruits - pineapple, banana, kiwi, grapes.
Creative composition from various kinds of applications. After the child has mastered these techniques, you can proceed to more complex, but even more original compositions.
In this case, the child, of course, will not be able to do without the help of an adult, but the time spent together is worth a lot. Well, if you prepare all the necessary figures of vegetables and fruits in advance and cut them out, then the baby will be able to cope with further work quite independently.
To complete the appliqué, glue the resulting products into a stencil-cut fruit vase.
By gradually increasing the complexity of the crafts technique, it will be possible to make the learning process easier, as well as develop the creative abilities of the younger student. In the course of such work, he will be able to create not just a picture, but will create a whole masterpiece where you can see a beautiful fruit vase.
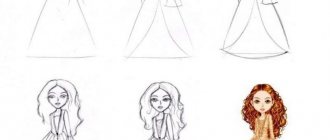
Preparing the composition
Notes on nodes in the senior drawing group on the topic “traffic rules”
In order to learn how to draw a still life, you need to be able to correctly select and place objects that will serve as nature.
A few simple rules will help you cope with this task.
Items for composition should be combined by theme. It is important to know how to place them correctly.
Location of items
When creating a composition, you need to decide on the layout, basis and format of the picture.
The image format can be horizontal, round or vertical, and accordingly the composition is formed according to this principle.
Horizontal helps to accommodate more objects for the image, but requires drapery in the background to create a harmonious design. The main emphasis must be placed in the very center of the composition.
The round format is not in great demand because it is not the most convenient option.
The vertical format involves a small number of objects in the picture. An example of such placement would be tall vases with flowers.
There are several ways to place composition elements.
With a triangular placement, the top of the supposed figure is formed by the tallest object, objects of smaller height form the base of the conditional triangle.
Objects that will serve as a model for a still life can be arranged in a circle or diagonally.
Items may overlap each other slightly; gaps are allowed between them.
It is important not to overload the composition with unnecessary objects; for this you should not use more than three sizes
Another component of success will be well-placed lighting, this will help to correctly place accents in the drawing.
Color ratio
Experienced artists consider another important rule for creating a still life to be the rule of three colors, which should form the basis of the drawing. You need to choose two or three primary colors and boldly use their shades.
A painting depicting a motley bouquet of flowers in any case has two dominant colors. You can focus on white daisies or red poppies, avoiding excessive variegation that tires the eye.
Juicy and beautiful apple
Summary of a lesson on drawing “airplanes” in the senior group
Apples appear on our tables in the middle of summer and do not leave the diet until late autumn, so they can be drawn from life. For the creative process you will need a pencil, the apple itself and a sheet of paper. After preliminary preparation, you can begin the drawing process:
- the outline of the fruit is depicted in the form of an ordinary circle; after outlining it, it is necessary to make the image naturalistic; to do this, draw a concave line at the bottom and top of the figure;
- in the lower recess an inverted crown is drawn, this will be the middle of the flower from which the apple has developed, and its upper part should be decorated with a stem, a simple stick with a leaf at the end.
You can decorate an apple in any color you choose, because green and yellow, red and orange apples of different colors grow in gardens. In the process of drawing, a child can learn to use watercolors and gouache, paper crayons or colored pencils.
Types of designs
There are many cutting designs, but we will look at the most basic forms. Fruit slices can be in the form of:
- assorted fruits;
- fruit carving - the art of artistic cutting of fruits;
- fruit plate;
- fruit composition;
- fruit bouquet.
Each type is beautiful in its own way and requires its own skills and efforts. Especially carving and creating bouquets. But you can learn this over time, if you realize for yourself that you get pleasure from bringing your ideas to life with bright fruit and berry colors.
So, we have sorted out what we need to create the slices; we will focus on the fruit plate. It remains to take note of a few useful tips.
Flat plate with a simple pencil
The basis of any classic plate is a regular geometric figure - a circle. You can try to draw a plate from two different angles: from above and from the side.
Plate on top
This is the easiest way to draw a plate with a simple pencil. First, you need to draw an even circle in the middle of the sheet. A compass is recommended, but those who have experience in drawing regular geometric shapes will not need one.
If you want to draw a circle by hand, then you can seriously simplify this task: first you need to draw a square. Arcs are drawn in the corners of the square, thanks to which an even circle is drawn, and the 90-degree right angles remaining from the square are erased.
You can also take a sketch of a simple cross with equivalent lines as the basis for the future circle and, already focusing on the ends of the lines, draw a circle.
Around the drawn circle, another circle is drawn, which serves as the side edges of the plate. The main part of the plate is ready. All that remains is to give the image three-dimensionality so that the drawing does not look simple.
To give volume to space, shadows and shading are used. In the main circle that is inside, it is necessary to apply shadows with light and precise hand movements to mark the bottom and side walls of the bottom of the plate. The rim of the plate should be shaded with unobtrusive lines.
You can often find all sorts of patterns on plates: geometric, floral, or even images of cartoon characters. We'll focus on the floral pattern.
All kinds of flowers, stems, leaves are drawn around the circle of the plate on the rim; to diversify the floral pattern, you can add bees, butterflies and other living creatures.
In order for the drawings to be as believable and proportional as possible, as in the original, it is important to pay attention in advance to finding images for sketching. In order to draw qualitatively and believably different objects without references and purely from your head, you need to practice often
Plate on the side
At the base of the side image of a flat plate there will be an oval. In order for the oval to be smooth and proportional, you need to make auxiliary lines and marks with a soft and easily erasable pencil.
On the depicted oval in the upper side part, you need to lightly draw an arc, which will be the upper part of the bottom wall. We highlight the edges of the oval with a thin line of a few millimeters.
Inside the oval drawn at the beginning, another similar oval is drawn, but this time as close as possible to the lower arc of the main oval. The bottom is drawn from below.
Further, according to tradition, the application of shadows and highlights continues. The places where the shadow falls are outlined, and they are highlighted with a simple pencil by shading or shading.
There is one trick in order to correctly and naturally depict shadows and other places that give the picture three-dimensionality: the plate reference that you previously found needs to be processed in a photo editor, using a black and white filter.
On the resulting image of the plate from a side angle, you can also try to draw a pattern, but you need to stick to the perspective, i.e. flowers or any other objects are drawn more “flattened”.