The question “How to teach children to draw a person?” It baffles many adults: not everyone can realistically convey proportions and portrait likeness, much less explain the stages of drawing a human figure to a child. We will show simple diagrams and give recommendations on how to draw a person step by step - even an adult child can do it.
shkolabuduschego.ru
Most adults, not engaged in professional artistic activities, stopped in their development at the “cephalopod” stage. But this is not a reason to turn away a child with a pencil who wants to explore this world and learn everything.
By drawing, the child fantasizes, develops his abilities, and trains visual memory. Of course, drawing a person is much more difficult than a tree or a hedgehog, but even the most complex task can be broken down into simple steps so that it does not seem so scary and impossible. Let's learn together!
On the topic: methodological developments, presentations and notes
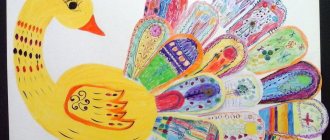
Summary of a drawing lesson in the senior group, based on the Russian folk tale “The Snow Maiden”.
Program content: Continue to teach children to draw a human figure in motion, observing the proportions of body parts, conveying the beauty of ballerinas through color, movement, smooth lines and emotions. Developed
LESSON SUMMARY ON DRAWING A PERSON (MIDDLE GROUP), TOPIC: “PORTRAIT OF THE SNOW MAID” Technique: Drawing with gouache paints. Program tasks: Learn to draw a human figure, conveying the shape of the part.
Summary of a lesson on art activities (non-traditional drawing with elements of appliqué) in the nursery group “Herringbone” Chernikova Valentina Petrovna. Goals: To introduce children to non.
Summary of a lesson on drawing a person “Snow Maiden in a Fur Coat” (middle group) Purpose: • To arouse children’s interest in a fairy-tale image, the desire to convey it in a drawing; • To teach children how to create.
SUMMARY OF A DRAWING CLASS IN A MIDDLE GROUP ON THE TOPIC: “THE SNOW MAIDE”.
I offer you a summary of a lesson for children of the preparatory group (6-7 years old) on the topic “A little boy.” This material will be useful to teachers of the preparatory group.
Source
I. General provisions
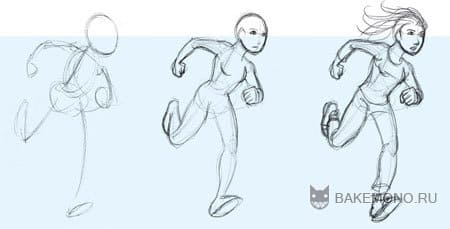
Before drawing the human body, you first need to sketch out the main volumes. Use circles and lines to outline gestures and body position. Never start detailing details from the head and then gradually work your way down. It is necessary to work with the entire figure, moving from rough shape to small details. This will help you see your body proportions clearly and prevent mistakes before you spend too much time on details and end up unable to change anything else.
For clarity, the three stages of drawing a body are shown below:
Lesson summary for the middle group “Drawing a Person”
Yulia Rakhmatullina
Lesson summary for the middle group “Drawing a Person”
Purpose: To train children in depicting a person .
Educational. Teach children to draw a person with watercolors, conveying the characteristic features of appearance.
Developmental. Develop the ability to draw a person in a certain sequence;
Educational. To educate: accuracy, perseverance, interest in the result obtained; educational interest in the defenders of the Fatherland.
Creative. Develop children's creativity, cultivate emotional interest in the result of their work;
Preliminary work. Examination of illustrations of soldiers, educational activity about the defenders of the Fatherland; conversations about the Russian Army, about the branches of the military, about the Motherland, about the Fatherland; reading fiction; listening to musical works dedicated to the army and defenders of the Fatherland.
Materials and equipment: 1/2 landscape sheet of paper, watercolor paints, a simple graphite pencil, a sippy cup (for each child), brushes, napkins (for each child, a sample drawing, a picture of a military man .
II. Human body proportions
The unit of measurement of the human body is the head. In Western art, men are typically 8 heads tall, while women are slightly smaller at 7.5 heads. In reality, the human structure is usually closer to 7 heads, not to mention other types of structure, because the proportions can be very different.
However, the 8-head model (shown in the picture) is very useful for beginners because it makes the basic parts easy to remember:
- Head;
- Nipples;
- Navel and elbows;
- Perineum and wrists;
- Fingers and thighs;
- The lower part of the kneecaps;
- Lower part of the calf muscles;
- Soles of feet.
Female body structure
Below are the main differences between the male and female proportional body.
- The body consists of an oval, soft shape;
- The shoulders are narrower than the hips (the hip joints are outside the pelvic area);
- Elbows at waist level;
- Fingers mid-thigh;
- Legs taper inward from the hips (more pronounced taper than in men).
Male body structure
- The elbows are at waist level, but the man's waist looks much lower;
- Fingers mid-thigh;
- Legs taper inward from the hips (less pronounced taper);
- Men are generally taller than women;
- The body consists of a trapezoid, angular in shape;
- Shoulders are wider than hips (hip joints are inside the pelvic area).
III A little reminder
Here are some drawings
, with which you can remember the proportions. Visualization will help you when you come to scaling joints and limbs.
The level of the knee is equal to the level of the elbow, and the level of the toes is equal to the level of the heel.
From shoulder to buttocks. The shoulder is level with the knee, fingers start from the level of the buttock.
Heels never protrude beyond the line of the buttocks.
The palm of the hand reaches to the shoulder.
When the arm is bent, the size of the palm is placed from the wrist to the crook of the arm.
When the arm is extended, the size of the foot fits from the wrist to the elbow.
IV. Muscles
Understanding muscle structure provides a huge advantage in creating the human body. Therefore, in this section we will look at some structures. And despite the fact that the description will be simplified, it will be sufficient for most drawings. Muscles or prominent bones will be shown as areas of different colors, the black outline being the line of muscle that is visible on the body. In order for you to understand better, the muscles in the examples are clearly expressed. Therefore, remember that this structure is found mainly in athletes, and in ordinary people the muscles are less pronounced. Also remember that women have more graceful and less bulky muscles than men.
Torso
Front view:
- Mastoid muscle;
- Clavicle bones;
- Deltoid;
- Breasts;
- Press.
Back view:
- Deltoid;
- Latissimus dorsi muscles;
- Deltas.
- The neck should not look like a straight cylinder.
- The shoulder line should not be a straight horizontal line.
- The neck narrows towards the bottom
- The transition from the neck to the shoulders is drawn using a trapezoidal shape.
Hands
Its position itself plays a large role in the behavior of the muscles on the arm, so I propose to consider different types. Notice how the muscles show up in different situations.
Straight arm, bent palm (inner side)
- Flexor carpi radialis;
- Extensor carpi radialis;
- Elbow \"peak\";
- Pronator teres;
- Line of transition to the body.
Relaxed (outer side)
- Deltas;
- Biceps;
- Triceps;
- Extensors.
Bent (outside)
Biceps
- Gains volume if there is resistance, for example if the hand is holding something heavy, and the triceps;
- Gains volume if the hand makes an effort to straighten something;
- The forearm starts out large and partially tapers.
Notice the alternation of the changing line of the hand.
- When a person stands, his arms do not hang straight. Pay attention to the connection between the line of the arm and the back of the neck.
- Consider how your hand changes when you turn your palm.
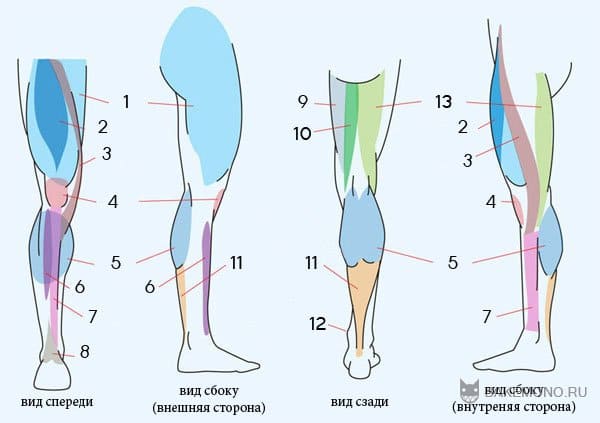
Legs
- Vastus medialis;
- Rectus femoris muscle;
- Sartorius;
- Patella;
- Calf muscles;
- tibialis anterior muscle;
- Anterior muscle;
- Extensor digitorum longus;
- Adductor;
- Semitendinosus muscle;
- Achilles tendon;
- Ankle bones;
- Biceps.
Bent leg
- The biceps is clearly visible with the leg bent (inside);
- When transferring weight to the leg, the rectus femoris muscle increases (inner side);
- When the leg is tensed on the inside, the tibialis anterior muscle is tensed, and when the leg is tensed on the outside, the calf muscles are tensed;
- When no force is applied to the leg, it is in a relaxed state and, accordingly, the muscle line is smooth (outer side).
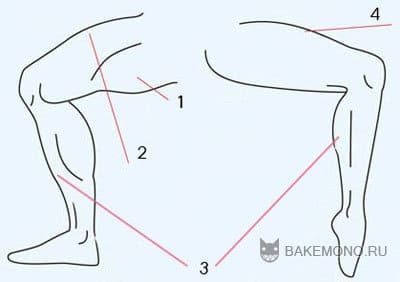
When the leg stands straight, the bottom of the leg bends backward (side view) and outward (straight view).
VI. Body in profile
Drawing a silhouette in profile starts with the usual skeletal structure:
1. The shoulder joints are a little distant from the spine and are not at the same level with it, because the “line” of the shoulders is in the form of an arc.
View from above:
Shoulder joint
Spine center
2. The center of gravity of the body is below the navel, inside the body. The body is most balanced when this point is on the balance line.
3. The hip joint is connected to the knee ankle line at a slight angle, so that the knees correspond to the center of gravity. If you look at the silhouette of the skeletal structure, there is an arc running from the head to the feet. However, such an arch is observed in upright people, and nowadays many people slouch.
4. The spine has a curved shape, similar to the letter “S”. How strong this curve is varies from person to person.
5. The apex of the curve of the spine, which protrudes forward, is located between the shoulder blades.
6. There is the opposite apex of the curve of the spine, which protrudes inward and is located slightly above the pelvic bone.
Having outlined the chest and pelvic bones, you can create an individual figure by superimposing lines of different sizes.
1. The arch of the back in women is more arched and more flexible than in men.
2. Women's abdomen most often has a smooth curve, while men tend to be flat.
3. Likewise, women's buttocks are rounded while men's are flatter.
VII. Breasts
To draw breasts, mark the nipples inside the body outline and then add volume.
To draw the breast from the side, draw a circle centered on a horizontal line that represents the level of the nipple.
- Here you can show the volume with a small line.
- The lower half of the circle corresponds to the lower part of the chest. The upper part of the breast is drawn with a slight curve extending from the nipple to the neck.
The shape of the breast begins at the axillary curve. It either sticks out (large breast size) or has a small depression (small breast size).
In this picture
You can clearly see the connection between the chest and biceps. The curve of the armpit goes into the chest, although most often part of this line is not drawn (indicated by a dotted line).
Read also
Topic of the week: “Parts of the body and face”
Topic of the week: “Parts of the body and face” Lesson 20. Grandmother and grandfather (Applying plasticine to the surface) Program content. Continue teaching children how to apply plasticine to a given surface; bring the product to the desired image using threads and plasticine. Consolidate knowledge
Topic of the week: “My Home”
Theme of the week “My Home” Lesson 22. House for a bunny and a rooster (Plasticine modeling) Program content. Strengthen children's ability to bring a product to the desired image using plasticine. Learn to retell fairy tales based on illustrations. Demonstration material. Heroes
Topic of the week: “Parts of the body and face”
Topic of the week: “Parts of the body and face” Lesson 1. Face of a clown (Modeling from plasticine using additional material) Program content. Teach children to roll balls from plasticine and attach them to a given base. Strengthen children’s ability to navigate
Theme of the week: “Transport”
Topic of the week: “Transport” Lesson 25. The train is rushing (Free choice of material) Program content. Learn to depict objects that resemble different geometric shapes (rectangle, circle, square). Draw complex objects with a simple pencil, conveying the shape of the main ones
Topic of the week: “My Home”
Topic of the week: “My Home” Lesson 41–42. Houses of the Three Little Pigs (part 1–2) (Drawing with pastel crayons, sanguine, charcoal, wax crayons) Program content. Continue learning how to make illustrations for fairy tales. Develop the ability to arrange objects on a sheet of paper. Learn
Theme of the week: “My City”
Theme of the week “My city” Lesson 43. The Kremlin (Drawing with gouache) Program content. Cultivate an interest in the history of your hometown. Learn to outline the silhouettes of the towers and walls of the Kremlin with a simple pencil, conveying their shapes and structure. Continue learning to use different shades
Topic of the week: “Parts of the body and face”
Topic of the week: “Parts of the body and face” Lesson 1. There are such boys (Drawing with a simple pencil) Program content. Teach children to draw a happy and sad face with a simple pencil. Learn to analyze and understand the content of a poem. Cultivate benevolence
Theme of the week: “Furniture”
Topic of the week: “Furniture” Lesson 11. Blanket for Vanyushka (Drawing with felt-tip pens) Program content. Teach children to decorate a rectangular object with colored stripes, alternating them by color. Learn to understand and analyze the content of the nursery rhyme. Cultivate benevolence
Theme of the week: “Clothing”
Topic of the week: “Clothing” Lesson 12. My winter hat (Brush painting. Gouache) Program content. Teach children to draw a hat with a simple pencil; paint over with gouache of different colors. Develop thinking, attention. Material. A large sheet with drawn three hats (red,
Topic of the week: “My Home”
Theme of the week “My Home” Lesson 21. Houses for nesting dolls (Drawing with colored pencils) Program content. Teach children to draw small and large objects consisting of a square and a triangle. Continue learning how to compose a plot composition. Cultivate responsive
Topic of the week: “My Home”
Theme of the week “My Home” Lesson 41. Ice hut (Drawing with pastel crayons) Program content. Continue to introduce children to cool tones. Learn to convey the characteristic features of objects using cool colors. Introduce opportunities
Topic of the week: “Parts of the body and face”
Topic of the week: “Parts of the body and face” Lesson 20. Clown mask (Brush painting. Watercolors) Goal. Teach children to draw a clown’s face with a simple pencil, consisting of circles of different sizes; navigate parts of the body and face. Strengthen the ability to analyze content
Topic of the week: “My Home”
Topic of the week: “My Home” Lesson 22. Fence near the house (Brush painting. Gouache) Purpose. Continue to teach children to draw various objects consisting of combinations of lines. Learn to retell fairy tales based on illustrations in the book. Develop speech and thinking. Demonstration
Topic of the week: “My Home”
Topic of the week: “My Home” Lesson 21. Building a house (Modeling from plasticine) Program content. To develop in children the ability to sculpt a house from rolled up columns, placing them on top of each other and firmly connecting them together. Strengthen the ability to use a stack. Develop
Theme of the week: “My friends”
Theme of the week “My friends” Lesson 28. Cipollino (Modeling from plasticine in combination with natural materials) Program content. Continue to teach children to sculpt the figure of a fairy-tale character using a combined method, conveying the shape of the head, torso, legs, arms and observing
Topic of the week: “My Home”
Theme of the week “My Home” Lesson 22. House for a bunny and a rooster (Colored paper. Application from prepared parts of an object) Program content. Cultivate compassion and kindness. Teach children to form a whole from several parts; apply glue to the part and stick it
Source