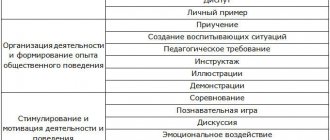
Benefits of classes
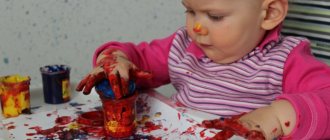
Drawing in an unconventional palm technique will allow the child to develop the muscles of his hands, and parents will be able to establish psychological contact with the baby. Such activities not only entertain, but also bring benefits:
- develop motor skills;
- give new knowledge about the shapes of objects;
- teach color recognition;
- develop taste.
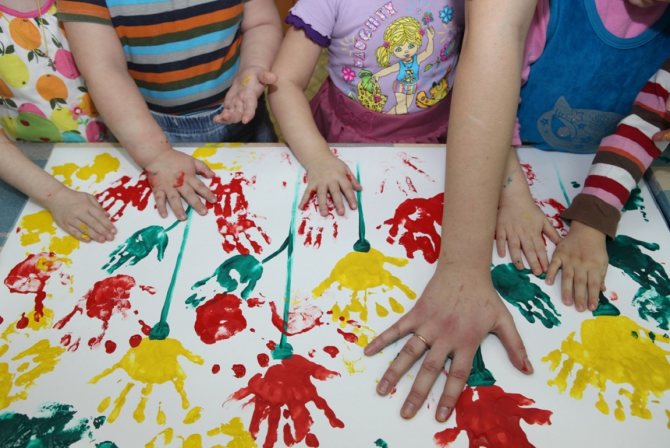
Regular finger painting classes allow you to strengthen your hand muscles and develop motor skills, and this has a beneficial effect on speech and abstract thinking. The child will be able to learn about new objects by depicting them, and will also become familiar with geometric shapes, different colors and shades. Such home lessons will help parents prepare their child for the first grade of school.
Small objects help develop coordination of movements. Children will be able to expand their horizons and gain new tactile and visual sensations. The child will receive many pleasant emotions from creative activities, he will develop a taste and a craving for beauty. Children express their experiences through colors. Each drawing reflects the joys and fears of a child. Parents should pay attention to what exactly he depicts.
You can start classes from 10-11 months, but the baby should draw only with the help of his parents. It is better to make the first lessons short - 5-10 minutes. Over time, they can be extended to 20-30 minutes.
You should not force your child to draw; it is better to observe his mood. Creativity requires a good mood and inspiration.
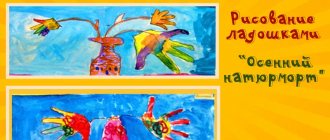
Drawing lesson: “Cheerful palms”
Objectives: to introduce children to an unconventional drawing technique (palm); learn how to independently come up with the composition of a drawing; develop creative imagination, attention, fine motor skills and hand coordination.
Equipment: simple pencil; set of gouache paints; brushes; palette; jars of water; napkins.
Progress:
Teacher: Today I offer you a new way of drawing. You've never drawn like this before. We will trace the palms and come up with interesting designs from them. (Then the lesson is conducted with a demonstration of drawing diagrams.)
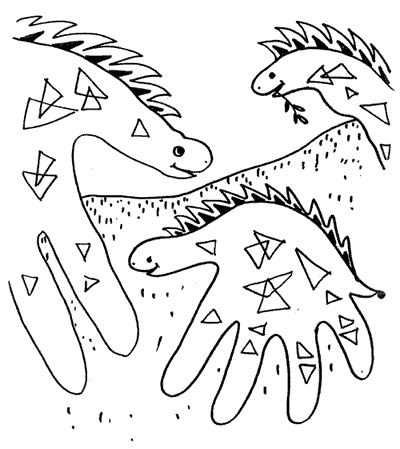
Baby dinosaur Smiles sleepily: Mom is nearby, dad is nearby - What else is needed for happiness?
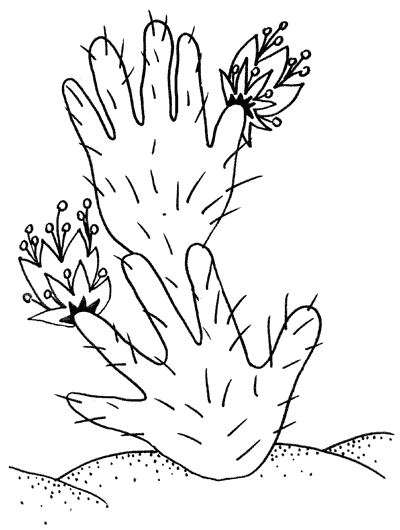
Take a closer look: It's a cactus. It's prickly. And when the rains come, all the thorns will bloom.
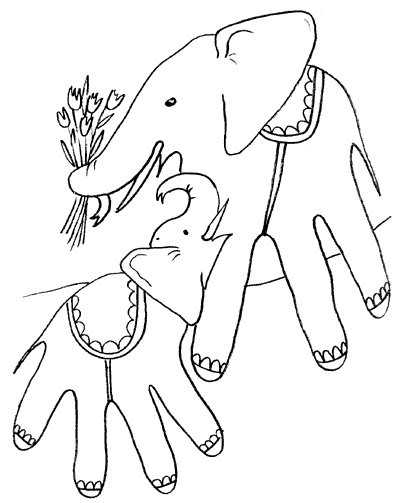
The elephant gave flowers to the baby elephant, and then said in his ear: “You eat better, my glorious son, so that you can grow up strong, like your dad.”
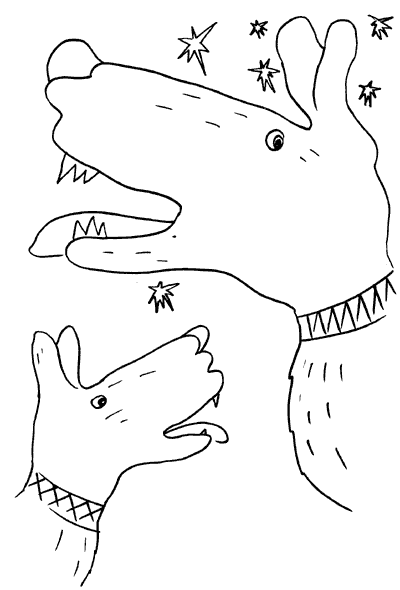
How many stars are there in the sky? I wish I could get at least one, If you can’t get even one, We’ll bark at the moon.
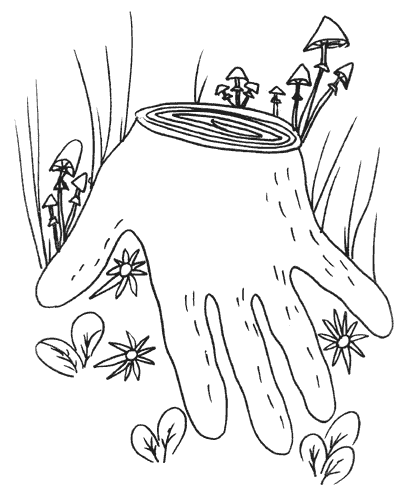
There is a stump in the clearing, It is not low, not high. Look, guys, what's growing on it? Honey mushrooms!
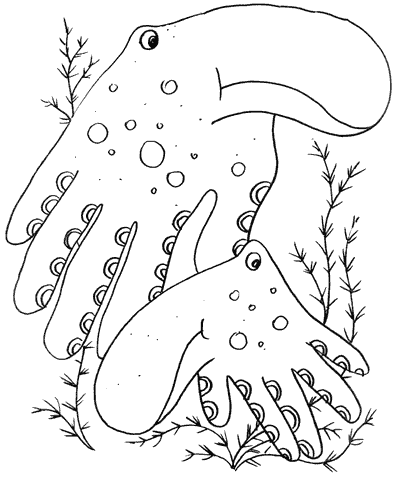
The octopus dad couldn't catch up with his son for an hour. The octopus barely calmed down a little, Because he needs to sleep, The legs need to rest.
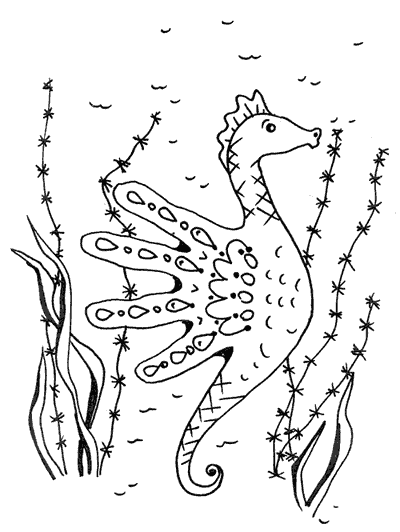
A seahorse rushes quickly, as fast as he can. Under water. Here I am stuck in the thick grass, I shout: “Gotcha, stop!”
Together with my friend, we draw a riddle, Palm, press the other one in order. Let's add circles, decorate them again - And now our butterfly is ready.
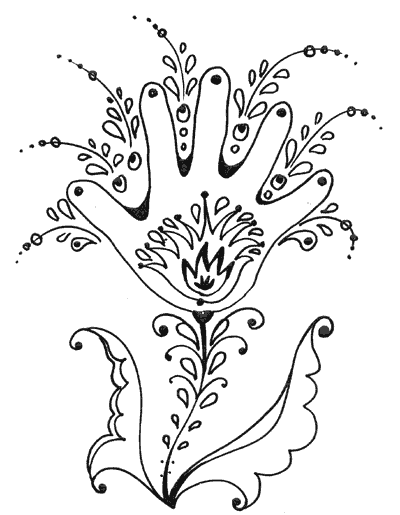
A scarlet flower has blossomed in the thicket, Each petal shines like a firebird. This is such a miracle. On my sheet of paper a fairy tale comes to life in complete darkness.
Teacher: - Do you want to try? Take a close look at your hands. Place your palm on a piece of paper. Turn it, move it. - Look! Imagine! Let your imagination run wild! Our palms can turn into whoever we want! Did you come up with it? Then press your palm and trace with a simple pencil. - And then fill in the missing details. - Well, now you can color your drawing using pencils, crayons or paints.
Teacher:
Guys, we are a little tired, let's take a rest: We painted today, Our fingers are tired. Let's shake our fingers and start drawing again.
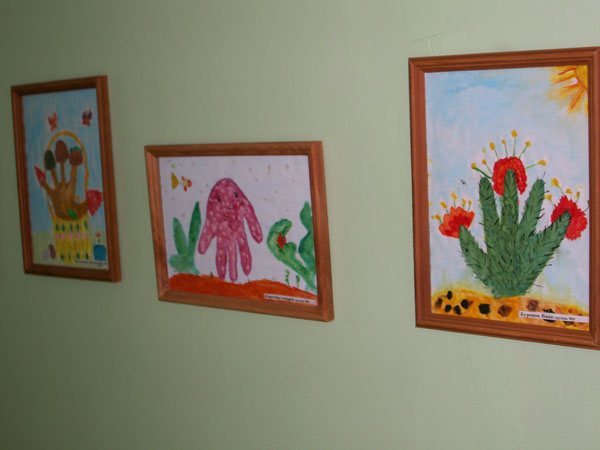
Teacher: Well done, guys! Look, we tried our best, and we came up with beautiful drawings. Guys, did you like turning your palm? (Children's answers). Today we will arrange an exhibition so that parents can also admire your work.
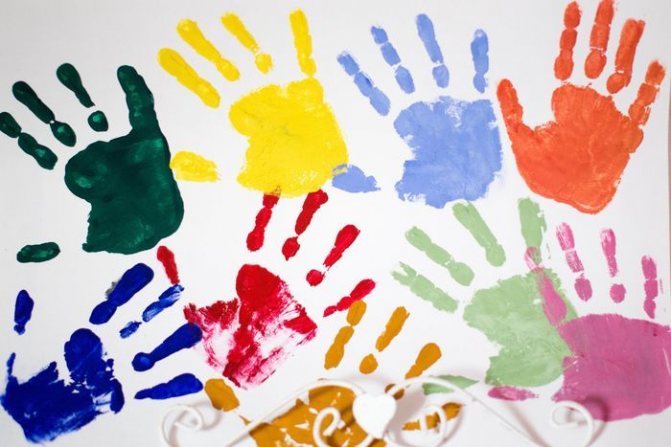
Here is the exhibition of “funny palms” we got:
Materials and tools
All materials can be found in any store that sells office supplies. Children do not need professional expensive paints. It is better to choose those with a safe composition, because the child can taste them.
Required tools and materials:
- paper;
- finger or any other paints;
- dry and wet wipes;
- cotton swabs and disks;
- old toothbrushes;
- oilcloth or mat for creativity.
You can choose any paper for drawing - A4 or A3 sheets, Whatman paper, coloring books, colored cardboard. You don’t have to buy expensive goods; just buy a standard album or sketchbook. But the paper in them should be thick so as not to get wet from water. Suitable paints include watercolor, gouache, and special materials for fingers. They can be purchased at any art stores. The colors should be bright; there are watercolors and gouache with glitter. Such materials will interest children. You can draw figures not only with your hands - the child can use cotton pads or sticks, toothbrushes.
It is advisable to seat the baby at a comfortable table, and lay a blanket or pillow on the chair to make him comfortable. It is better to cover the workplace with oilcloth or a special rug. In any case, the children will cover it with paints. It is also recommended to dress the child in old clothes that you don’t mind getting dirty. And to cleanse the skin you need to use dry or wet wipes.
Kids won't be able to draw serious pictures yet.
Their first attempts will resemble meaningless scribbles: dashes, sticks, crooked lines, blots. But the more often the child practices, the more interesting his images will become. With age, technique will improve, and the most talented children will begin to create real masterpieces.
Precautionary measures
Small children get tired quickly; for the first time it is enough to practice for no more than 5 minutes . Further, the child’s attention will not concentrate on creativity. The first few lessons are an adaptation period. You should not set difficult-to-achieve goals while you need to conduct lessons in the form of a game. While drawing, children, with the help of their parents, will be able to study geometric shapes, names of colors, various animals and types of transport, even body parts.
It is important to properly prepare the workplace and monitor the baby. First you need to deal with the paints. If it is watercolor, then it is diluted with water to a paste-like state. Thick gouache should also be made more liquid. Finger paints are ready to use. You can add glitter to them to make drawing more interesting.
It is better to pour the material into a flat saucer or plate. It is difficult for kids to get paint out of a small jar with their fingers; it is much easier to scoop it out of a large bowl. It is recommended to place a bowl of warm, clean water nearby. The child will wash his hands in it in order to continue using a different color. You also need to place a towel nearby, which can be stained with paint.
It is not advisable to leave your baby alone during classes. A small child can be so inventive that he will paint more than just paper . The role of parents during creativity is to channel the children's energy. The mother or father must communicate with the baby, prompt or help him. But you need to be allowed to make mistakes. Let a child draw crookedly or ugly - this is how he still expresses his “I”.
If the baby is not yet a year old, then it is better to provide him with a floor instead of a table. It is advisable to remove the carpet from it and lay down oilcloth. It is also recommended to remove all items that a child could damage. Wardrobes and beds can also be covered with oilcloth, otherwise they may be painted. If parents are afraid that the baby will freeze, you can put a warm blanket under him.
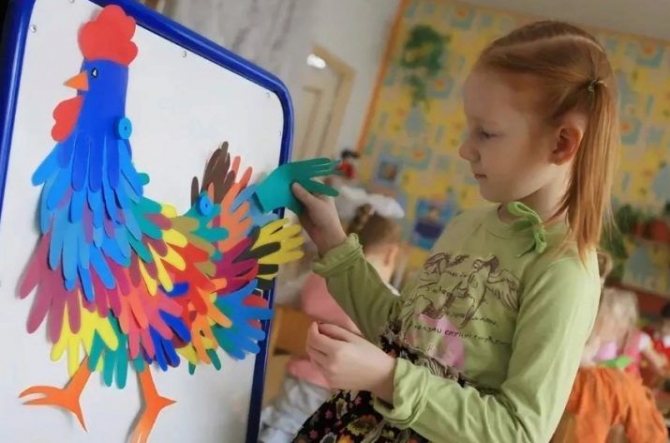
Ideas for original handicrafts made from palms
The options for crafts for children aged 10-12 are already becoming different. They come up with more ideas that are original. They even depict algae using palms. Interesting things you can do:
- symmetrical palms are used to create spiders and crabs;
- the fan position can be used to recreate a peacock;
- fish from an aquarium with bubbles;
- They even make caterpillars and centipedes.
There are a lot of ideas, even the same object can be made in different ways.
Octopus
To make a colored octopus you need to prepare: a sheet of album, colored paper, pencil, glue and scissors. Now you can move on to the craft:
- from any color, outline and cut out a palm template;
- the place where the palm ends is made rounded;
- the blank is glued onto a landscape sheet;
- the hair is made from a strip of orange or brown paper, many lines are cut along the perimeter on one side;
- draw a hat, cut it out;
- Hair is glued to the top of the rounded part of the palm, fringe down, and then a hat is attached to it.
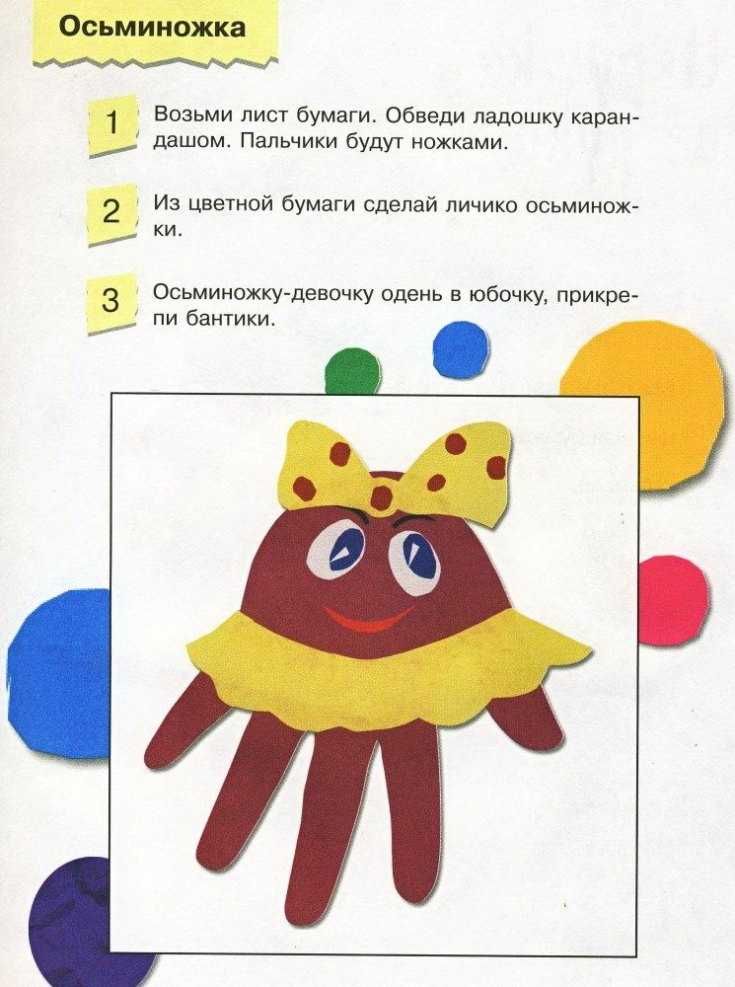
Eyes, mouth and nose can be drawn or cut out of paper. For beauty, the craft is decorated with beads glued at the base of the fingers. The completion will be the creation of the seabed: yellow sand, algae, small pebbles. All this is cut out of paper and glued onto a white sheet with an octopus.
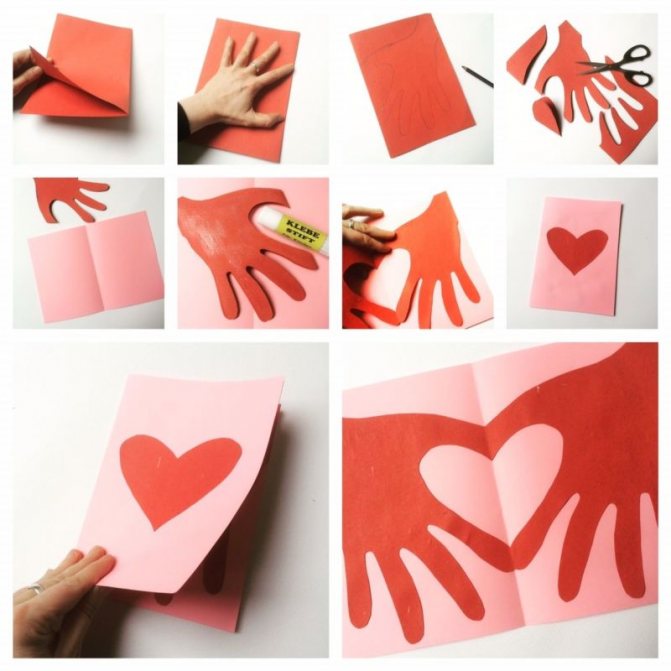
Heart
For Valentine's Day, you can create a gift with your own hands:
- The palms of each hand are traced, only the fingers should be connected.
- Then this outline is cut out. The color chosen is red or orange.
- Then each palm is connected with the thumbs inward towards the side where the thumb is located.
- It turns out that the base of the hands are connected together, and on top the fingers diverge to the side. You should get a heart shape.
- Glue the palms together with a thin strip from the bottom and a little from the side. A pocket is created inside where you can put a flower.
- The outside of the palm is decorated with flowers cut from paper of a different color.
Hare
A flat craft made from palms in the shape of a bunny will look original in a children's room. Completing of the work:
- The base is cut out in a round shape, and the saucer is outlined if there is no compass.
- A palm template is made from cardboard so that all the parts are the same.
- 14 palms are traced and cut out.
- Then they are glued in a circle onto the base, first along the edge, then in the middle and below.
- Carrots are cut out of orange paper, and two leaves are cut out of green paper and glued together.
- The base for the eyes and the pad for the mustache in the shape of a figure eight are drawn and cut out of white paper. The eyes are an elongated semi-oval, 2 larger blue parts, two smaller black ones. Glue by placing a smaller element on top of a larger one.
- The nose and mouth are red.
- They assemble the muzzle and fasten the elements together.
- Long ears in the form of drops, the middle is made yellow. Upper and lower legs.
- All parts are placed on the workpiece. The carrot is inserted into the folded foot.
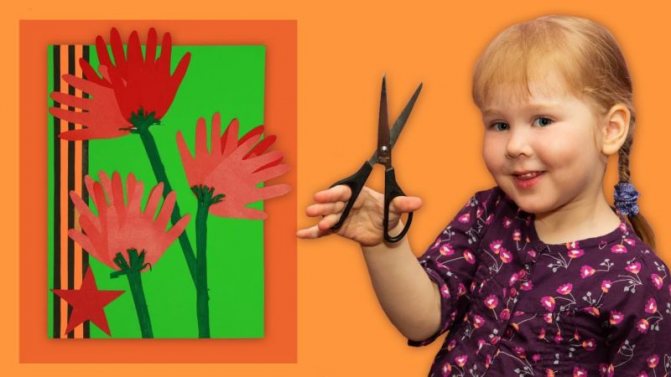
Tulips
Another interesting flower idea is tulips. A child's handprint of any color is made on a sheet of thick paper.
After drying, the templates are cut out and glued to the cardboard.
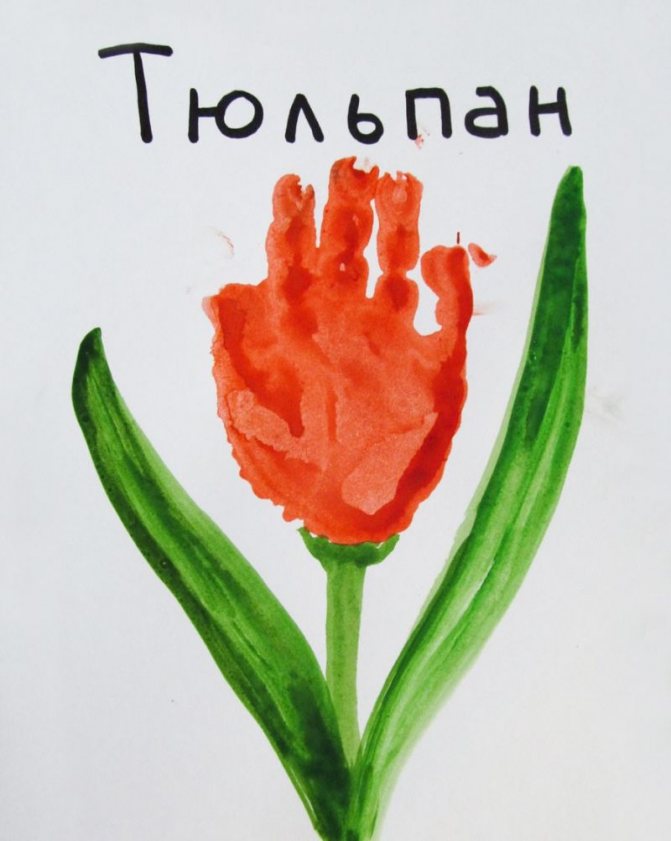
The stem and leaves are drawn on a green leaf, also cut out and glued to the palm. Then the entire flower is cut out along the contour.
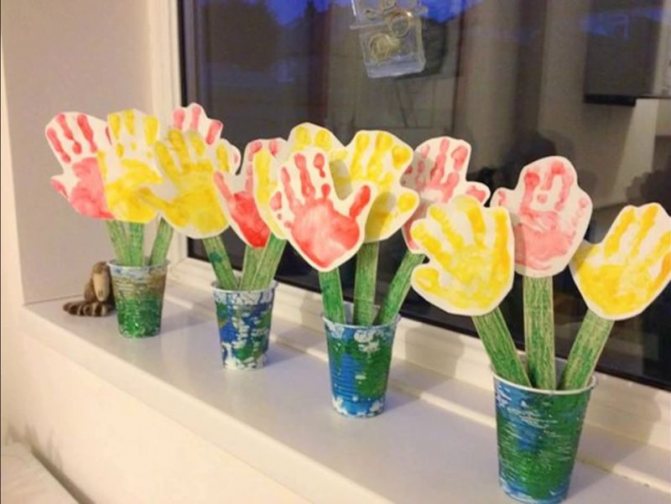
You can make several tulips this way, put them together like a bouquet and tie them with a ribbon.
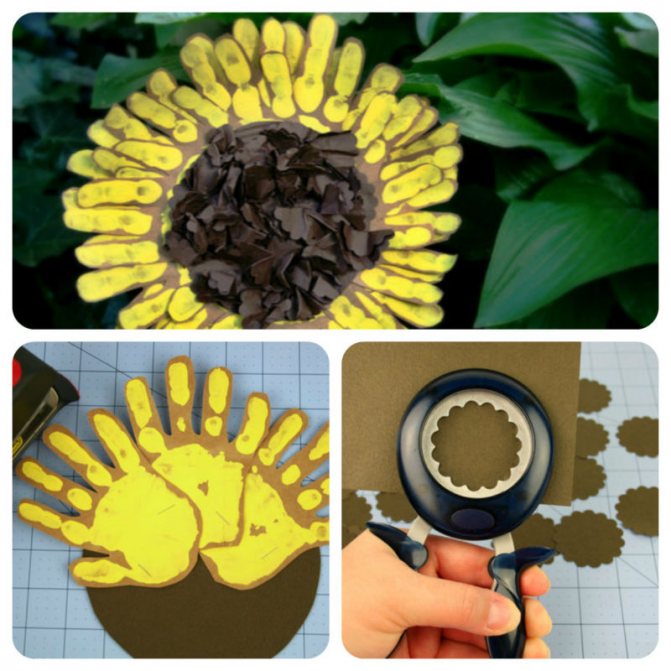
Sunflowers
Such crafts offer an unusual design. Children like to play with their hands in water, and even more so in paints:
- First, prepare the blanks of the palms.
- Children dip them in yellow paint and make prints on a white sheet. After drying, they are cut out.
- You will need a lot of blanks, 20-25 pieces.
- Next, cut out 6 leaves from green paper, and 3 circles with a diameter of 15 centimeters from yellow paper.
- The palms are glued with the base along the edge of each circle. Draw a circle in the middle of the craft with a pencil and coat it with glue.
- Sunflower seeds are poured in one layer into a circle and pressed lightly with your hand.
- The stem and leaves are made of colored paper.
- Form an applique on a sheet of cardboard and attach it to the shape of sunflowers.
Flower in a pot
Making a flower in a vase is very simple. Cut out a vase in the shape of a trapezoid and glue it to colored cardboard. A green palm is glued above the vase. Flowers for every finger. The core can be made from beads.
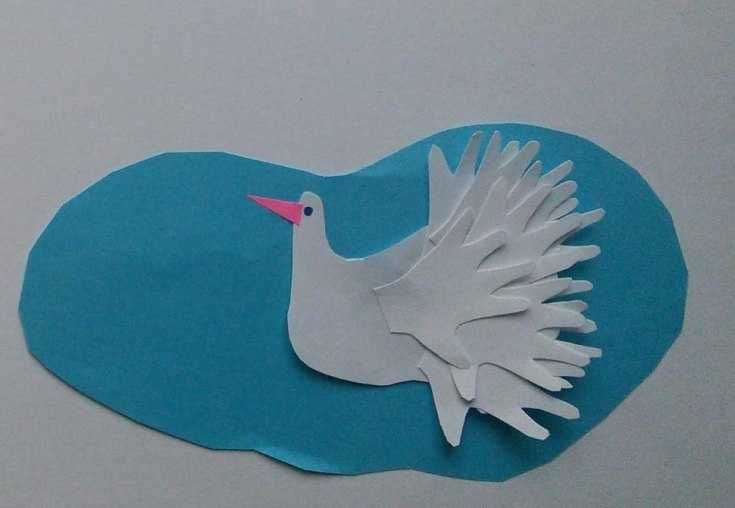
Pigeon
This is a beautiful craft made from palms and is very easy to make. The palm blanks are made of white. An eye can be replaced by a beautiful button.
Assembling the bird starts from the bottom. First, palms are placed in the form of a tail, then they are glued together. Next the eye is attached. That's it, the dove is ready.
Swan
Step-by-step instructions for performing the work:
- A child's palm is outlined and cut out from a white sheet. Then you can take a template and make a few more pieces to make fifteen for lush plumage.
- The swan's head and neck are drawn with a pencil and also cut out. The beak is painted yellow, the eyes are painted with a black marker.
- The feathers from the palms are attached in the opposite direction from the head.
Ninja turtle palms
Your favorite cartoon characters can also be made with your own hands. On white cardboard, dipping your hand into a bowl of green paint, put a palm print:
- After the workpiece has dried, draw an elongated oval with a marker on top of the base of the thumb. It should look like a knotted, folded scarf.
- The nodule is located on the side.
- The eyes are also marked on the bandage; the rest is painted red.
- A mouth is drawn above the fingers with a black marker.
- Then the craft can be cut out.
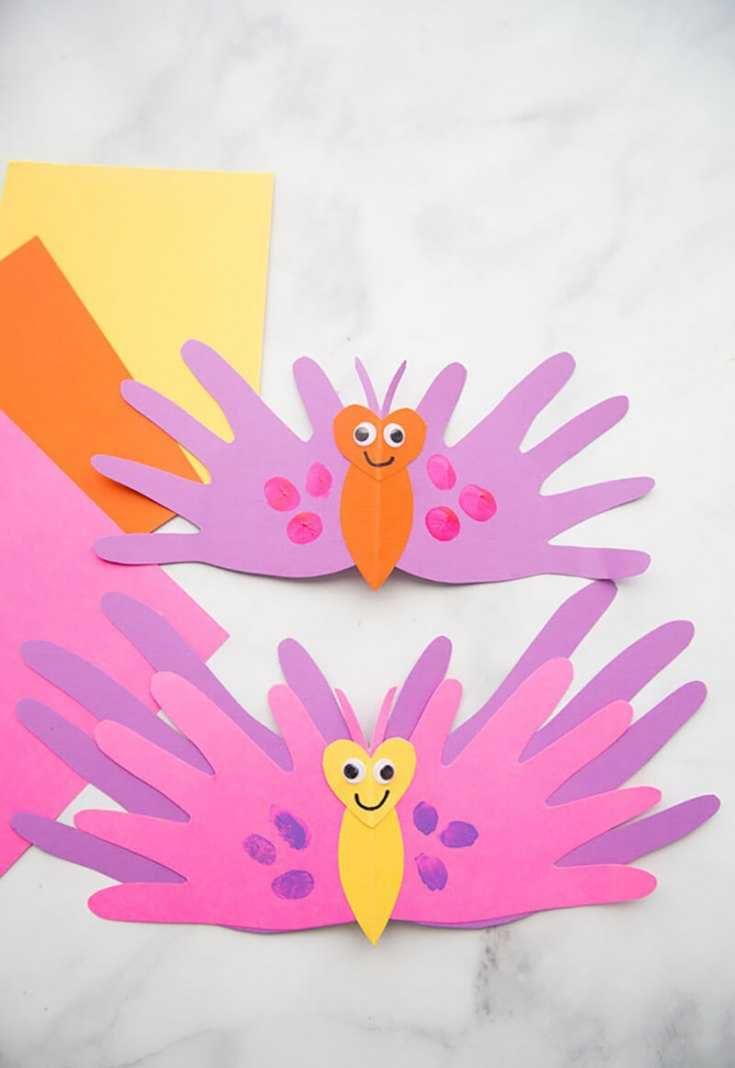
Butterflies
The child will work with interest on creating butterflies. They begin their creativity by making two palms of each color. Further:
- the beige body is an elongated oval, the head is a circle, connect them;
- wings are placed two on each side (fingers up) on top and bottom. You need to glue your palms under the body;
- thin antennae are cut out and glued to the head.

The butterfly will be decorated with ribbons, plasticine, and felt-tip pens.
Christmas tree
The applique for the New Year is its attribute, a green Christmas tree. It’s good to do it in a whole group, because you need a lot (at least 10 pieces) of paper palms. The assembly goes like this:
- lower part: 4 palms, fingers down, arranged in a fan and glued to the cardboard;
- then the same, only three blanks;
- then two palms, and the top is already one.
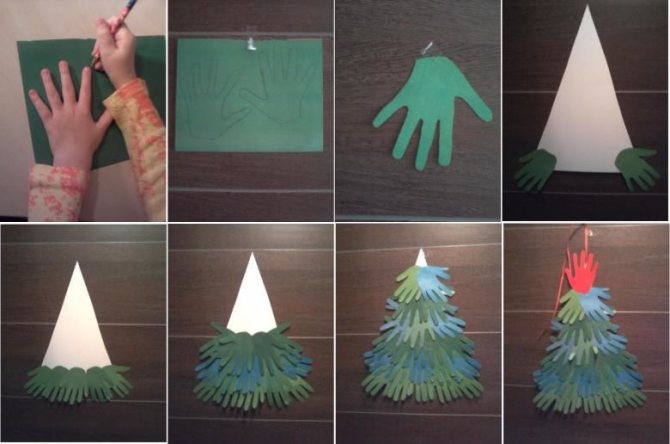
The result is a lush triangular-shaped Christmas tree.
You can glue a gold star to the top of your head. Decorate the branches with balls and ribbons.
Wreath
The Christmas wreath will also interest children. First, blanks of palms are made from shades of green. For the base, cut out a ring of the required size from cardboard.
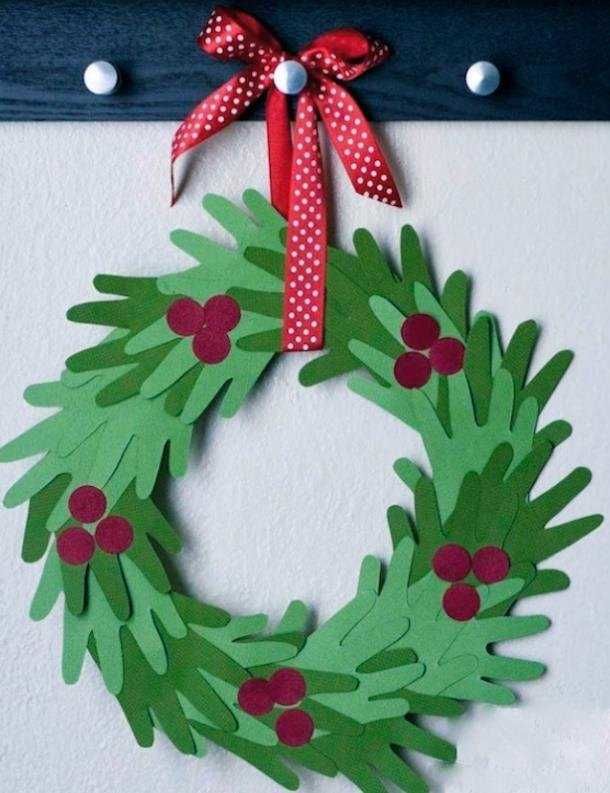
Decorations: bow, ribbon, berries in the form of small circles.
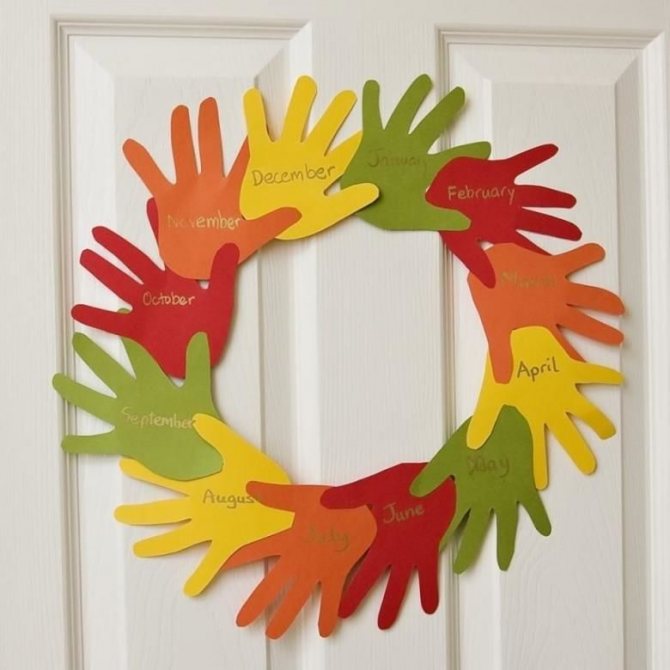
For fastening, you can use double-sided tape. They glue the palms to the ring, fingers along the ring.
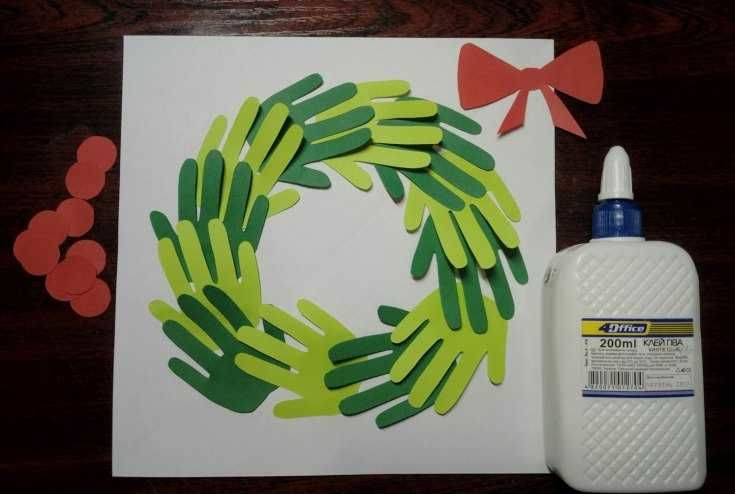
When the wreath is complete, mark a place for the bow and attach it. Three berries are placed symmetrically on the wreath.
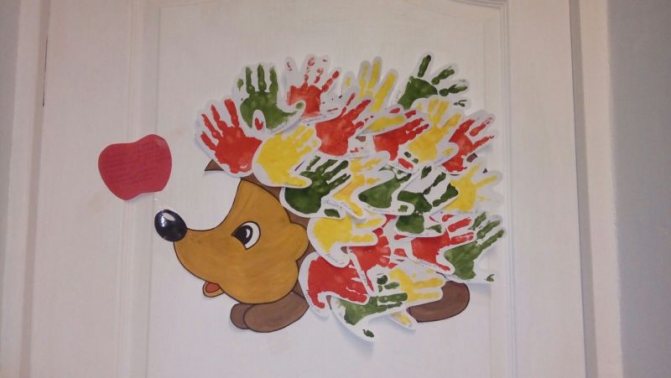
Hedgehog
This small animal is often found on forest edges, in parks, and in gardens. Children really like hedgehogs, so every child wants to make such an animal with their own hands. Work plan:
- a palm (4 pcs.) will be needed in black;
- arrange the blanks in a fan so that it looks like the back of an animal;
- glue parts;
- a body with a nose is cut out of cardboard and glued onto the prickly back;
- Use paint to draw a mouth, eyes, paws.
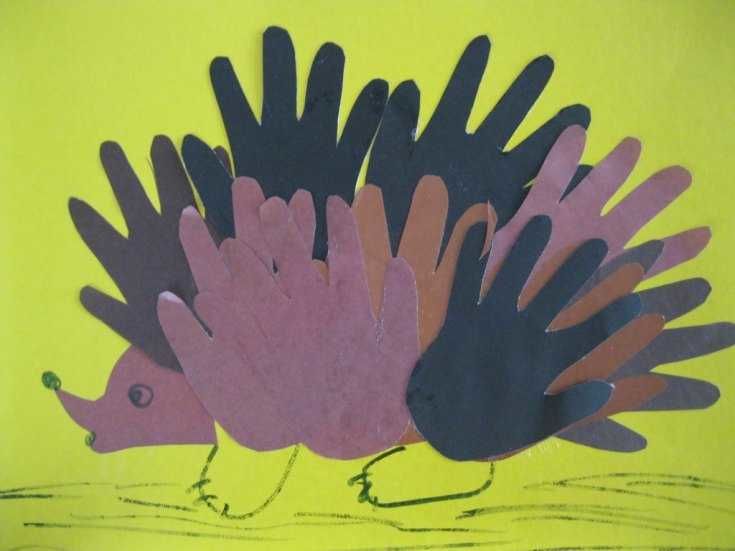
You can attach a paper apple or mushroom to the thorns.
Crafts made from palms can vary in complexity, so this should be taken into account when working with children. Kids can only take part in creating applications and drawings. Older children create interesting crafts themselves.
Paint Recipes
The technology called “Finger Painting” involves the use of paints. But many parents worry that they may be dangerous for the child. After all, many kids taste them, and they contain many harmful chemicals.
Some mothers prepare their own paints. The ingredients are quite simple:
- 2 tbsp. flour;
- 1.5 tbsp. water;
- 7 tbsp. l. salt;
- 1.5 tbsp. l. vegetable oil;
- glycerol;
- food colorings.
First you need to mix the dry products - flour and salt. Add water to them and stir until thick sour cream forms. Then add vegetable oil. The ingredients can be mixed with a whisk, fork, mixer or blender. Glycerin is added as desired, it gives the paint shine.
The finished mass is poured into different jars; you can use empty containers from gouache or baby puree. Then you need to add dyes. They can be natural - juice of carrots, beets, celery, turmeric. You can also use food colorings that are added to baked goods.
At home, you can prepare three-dimensional paints for finger painting. You will need few ingredients:
- 1 tbsp. flour;
- 1 tbsp. salt;
- 2 tbsp. water.
The products must be thoroughly mixed and placed in different containers. Then dyes are added to them. For additional shine, glitter or glycerin is added to the mixture. Next, the jars are placed in the microwave for 1.5 minutes at 180 degrees. The result will be a voluminous material. While drawing, the paints will lie on the paper so that any image will acquire a 3D effect.
You can also use porridge for cooking:
- 0.5 tbsp. fine-grained cereals;
- water;
- dyes.
Semolina is suitable for creating paints; it is quite small. It is cooked according to the usual recipe; the consistency of the porridge should resemble sour cream. For greater viscosity, you can add PVA glue to the mixture. The mass is also laid out in small jars and mixed with dyes. This material will also allow you to create three-dimensional drawings. But after applying it to paper, you need to handle the painting more carefully - it must dry. You can fix the cereal with regular hairspray.
Tips for parents
Parents should show the little ones exactly how to draw a picture with their fingers. The unusual technique of fine art should interest the child. Use your fingertip to scoop up some paint and make a dot or draw a line on the paper. The baby can repeat this. But you can draw not only with your fingers, but with your entire palm.
Older children enjoy using ready-made templates. You can find them on the Internet and print them or draw them yourself. These are images of fruits, vegetables, animals, transport. They are usually already painted, but have white areas. The child must paint them so that the colors match, or trace the outlines of the drawings .
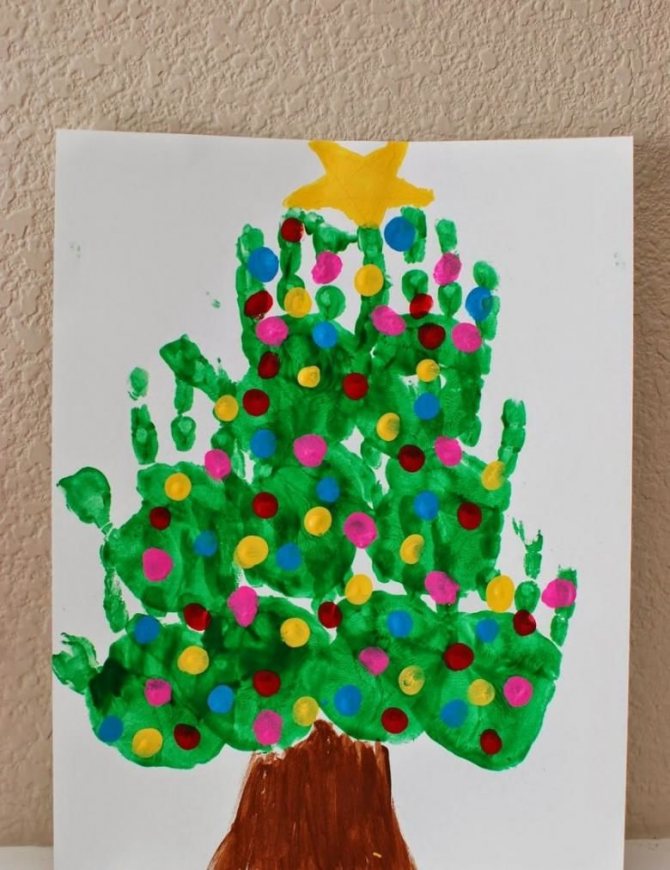
There are popular pictures that kindergarten teachers use. The finger painting technique is also suitable for depicting natural phenomena. A child can draw the sun, rain, snowfall, and starry night with his hands.
The background is painted over with your fingers, evenly distributing the material over the paper. But you can use colored cardboard. Large images - sun rays, clouds, fish, flowers - are drawn with palms. And small details can be depicted with little fingers, cotton swabs and even toothpicks.
Finger painting will allow you to prepare greeting cards and themed posters for kindergarten. The child will be able to take part in decorating the house for any holiday. And parents will help kids master more complex painting techniques with each new lesson.
Project “Colored Palms”
Municipal preschool educational institution
"Lipitsa combined type kindergarten "Spikelet"
Project “Colored Palms”
(
use of unconventional drawing techniques)
1st junior group 2015-2016
Educator:
Polyakova N.A.
Relevance of the project:
Non-traditional drawing technique as a means of developing creative abilities in preschool children.
The world will be happy only when everyone
man will be the soul of an artist. In other words, when everyone finds joy in their work.”
Rodin
It is impossible to raise a creative person without beauty. Beauty is an eternal source of spirituality, inspiration, and creativity.
How to help a child discover himself most fully? How to create conditions for the dynamics of creative growth and support a child’s inquisitive desire to know the world in all its bright colors and manifestations? It is these questions that visual activity, one of the simplest, most exciting and accessible ways to develop a child, helps to solve.
In the field of artistic and aesthetic development of a child, the main objectives of educational activities are to create conditions for:
developing children's interest in the aesthetic side of reality.
introduction to various types of artistic and aesthetic activities,
developing the need for creative self-expression, initiative and independence in the embodiment of artistic ideas.
Using non-traditional drawing techniques helps us solve these problems with children of early preschool age, since at this age children have not yet developed the skills of drawing with a pencil and brush.
Such non-standard approaches to organizing visual activities surprise and delight children, thereby arousing the desire to engage in such an interesting activity. Original drawing reveals the child’s creative capabilities, allows you to feel the colors, their character and mood.
Non-traditional drawing techniques create an atmosphere of ease, openness, promote the development of initiative, independence, and create an emotionally favorable attitude towards activities in children.
That’s why we developed the “Colored Palms” project.
Objective of the project
— formation of artistic and creative abilities in children of early preschool age through non-traditional drawing techniques.
Tasks:
- develop children's imagination and creativity,
- enrich and expand the artistic experience of children,
- develop a desire to experiment,
- encourage and support creative ideas.
— to cultivate a child’s positive attitude towards cooperation with adults, with children, towards his own activities and its results.