Glazunova Anna Aleksandrovna No. 230-095-129 APPENDIX 3 Summary of the modeling lesson senior group
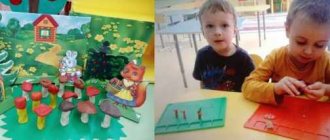
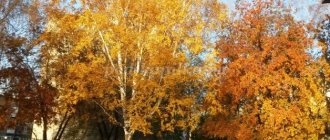
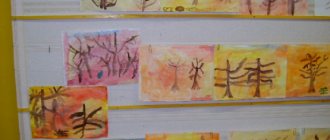
Autumn forest
collective work plasticineography
Program content.
Expand knowledge about the diversity of the plant world and autumn color.
To develop a cognitive interest in nature. Teach children to convey in their work the characteristic features of the appearance of different trees through plasticineography. Continue to introduce children to the means of expression in artistic activity: color, material, composition. Learn in modeling, convey the characteristics of objects: long - short, thick - thin. Continue to practice various sculpting techniques: rolling, rolling, flattening. Learn to independently find new design solutions and choose materials independently. Learn how to negotiate upcoming work and distribute responsibilities. Strengthen children's ability to distinguish words from signs and reproduce them orally. Dictionary:
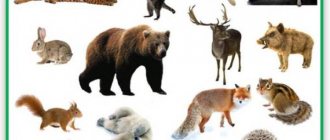
Forest.
Trees. Birch, maple, fir tree. The trunk and branches are short at the top and long at the bottom. Sunny - blue sky. Cloudy - gray sky. The grass is yellow. Mushrooms. Roll out the sausage, press and flatten. Material:
thick cardboard blue (light blue), size A3.
Set of plasticine, stack, hand napkin. Illustrations depicting different trees. Children's work depicting various trees, made using the plasticine technique from previous classes. Garbage bags - blue, yellow, white, gray, red. Napkins are red, yellow and green. Watermelon seeds. Preliminary work:
sculpting trees during art classes;
looking at various trees on a walk, looking at illustrations depicting an autumn forest. Progress of the lesson
Display an illustration of a forest in front of the children. Invite the children to consider what trees grow in the forest. These are fir trees, birches, maples. Ask the children what else can grow in the forest: mushrooms, flowers, berries. Invite children to examine and clarify the structure of each tree (maple, spruce, birch). The birch has a white trunk, the branches resemble an arc, at the top of the tree they are short, the lower they are, the longer. The maple has a straight trunk, branches on both sides of the trunk with a slope to the left and right stretch upward, and the lower the branches on the tree, the longer. The Christmas tree has a straight trunk, the branches grow from the bottom of the trunk to the very top, the longest at the bottom, the shortest at the top.
Recall with your children how to sculpt trees. Christmas tree.
Roll out a brown plasticine sausage - a trunk, press it to the base in the middle: slightly at the top, flattening at the bottom.
Roll out several green sausages and, bending each one with a corner, place it on the tree trunk from bottom to top, starting with the long branches, flatten it, and fluff the lower part of the branches in a stack. Birch.
Roll out a sausage from white plasticine - a birch tree trunk. Roll out thin white sausages, secure each one one by one on both sides of the trunk.
Press one branch against the trunk, bend the branch in an arc downward, and secure the other end. Apply black stripes along the trunk. Maple.
Roll and secure the trunk as with previous trees. Branches of thin brown sausages are attached in pairs on both sides of the trunk with a slope to the right - left in the upward direction.
Invite the children to decide who will sculpt which tree or trees. The teacher, with the help of the children, makes a pencil sketch of the forest (the location of each tree and its size are determined).
The sequence and methods of modeling should be repeated once again and the children should be invited to start working.
While working, pay attention that you can adjust the length of the branches using a stack, just remove the excess plasticine.
Invite the children to draw foliage on the trees.
Suggest thinking about what foliage can be made from.
Show two ways. 1.
Roll out the sausage, cut into small pieces in stacks, roll them into many balls, distribute them on the branches without pressing.
Place a watermelon seed on top of each ball with the rounded side facing the branch and press with your finger so that the plasticine ball is flattened and attached to the base. Use gouache to paint the leaves on the tree and on the ground in different colors (red, yellow, green, orange). 2.
Spread the space between the branches with glue, put 2 - 3 small pieces of yellow and (or) green, red napkins. The napkin must be slightly compressed (to add volume).
The teacher himself begins to make clouds from garbage bags (glue is applied to the prepared clouds cut out of cardboard and a bag is glued (you can use 2 bags - blue and white or blue and gray). If desired, children who completed the task before others can help the teacher .
Invite children to make grass and fallen leaves in any way they like (bag, napkin, seeds)
At the end of the lesson, display your work on a stand.
Draw the children's attention to how beautiful the forest turned out. The trees are beautiful and different, no two trees are the same. Note: children will be able to cope with this amount of work only if they have already sculpted trees using the plasticine technique in art classes. Glazunova Anna Aleksandrovna No. 230-095-129 Summary of a modeling lesson, senior group
Still life from teaware
Program content:
To form an aesthetic attitude towards everyday objects and their artistic depiction in still life.
Strengthen children's understanding of still life. To develop in children a sense of composition and color - to teach them to place pattern elements on the surface of an object. Strengthen the ability to connect parts of a product by smoothing the fastening points. Automate phrasal units that ensure the organization of the lesson; practice individual logical types of statements. Cultivate interest in each other’s visual activities, the ability to provide all possible assistance. Vocabulary:
teapot, cup - tableware.
To drink tea. Candies, cookies, bagels. Still life. "Teaware" Roll out the ball, flatten it, roll it into a sausage - a handle. Right left. Material:
Parcel with a teapot and a pair of teas, bagels, sweets.
Thick blue cardboard. Salt dough, stack, hand napkin. Preliminary work:
Examination of illustrations depicting dishes.
Role-playing games: “Home”, “Family”, etc. Progress of the lesson
: Bring in the parcel.
To clarify that we have received a package from the store. Print the parcel and place the contents of the parcel on the table. Find out from the children what they sent us and how to call it in one word. Ask the children what these dishes are for. Pay attention to how beautifully the dishes are arranged on the table. Ask the children what else can be added to the teaware. Place 1 – 2 bagels and 1 – 2 candies next to the dishes. Ask the children what all these objects are called together. Explain that our still life is called “Teaware”. Remind children that in a still life there is always a main subject. Clarify which subject is the main one. This is a teapot. He's the biggest. Invite the children to make such a still life together. You should start working with a kettle, because... he is the biggest (he is in charge). Kettle.
1. Roll out the ball. Place it on a board, flatten it, smooth the edges. We mark the lid of the teapot with a stack, roll it into a small ball and attach it (using a brush with water) to the lid.
2. Roll up the sausage-handle, attach it to the right side of the teapot (just below the lid line), and then, bending the handle in an arc, attach the other end of the handle.
3. For the spout, roll out the sausage and attach it in the middle of the left side of the kettle. Use a stack to make a straight cut from the spout of the teapot.
We invite children to fashion their own cups.
During the lesson, we provide children with individual assistance in performing various modeling techniques.
We suggest adding bagels, buns, and sweets to the still life.
At the end of the lesson, place all the work on a baking sheet and take it to the kitchen to dry.
Clarify what the children sculpted (still life).
What is the name of this still life (“Teaware”). What objects does the still life consist of (teapot, cups, etc.). Explain that when the products dry, we will paint and decorate them. Glazunova Anna Aleksandrovna No. 230-095-129 Still life from teaware
Lesson 2
Program content:
To form an aesthetic attitude towards everyday objects and their artistic depiction in still life.
Strengthen children's understanding of still life. To develop in children a sense of composition and color - to teach them to place pattern elements on the surface of an object. Encourage children to use natural materials to decorate dishes. Automate phrasal units that ensure the organization of the lesson; practice individual logical types of statements. Cultivate interest in each other’s visual activities, the ability to provide all possible assistance. Vocabulary:
teapot, cup - tableware.
To drink tea. Candies, cookies, bagels. Still life. "Teaware" Peas, noodles, beans, shells. Right, left, middle. Material:
Dried products, gouache, peas, beans, pistachio shells, fabric.
Preliminary work:
Laying out patterns of peas, beans, noodles, pistachio shells.
Progress of the lesson
Invite children to consider peas, beans, pistachio shells, noodles. Remember what patterns they laid out in this material.
Offer to decorate teaware.
Draw the children's attention that the dough is dry, hardened and already primed.
Stages of work.
- Please note that the cups must be the same - the same color, with the same pattern. To do this, children need to agree on what color to use, what pattern and what material to use.
- Covering products with gouache.
While the gouache dries, the children lay out a sample of the pattern.
3. Decorating dishes based on a sample.
4. Still life design.
Children place a teapot, cups, bagels, and candies on the prepared base.
At the end of the work, the children look at the still life. Glazunova Anna Aleksandrovna No. 230-095-129
Drawing lesson senior group “Gloomy windy day”.
Using unconventional drawing techniques.
Program content:
Teach children to display the state of gloomy, windy weather in drawings (wind, rain) with color, lines, and create compositions using various drawing techniques.
Introduce children to the technique of blotography with a tube and spray. Strengthen your drawing skills with a dry, hard brush - a poke. Learn to plan your activities and, upon completion of work, give a report on the work done. Continue to develop the ability to evaluate your work. To form an aesthetic attitude towards nature and its depiction in the landscape. Cultivate love for native nature. Encourage children to use familiar and previously learned words. Vocabulary:
What time of year?
The time of year is autumn. It's a nasty day. The wind is blowing, it is raining. The tree and grass bent over and leaves flew. Material:
2 illustrations depicting sunny and cloudy weather.
A straw (for a cocktail), a hard brush, an old toothbrush, a glass. Gouache, black ink, brushes for finishing touches, napkins, aprons. Preliminary work:
Examination of paintings and illustrations depicting autumn nature.
Progress of the lesson
Invite children to an exhibition of paintings. Draw children's attention to illustrations depicting sunny and cloudy weather. Invite children to compare two pictures, clarify what kind of weather is depicted in them (sunny and cloudy). Draw children's attention to how windy weather is depicted (trees and grass leaned to the side, leaves flew). Explain that today the children will draw a cloudy, rainy day. Clarify what natural phenomena can be drawn so that everyone understands that it is a cloudy day. Rain, wind. Pay attention to the colors used to depict sunny and cloudy weather.
Invite children to paint not only with brushes, but also with other materials. Using a straw (for a cocktail) we will draw a tree, with a hard brush we will draw leaves, and with an old toothbrush and a stack we will draw rain.
Next, you should introduce children to new unconventional drawing techniques - blotography with a tube and spray.
Blotography with a tube:
using a syringe, squeeze a small amount of ink onto the bottom edge of the sheet.
Then take a cocktail tube, insert one end into your mouth and start blowing on the stain, but so that its end does not touch either the stain or the paper. From time to time, turn the sheet of paper and inflate the not yet inflated droplets of ink. The ink dries quickly, so you should wait a bit to start painting the leaves the poking method .
Invite any child to paint a few leaves with a dry bristle brush.
Next, you can start painting the rain using a toothbrush and spray . We collect a little paint on the stack and apply this paint to the bristles of the toothbrush. We tilt the toothbrush towards the paper and carefully run the stack along the bristles of the toothbrush towards you (from bottom to top). Small droplets lie evenly on the paper. Once again clarify the sequence of work and invite the children to start drawing. In the process of work, provide children with assistance in creating images in new ways of drawing. Encourage children to make additions that enrich the content of the drawing. At the end of the lesson, place all the drawings on the stand and clarify what techniques the children used to depict wind and rain. Encourage children who added to the drawing.
Modeling “Winter Trees” in the senior group
Construct
conducting GCD
PM 02
Organization of various types of activities and communication of preschool children
Belousova Daria Alekseevna
(specialty 44.02.01 Preschool education)
DOO:
№41
Group:
older (5-6 years old)
Head of practice:
Kolmogortseva Veronika Dmitreevna
Methodist:
Chemezova Natalya Yurievna
Kind of activity:
fine arts (modeling)
Topic: “Winter trees”
Educational area:
artistic and aesthetic development, cognitive development.
Shapes:
frontal, individual.
Target:
creating a winter tree, the ability to make a flat picture from plasticine.
Planned result:
Children show independence, accuracy, and the ability to get things done.
Children develop attention and observation, fine motor skills, mental operations (analysis, comparison, synthesis) in the process of joint modeling planning.
Children know how to sculpt a winter tree
Children practice various modeling techniques: rolling, rolling, flattening.
Children convey the characteristics of objects: long - short, thick - thin.
Children create a winter tree from several parts
| Tasks: | Tasks taking into account the individual characteristics of children: |
| Educational: — Develop independence, accuracy, and the ability to get things done. Educational: — Develop attention and observation, fine motor skills, mental operations (analysis, comparison, synthesis) in the process of joint modeling planning. Educational: Fine – learn to sculpt a winter tree. Technical – Continue to practice various sculpting techniques: rolling, rolling, flattening. Learn in modeling, convey the characteristics of objects: long - short, thick - thin. Compositional – Learn to create a winter tree from several parts |
Principles of preschool education (FSES DO):
building educational activities based on the individual characteristics of each child, in which the child himself becomes active in choosing the content of his education, becomes the subject of education;
assistance and cooperation of children and adults, recognition of the child as a full participant (subject) of educational relations;
Principles of education:
formation of a personal style of relationships with peers and teachers, creation of a positive emotional background and an atmosphere of emotional uplift, education through interaction.
Principles of training:
the principle of learning in the zone of proximal development, the principle of clarity, systematicity and consistency.
Education methods:
methods for children to comprehend their social experience (conversation), a method for forming social experience (game), a stimulation method (game situation, encouragement).