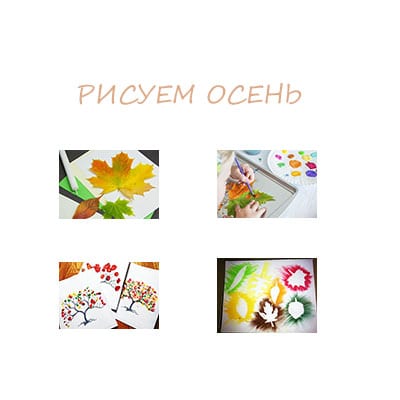
Drawing on the theme of autumn in kindergarten is a mandatory part of the educational program, as it allows you to better study the main signs of autumn, master the palette of autumn shades, and consolidate the ability to work with different art materials.
Autumn drawings for kindergarten can be made in a variety of techniques, using an unconventional approach, but taking into account the age characteristics of the children.
Drawing on the theme of autumn in kindergarten
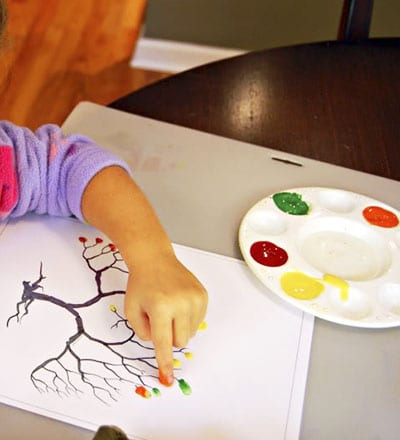
Finger painting “Autumn tree”
For example, children 3-4 years old will be quite capable of depicting an autumn tree by applying droplets of rich colors to the main trunk with their finger.
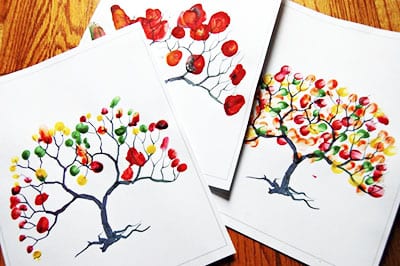
Draw leaves with your fingers
For such work, you will need to prepare in advance a palette and templates for drawings of tree trunks and branches. We invite the kids to cover the tree with leaves, choosing the most autumn colors from the palette.
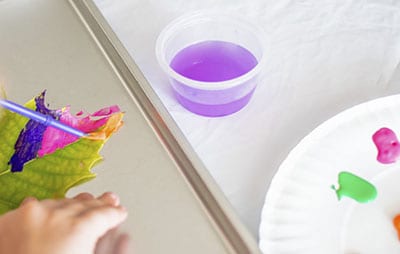
Autumn with finger paints
Kids just love to draw with stamps. Stamps made from natural materials, such as potatoes, are especially attractive. The child dips the stamp in paint and the autumn leaves are ready to fall! You can pour the paint into a small saucer for convenience. You can make saucers with different colors and several different stamps.
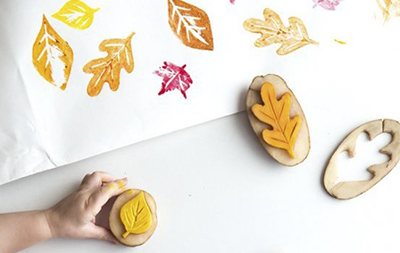
Autumn drawing with potato stamps
Children 4-5 years old can be offered more complex drawing techniques:
How to draw an autumn landscape step by step: an easy but beautiful gouache drawing
Making the next wonderful picture will be very easy. You don’t necessarily have to have a diploma from a higher art school or attend specialized courses.
The language of our lesson is simple and will be understandable to everyone. He will describe to you all the nuances of working with materials, setting light and shade, and processing volume and perspective.
Don’t be intimidated by complex phrases, but rather get down to business quickly:
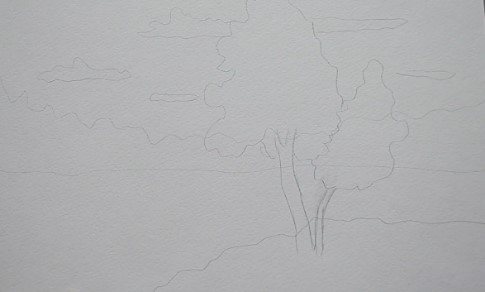
- The sketch is done with an HB pencil, it should be a light sketch, do not press too hard on the tool. Draw a horizontal line just below the center, which divides the sheet into two parts. Next, we outline the mass of trees in the distance. Then we sketch a meadow with birch trees and note the clouds in the sky.
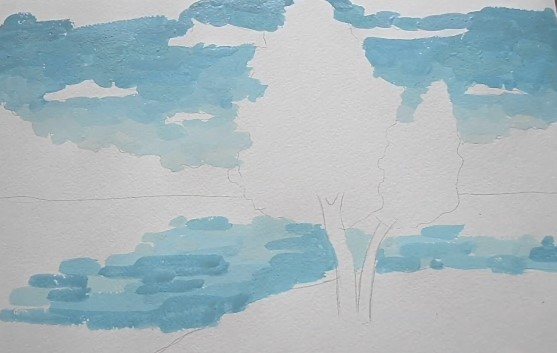
- If your gouache has dried out, fill the bottles with water and place them in this position overnight.
The next day, drain the liquid and you will be left with fresh, wet material at the bottom. We paint the sky with a pale blue tint, with abrupt strokes, as well as its reflection in the river. The further from the center the darker the tone becomes, add blue paint to the mixture.
- We write out the long shot, the lighting will be on the left side. First, we cover the silhouettes with yellowish pigments, then we work on the halftones with a red palette. Water, like a mirror, reflects everything, so we depict a vertical smeared reflection on it.
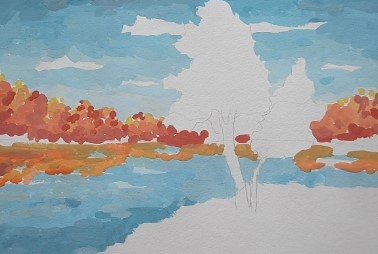
- We outline cumulus clouds in empty spaces with whitewash, and decorate them with a pinkish-lilac color. So, we will clearly show the shadow and volume. Now we move to the foreground, make the first layer of yellow crown, mixing in a little light green.
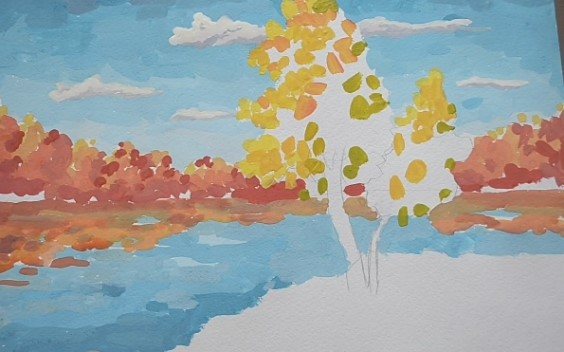
- We use a greenish tone to express the nearby lawn and several accents on the forest background. For additional texture, add dark contrasting shadows in some places. To do this, mix ocher with blue paint and mix the desired range.
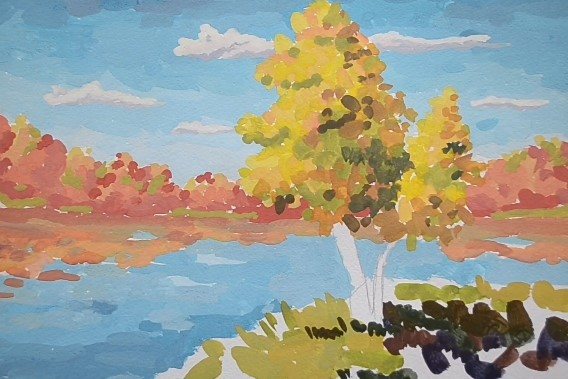
- Use whitewash and a thin brush to highlight the ripples on the river. We paint strokes of different lengths in chaotic places. We draw the ornament on the birch trunks in black. Using a purple tint we go over the background, showing the shadow.
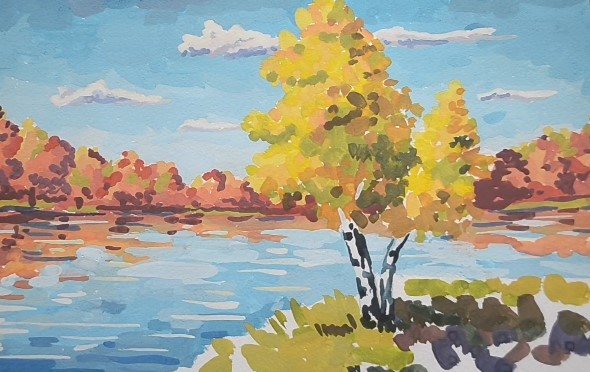
- We place accent spots in the crowns and in the reflection on the water surface. Draw blades of grass on the field. Finally, we release a flock of migratory birds in the corner of the image.
We leave our autograph at the bottom of the masterpiece so that everyone understands who worked hard and created an incredible landscape.
Drawing with a white wax candle
For work we prepare thin paper, real autumn leaves (which we collect during our walk), a candle, a brush and paints.
Materials for work
We place a leaf with thick veins under a sheet of paper and run a candle along it.
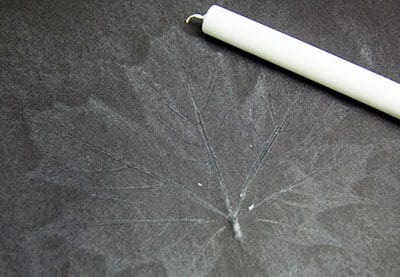
We paint with a candle
Cover the entire sheet with paint.
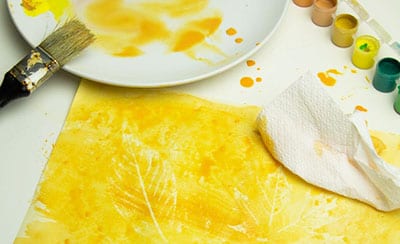
Coloring with paint
Where the candle comes into contact with the veins of the leaf, its outline will appear.
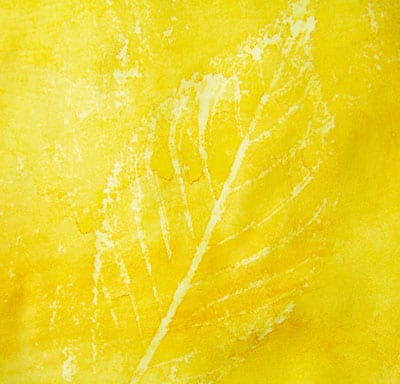
The drawing begins to appear
Drawing with wax crayons
We again use the leaves that we collected during a walk in dry weather. They do not need to be dried because they will become brittle during the drying process. You will also need thin white paper and wax crayons.
Materials for drawing
Place the piece of paper under the sheet of paper and carefully color the entire space above it with chalk.
We drive with chalk
Where the chalk touches the veins, the clear contours of the leaf appear.
Autumn chalk drawing
To make the drawings look more impressive, we fix them on a bright background - for example, sheets of colored cardboard.
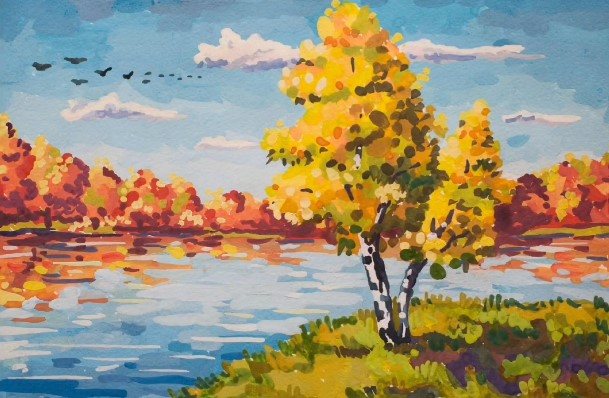
Autumn pictures for school with paints: a step-by-step master class on painting with gouache
If you successfully completed the previous illustration, then working with paints will definitely not scare you. This material is thicker and more saturated, allowing you to achieve bright and natural transitions. You don't need a large package of gouache, because we only use autumn colors.
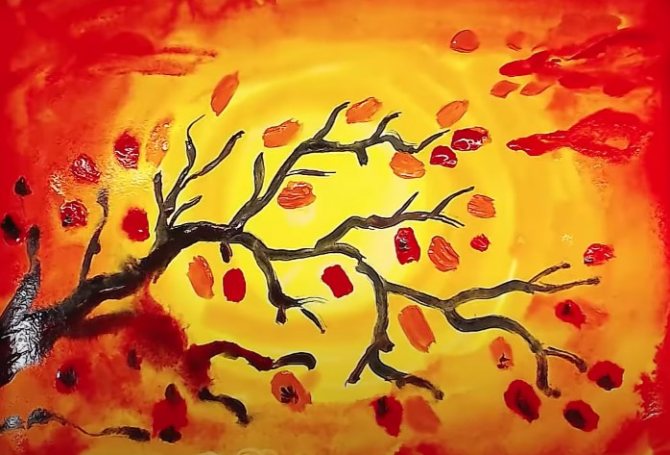
Brew some warm tea, turn on some nice music and create masterpieces with us on the theme of the golden season. Your efforts will be rewarded at school according to your merits; you will definitely be one hundred percent prepared for the fine arts lesson!
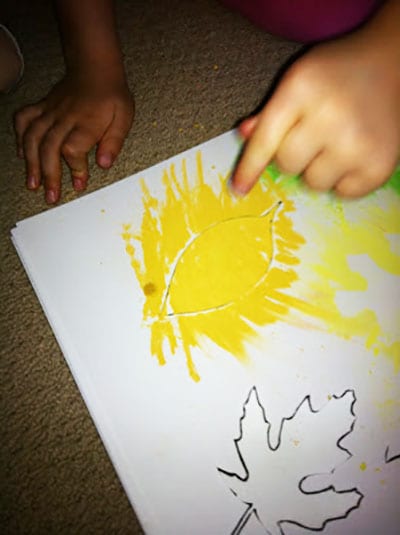
Now we will figure out how to paint an autumn tree branch step by step:
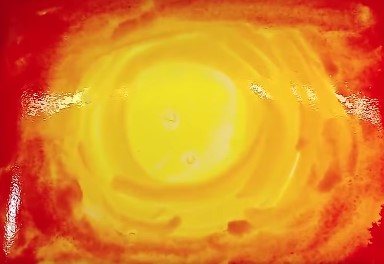
- Fill the entire canvas with bright yellow pigment. We put an orange tone on the brush and outline a circle in the center, making strokes in a rounded shape.
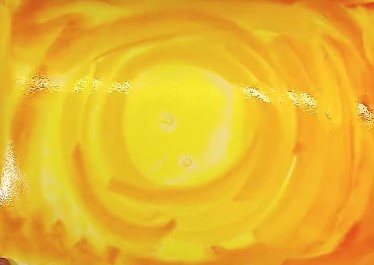
- We fill all the edges and corners with a scarlet palette, slowly mixing it into the already drawn tints. We leave the most intense accent in the middle, so we get a huge sun.
- We draw a bending branch; it should not be a completely straight segment. It has thin knots and uneven branches. This is the natural beauty of nature!
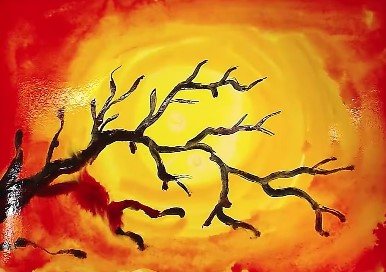
- Using single strokes of orange and scarlet gouache, we mark the remaining leaves on the branches.
- We mark each element with black spots, make sure that they are slightly blurred. So, we will highlight the depth and volume of individual zones.
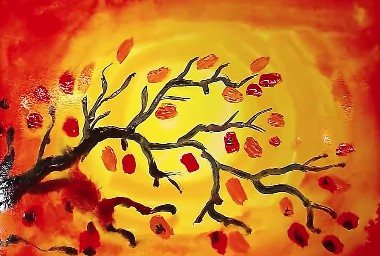
- We also work on the sky and clouds from above in the same range. We make soft dipping movements to get similar colorful clouds.
The canvas simply screams and bursts with color, it looks extremely impressive and will amaze all spectators and observers on the spot!
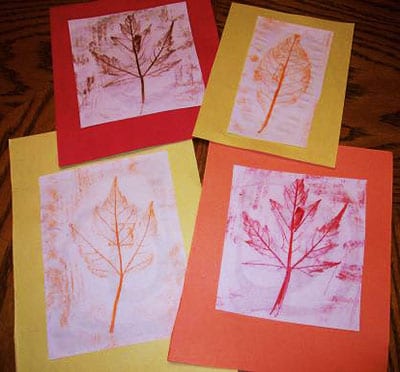
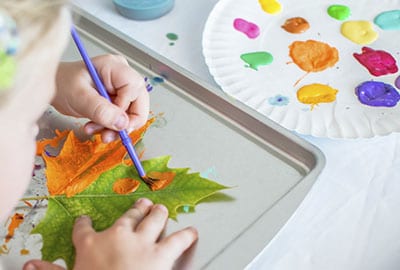
Autumn drawing with prints
Again we use freshly picked autumn leaves. We cover each of them with a layer of colors from the autumn palette and carefully turn them over onto a sheet of white paper. We carefully lift the sheet - a multi-colored imprint remains in its place.
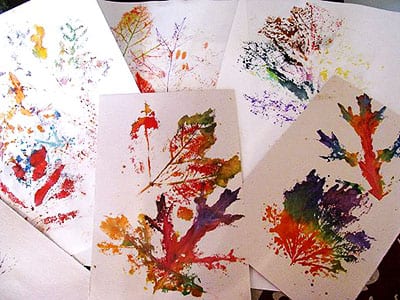
Casting imprints
From such drawings you can organize a real autumn exhibition
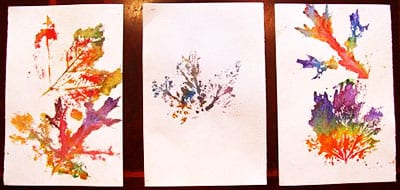
Exhibition
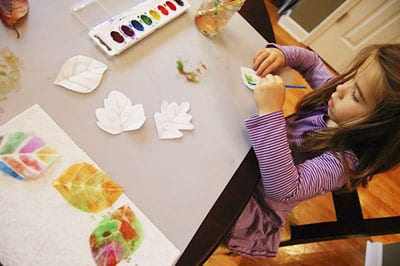
Coloring leaves
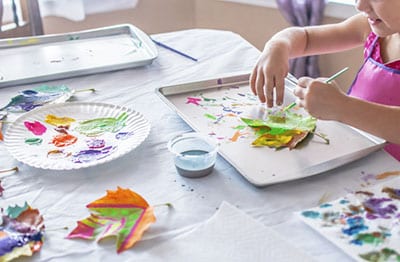
Children 5-6 years old can already cope with more jewelry work. We use well-dried autumn leaves, which must be handled carefully, as they break easily in your hands. We cover the leaves with different shades of paint.
Coloring the leaf
It is better to use gouache or acrylic paint; watercolor often rolls off the surface of the sheet.
Autumn palette
Having painted one side, dry it and paint the second.
Paint the other side of the leaf
In this case, the leaf itself is an autumn picture.
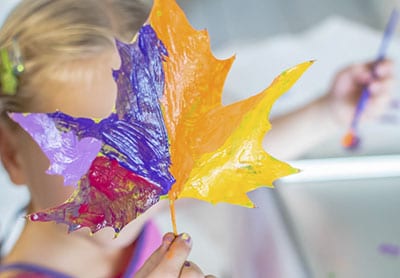
Autumn painted leaf
The result is bright autumn leaves that can be used to create various decorative compositions.
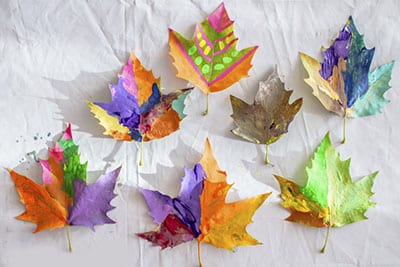
Leaves for autumn compositions
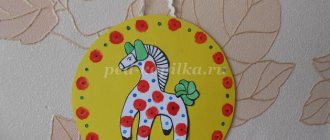
From painted leaves you can make an original autumn pendant on a branch.
Autumn pendant on a branch
Easy and simple autumn drawings for kindergarten
Many parents wonder how to help their child depict the seasons. They start looking for examples and ideas on the Internet. And we have collected everything you need in a convenient format especially for you! Step-by-step photos with detailed instructions for drawing on the theme of autumn will orient you and your child with food.
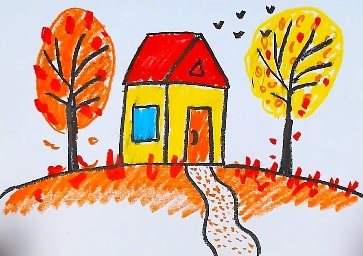
Before starting work, clean the work area and lay out the necessary materials, teach your little one to hold the tool in his hands and make even strokes. After such a brief excursion, begin to transfer the lesson step by step onto your canvas. A little patience and perseverance and you will get a real masterpiece!
Step-by-step instructions for drawing autumn for a child:
- We outline an even square, and on top of it we mark an isosceles triangle in the right area. We continue it to the left, forming a roof.
- We lower the vertical edge, outlining the cube. On one wall we draw a rectangular door with a handle, and on the other plane a window.
- We use an arcuate line to show the hill on which the building stands. In both parts of the canvas we express trees, with branches spread out in different directions. Keep in mind that the closer to the ground, the thicker the plant trunk becomes.
- We fill the roof of the house with scarlet color without going overboard. We paint the foundation of the house and the neighboring tree with a yellow tint, outlining the rounded shape of the crown.
- Color the opposite tree and clearing with bright orange chalk. With a few chaotic strokes we will show the falling leaves. We will decorate the door in the same color scheme.
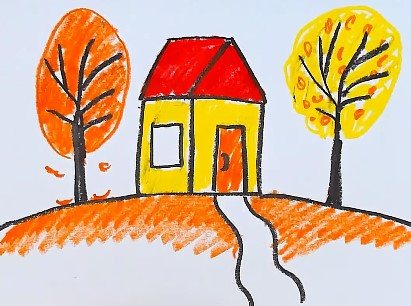
- We focus on the red foliage that develops in the wind. Cover the path with small multi-colored specks in the appropriate palette.
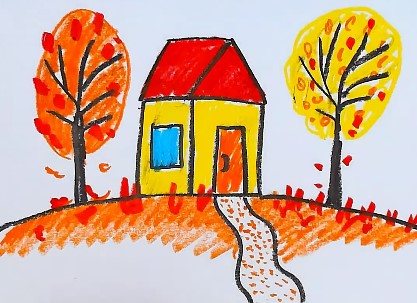
- Let us write a characteristic phenomenon for this time of year: bird migration. Our smaller brothers fly away to warmer climes in a whole wedge, which is what we will depict in the corner of the composition. We sketch the birds themselves in the form of black checkmarks.
This illustration is extremely simple and quick, we drew it in literally 10 minutes. The mischievous, active fidget will definitely not get tired of creativity and will even want more!
You can also draw cute autumn mushrooms with pencils.
Coloring paper leaves
This work also requires concentration and perseverance, but less caution - paper sheets cannot be broken and are difficult to wrinkle.
We color each leaf on both sides.
Coloring the leaf
We dry them and use them to decorate a group or hall.
Decorated paper leaves
Autumn drawing with crayons
We cut out templates of autumn leaves from thick paper in advance.
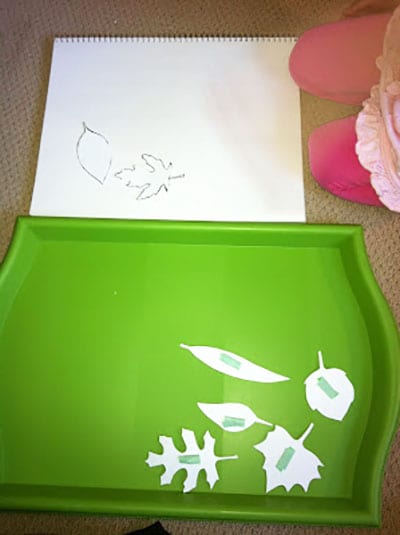
Cut out the leaves
Place the template on a landscape sheet.

Attached to a piece of paper
Carefully paint over the entire space around it with wax chalk, directing the strokes from the center to the periphery. Coloring a birch leaf.
Birch leaf
Coloring the maple leaf.
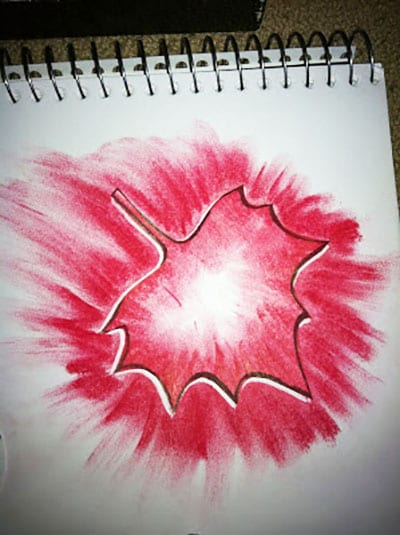
Maple Leaf
We lift the sheet - only its outlines remain, around which we see a real explosion of bright color.
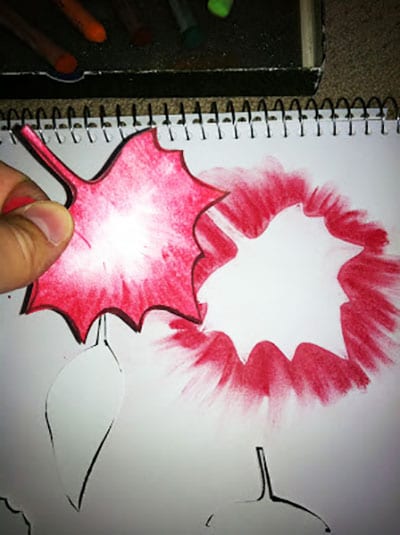
The outline remains
Such non-standard drawing on the theme of autumn in kindergarten will help develop a child’s interest in creativity and awaken in him the desire to create new interesting compositions and paintings.
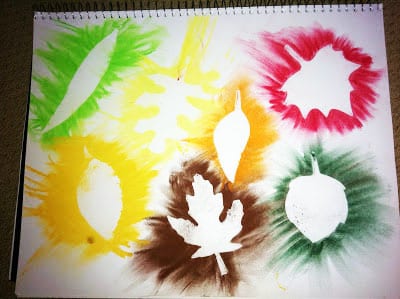
Bright autumn drawing with crayons
Preview:
Self-analysis of an open lesson with non-traditional
drawing techniques “Autumn trees”
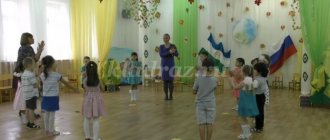
Direct educational activities were carried out with children of senior preschool age with a subgroup of 10 children.
GCD theme: “Autumn trees.”
Type of educational activity: continuous educational activities are integrated, because through various contents and activities, the main goal of the event is achieved.
Dominant educational field: artistic and aesthetic development.
The purpose of GCD: to develop children's interest in artistic creativity through the use of non-traditional drawing techniques.
Objectives of integrated educational areas:
Preliminary work: conversations, stories, observation, looking at illustrations.
The lesson consists of three parts:
The duration of the lesson is 25-30 minutes, which complies with SanPin standards.
GCD corresponded to the interests of the children, the temperament and level of preparedness of the pupils.
The organization of children's activities corresponded to teaching, developmental and educational tasks. The logical presentation of the material, accessibility, as well as the creation of a game situation contributed to the formation of children’s knowledge throughout this continuous educational activity. The transition from one type of activity to another made it possible to involve each child in an active process.
Various methods were used in GCD: verbal throughout all educational activities; visual – display of illustrative material; game - a surprise moment; practical; control and stimulation in the form of approval and praise; artistic word.
The main part of the ECD included independent, mental and practical activities of children aimed at completing all assigned tasks.
The main part of the ECD included tasks for the perception of new knowledge, systematization of children’s existing knowledge in independent activities.
In order to relieve static tension, as well as increase mental performance and reduce fatigue, physical exercise was performed.
Individualization of learning was manifested in helping children who had difficulty completing tasks, repetitions, reminders, and additional explanations.
During practical work, the children showed increased interest in the task and the children were interested; no fatigue was observed. During verbal communication while the pupils were doing work, she gave a positive assessment of the children’s activities.
The final part of the GCD summed up the activity using the method of analyzing the success of the task.
Conclusion: all the tasks set during the planning of the GCD were solved, the goal was achieved. Each child produced a beautiful autumn picture. Educational activities contributed to increasing playful motivation for learning, creative development, and cognitive interest. The level of activity of the children was at a sufficient level. All children were involved in the activity, interest was maintained throughout the entire educational activity.
Source
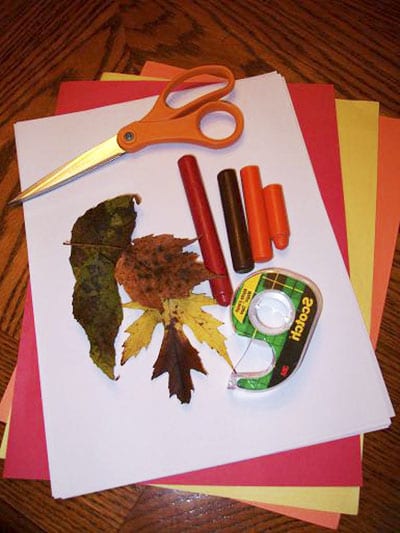
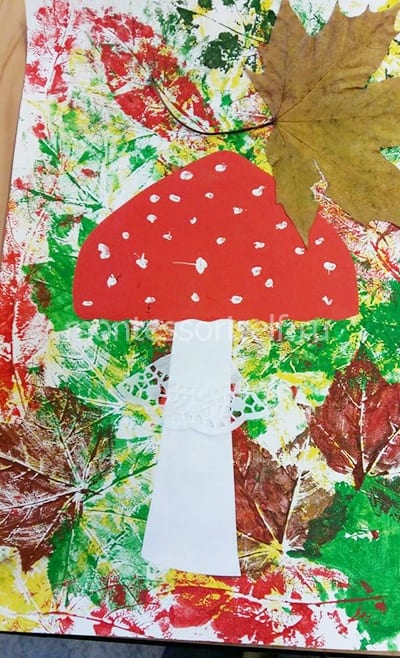
Drawing and application “Autumn fly agaric”
Using real leaves we draw a colored background. We are waiting for it to dry. Cut out the fly agaric cap from red paper, and cut out the stem from white paper. From a napkin we cut out a fringe for the fly agaric leg. We combine all the elements of the craft on a colored background and complement it with a dried maple leaf. All that remains is to paint the fly agaric’s cap with white dots. Our autumn fly agaric is ready!
Application and drawing “autumn fly agaric”
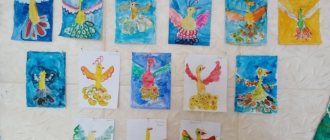
Summary of the drawing lesson “Autumn Forest” in the senior group
Victoria Kargina
Summary of the drawing lesson “Autumn Forest” in the senior group
Objectives: To cultivate interest in autumn natural phenomena , emotional responsiveness to the beauty of autumn . autumn impressions in drawings , draw various shapes of trees, large, small, tall, slender, continue to depict leaves. To develop children's aesthetic perception and love of nature.
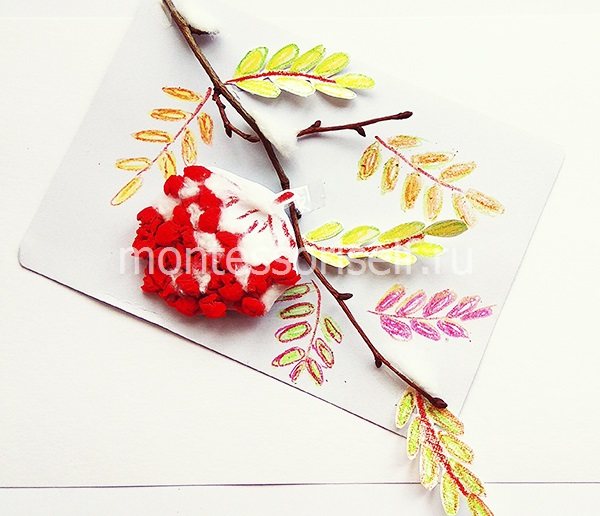
Drawing and application “Rowan”
A very beautiful craft in combination of a pattern and a rowan applique. Glue on a real branch. We draw the leaves with pencils (we draw some on the main sheet, and cut out some from another sheet of paper. We form the rowan from lumps of paper.
Drawing and application “Rowan”
Look at the video on how to make a beautiful autumn landscape from leaf prints:
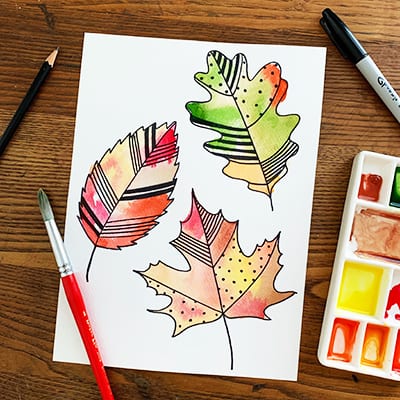
And here is an example of a wonderful autumn drawing, drawn with watercolors and crayons. First, the outline of the drawing is drawn in pencil, then patterns are drawn on bushes, trees and grass with white or yellow chalk. After applying watercolor, the pattern will become bright and clear.

Drawing autumn with watercolors and crayons
Parents or teachers can draw the outlines of the leaves; the children will just have to color them with watercolors. After the watercolor has dried, outline the contours, veins and patterns with a black marker.
Autumn leaves in watercolor and marker
In this drawing, the contours are also highlighted with a colored felt-tip pen.
Autumn drawing in watercolor and pencil
Abstract of the GCD “Drawing. Winter forest"
Educational objectives:
To form an idea of a sketch as a stage of drawing planning;
To develop children’s ability to depict a winter landscape, determining in advance the content and some methods of depiction;
Foster love and respect for our native nature.
Didactic materials: tinted paper (landscape sheet), pencil, watercolor, cups of water, napkin for blotting brushes, educational game “Make a winter landscape”, sketches of a winter landscape, a letter from the inhabitants of Africa, cards with an image; sun; months; rising sun.
Equipment: magnetic board, tape recorder, CD music by P. I. Tchaikovsky “The Seasons. January", easels.
GCD move:
1. Introduction to the situation
Didactic task: to motivate children to participate in activities.
Educator: Children, what time of year is it now? (Children's answers: winter).
Educator: Children, tell me, do you like winter trees? How? (Children’s answers: trees in winter are beautiful, elegant, fluffy...)
Educator: That's right, the trees dress in white hats, fluffy, winter outfits, white fur coats, shine and sparkle in the cold.
Children, children living in Africa sent us a letter. They write that they have never seen winter trees and ask us to help them, to draw a northern winter forest for them. Want to help? Can you? (Children's answers: yes, we want to help, we can).
2. Update
Didactic task: to consolidate children’s ideas about winter trees, their structure, shape.
Educator: Children, what trees can be found in our northern forest? (Children’s answers: Birch, pine, spruce, rowan). How do coniferous trees differ from deciduous trees in winter? (Children's answers: needles grow on coniferous trees that do not fall off, they are green even in winter, but on deciduous trees the leaves fall off...).
Educator: What do deciduous trees look like in winter? (Children's answers: in winter, deciduous trees stand without leaves, resting).
Educator: What color is the bark of birch, pine, and spruce? (Children's answers: birch has white bark, pine has brown bark, spruce has gray bark).
Educator: What height do the trees grow in the forest? (Children's answers: different, high and low). It’s true, there are trees with thin and thick ones, with forked trunks, young and old. Children, think and tell me how you will place a winter forest on a sheet? (Children's answers) Children, I suggest you draw up a sketch of a future drawing of a winter forest.
3. Difficulty in the situation
Didactic tasks:
– create a motivational situation for the formation of children’s ideas about a sketch of a picture;
– to form the experience of fixing a difficulty and understanding its cause.
Educator: Children, can you make a sketch of a winter forest? (Children's answers: no). Why couldn't they? (Children’s answers: we don’t know what a sketch is).
4. “Discovery” of new knowledge (mode of action)
Didactic tasks:
– introduce a sketch of a painting, like a drawing made with a simple pencil;
– consolidate the ability to overcome difficulties by “asking someone who knows”, to form an emotional experience of the joy of discovery.
Educator: Where can we find out what a sketch of a painting is? (Children's answers: ask, look in the encyclopedia, search on the computer).
Educator: Would you like me to tell you? I invite you to a creative workshop. Here is a sketch of the future painting; this is the composition of the painting, drawn with a simple pencil.
Educator: Every artist, before painting a picture with paints, must imagine what it will look like, where everything will be located, how much space certain objects will take up, that is, think through the composition of the picture. First you need to determine where the horizon line is. This is that imaginary line where the earth seems to connect to the sky (shows). It is very important to think in advance about the size of the images in the painting. Please note that the nearest trees are drawn in the foreground, at the edge of the sheet - large, and those objects that are in the background, near the horizon line - small.
Educator: Why do you think you need to sketch a drawing? (Children's answers: in order to correctly position the drawing on a sheet of paper, observe the size and ratio of the parts of the drawing). Children, how do they make a sketch? (Children's answers: with a simple pencil, use light pressure).
Educator: Children, I invite you for a walk. Physical exercise “Winter Forest” is being held
We came to the winter forest (walking in place)
There are so many miracles around here! (spread arms to the sides)
On the right is a birch tree in a fur coat standing (hands move in the indicated direction and look.)
On the left the tree looks at us
Snowflakes are spinning in the sky (they move their hands away and follow with their eyes)
And they lie beautifully on the ground. (movement (flashlights) and look up)
How beautiful they are!
There is beauty and peace in the forest, (spread arms to the sides)
And it’s time for us to go home (steps in place).
Educator: Children, I invite you to sit at the tables. I suggest you help the people of Africa by drawing a winter forest for them. Think about how you will depict a winter forest. Children, what color of paint will you use to depict the winter forest? (Children's answers: cool colors: blue, green, indigo, white). What will you add to the drawing? (Children's answers: animal tracks, snowflakes, draw the sun, birds, bunny, etc.)
Educator: Children, where will you start your drawing? (Children's answers: from a simple pencil sketch).
Educator: Get to work. Children choose tinted paper (prepared in advance), go to their places and begin independent productive activities accompanied by musical accompaniment, the music of P. I. Tchaikovsky “Seasons. January". The teacher pays attention to how children make a sketch, hold a pencil, brush, and draw straight and oblique lines. Helps with advice if children find it difficult to complete a task.
Educator: Everyone got their own, unique landscape. How beautifully the trees are depicted, they are drawn slender and covered with snow. From the drawings we will compile an album “Northern Forest in Winter” and send it to the people of Africa.
5. Incorporation of new knowledge (method of action) into the child’s system of knowledge and skills
Didactic tasks:
– consolidate children’s understanding of a sketch as a compositional construction of a drawing with a simple pencil;
– develop communication skills.
Educator: Children, I invite you to play the game “Make a Landscape.” Look at the future picture in front of us with the image of heaven and earth and clear horizon lines. Choose one contour image each (silhouettes of trees small, medium, large), clouds, snowdrifts of different sizes (small, medium, large) and draw it on the overall composition when your friends invite you. I am the sun, I am walking high in the sky (I draw a sun with a simple pencil at the top of the sheet), I want to take you into the picture. Tell me who are you? The child names the image, draws it, gives reasons for his choice and invites another, until all the children have placed the images in the picture. Children, what have we done? (Children: sketch of a painting).
6. Reflection
Didactic tasks:
– reflection on activities in the classroom;
- create a situation of success.
Educator: Who did you help today? (Children's answers) Did you manage to help the people of Africa? What knowledge did you find useful? What new did you learn? (Children's answers: we learned what a sketch is). Appendix 1 Appendix 2