Notes on drawing “Balloons” for children of the middle group
Svetlana Panchekhina
Notes on drawing “Balloons” for children of the middle group
Topic: "Colored balls "
Program content: continue to introduce children to the techniques of depicting round and oval objects; develop hand motor skills; cultivate the desire to achieve good results.
Materials: teddy bear toy, round and oval balloons
Ioo: cognitive development; speech development.
1. Organizational moment. Educator: Guys, listen to who I’m telling you about!
The furry beast loves honey.
If he doesn't understand something,
Can roar wildly
Because he is (Bear)
“Today I invited the little bear to come visit us, but he still doesn’t come.” I wonder where he is? (a roar is heard, a bear cub appears)
. Oh, little bear, what happened?
Little Bear: I was stomping along the forest path.
I carried the balls in my hand.
He stumbled and fell - WHAM!
And my one balloon disappeared (roars)
Educator: Guys, what happened to the ball? Where did he go? (burst)
.
Oh, what a pity! How can we calm the bear cub down and cheer him up? I think I've come up with an idea, let's draw new balls for the bear! (Let's)
. Little bear, don’t be sad, the guys and I will draw new balls and not just one, but many, because we have a lot of kids.
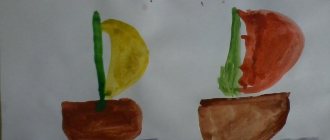
2. Looking at a balloon . The teacher invites the children to look at the remaining balloons . Guys, what shape is the ball? (round, oval)
.
The teacher invites the children to outline this shape in the air with a movement of their hand .
3. Demonstration of drawing . The teacher shows the technique of drawing an oval with pencils , accompanying the words with the direction of movement: “Round, long, round again and long again.”
, and then invites one of the guys to show at the board how to
draw an oval-shaped balloon .
4. Independent work of children , the teacher helps individually, as needed. After finishing the work, the teacher invites the children to attach the finished drawings to the magnetic board and turns to the bear cub: “Look, little bear, what wonderful balls the guys have drawn for you .” The little bear thanks the children for the balloons and leaves.
5. Finger gymnastics at the teacher’s choice.
6. Summary: What did you do today? What did you draw ? What shape are balloons ? What color were the balloons ? For whom were the balloons drawn ?
Summary of direct educational activities in the educational field of communication in the middle group. 1. Developed in accordance with the project “Oh, these fairy tales.” 2. Topic: “Let’s call a fairy tale.” 3. Goal: To consolidate children’s knowledge about Russian folklore.
Long-term plan for design and application in the middle group for the first half of the year PERSPECTIVE PLAN FOR DESIGN AND APPLICATION SEPTEMBER. 1 (design): Topic: “Practical experimentation with paper.
Source
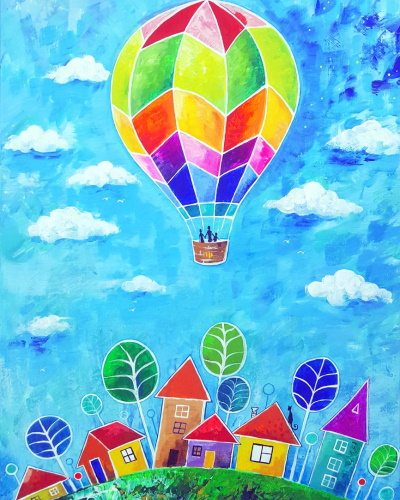
Hot air balloon hovering over the city
Drawing a balloon in this master class will reinforce knowledge and skills in drawing for young children. But something new will appear, namely, elements of the urban landscape. The acquisition of skills in working with color continues, and knowledge of the principles of perspective is consolidated.
To work you will need:
- drawing paper;
- a simple pencil;
- eraser;
- round and flat brushes;
- gouache;
- thin markers of different colors.
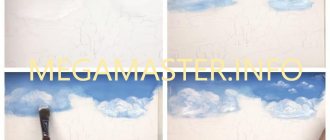
First you need to determine the center of the sheet. The entire composition will be located relative to this center. To do this, divide the sheet in half with a vertical and horizontal line.
The intersection of these lines is the center of the sheet and the composition of the drawing. Lines are drawn with a simple pencil.
The balloon will be located at the top of the sheet. At the bottom of the sheet is the city.
You need to make a sketch with a simple pencil. Mark the location of the ball in the sky. It can be placed in the center of the composition or closer to the edge of the sheet, as desired. Drawing for children doesn't have to be complicated. Therefore, the city landscape can be made a little fabulous and simple in execution.
Outline the location of the city's houses:
- The houses are depicted close to each other.
- Windows are painted on houses. They can be of different sizes - square, rectangular.
- Roofs are drawn at different heights.
- At the very bottom of the sheet you need to show the surface on which the houses are located. This is a city street. You can draw small figures of people and cars on it.
After the sketch is made, we begin to work with paints:
- Paint the background blue. This is heaven.
- Clouds are painted with white gouache.
- Color the balloon.
- They draw the roofs of the houses.
You can depict a fairy-tale city and use different colors for this. And the houses themselves can also be painted in different colors.
You can paint tiles on some house roofs. And show the brickwork on the walls. But not on all houses.
Next, you need to let the work dry. Then, with a thin felt-tip pen, you need to trace along the contour of the house, roofs, windows, tiles on the roofs. And other small details are drawn in this way. The drawing is ready.
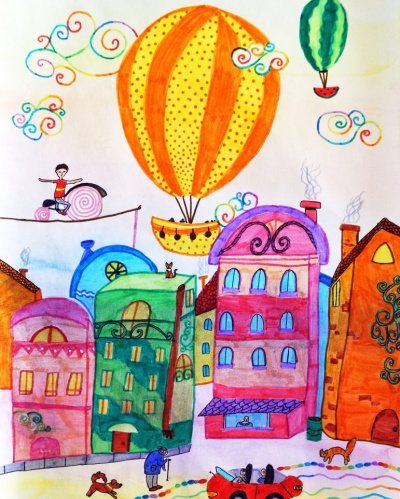
Balloon drawing for children of any age. The master classes show the principle of creating a drawing for children of primary school age.
To make such a drawing, the child will need to master the skills of drawing three-dimensional objects, learn to work with the background, and develop spatial thinking. Drawing a round ball will help your child learn to maintain symmetry when drawing geometric shapes.
Summary of drawing lesson “Multi-colored balls”
Kots Svetlana
Summary of drawing lesson “Multi-colored balls”
Priority educational field: Artistic and aesthetic
• continue to introduce children to the techniques of depicting round and oval objects;
• develop hand motor skills;
• cultivate the desire to achieve good results
Subject-spatial development environment: a toy - a bear cub, a person in a bear costume, round and oval balloons
Planned results: They recognize a bear by its characteristic features, describe a balloon, recognize a circle and an oval, write a story about the work done.
Multicolored balloon with basket
To work you will need:
- paper;
- a simple pencil;
- ruler;
- eraser;
- paints (gouache or watercolor); colored pencils or wax crayons.
Stages of creating a drawing:
- On the sheet you need to mark the location of the ball and basket. To do this, mentally or with a light pencil line, divide the sheet into 2 parts in the center with a horizontal line. There will be a ball at the top of the sheet and a basket at the bottom.
- Drawing a ball. At the top of the sheet, mark a square with a simple pencil. A circle is drawn inside the square.
- A basket is marked at the bottom of the sheet. It is much smaller than a ball. Draw a rectangle and connect it with straight lines to the ball on the left and right. These lines are the rafters with which the basket is attached to the ball.
- At the bottom above the basket the ball narrows. Since this balloon is a drawing for children, the balloon can be compared to a lamp to make it easier to draw its shape.
- Next, you should draw 2 lines going from the very top of the ball to the basket. They need to be curved a little as they go through the round shape of the ball and cannot be straight. They seem to lie on the ball, repeating its shape.
- Add horizontal lines encircling the ball. They should also be slightly curved as they pass through a circular surface.
- The square is no longer needed, so it needs to be erased.
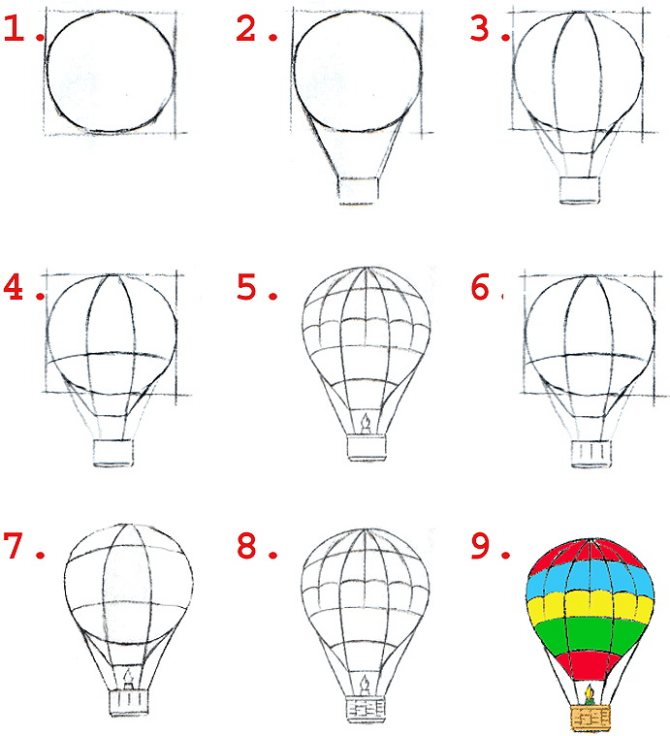
- They depict a burner in the basket - an air heater with which the ball flies.
- Next you need to draw the basket.
- To the already drawn vertical lines on the ball, add one more to the left and right. They also draw a line going from top to bottom in the center. It will no longer be curved, since it runs through the center of the ball and visually looks straight.
- Add another horizontal line in the center of the ball, bending it in the shape of the resulting “slices” of the ball.
- Draw basket weaving.
The sketch of the ball, drawn with a simple pencil, is ready. Now you need to paint it with bright colors using paints, wax crayons or colored pencils. To accurately draw fine details, such as the cables of a ball or the weaving of a basket, use a felt-tip pen.
Summary of GCD for drawing in the middle group “Multi-colored balls”
Zakharova Anna
Summary of GCD for drawing in the middle group “Multi-colored balls”
Age group : middle (4-5 years)
.
Topic: " Colorful balls "
Leading educational field: “Artistic creativity”
Goal: To develop children's creative potential using non-traditional visual arts techniques.
Educational: continue to introduce non-traditional drawing ( drawing with cotton swabs print -drawing technique )
, continue to develop in children the ability to carefully fill the outline of an object with color.
Strengthen ideas about the shape of an object (round, oval)
.
Enrich children's ideas about colors (green, blue.)
.
Developmental: develop imagination and color perception.
Educational: Arouse interest in drawing , cultivate friendliness by appreciating the work of other children.
Types of activities: gaming, motor, communicative, visual.
Forms of organization: group , individual.
Forms of implementation of children's activities: conversation, play, looking at illustrations, drawing .
Vocabulary: round, oval, green, blue.
Equipment: White A4 paper with an outline of balls , gouache, water jars, napkin, balls , sponge.
Preliminary work: reading and watching the fairy tale Winnie the Pooh, D/I “Pick it according to the shape”
, D/I
“Colored Rainbow”
, examination of illustrations.
New Year's balls: summary of joint drawing activities between a teacher and children (Ebru technique)
Epifantseva N.P. New Year's balls: a summary of the joint activities of a teacher and children in drawing (Ebru technique) // Sovushka. 2022. N1 (15). URL: https://kssovushka.ru/zhurnal/15/ (access date: 01/19/2022).
Order No. 269902
Goal: Developing interest in drawing in the EBRU style.
Tasks:
Learn to draw patterns on water. Develop creativity, aesthetic perception, color combination, imagination, fantasy and fine motor skills of the fingers. Continue to develop the ability to enjoy a beautiful drawing. Cultivate neatness and interest in the activity.
Types of activities: artistic and aesthetic cognitive, communicative, gaming, productive, motor, musical.
Forms of organizing joint activities:
Conversation, discussion.
Preliminary work: conversation about the New Year, New Year's toys, looking at New Year's toys.
Methods and techniques.
Methods: verbal, visual, gaming, practical,
Techniques: Showing, demonstration, explanation, answer, question, analysis of the method of action, pedagogical assessment, children's self-report.
Vocabulary work: ebru technique, patterns, pipette, palette.
Materials for joint activities between teachers and children:
Demo: Recording music by P.I. Tchaikovsky "Winter" from the cycle "Seasons"
Handout: special solution, plastic plate, Christmas ball templates, paints, pipette, palette, toothpick, jars of water, dry and wet wipes.
The progress of joint activities between the teacher and children
Organizing time.
Children are in play areas. I invite the children to stop playing and come to me.
Educator: Guys, look what I have! When I came to work in the morning, I found a letter under our door. Let's read it?
Children's answers
Educator: read the letter. Guys, how can we help D.M. Maybe, you know?
Children's answers
Educator: Aren’t you afraid of difficulties?
Children's answers
Educator: To do this, I suggest you go to a magic workshop where we can do some magic. But in order for us to get there, we need to close our eyes and say the magic words: “Turn and spin in a magic workshop!”
Guys, look, here is our Christmas tree, which is left without toys. But we will definitely fix this. We will draw toys.
Main part:
Educator: In the magic workshop there are rules that we must follow. Let's repeat them:
- To avoid getting dirty, you need to wear aprons.
- Any liquid, even if it is magical, cannot be tried, just like paint.
- Our stick is very sharp and you need to use it very carefully so as not to get hurt.
- After completing the work, you need to restore order and put everything back in its place.
Educator: So, guys, today we will be wizards. After all, we will draw not on ordinary water, but on magical water. It is in your plates.
Educator: And our colors are also magical. And they are poured on our palette.
Educator: Guys, I already have several ready-made toys. Let's look at them. (show how they were made)
Educator: Guys, first let me show you how to do it. Come to me.
Educator: Let's try to make several toys with different patterns. First let's make a pattern, droplets. To do this, you need to take a pipette and draw paint into it. Pipette paint into the middle and along the edges of the plate.
Children are completing the task.
Educator: Now let’s transfer our pattern to the toy, carefully placing it on the surface of the water and also carefully removing it. Look how beautiful it turned out. Well done!
Educator: My young artist-wizards, your fingers are probably tired. Let's take a little rest and stretch them out.
Let's start warming up our fingers. Repeat after me!
"Snowball"
One, two, three, four, (curl your fingers)
You and I made a snowball (Make by changing the position of the palms)
Round, strong, very smooth. (Show a circle, stroke their palms together)
And not at all sweet. (They shake their finger).
Once - let's throw it up, ("Toss it up", look up)
Two - we'll catch it. (“Catch”, crouch)
Three - let's drop (Get up, “drop”)
And... we'll break it! (Stomp)
Educator: Well done! Let's continue to conjure.
Educator: Let's try to make a drawing in a circular motion. And we will also transfer it to the toy. To do this you will need a magic wand. Children are completing the task.
Educator: So our New Year's toys are ready. Let's look at them. And let's remember how we made them. As soon as they dry, we will definitely decorate our Christmas tree with them.
Educator: Let's take them to the group and dry them, and then hang them on our Christmas tree, which we will also take to the group. Probably Santa Claus won’t mind if we take the Christmas tree.
Reflection
Educator: Guys, but in order to do all this, we need to return back to the group. Who remembers our magic words? Let's take the toys in our hands, close our eyes and say them: “Spin, Spin, and you will find yourself in the group!” So we found ourselves back in kindergarten. Let's show the guests what we did.
Perform an action.
Educator: Guys, did we help Santa Claus? What did we do? Well done! Now let's go to the group.
Thanks to all!
Step by step process of drawing an airplane
- At the first stage, draw the outline of the airplane. Its outline is similar to a fish.
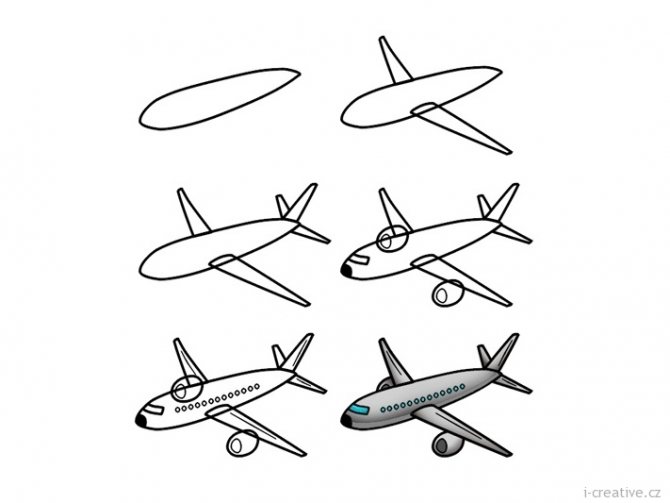
Drawing an airplane step by step
Important! Explain to children that they do not need to draw thick lines with a pencil. If necessary, inaccuracies can be removed with an eraser.
- The wings are being drawn. This is an important element. The wing, which is located behind the body, needs to be drawn partially. The wings are shaped like triangles with rounded corners;
- Draw small wings on the back of the tail. Draw a rectangular front window on the front of the hull, and round portholes throughout the hull.
Drawing an airplane flying through the clouds can take a lot of time, as it requires drawing a large number of details, smooth geometric shapes and lines. Nevertheless, most boys will be delighted with this activity. Girls will also love the beautiful airplane drawn with their own hands. And the teacher’s correct approach to organizing the lesson will help to depict an airplane easily and quickly.