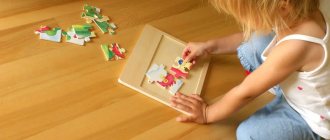
Modeling from plasticine in elementary school: the benefits and goals of creative activities
When working with plasticine, fine manual motor skills develop.
During this process, children also improve and develop:
- logical thinking;
- memory;
- motor coordination;
- speech;
- perseverance and patience;
- Creative skills;
- abstract and figurative understanding;
- imagination;
- attentiveness;
- emotional condition;
- self-esteem;
- hand-eye coordination;
- manual touch;
- observation and eye.

The tasks of modeling from plasticine are:
- formation of ideas about shapes and colors;
- safety training with material during classes;
- stimulation of fantasy and imagination;
- distraction from irritating and harmful factors;
- learning to cope with one’s own anxieties and fears;
- improving the condition of the nervous system and the body as a whole;
- nurturing self-confidence;
- developing interest in creativity;
- formation of aesthetic taste;
- training in the three-dimensional method of depicting objects.
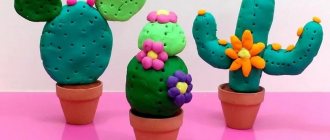
Basis for stucco painting
You can paint pictures with plasticine on completely different bases! Often, ordinary cardboard is used, which can tolerate all the options for a child’s creative self-expression. For older children, glass is suitable as a basis for a plasticine picture, to which the plasticine is securely fixed and lasts a long time. Glass is especially good for “reverse paintings”, when the plot is stuck from bottom to top, from light to dark tones, from the main elements to the background.
Kids will be interested in plasticine painting on improvised materials, for example, an old mp3 disc, a boring white cup or an ordinary plastic plate. This “picture” does not require additional decoration and can be an ideal gift for your beloved adults on any occasion.
Types of beautiful and safe plasticine for children
The table will introduce safe and non-toxic types of plasticine for children:
| Plasticine type | Features of the material |
| Classical | It can be soft or harsh; quite soiled, difficult to wash. |
| Wax | Very soft and sticks well. |
| Ball | In the form of weightless granules, which are connected by harmless glue; can glow in the dark and adheres perfectly to paper. |
| Solidifying | It dries within a day and is suitable for creating entire collections of crafts, for example, Christmas tree decorations. |
| Art plasticine | The hard one is intended for three-dimensional crafts, and the soft one is for plasticineography and appliqués. |
| Floating | Non-fading crafts made from it can float. |
Research project “Study of the properties of plasticine”
Relevance of the work:Plasticine is a material familiar to everyone from early childhood. We use plasticine in technology lessons. It is bright, soft, elastic, and most importantly, you can create absolutely anything from it: your own colorful world, full of adventures and unusual creatures. We already know how to sculpt all kinds of figures: dolls, animals. We would like to know more about the quality and properties of plasticine, whether it is possible to make plasticine at home. What properties will the manufactured plasticine have? We decided to make plasticine at home and compare its properties with industrial plasticine.
Hypothesis: Let's assume that the properties of plasticine obtained at home coincide with the properties of production samples.
Purpose: Check the properties of plasticine from different manufacturers.
Tasks:
-study the qualitative composition of plasticine;
-show the use of plasticine;
-make plasticine at home;
-conduct a study of samples;
-analyze the result. Object of study: samples of plasticine from different manufacturers.
Subject of research: properties of plasticine. Research methods: work with sources of information, experiment, observation. 1.From the history of plasticine
The word plasticine
originates from the Italian word
plastilina,
and from the Greek
plastós,
which means stucco.
200 years ago no one knew about this wonderful substance. And its invention can be attributed to two people at once - pharmacist Franz Kolb and inventor William Harbutt. The first of them in 1880 patented a model mass called “Plastilin”, and the second in 1897 invented non-drying clay, giving it the name “Plasticine”. The inventions were almost identical, and were collectively called plasticine. William Harbutt tried for a long time to find an application for his invention in the field of modeling. One day he discovered that his six children were as interested in the invention as he was. Therefore, William decided to fill the house with various plasticine products - castles, fountains and ships. At first, the substance had only one color - gray. But after a few years, plasticine in four colors went on sale. Seeing how quickly the products were sold out, Harbutt decided to open his own factory. Gradually the invention gained enormous popularity. Smart plasticine has become a favorite hand toy for adults and children. But the usual, classic look is also used by many artists, architects and engineers to create various models, ranging from a spaceship to dinosaur figures.
2. Types of plasticine
Today, the children's goods market offers a wide range of different types of plasticine:
- Plasticine
is successfully used in children's creativity.
Soft, plastic, painted in bright colors. Due to the wax introduced into its composition, this plasticine is easily kneaded even in weak hands, and the parts of the figures are perfectly attached to each other. Foreign manufacturers produce plant-based plasticine
and are considered the most popular. Pieces of different colors are easily mixed with each other to obtain new shades, and the fluorescent colors of such plasticine delight everyone. - plasticine
_ After some time in the air it hardens, and you can play with crafts made from such plasticine along with other toys. There are several types of hardening plasticine. - plasticine
, as its name implies, consists of small foam balls bound together by a glycerin-based substance.
You can make voluminous crafts and panels from such plasticine. Homogeneous hardening plasticine is more pleasant to work with; it helps to realize the most complex ideas. Floating plasticine
does not have any special advantages compared to other types. Except for one thing: crafts can float. From such plasticine you can fashion a toy for an evening swim, send a flotilla of boats on a voyage, or launch a flock of swans in a basin of water.
3.
Composition of plasticine
Plasticine is the same clay that people have been familiar with for several millennia. Modern plasticine masses are made on the basis of many different components, the quantity of which ultimately determines the characteristics of the material for modeling: appearance, harmlessness, softness. It is worth noting that the plasticine sold today by most manufacturers is very different in composition from that which was present on store shelves 15-20 years ago.
If earlier for the production of plasticine they used mainly animal fat, supplemented with various chemical components, today there are many types of children's plasticine, significantly different from each other in composition.
In addition to fine purified clay powder, the composition of modern plasticine also includes dyes, wax, animal fat, petroleum jelly and other substances that prevent the plasticine from drying out and hardening. It is these substances that give plasticine softness, plasticity and stickiness. Wax promotes softening when heated and hardening when cooled. Ceresin helps plasticine retain its shape, and fat makes it waterproof. Plasticine always contains a dye that gives it the desired color. Otherwise, all the plasticine would have a clayey-grayish tint.
The most common components of modern plasticine are:
- fine clay powder;
- beeswax;
- animal fat;
- ceresin is a mineral wax, which, among other things, is used in the production of cosmetics as a binder and softening additive;
- pigments (color dyes);
- Vaseline, which prevents the plasticine mass from drying out quickly, making it soft and pliable.
4. Making plasticine at home
From materials on the Internet, we learned that plasticine can be made at home.
Several manufacturing technologies have been found, using heating and cold methods. We decided to make plasticine using a safe, cold method. We have determined the basis of plasticine, which can be prepared at home. The base is: flour, salt, water, vegetable oil Recipe
Starch - 1 tablespoon
Water - 1 glass
Salt - half a glass
Vegetable oil – 2 tablespoons
Flour – 2 cups
Glycerin – 5-10 drops (a substance that prevents hardening and drying out)
Stages of work:
1.Pour water into the container.
2. Add salt. 3. While stirring, dissolve the salt in the water.
4.Add vegetable oil. 5.Add glycerin.
6.Pour in flour. 7. Mix everything thoroughly. 9. Divide into parts. eleven . Add dye (gouache) to each part. 13. Knead until the color is uniform. 14. Place the finished plasticine in storage containers. Conclusion:
You can make plasticine at home.
5. Study of the properties of plasticine
We decided to compare and test the manufactured plasticine for properties such as softness, plasticity, soilability, and, of course, the ability to glue parts. For the study, we took several types of plasticine from different manufacturers Poland, No. 2 – “Plasticine Classic”, manufactured by LLC PA “Raduga”, Ryazan, No. 3 – “Plasticine Cartoons”, manufactured by JSC “Gamma”, Moscow, No. 4 – “Bioplasticine with AloeVera" manufactured by Premier - Plast LLC, Yoshkar - Ola, No. 5 - manufactured plasticine.
1 experience. Testing plasticine for softness
.
Progress:
- Cut off a small slice.
- They held it in their hand.
- The results obtained were recorded in Table 1.
Table 1. Testing plasticine for softness.
№1
| №2 | №3 | №4 | №5 | |
| soft | soft | solid | solid | soft |
Conclusion:
Plasticine No. 1,2,5 is soft, No. 3,4 is hard, but under the influence of heat it becomes soft.
2 experience. Study of plasticine for plasticity
.
Progress:
- Cut off a small slice.
- They held it in their hand.
- We ran a piece of plasticine across a sheet of paper
The results obtained were recorded in Table 2.
Table 2 . Study of plasticine for plasticity
| №1 | №2 | №3 | №4 | №5 |
| crumbles | plastic | plastic | plastic | plastic |
Conclusion:
All types of plasticine, except plasticine No. 1, have plasticity.
3 experience. Study of plasticine for the ability to bond parts
.
Progress:
- Cut off a small slice.
- We made a craft.
- The results obtained were recorded in Table 4.
Table 4. Study of plasticine for the ability of gluing parts.
| №1 | №2 | №3 | №4 | №5 |
| Badly | Badly | Fine | Fine | Fine |
Conclusion:
Plasticine No. 1 and No. 2 have weak gluing ability; we do not recommend using such plasticine in the manufacture of crafts. Plasticine No. 3,4,5 has good gluing ability. This plasticine can be used to make crafts.
Conclusion
Thus, in the course of the work done, we studied the composition and properties of types of plasticine, obtained plasticine at home and conducted a comparative analysis of industrial and home samples of plasticine.
As a result, the following conclusions can be drawn:
- plasticine can be obtained at home;
- a homemade sample of plasticine has all the characteristic properties of plasticine;
- The research hypothesis was confirmed - the properties of plasticine obtained at home coincide with the properties of production samples.
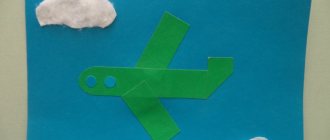
How to draw with the little ones
So, let's draw a picture. We immediately think about what the baby can do. Taking into account its capabilities. If it's a snowman, then you shouldn't draw it big. The toddler’s small palm will not yet be able to roll out a large piece of plasticine, even if we knead it first. Make 2 or 3 snowmen. It will be even more interesting.
Drew. The kid made a circle, help him secure this part to the base. Move on to the next part of the picture.
Just like that, taking into account the interest and abilities of the baby, you will develop the child’s creative abilities. What else would I like to remind you? It's class time. Don't wait for the baby to get tired. Let the first stucco lessons take 5-10 minutes. You can always adjust the time later.
Friends! I wish everyone to understand the science of being good parents! Share your secrets with us so that we can strive for the ideal! That's all for today! Let me just remind you that you have the opportunity to tell all your friends about our conversations, you can invite them to us, and let them tell you what helps them be better dads and moms. Subscribe to news, re-read old conversations, stay active! And... that's it! Bye bye!
Plasticineography methods
The most commonly used of them are:
- Strokes. A small amount of plasticine is placed on the pad of the index finger or a special plastic spatula, after which it is applied to the work surface in the right place with sharp, randomly directed movements.
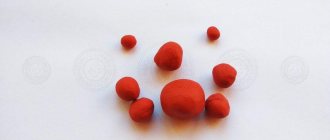
- Plasticine balls. Typically used when placing accents on a flat image (for example, the middle of a flower) or as basic shapes to fill the inner surface of an object schematically depicted on the working plane.
- Flattening the rolled balls. It is not recommended to use a lot of force when flattening the balls. Otherwise, the resulting figure will be deformed, thus losing its clear rounded shape.
- Smearing on the surface. This technique is used to create a background or fill the inside of a figure with colored material.
- Scratching patterns on plasticine. Patterns are created on a flattened piece of plasticine using a special plastic knife or tools with already formed threads.
- Rolling plasticine sausages. You can roll sausages both for placing them on the final image, and for the purpose of using them as a blank.
- Squeezing plasticine out of a syringe. For extrusion, it is recommended to use a special syringe, which allows you not only to easily extrude thin strips of plasticine, but also to remove the remaining working material from the main body of the tool.
Let's get inspired
I suggest making a picture for the little ones:
I showed our result on Instagram:
Wonderful lessons on sculpting pictures of landscapes from plasticine can be found on the Video Modeling channel. There are few video tutorials, but one or two are enough to understand the basic principle and even create masterpieces.
And our result for this lesson:
Please do not treat such creativity as purely childish. There are paintings that are worthy of admiration and can take pride of place on the wall of an apartment. For example, we have a painting that we sculpted based on Pushkin’s fairy tale “Ruslan and Lyudmila. Remember the beginning: “Near the Lukomorye there is a green oak tree, a golden chain on that oak tree...”

Our second favorite picture
Just look at the masterpieces you can create. Sometimes even oil painting does not look as impressive and voluminous as plasticine.
How to make three-dimensional paintings correctly: step-by-step instructions
So, if a flat image is easy to make, then with three-dimensional masterpieces certain difficulties may arise. All work must be carried out in a certain sequence
- Selection of materials and base for the product.
- Preparing plasticine (the raw material must be soft enough).
- Position of the sketch on the base. In this case, you need to take into account where the background will be located and how much space it will take up.
- Making the necessary elements from pieces of plasticine. They can have different shapes and sizes. Various techniques are used in the process: rolling, flattening, pulling the part away from the general shape.
- Attaching pieces of a given shape to the desired area.
A three-dimensional painting made of plasticine is a real masterpiece that will become a wonderful decoration for your interior. Its plot may be different. For example, the image of the sea will be very beautiful. In this case, the product will turn out to be quite colorful. In order to make such a masterpiece, you will need to follow a certain sequence of actions:
- We start work from the top of the base. To do this, you need to smear plasticine in white, blue and blue shades on the surface of the cardboard. Naturally, you can add gray or pearlescent color here. In order for the material to spread well, it needs to be softened. To do this, heat the raw material with a hair dryer. For a more impressive effect, all shades of plasticine can be mixed and only then smeared on the base. Although sometimes the blue background is done first.
- Once the sky is ready, you can start creating the water. For this, a dark blue color is used for the background. Next, decide whether there will be waves in the picture. If so, they may be lighter or darker than the background. In addition, you can use shades of green and turquoise. To make the wave look voluminous, you should use darker plasticine.
- The setting sun can become a separate element of the picture. It usually has a reddish tint and is located on the horizon. In addition, it is necessary to make a sunny path on the water.
- If you want to depict an island with a palm tree in the picture, then yellow, brown and green plasticine is used for this. Please note that the tree can be made voluminous. To do this, you need to place pieces of raw material on top of each other. To make palm leaves, green plasticine is necessarily used, from which oval elements are rolled and then flattened. Using a stack, a corresponding design is made on the tree trunk.
Popular articles Aries figurine using a jigsaw
In principle, in a few hours you can build a real masterpiece that should be placed in a frame. However, be careful, as the plasticine may become crushed under the glass, and the painting will no longer have its former appearance.
Girl in a boat
When the swimming device is ready, we move on to making the girl. Using strokes we create her face and hand, and then we lay out her hair and dress with plaits. And again you need to remember about light and shadow. The hair on the right will be darker and the hair on the left will be lighter. The dress should be made in layers, and you should start making it from the end, that is, from the hem. We apply strands tier by tier, creating the effect of voluminous ruffles. Let's move on to the final part - “drawing” the sea. The waves will look like swirling snails. They also need to be made in layers to create the effect of background and foreground. Some circles can be emphasized with white stripes - these will be highlights. We make a frame from the strands, and on top you can depict a wave to show the infinity of the water element.