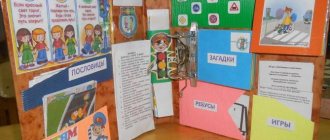
Geometric applique
This article is intended for practicing appliqué with children.
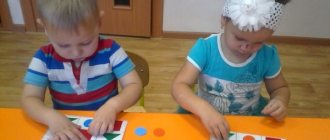
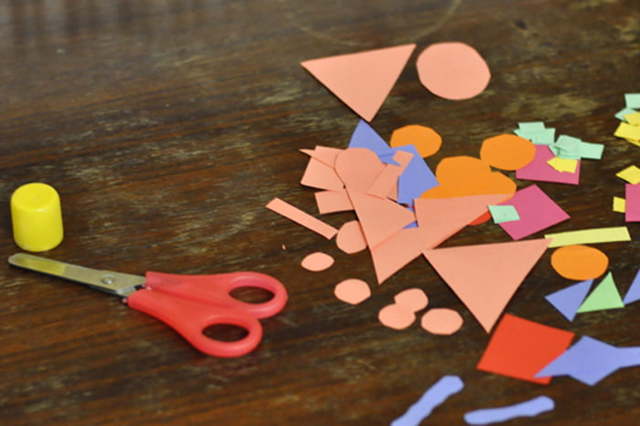
Geometric applique will unobtrusively introduce the baby to the basic properties of objects: size, color, shape. The drawing is made up of simple geometric shapes. The application is associated with cognitive activity and has a huge impact on the development of the child’s creative and mental abilities. It will be of great benefit and will help develop work skills. When starting to introduce a child to an application, you need to remember three main rules: 1) the child cannot hold his attention for a long time 2) he should be interested 3) the child needs praise for the work done. Before starting class, cut out geometric shapes of different colors and sizes. Pay the baby's attention to the figure, its color and size. Help me put the shapes in the right order.
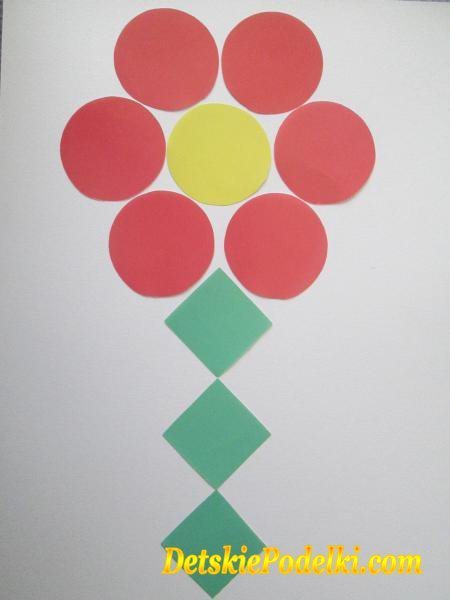
Flower applique.
If the child is still very small, then it is better to perform the application together. Place the flower on paper and ask your child to repeat after you. Show how to use glue and glue a picture. At first, use 2-3 geometric shapes in the application; for better memorization, pronounce the names and comment on your actions.
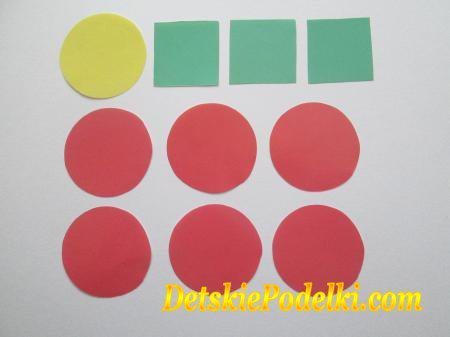
The flower is made of circles and squares. The circles are the petals of the flower, and the squares laid out in the shape of a diamond are the stem of the flower.

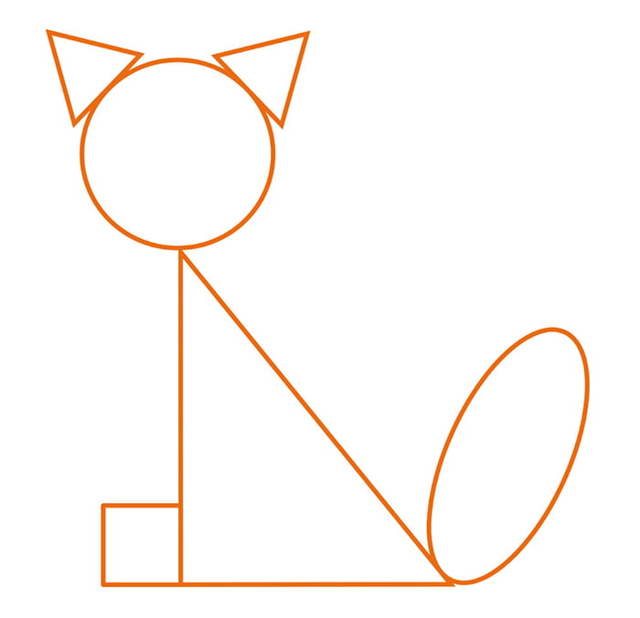
The caterpillar is made entirely of circles and only a small triangle is required for the mouth.
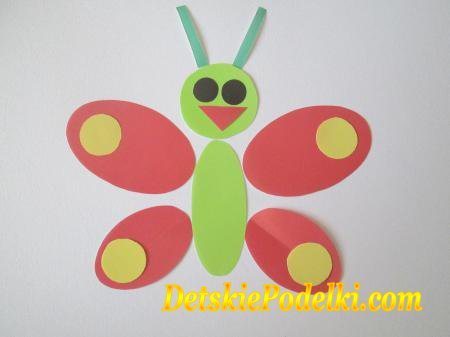
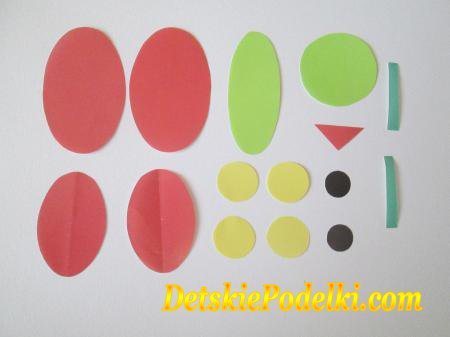
The butterfly applique will be more complex, it includes new geometric shapes. The number and size of parts increases.
It’s worth trying to make a general picture of geometric shapes with your child. First, work on each element of the future picture separately (flower, butterfly, caterpillar), and then assemble the overall picture. While doing appliqué with your child, ask him who he is portraying? Who are caterpillars and what do they turn into? By conducting classes using this method, the child’s horizons develop.
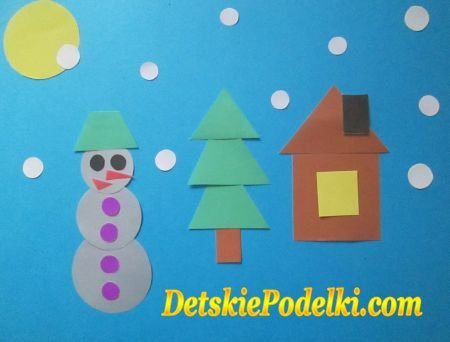
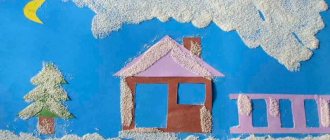
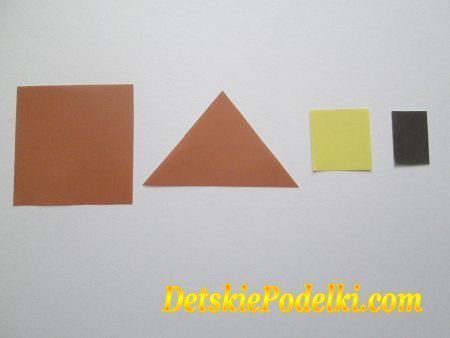
If it’s winter outside, then you should try to make a simple winter geometric applique.
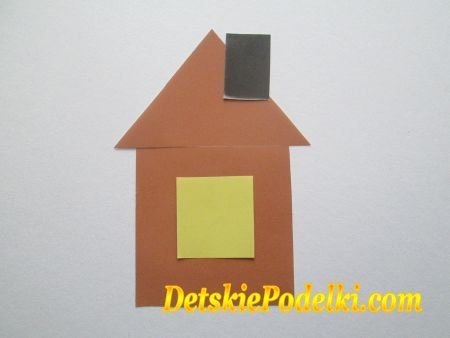
First, we try to lay out the house from the figures, and then glue it onto the base for the applique.
We assemble the Christmas tree from green triangles, and from small circles we make beads for the Christmas tree. Everything is also simple with the snowman, it consists of circles of different sizes, one trapezoid and two different small triangles.
Application of geometric shapes “Cats and mice”.
Geometric paper applique. Garland.
Our task is to teach the child to stick exactly geometric shapes: circles and ovals, rhombuses and triangles, squares and rectangles, alternating them by color and shape. Show your child how to make a paper applique, imitating a garland on a string using circles and flags.
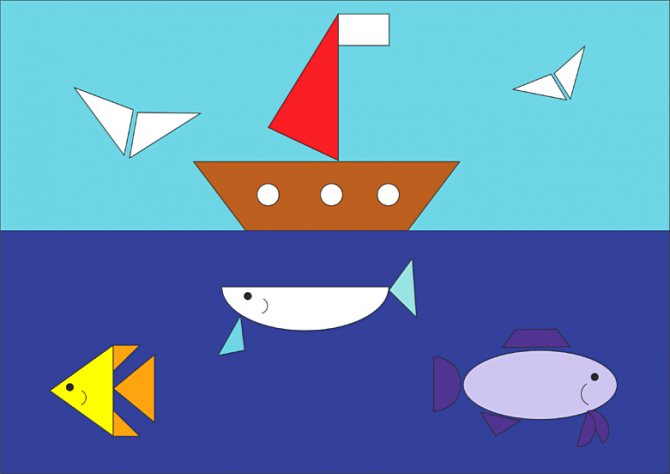
Ship made of geometric shapes.
The geometric application should be interesting, not very complex and not very simple, only then can the child be interested in the work. Cut out various geometric shapes from colored paper and construct different ships from them. It can be one large ship or several small ones, with sails or a funnel. Glue the result you like onto paper.
Source: https://detskiepodelki.com/podelki-iz-bumagi/12-geometricheskaya-applikaciya.html
Vase with candies
The word “vase” in this task is conditional. The child can fill a jar, plate, tray or glass with colorful shapes. It is these objects (their outlines on paper, cardboard) that will act as the basis. The step-by-step process of making a craft looks like this:
- You need to prepare a base with the outline of a basic object applied to it - vases, jars, plates.
- Cut out circles of different diameters from multi-colored paper or foil that will symbolize lollipops.
- Kids must fill the outline of the base object with candies in any order, without going beyond its boundaries.
- You can complement the applique with painted flowers, candies of other sizes, and the sun.
Application templates from geometric shapes for children
Don't know what to do with your child? Great fun is creating appliqués from geometric shapes. This activity does not require special materials or preparation; it develops fine motor skills, imagination and thinking of the child, and is even very exciting for an adult. Appliqué is also often practiced in kindergarten, along with drawing, putting together puzzles, singing, etc. What types of applications are there?
Types of applications
People are accustomed to the fact that appliqué is a childhood hobby, but the beautiful mosaics and stained glass windows on the windows and walls of the most beautiful buildings in the world are also, to some extent, appliqué.
What is its essence? This is a set of individual parts assembled into a single whole (these can be either arbitrary geometric shapes or parts that have a predetermined shape and place in the finished drawing).
Applications can be made from different materials:
- From paper.
- From cardboard.
- From fabric.
- From cereals and seeds.
- From plant leaves.
- From threads.
- From rhinestones.
- From any other materials that can be attached to any base, thereby creating a pattern.
But still, paper remains the most inexpensive, simple and safe for a child, and therefore the most common material for creating appliqués. And the range of possible ideas for working with it is limitless. For example, using the appliqué technique from geometric shapes for children, you can make:
- Flowers and other plants.
- Animals.
- Cars, ships, planes, etc.
- Houses and architectural buildings.
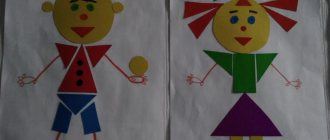
- Little people and different clothes for them.
- Clowns, artists, magicians.
- Fairy tale characters.
- Collage in the form of a colorful rug.
- Entire story compositions.
Application "Owl" made of leaves and colored paper
For the little ones
At the age of 4–5 years, a child, of course, cannot independently come up with a composition, select details for it, cut them out and arrange them correctly on paper. Therefore, special coloring books with applications for kids were invented.
They already give the details. They just need to be cut out. All the details are very simple and are already painted. The contours of the finished drawing, and sometimes the background to it, are also given.
The parts just need to be laid out in the correct way, like puzzles, and carefully glued. Even a small child can easily cope with this task. True, you shouldn’t leave him alone with scissors .
Therefore, either cut out the parts yourself, or watch how he does it.
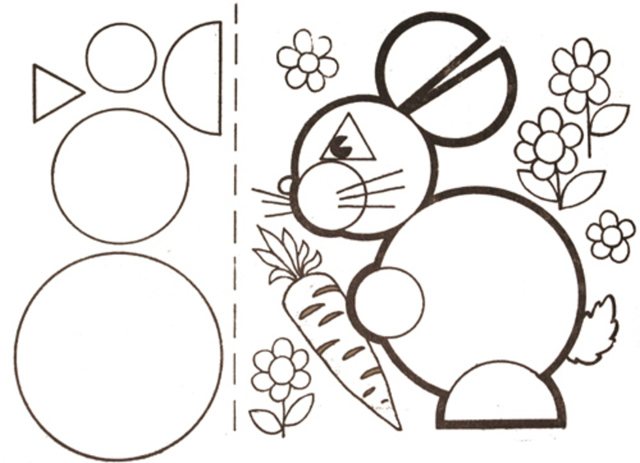
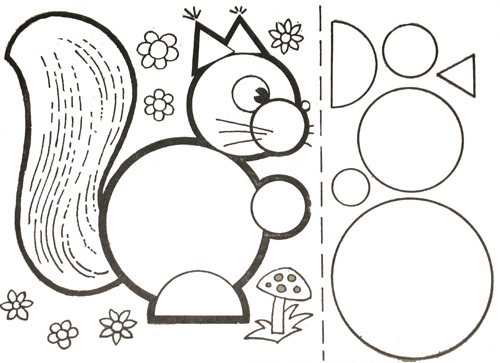
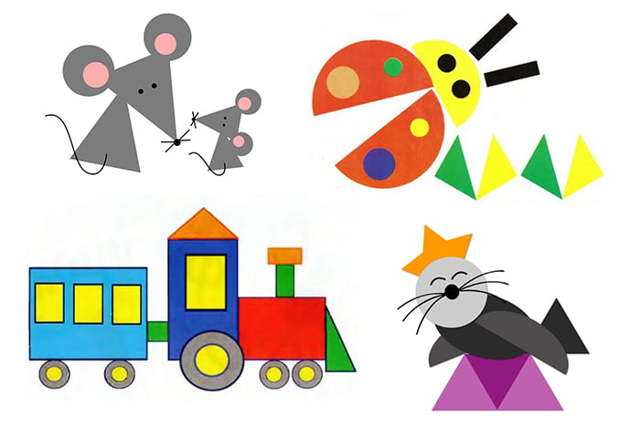
For example, you can make a funny hare or squirrel from circles and semicircles. And the cunning fox is made of triangles. These crafts from geometric shapes for children are very simple, the number of parts is only 5 or 6 pieces.
Applications for first graders
At the age of 6-8 years, the child’s skills are already more developed. Therefore, crafts made from geometric shapes for the 1st grade of school or the senior group of kindergarten have smaller and more complex details. In addition, a first-grader can already independently compose a separate object or even a small composition from them.
For example, a New Year tree made up of green triangles of different sizes (decreasing towards the top) and multi-colored bright circles representing balls. Such balls can be made voluminous by using rhinestones, beads, buttons or other similar details instead of paper.
You can develop the New Year theme and make Father Frost and the Snow Maiden, a snowman or some other characters associated with this holiday. Or create some other fairy tale plot.
Goals and objectives
In accordance with the requirements of the Federal State Educational Standard, the creative development of children is one of the main directions of the pedagogical activities of preschool educational institutions. Plasticineography allows you to successfully solve the goals and objectives of educational activities in different age groups.
2-3 years
An early age is considered optimal for starting classes using plasticine. Already at 2 years old, children, under the guidance of an adult, are able to create masterpieces from plastic material.
The main goal of plasticineography classes with children 2-3 years old is the development of fine motor skills. The nerve endings located at the fingertips must be stimulated with the help of modeling, as this is a necessary condition for the development of speech in babies. Also, in order to develop speech in the classroom, the teacher asks the children to come up with a story or fairy tale that would mention the object that they made.
In addition, modeling and creating pictures from plasticine create the prerequisites for the development of children's thinking and aesthetic taste.
For children 2-3 years old, plasticineography allows you to solve the following problems:
- the formation in young children of perseverance, the desire to complete the work started;
- developing the ability to perform work according to a model;
- developing cooperation skills, group and pair work;
- developing the ability to evaluate one’s own work or the work of a friend;
- development of voluntary attention, the ability to focus on the goal of the activity;
- development of spatial orientation skills;
- training in basic modeling techniques;
- teaching children to do work consistently and accurately;
- creating conditions for the development of imagination and creative self-realization.
4-6 years
Starting from 3-4 years old, plasticineography allows children to improve their modeling skills. To successfully solve this problem, the teacher needs to create a sustainable interest in the visual arts among students.
In the older group, plasticineography becomes a favorite activity for many children. In the period from 4 to 6 years, in the process of creating a picture from plasticine, the following psychological and pedagogical tasks are solved:
- learning to respect the boundaries of the drawing;
- formation of a basic stock of knowledge about the properties of plasticine;
- training in the rules of using decorative materials (beads, sequins, twigs, shells, threads) in modeling;
- consolidation of ideas about sensory standards;
- development of coordination of actions of the right and left hands;
- improvement of the eye;
- stimulating the creative activity of preschoolers;
- development of aesthetic taste and skills in creating a harmonious composition;
- development of communication skills;
- preparing the hand for mastering writing;
- development of accuracy, diligence, patience.
Starting from 5-6 years old, in plasticineography classes you can use templates to develop in children the ability to transform a flat figure into a three-dimensional one. And for children 6-7 years old, it becomes possible to independently make a template for further work with it using the plasticineography technique.
7-8 years
The purpose of plasticineography in working with children of senior preschool and primary school age is to teach them complex modeling techniques. At the age of 4-5 years, they learned basic actions: rolling sausages and balls, and at this stage, children are taught plasticineography techniques necessary to create a full-fledged composition: squeezing plasticine from a syringe, smearing, twisting.
The technique of plasticineography in working with children 7-8 years old involves solving the following psychological and pedagogical problems:
- create conditions for the development of visual and figurative thinking;
- development of creativity and initiative;
- developing the ability to express one’s own idea in a picture;
- developing the ability to independently select colors and additional decorative elements to create a composition;
- developing the ability to combine several modeling techniques in work;
- expansion of the active dictionary;
- formation of communication skills.
As a rule, younger schoolchildren, when making a picture using the plasticine technique, prefer to work with the template individually. In most cases, children 7-8 years old no longer need to be given step-by-step instructions to complete the work. They are able to independently create a masterpiece on a given topic using plasticine stencils.
Application of geometric shapes for children: patterns, animals and other DIY crafts
Creating an applique from geometric shapes is very similar to working with a construction set, only here it is paper and flat. Instead of cutting out ready-made silhouettes of animals, plants and other objects from colored paper and pasting them in the required order, the child assembles them from simple geometric shapes according to the “what looks like” principle. This is much more interesting than it might seem!
The benefits of geometric applique for the development of preschool children
From early preschool age to 1st grade, exercises on connecting simple shapes into a single image are very useful for children. They help the little ones learn and remember what geometric shapes there are, and consolidate the names of colors.
Classes with this type of application also develop:
- fine motor skills;
- accuracy;
- eye gauge;
- perseverance and attentiveness;
- skills in working with scissors and glue;
- imagination, the ability to think outside the box (the triangle looks like the face of a fox or a piece of cheese);
- the ability to design, taking into account the order in which the figures will be placed on the finished craft - the parts that should be further away are glued first, and those that are closer to the viewer can be layered on top of the previous ones (for example, if the bear stands half-turned, first it is attached to the background one of his paws, then his body, and only then his second paw).
In addition, the process of selecting the necessary details and composing them embeds in the minds of little creators the understanding that much in the world around them consists of geometric shapes, and the complex is made up of the simple.
Organization of the process
Geometric applique does not require serious artistic skills from adults to organize the process of children's creativity. The main thing is to provide the kids with all the necessary materials and tools, to organize a safe and convenient space for work.
In order for children aged 2–4 years to successfully make an applique, they need to prepare a drawing with clear contours and cut out the appropriate number of parts. At the same time, they may need a personal example from a senior, showing on the same blank what, where and how to stick.
At this age, children can already arrange geometric shapes on a sheet of paper without ready-made contours, looking at a sample. You can have them cut out parts with straight lines, such as triangles, themselves from lined sheets of colored paper. In this case, you should make sure that the scissors are safe - with rounded ends.
- For older preschoolers.
At 6–7 years old, children are able to trace simple patterns and cut out appliqué details themselves. At this age, it is useful to provide them with an independent choice of the color scheme of the craft: for example, when depicting flowers, geometric patterns, butterflies. This helps them learn how to combine colors and develops their creativity.
To ensure that the work lasts, use high-quality, not too thin colored paper and make sure that the glue stick has not dried out.
Examples of geometric applications
To conduct a lesson, just search on the Internet and print ready-made templates. For older children, you can introduce a loose theme by giving a few basic shapes that they can use in their appliqué pictures.
Cat
Application designed for the middle group of kindergarten. To work on the cat you will need geometric shapes:
- a circle with a diameter of 3.5–4 cm for the head;
- one large right-angled triangle for the body and two small ones for the ears;
- a square with a side of 1.5 cm is a foot;
- an elongated oval for the tail (the wider the figure, the fluffier the tail will be).
The large triangle should be placed on the sheet so that the smaller leg is at the base, and the head with ears should be placed at the upper sharp corner. Place a paw on the side of the right angle of the body, and a tail on the lower end of the hypotenuse.
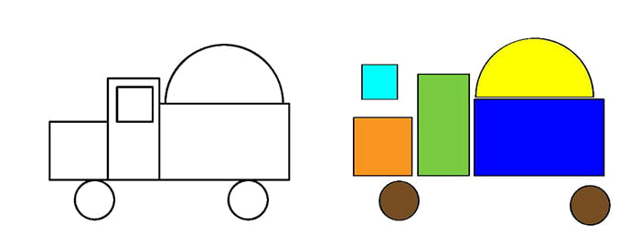
Car
The truck consists of almost the same number of parts as the previous craft. A small complication is that the window will need to be glued to the top of the cabin - this will immediately change its appearance and bring the whole composition to life in the eyes of the child.
Required figures:
- 2 rectangles for the cabin and body;
- 2 squares - hood and window;
- 2 round wheels;
- 1 large semicircle is the sand that the truck carries in the back.
After gluing up all the parts of the truck, kids will likely want to draw a picture of the person driving the car in the window.
House
A plot-based application that gives scope for creativity and additional elements. In order to make a house with a courtyard, you will need to prepare:
- 3 rectangles are the lower part of the house, the door and the pipe;
- 3 squares - for windows;
- 1 circle and 8 small triangles for the sun and its rays;
- a narrow long rectangle and a large oval - a tree in the yard;
- 1 small circle for the center of the flower, 9 ovals for the petals and a thin rectangular strip for the stem;
- oval for a puddle in the yard.
Glade
Polyana is a multi-composition application in kindergarten for children 5-6 years old. Here we will get acquainted with models that need to be made first, and only then fixed to the base. Volumetric types of applications are made with such an original sample.
Our base is blue cardboard. This is heaven. The sun is shining. The grass grows and flowers bloom in it. And butterflies and dragonflies flutter above them. All parts are made of accordion-folded paper.
- Grass
. We fold a strip 5 cm wide and 2 times longer than the bottom of the base like an accordion. Cut off the top (approx. 1 cm) at an acute angle. Glue the strip. - Flower.
We fold a long strip 3-5 cm wide and turn it in a circle so as to connect the edges. We secure them. The flower is ready. We make several of these products in different colors.
Don't forget about the stems (glued strips) and leaves (accordions in half).
- Butterfly
. Cut off and round the edges of a sheet of paper. Fold crosswise like an accordion. We do the same with a sheet of smaller size and a different color.
We connect 2 sheets in the middle with a strip. We secure them. Spread the wings.
- Sun.
Cover the top corner with a yellow triangle. We attach a corrugated strip along its edge, creating rays. - Dragonfly
. Cut out 2 blanks from a plain sheet. One is in the form of a figure eight, the second is a droplet. Glue a droplet to the base and next to it a figure eight so that between its circles we place corrugated wings fastened in the middle. - The clearing came to life and bloomed to the delight of the children.
Application of geometric shapes
Applique, which is easily made from geometric shapes, is one of the simplest, but also interesting activities for young children.
By doing this activity, your child will not only develop his creative potential and artistic taste, but also associative thinking, eye, and color perception. For preschoolers, such work will be the first step towards studying geometric shapes and their features.
Making appliqués from a wide variety of geometric shapes will also help develop a child’s understanding of color compatibility.
In kindergarten, especially in younger groups, children slowly begin to do such work. The teacher gives them ready-made parts, the children glue them on. The older the child gets, the more freedom he has when making this kind of applique: they independently cut out templates with scissors and create simple plot compositions.
At school, younger students continue to make appliqués during labor lessons. Often 1st grade students do work using this technique about wild animals, seasons, and make holiday-themed greeting cards for loved ones.
Grade 2 develops their imagination even more: they build entire cities and episodes from fairy tales out of paper on cardboard. The program is more complex for 4th grade students: their pictures are more realistic, rich in small details, and dynamic.
This application is perfect for kids. The picture shows the finished work and the parts that make up the machine. The parent or teacher must independently cut out the parts, help the child choose bright colors for his work, show how to properly apply glue to the parts with a brush, glue them onto cardboard, and remove excess glue with a napkin.
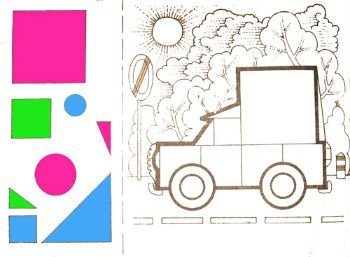
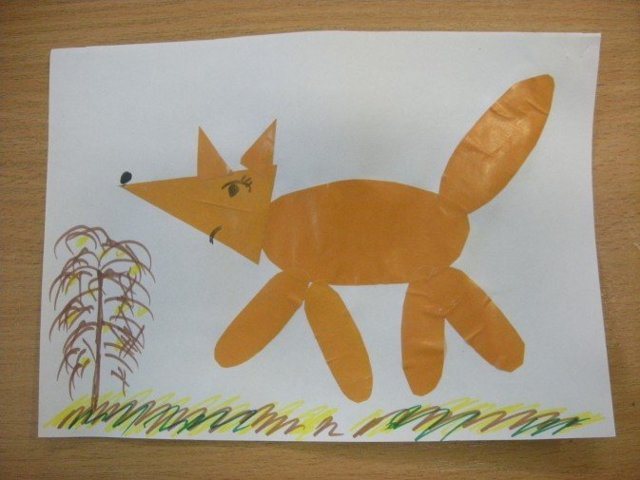
Figure “Fox”: master class with photos and step-by-step instructions
To work you will need:
- White sheet of office paper
- Orange colored paper
- Scissors
- Simple pencil
- Markers
- Oilcloths
- Tassels
- Glue
First, we make templates from orange paper. We cut out one large oval, which will be the body of our fox. Another smaller oval is the tail. The smallest ovals - paws - should be 4 pieces. One large isosceles triangle is the fox’s muzzle, two small ones are the ears.
When all the details are ready, we begin making the applique itself. In the middle of the white background sheet we glue the body of the animal. Gently apply glue to the part with a brush. In order not to stain the table, you can lay down oilcloth:
- We glue the muzzle to the body.
- Then the tail.
- We glue 4 paws so that the picture is dynamic, because the fox is in motion.
- We attach the remaining parts – the ears – to the sheet.
- After this, we need to draw on the fox’s mouth, nose and eyes, and also draw the background: grass, sun, trees, bushes - whatever comes to the child’s mind, he can draw on a white background. This is what the kids should get:
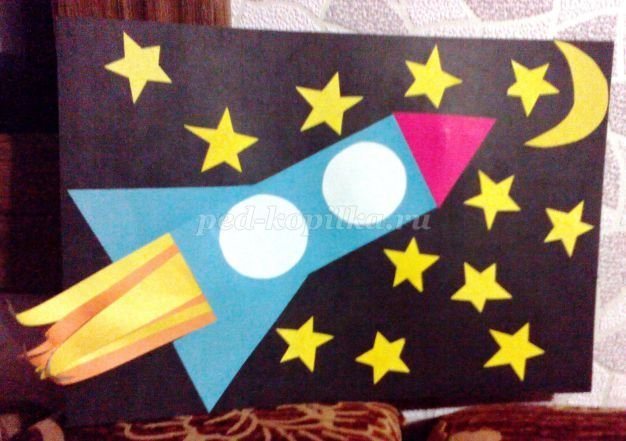
We make a bright applique “Rocket” with our own hands with a child
Required tools and materials:
- Black cardboard
- Colored paper
- PVA glue
- Plain or white pencil
- Scissors
- Glue brush
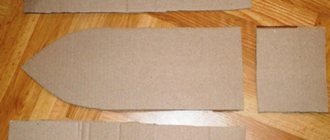
To make this work, we use ready-made templates, which are parts of our future rocket and starry cosmic sky:
On black cardboard we mark the border of the lower part of the ship with a pencil.
We twist the parts of our tail - the triangles - from the sharp end with scissors. This must be done carefully and carefully.
We glue the resulting twisted parts in three layers as follows.
We glue the remaining parts of the spaceship to the tail.
You need to finish the work by decorating the starry cosmic sky. Glue on yellow stars and a month.
Now our work is ready:
Making applications does not require much effort from the child and the parent or teacher, so the child can simply enjoy the process of creation, and the elder can observe and tell the child what and how to do so that his idea comes true.
The child’s finished works can be beautifully framed or made into a presentation in the form of a collage and hung in the children’s room.
This type of technology is very useful especially for kids, because it develops fine motor skills, learns how to independently make crafts, cards for mom, grandma, dad, brother or sister. Making crafts instills in a child diligence, hard work, and accuracy.
And an application made independently from geometric shapes introduces preschoolers to the basics of geometry for the first time, which makes it easier for parents in the future.
We invite you to watch several video master classes on the topic “Appliqué from geometric shapes.” Creative success!
Source: https://sdelala-sama.ru/podelki/821-applikaciya-iz-geometricheskih-figur.html
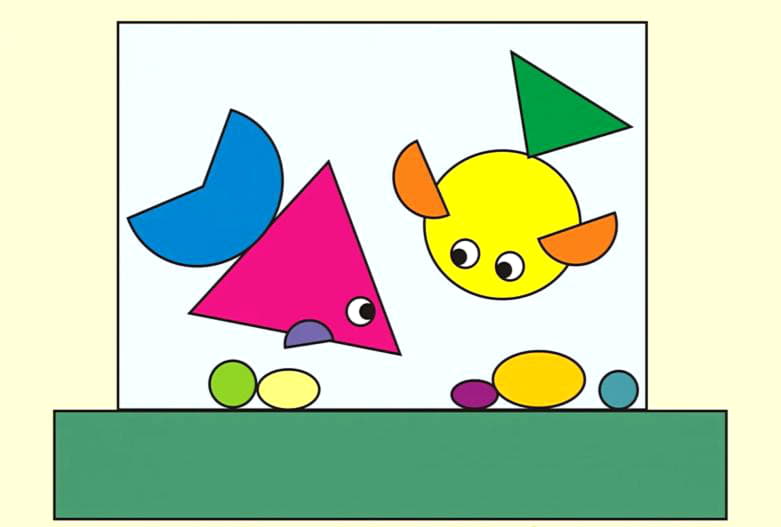
Chick
Kids think abstractly; for them, such a trifle as the color or shape of a character does not matter if his image conveys child-like emotions. But how can you make an applique just like this so that your baby feels a kindred spirit? Here's a great example of this!
Meet Tsypa! Him:
- Body - square;
- Eye – 2 circles (black and white, and a little more white);
- Beak - triangle;
- The paws are also triangular;
- The wing is a semicircle;
- Tuft - crescent.
Now, trust the little one, let him choose what color will be! Explain what each figure means and why the bird needs it. Isn't that interesting? So, finding the right stencils for applications is already a game. All that remains is to glue everything together!
Outline of lessons on applique, modeling (senior group)
- GBOU School No. 967
- Structural unit No. 3
- Topic: “Our farm” - applique of geometric shapes of different sizes
- Spent:
- Teacher gr. 2
Yumanova V.A.
- Moscow
- 2019
- Tasks:
- — Teach children to create images of different pets based on two ovals, adding various details.
- — Strengthen the ability to cut out ovals from rectangles folded in half, rounding the corners.
- — Teach children to convey spatial representations (near, side, right, left, closer, further).
Preliminary work. Looking at pictures of domestic animals and their babies. Designing images of animals from geometric mosaics. Reading fiction. Conversation on the content of the painting “The Farm”.
- Preparing the basis for a future composition: for children's work, the teacher cuts out green lawns and blue puddles (in the form of blots) from colored paper and prepares the basis for a collective composition - a large sheet of paper.
- Materials and equipment: paper rectangles (different in size and color), scissors, glue, glue brushes, glue sticks, cloth napkins, oilcloths, boxes for scraps, felt-tip pens for decorating small parts.
- Progress of the lesson
- The teacher shows the children the picture “Farm”.
- Educator: - Who lives on the farm?
- A finger game is played, depicting domestic animals.
- Dog
- The dog has a sharp nose
- There is a neck and a tail.
(Right palm on the edge, towards you. Thumb up. Index, middle and ring fingers together. The little finger alternately lowers and rises).
- horse
- The horse's mane curls,
- Playfully beats with its hooves.
(The right palm is on the edge away from you. The thumb is up. The left palm is placed on top of it at an angle, forming a mane with the fingers. The thumb is up. Two thumbs form the ears).
- Cat
- And the cat has ears
- Ears on the top of the head
- To hear better
- The mouse is in her hole.
(The middle and ring fingers rest against the thumb. The index and little fingers are raised up).
The teacher attaches ovals to the flannelgraph: three large ones and above them, at a short distance on the side, a slightly smaller one.
Educator: - Guys, who or what can these ovals be turned into? (Children's answers).
Educator: - And now I invite you to see how these ovals turn into different animals. Guys, look at the figures of three animals (dog, sheep, horse), which are based on ovals - a large one (torso) and a small one (head).
- Educator: - I will show you pictures, and you must say who it is and how you guessed about it.
- All these animals are similar in that they have a large oval body and a small oval head; But animals differ in other parts of the body - tails, necks, legs.
- Educator: - I will leave the pictures on the board so that while you work you can compare your ideas about animals with them.
- Educator: - Children, tell me how to cut out ovals.
(Children's answers: you need to fold the paper rectangle in half, and holding the fold, round the corners, first one, then the other. When we unfold it, we will get an oval.)
Educator: - I remind you of the safety rules when working with scissors.
I hold a large oval in one hand and a small one in the other, and begin to show you combinations of torso and head placement.
Educator: - Who could it be if the head is attached directly to the side of the body? right or left? (Sheep, pig).
— What kind of pet can you get if you raise your head above your body from the side? (Horse, cow).
— If you lower your head below your body? (Any animal that eats or drinks).
Educator: - Guys, think about what animal you would like to depict from ovals. (Children choose paper that is suitable in color and size and begin to cut out, checking the drawings or images of animals in the painting “Farm”).
Next, children place (stick) animal figures on the lawns, in blue puddles pre-cut by the teacher, and place them on the general composition “Our Farm”, complement the picture by drawing animals and other farm paraphernalia.
Source: https://nsportal.ru/detskiy-sad/applikatsiya-lepka/2019/03/26/nasha-ferma-applikatsiya-iz-geometricheskih-figur-raznoy
The simplest pictures
Children 1-2 years old are just getting acquainted with the world around them
It is important to teach them how to stick, excluding a clear composition. The lesson is conducted in the form of a game
Bear juggler
You should come up with a story about how the bear lost the juggling balls. The goal is to introduce children to the circle, consolidate knowledge about shades, and develop skills in handling adhesives. Required:
- mugs of different sizes and colored sheets;
- bear image, like a bright sticker;
- cardboard;
- glue containing starch or flour;
- dry and wet wipe.
When telling the story of how a cheerful little bear lost the balls, stick a character on it. Help your child find these balls, which differ in volume and tone. Now the little master himself has to lubricate the parts from the central part to the edge, arrange them around Toptygin and, using a dry cloth, press them to the base.
Fruit platter
This is a more complex craft that consolidates the knowledge gained. A plate or basket is drawn and cut out. Children deliver images of apples, pears, and grapes into it, matching them according to geometric configurations. After this, the names of tasty items and colors are repeated. Here you can try to make a caterpillar that doesn’t mind eating them.
Space
1st grade boys often dream of becoming astronauts. They will be happy to make an application on a space theme:
- The outline of the rocket is applied to the base.
- For planets and rocket portholes, several circles are cut out (from 7 to 10).
- For stars, smaller circles are made (10-15).
- The triangle is needed for the nose of the rocket.
- Another triangle, cut in two, plays the role of the rocket's tail.
- From a large rectangle, many strips are made and pasted to resemble the fire released by the rocket.
The missing elements of the application can be completed.
School age children
Junior grades are able to independently separate details according to a model, and can assemble a complete picture, focusing on their imagination. Initially, you should show the children what the finished craft will look like.
To work you will need brushes, colored paper, glue, scissors, cardboard, a ruler and a simple pencil.
A base is prepared, geometric shapes in a specific theme are sketched on it. All details are copied from the base, cut out and glued according to the template.
Tags
Geometric shapes geometric shapes geometric shapes cangeometric shapes fromgeometric shapes.from shapes helpgeometric shapes.geometric shapes.from geometric shapesstudying geometric shapesfrom geometric shapes.from geometric shapesPhotos of geometric appliquessimple geometric shapes.from geometric shapesfor geometric appliquesphotos of geometric appliquesPhotos of geometric appliques
coloring pages drawn articles and pictures will be the basis ideas comments and rectangle world drawings should photos
Origami crafts
The ability to make three-dimensional geometric shapes will be useful to the baby in life. The origami technique is very popular today; it makes it possible to create original things. But you shouldn’t start making complex products right away; you need to start with simple figures.
There are many master classes that will make any task easier. You just need to find a suitable option to start implementing your plans. Origami classes will allow younger students to better imagine shapes.
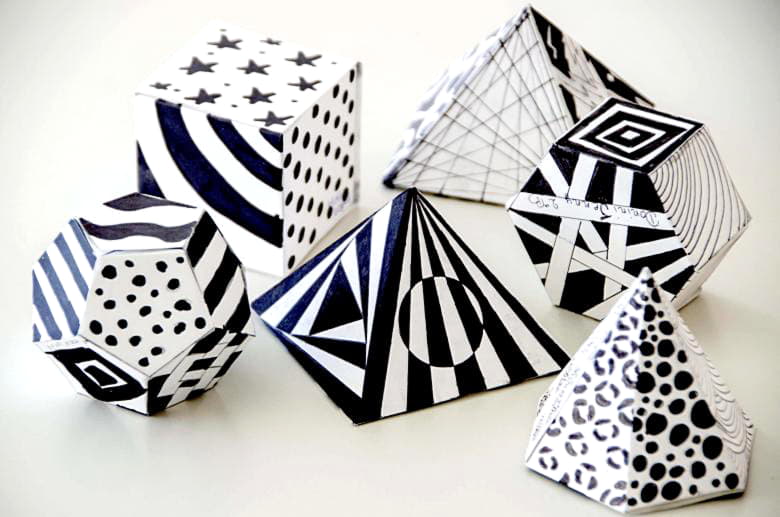
Cube
A simple polyhedron consists of squares. For development you will need a diagram, which is better to make yourself. It must provide places for gluing the figure. The finished cube can be used for various games and will become a great home decoration.
Cone
Making such a figure is more difficult. Using a compass, draw a circle and cut out a sector. Then the figure is glued together. Afterwards, measure the diameter of the base and draw a circle according to the measurements obtained. The side part and the bases are connected. The resulting cone can be used as a frame for other crafts. It will make a wonderful Christmas tree, a cap for a sorcerer or a gnome.
Pyramid
This figure is based on a polyhedron. All sides are triangles. A template is prepared in advance, with the help of which the scan is obtained. It is carefully glued together to obtain the finished figure.
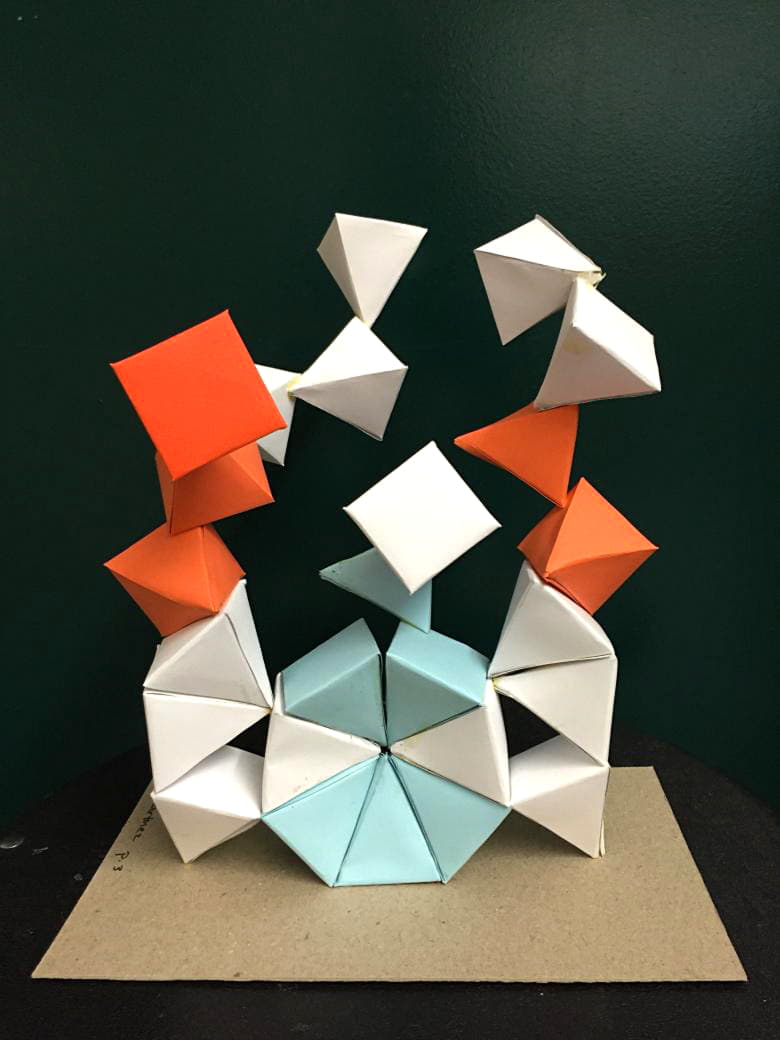
Home decorations
If you cut and glue many shapes of different colors and sizes, they can be used for room decoration. They will make great Christmas tree decorations. They are hung on threads or fishing line to attach them to the ceiling. Such colored figures are pre-decorated with sparkles, braid, and beads to make them sparkle. They create magnificent garlands.
Activities with your child will definitely contribute to his all-round development. By cutting out colored figures or gluing a three-dimensional object, he will learn to correctly perceive shades. Creating applications is useful for fine motor skills, development of thinking and imagination.
By showing your imagination, you can make interesting crafts and applications using geometric figures. Working with shapes is beneficial for a child's development. It prepares him for learning mathematics and makes it easier to understand the basics of design. Teaches accuracy and perseverance. Develops analytical skills and spatial thinking.
Development of a quadrangular pyramid
First, let's imagine what the geometric figure looks like, the model of which we will make. The base of the selected pyramid is a quadrangle. The side ribs are triangles. For work we use the same materials and devices as in the previous version. We draw the drawing on paper with a pencil. In the center of the sheet we draw a quadrilateral with the selected parameters.
We divide each side of the base in half. We draw a perpendicular, which will be the height of the triangular face. Using a compass solution equal to the length of the side face of the pyramid, we make notches on the perpendiculars, placing its leg at the top of the base. We connect both corners of one side of the base to the resulting point on the perpendicular. As a result, we get a square in the center of the drawing, on the edges of which triangles are drawn. To fix the model on the side faces, add auxiliary valves. For reliable fastening, a strip of centimeter width is enough. The pyramid is ready for assembly.
Bouquet
These are not just flowers, but a structure that will stand. In this case we will make all parts of the plant. The flowers, leaves and stems themselves. Children in the middle group will master this simple applique very quickly.
We fold the green leaf in half so that the colored part is on the outside. Edge to edge. We secure them
It is very important not to bend it too much, just run your hand lightly in the middle.
Now you can make cuts from the middle to the edges of the sheet, not reaching the edge by approximately 1.5-2 cm.
We roll the sheet into a tube and fasten its corners at the bottom one to the other. Produces a stable structure
We slightly spread the “petals” of the bouquet at the top.
It will not be difficult to cut out flowers of different colors. They will be nicely decorated with centers that can be made round, heart-shaped, and even triangular or square.
We attach the flowers to the edges of the stems at the top. The bouquet is ready, you can give it as a gift!
The simplest pictures
Children 1-2 years old are just getting acquainted with the world around them
It is important to teach them how to stick, excluding a clear composition. The lesson is conducted in the form of a game
Bear juggler
You should come up with a story about how the bear lost the juggling balls. The goal is to introduce children to the circle, consolidate knowledge about shades, and develop skills in handling adhesives. Required:
- mugs of different sizes and colored sheets;
- bear image, like a bright sticker;
- cardboard;
- glue containing starch or flour;
- dry and wet wipe.
When telling the story of how a cheerful little bear lost the balls, stick a character on it. Help your child find these balls, which differ in volume and tone. Now the little master himself has to lubricate the parts from the central part to the edge, arrange them around Toptygin and, using a dry cloth, press them to the base.
Fruit platter
This is a more complex craft that consolidates the knowledge gained. A plate or basket is drawn and cut out. Children deliver images of apples, pears, and grapes into it, matching them according to geometric configurations. After this, the names of tasty items and colors are repeated. Here you can try to make a caterpillar that doesn’t mind eating them.