Construction using the origami technique “Fox” for the middle group
Goal: Continue to introduce children to the origami technique. Introduction to basic forms.
Tasks:
Educational: increase interest in origami through play, learn to fold a square in different directions, create compositions with paper products, consolidate technical skills in working with paper.
Developmental: develop attention, memory, fine motor skills and eye.
Educational: to cultivate interest in paper design, to cultivate independence.
Demonstration material: illustrations of a fox, finished craft, finished basic form, orange paper.
Handouts: orange paper for origami, scissors, black pencil for eyes and nose.
Repetition of the rule for working with scissors:
1. Store scissors in a specific place
2. Place the scissors with the sharp ends closed away from you
3. Pass the scissors to each other, rings first
Preliminary work:
Looking at pictures, illustrations, reading stories, fairy tales, poems and guessing riddles on the topic
Organizing time:
The teacher offers to look at a picture of a fox and asks them to tell who is depicted in the picture and what they know about the fox.
Conversation with children.
Educator: The fox is a beautiful animal. Her body is covered with thick red fur. The fox has a luxurious fluffy tail. She has short legs and a sharp muzzle. The fox's eyes are beady and glow with a cunning fire.
Foxes live all over the globe. They live not only in forests, but also in the tundra and steppes.
- Who can tell me, guys, what do foxes eat? - That's right, foxes eat hares, mice, birds, fish, and also like to eat berries, fruits, and vegetables.
Foxes are very careful. In case of danger, they confuse their tracks and hide them in other places. Because of this, the fox is called the most cunning animal.
Foxes live as a small family in a hole they dig in the forest. They have keen eyesight and sense of smell.
Foxes are considered useful animals; they eat small rodents.
Many fairy tales and stories have been invented about the red-haired beauty. What is another name for a fox? (Children’s answers.) That’s right, the guys call the fox “red-haired cheat”, “fox-sister”, “Fox-Patrikeevna”.
- And now, guys, I suggest making everyone their own paper fox, don’t you agree?
First we need to stretch our fingers.
Finger gymnastics:
Let's go for a walk (hands clenched into fists, thumbs running across the table)
And the second ones catch up (index fingers “run” across the table)
Third fingers run (“middle fingers run”)
And the fourth ones walk (“ring fingers walk”)
The fifth finger jumped (touch the table rhythmically with both little fingers)
And at the end of the path he fell (slam his fists on the table).
Practical part:
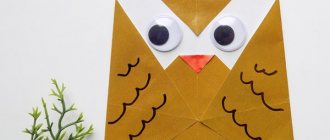
Creating a fox using origami technique.
1.Fold the paper and cut out a square
2. Take the opposite corners and fold our square in half
3. Bend the end of the triangle to the opposite middle
sides.
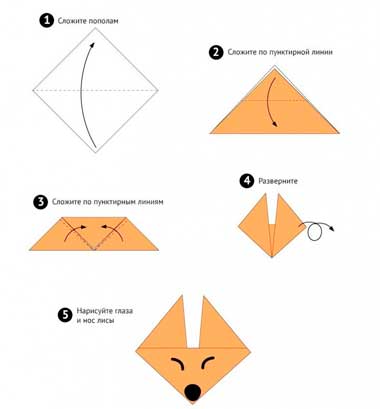
4. We bend the left and right side ends upward to create ears.
(The teacher shows the sequence of techniques for folding a figure, draws attention to accuracy in working with paper. If necessary, provides individual assistance.)
- So we have the face of a fox. What is our little fox missing? (Children's answers.) - That's right, of course the nose and eyes are missing. To do this, we will draw them with a black pencil.
But before that, let's have a physical moment with you. (Children get up for physical exercise.)
Physical education minute:
Three nods.
Four - arms wider,
Five - wave your arms.
Six - sit down quietly.
- Guys, now let’s draw our fox’s nose, eyes, and now our little fox is ready.
Lesson summary:
- Guys, what did we do today?
What did you get out of our lesson?
What other animals would you like to learn how to make from paper?
These are our little foxes!
Summary of a lesson on paper design in the middle group. Theme "Dog Kennel"
"Dog Kennel"
Goal: to learn how to make simple paper crafts based on a new design method - folding paper in half.
Tasks:
-learn to analyze paper crafts: identify parts, their spatial arrangement relative to each other, location of parts on a plane;
-learn to fold a sheet of paper in half (lengthwise, crosswise);
- learn to round two corners of a square so that it becomes a semi-oval;
-continue to teach how to work carefully with glue and napkin;
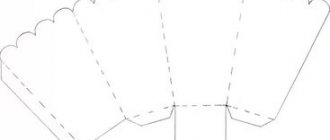
Materials and equipment (for each child): thick sheet of paper 11x22 cm; strip of brown paper 13x4cm; a square sheet of black paper measuring 5x5 cm; PVA glue; scissors; dog figurines; a booth constructed by a teacher from a box.
Progress of the lesson:
A ball game is played “Who lives in which house”. Children stand in a circle facing the teacher. The teacher has a ball in his hands.
Educator: Guys, I will throw the ball and name the animal or bird. And the one who caught the ball names where this animal or bird lives.
Throws the ball: Fox (in a hole), crow (in a nest), squirrel (in a hollow), etc. The game is played several times.
Children sit at tables on which everything necessary for work is prepared.
Educator: Look what I have prepared for you (shows his craft booth). Who lives in the booth? (dog). Yes, the dog Zhuchka lives in the booth with his puppies.
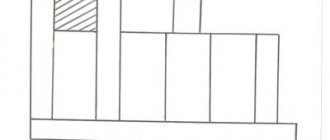
Next, the teacher analyzes the craft: My booth has a roof, it is glued to the wall on top, and a black hole is glued to the wall in the middle.
Educator: Zhuchka’s puppies will soon grow up, and it will be cramped for them all to live together. Let's help the dogs and build booths for them.
The teacher shows and explains the techniques: how to fold a thick sheet of paper crosswise and bend a strip of paper lengthwise; how to round off two corners of a square to make a hole for the dog, how to apply glue to a part, how to use a napkin, check whether it is well smeared. Invites children to examine the prepared parts.
Educator: Before we get to work, let's warm up.
Physical school is being held.
One - rise, stretch, (Stretched.) Two - bend, straighten, (Bent your backs, hands on the belt.) Three - clap your hands, three claps, (Clap your hands.) Three nods with your head. (Move your head.) At four - arms wider, (Arms to the sides.) Five - wave your arms, (Swing your arms.) Six - sit down again. (Sit down.)
Educator: Well done, now let’s get to work.
At the end of the lesson, all works are placed side by side. A large dog runs between them.
Educator: Guys, look how happy Zhuchka is. Apparently she really likes the houses you designed for her puppies. She thanks you. Let's let all the puppies out of the bug box, let them look at their future homes. Dasha, raise the booth, who did you find there? The girl takes out the dogs, the teacher distributes them to the children. Children play with dogs.
List of used literature:
Kutsakova L.V. Construction and artistic work in kindergarten: Program and lesson notes. –M.: Sphere shopping center. 2