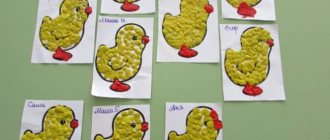
Print Thank you, great lesson +6
All children know what a beautiful birch tree looks like.
This is a tall tree with a thin black and white trunk, and its crown consists of small light green leaves. To make a birch tree from plasticine, we just need three shades - light green, white and black. Trees can be made in different ways, for example, in the form of an applique on cardboard, because colored plasticine allows you to create 3D drawings. In this tutorial we will show you another interesting way. Based on it, it will not be difficult for you to reproduce an entire birch grove. Other lessons on trees:
Step-by-step photo lesson:
Prepare plasticine of the indicated colors for modeling. It is advisable to choose a dense texture - the hardest, inexpensive plasticine that is sold in the store. This is especially true for sculpting the trunk, because otherwise, the tree simply will not hold its shape - the stem will bend under the weight of the crown.
Soften the white plasticine.
Stretch the white plasticine into a long, uneven sausage. To make the tree more stable, you can use a small cream or ketchup lid. Fill the lid with black or brown plasticine, insert a stick or toothpick. And stick a white uneven trunk on top.
Soften green plasticine to create a crown.
Press the green mass into a flat cake. Pressing on the sides with your fingers, give it a characteristic shape.
Treating the entire surface of the green workpiece with the tip of a spatula, make an imitation of leaves. The same should be repeated on the reverse side.
Use a spatula to cut through the top of the trunk.
Insert the crown into the cut and secure with your fingers.
Carefully apply black spots on the trunk in a random order.
So the plasticine birch tree is ready. This slender tree will perfectly complement any composition, for example, a house in the village.
05. 12.2017
Blog of Ekaterina Bogdanova
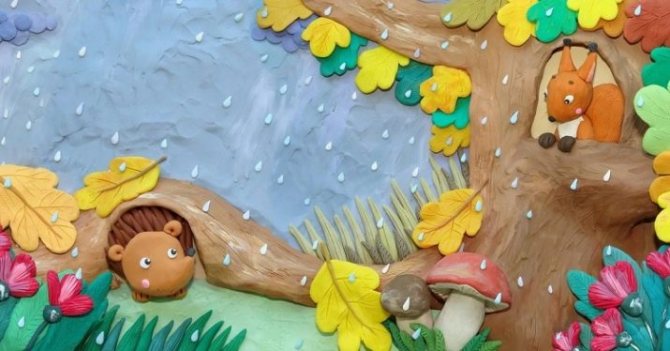
My dear friends and readers, we have already learned how to make an autumn paper appliqué with an image of a succulent paper so familiar to all of us with our own hands. In this lesson I also want to talk about how to make another craft, just as fabulous and a little sad. An autumn applique awaits us - a birch tree made from plasticine. We will depict on it a lonely tree with yellowed, flying leaves, a gloomy, rainy sky and gray wet earth. Of course, you will immediately have a question about how to put all this together on one application and make it using plasticine. Everything is very simple. We will use an interesting technique called plasticineography, which allows you to paint wonderful paintings, landscapes, still lifes and even portraits, as if using oil paints.
I propose to make the central tree a birch - a delicate and tremulous Russian beauty, which many associate with the homeland and rich nature. If we are talking about a birch tree, then it should have a white thin trunk with black marks, thin branches hanging in clusters almost to the ground, and small leaves.
To work on creating an autumn landscape, prepare:
- cardboard - the most ordinary, waste cardboard, cut from any old unnecessary box;
- plasticine - small pieces of gray, brown, blue, dark blue, dark green, brown colors to create an autumn background;
- white and black plasticine for a birch trunk;
- gray plasticine for thin branches;
- yellow plasticine for autumn yellowed leaves.
“Modeling Birch and Christmas Trees”
Summary of educational activities in the middle group
on the topic: “Modeling birch and Christmas trees”
Target:
teach children to describe and compare trees and their benefits; convey in modeling the characteristic structural features of birch and spruce.
Tasks:
Learn to find characteristic features of the external structure of different types of trees; practice using plural nouns; learn to convey the thickness and location of Christmas tree and birch branches in sculpting; develop attention, logical thinking, curiosity, develop fine motor skills; develop the ability to use a stack; cultivate a love for native nature, a desire to learn more about the world around us.
Material:
plasticine white, green; pictures depicting trees of different types and trees of different heights and trunk thicknesses, boards for plasticine, half an A4 sheet for each child, napkins.
Progress of the lesson
Educator:
Guys, when I came to kindergarten, I found a letter. Dunno sent it to us: “Guys, I was walking in the park and saw many, many different trees there. I had fun, it was good to breathe fresh air, look at flying birds, squirrels jumping from branch to branch. I didn’t break branches from the trees, I treat trees with care, because they make the forest so fresh and good. I collected a lot of leaves from different trees, and then I looked at the collected bouquet and realized that I didn’t know which leaf was from which tree. Guys, please help me figure it out."
Educator:
Children, let's help Dunno figure out which tree is where (I show pictures of trees, and the children name them).
Educator:
And now, so that Dunno remembers the trees better, I will read the riddles, and you try to guess them.
I'm standing in the forest on one leg,
Cones on top, bears below,
Green in winter and summer,
The dress is covered in needles, but I call myself .. (Christmas tree).
Not caring about the weather, she walks around in a white sundress, and on one of the warm days May gives her earrings. (Birch)
I crawled out of the little barrel, put down roots and grew up, I became tall and powerful, I am not afraid of thunderstorms or clouds. I feed pigs and squirrels -
It’s okay that my fruit is small. (Oak)
Educator:
You know, children, if only birch trees grow in the forest, then this is a birch grove; if only oaks grow, then it is an oak forest; if only spruce trees grow, then this is a spruce forest; and if it’s pine, then it’s a pine forest.
Educator:
Children, what height are trees? (high, low).
What about thickness? (thick, thin).
What color are the Christmas tree needles?
Educator:
Well done. Do you know this tree?
Educator:
Yes, it's birch. White-trunked, curly, silky - these are the affectionate words used to call birch. Many poems and songs have been written about her. Birch produces tasty and healthy sap. You just have to collect it carefully so as not to damage the tree. In autumn, birch leaves turn yellow and fall off. The fruits of birch are catkins.
How to make an autumn applique - birch from plasticine
Initially, prepare a creativity kit, which will include a box of plasticine or individual pieces if you have already worked with this material before. The cardboard for the background can be cut out from the same box or taken separately.
To make an interesting drawing, as if painted in oil, take different pieces: dark ones for the background, yellow ones, white ones for the birch tree. All this can be successfully combined in one application in the future.
Let's start from the top of the drawing. Let's create a dark, impenetrable autumn sky. Apply gray and dark blue plasticine with your fingers, smearing it onto the cardboard. The mass must be very soft so that it is ideally distributed over the surface of the cardboard.
Fill the top part of the picture with light blue, blue, dark blue, gray. Spread gold in one place, showing the meager rays of the sun peeking through behind the lead clouds. Also decorate the second part of the picture (bottom), but with brown and orange colors, showing wet ground covered with dry leaves.
Roll a sausage out of white plasticine. Glue it in the center of the picture, bending it, stretching the lower part with your fingers, showing the slender trunk of the birch. Stick on small black spots.
Make very thin gray sticks and glue them on as tree branches.
Create many small leaves from yellow plasticine.
Glue the leaves to the branches, distributing them evenly. Also add foliage to the base of the tree.
A unique autumn application in the form of a plasticine pattern is ready. Now, dear friends, you know how to make another autumn-themed craft with your children. Subscribe to updates and share information on social networks.
Video content called “” was posted by the author of “Poznavayka” for 3 years. ago, it was already viewed 4,858 times. The video was liked by 55 people and disliked by 3 users.
DIY plasticine crafts
Plasticine is a fairly expensive material.
This is especially felt when you need a lot of it. To save on purchases, it is better to make it yourself. In addition, homemade material will be much more pleasant to the touch, and the process of its preparation itself is entertaining for both children and adults. To make homemade plasticine you will need:
- ¼ cup fine salt;
- ½ cup boiling water;
- 1 tablespoon of odorless vegetable oil;
- 1 cup flour.
First, you need to boil water in a saucepan, then add flour and salt to the boiling water and stir the resulting mass with a spoon. After this, place the resulting dense lump on the table, after sprinkling the countertop with flour. Make a small depression in the resulting mass and pour oil into it. Then knead the resulting dough thoroughly (until smooth).
After this, it can be colored using special dyes (food dyes can be used).
The resulting plasticine can be used immediately or saved. To eliminate the possibility of damage, it is necessary to pack it in ziplock bags. This way it will be stored for quite a long time.
What you need to make plasticine crafts

The main element in modeling is plasticine. When working with children, you should choose the right plasticine, since for young children it will be difficult to warm up and roll out rough and dry plasticine, and children will not like this activity. Consider the age of the children. Today, in art shops and stationery stores there is a lot of material for different age categories of children. In addition to plasticine, you will need:
- Stacks are usually plastic knives for cutting plasticine, which are included in plasticine packaging, in a standard shape. If desired, you can purchase stacks of more complex shapes and from a different material: wood or metal.
- modeling board – needed for forming individual elements of crafts, appliques, and cutting plasticine.

- all kinds of improvised means are necessary for decorating and making crafts. These can be: toothpicks, paper clips, pens, buttons, beads, beads, and various objects with good texture to transfer texture to plasticine.
Basic techniques for modeling with plasticine
The diverse forms of appliqué elements and crafts require careful thought about execution techniques. This is the task of helping kids master the simplest techniques for creating shapes. The simplest forms of creation in modeling are:
- rolling - circular movement of palms against each other, pressing plasticine, to form a ball;
- rolling - direct movements of the palms against each other, turning the ball into a cylinder;
- flattening - pressing the formed ball between the palms, or to the surface of a table or modeling board;
- pinching – execution of small details on large appliqué figures. This is squeezing a small amount of plasticine (a pinch) with your fingers, usually on the edge of the product;
- smoothing - connecting several elements of a product to each other by rounding the joints with plasticine with your fingers.
Autumn motifs in the works of children
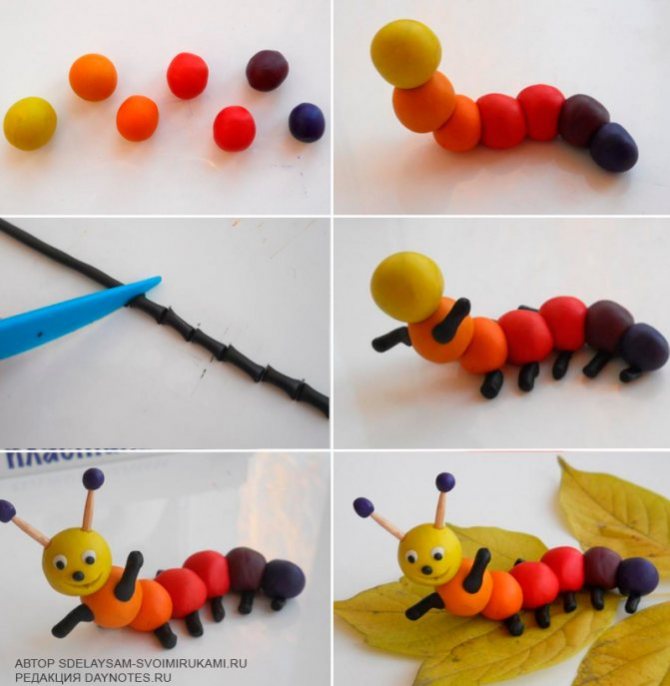
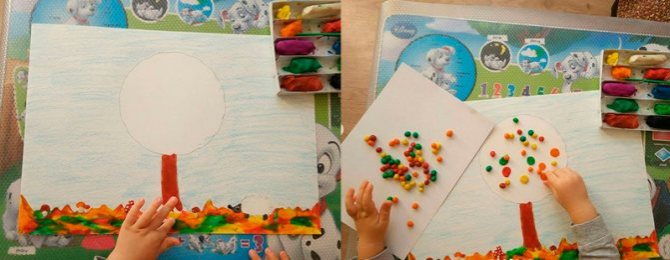
You can make working on a craft interesting for children if you take into account their capabilities. Therefore, I will try to show the works according to age level. I'll start with our work. For the tree, I rolled plasticine balls, and my son flattened it and drew a pattern on the leaves with a knife.
But a caterpillar is several circles gathered together and attached one after the other. To give strength to the structure, place all individual fragments on a toothpick. And, if you want the caterpillar to be flexible, put the balls on a needle and pull it along the thread. When all the parts are assembled, cut the thread at the needle itself, and embed its tip in plasticine.
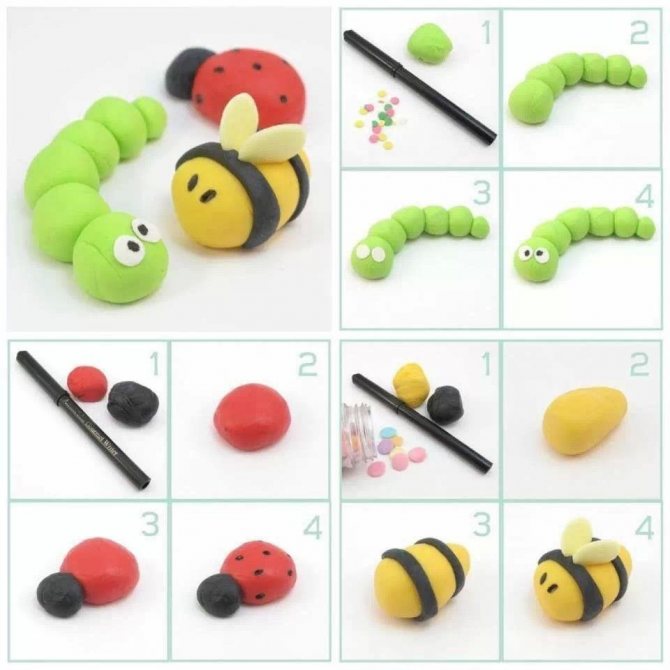
You can, as this master class shows, make a caterpillar rainbow.
And don’t forget about the design of the face and the paws! By the way, here the circles are simply attached to each other. And this option is also suitable.
Older children want to show their talent more fully. For example, a preparatory group in a kindergarten can start making a real autumn meadow, where mushrooms grow and animals run around.
This is the kind of application we will make too.
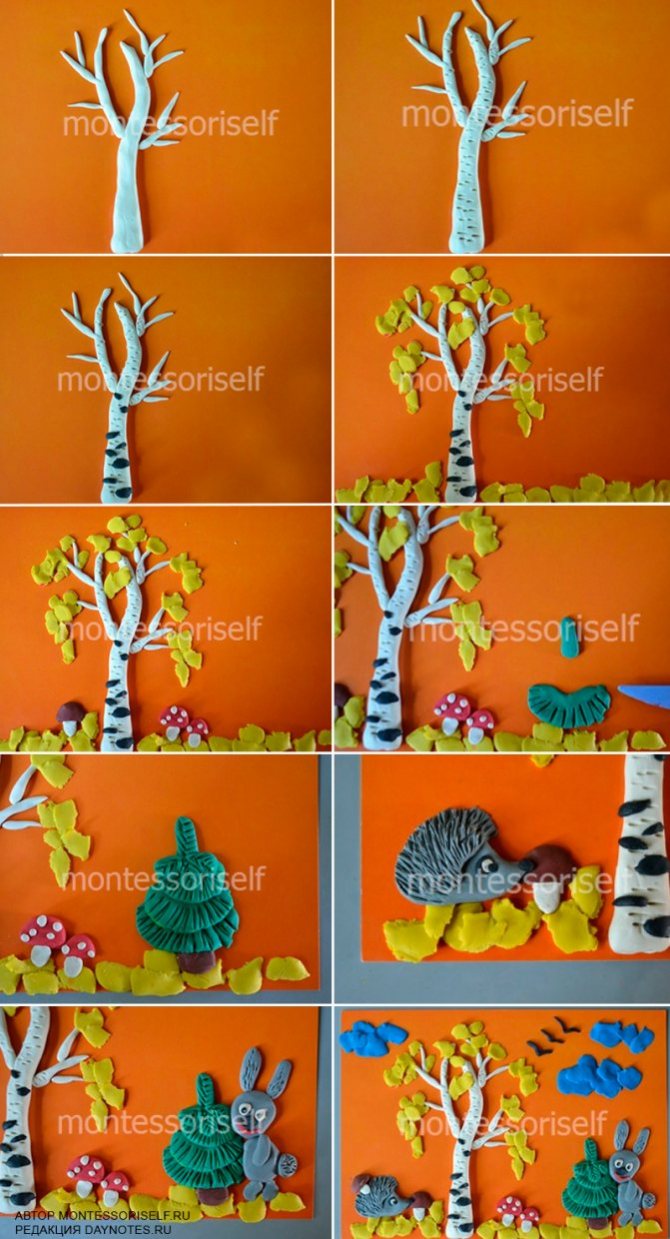
- In the middle of the leaf we make a tree trunk. We select the shape and color. For example, birch can be white and slightly curved.
- Branches extend from the trunk.
- To make our tree more like a birch tree, we make “spots” by pressing holes (not through holes) with a small object.
- You can complement the picture with several black spots.
- We tear off the “leaves” from the yellow plasticine and glue them around the branches.
- It's autumn, which means there are also a lot of fallen leaves on the ground.
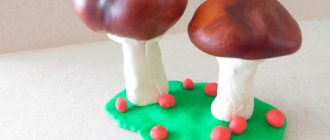
- Mushrooms grow around. They have a semicircular cap and short legs.
- There is a Christmas tree next to the birch tree. Glue a semicircle at the bottom. We divide this “skirt” into strips with a special knife. And so on for each top ball.
- There must be a hedgehog near the mushrooms. It is made like a droplet, only the nose is slightly turned up.
- Separate the part where the hedgehog has needles and draw many, many stripes.
- The hedgehog is already with the harvest. Glue a small fungus onto its needles.
- The bunny is standing by the Christmas tree. It has a head with long ears, a body, legs and a tail.
- Autumn heavy clouds and flying birds complete the picture.
- Author of the master class
Of course, if it is difficult for the baby to do something from this, you can skip this detail.
Such a picture can be done by children from 3 years old, however, if the child is assiduous. But 4-5 year olds can easily cope with this task.
Of course, it will be much easier if mom helps roll the balls.
Options for modeling from plasticine, autumn theme, photo
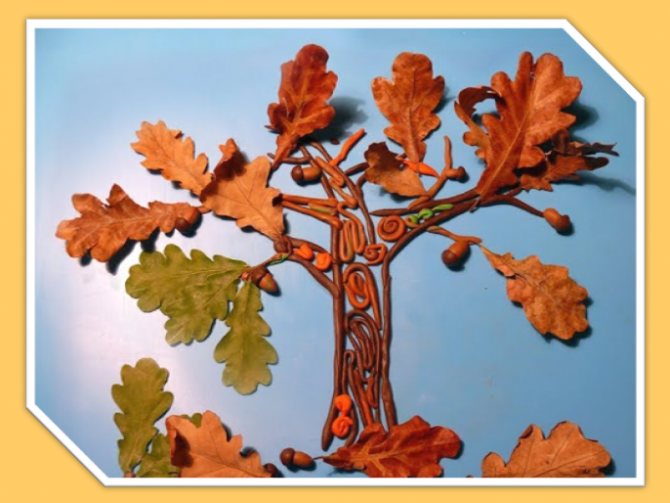
Autumn tree made of plasticine and dried oak leaves

Plasticine panel “Autumn”

Plasticine applique “Hedgehog in the autumn forest”
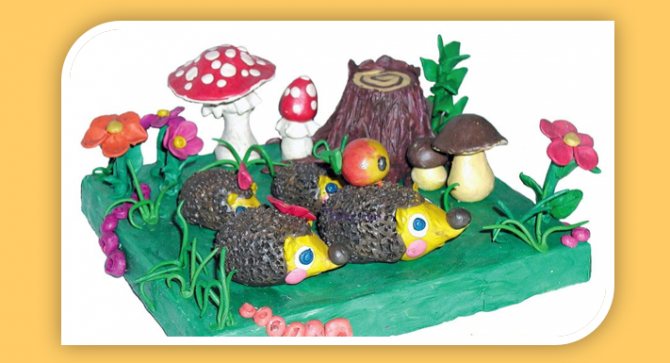
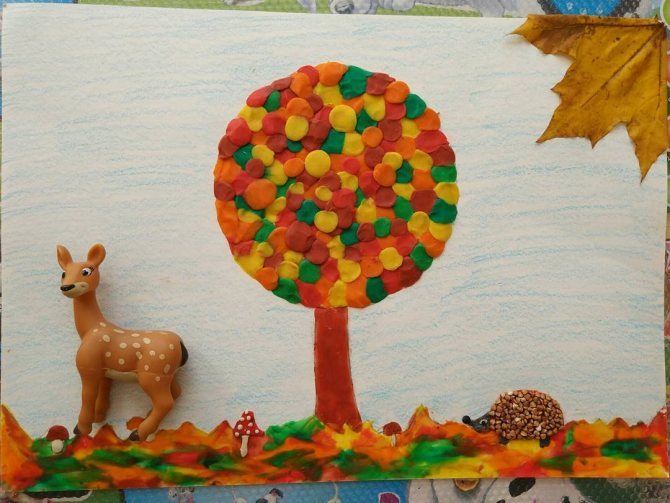
Composition from plasticine “Autumn meadow”

Autumn landscape, plasticineography
What applications should I make?
Both kids and children from the younger group can make beautiful applications with their own hands step by step.
To create this autumn craft from plasticine you will need cardboard or thick paper. The process of sculpting such a picture consists of five stages.
- To begin with, you need to roll thin flagella of different lengths from yellow, red and orange plasticine.
- They need to be formed into spirals.
- These small parts are attached to cardboard. The crown of the tree is formed from them. The spirals need to be arranged in a chaotic manner. In this case, the autumn tree will look more natural. Each of the elements needs to be lightly pressed onto the cardboard.
- You need to fashion denser and wider flagella from brown plasticine. They are attached to the bottom of the craft and act as tree trunks. To make the base look neater, it needs to be slightly trimmed with a stack.
- From the remains of yellow, red and orange plasticine you need to form spiral leaves that will fill the space at the bottom of the picture. Some of the colored parts should be made more blurry by pressing them onto the cardboard and slightly smoothing the edges.
You can fill the free space with blue, purple and white details. They are attached to the paper and lightly smeared on it. This landscape looks like a full-fledged postcard.
Maple leaf
This craft for preschoolers can become part of a postcard or a large flower arrangement. To sculpt a colored maple leaf, you need to use white paper, several pieces of light plasticine of different colors and scissors. The technology for creating such crafts is very simple.
- To begin, cut out a maple leaf of the required size from a piece of cardboard.
- Several small parts need to be cut from blocks of plasticine of different colors.
- Each of these pieces needs to be kneaded and laid out on paper in a chaotic manner.
- All these details must be smeared over the surface, carefully mixing the colors. Transitions between different shades should be smooth.
This fall themed maple leaf can be further decorated with black dots to make it look more natural.

Gifts of Autumn
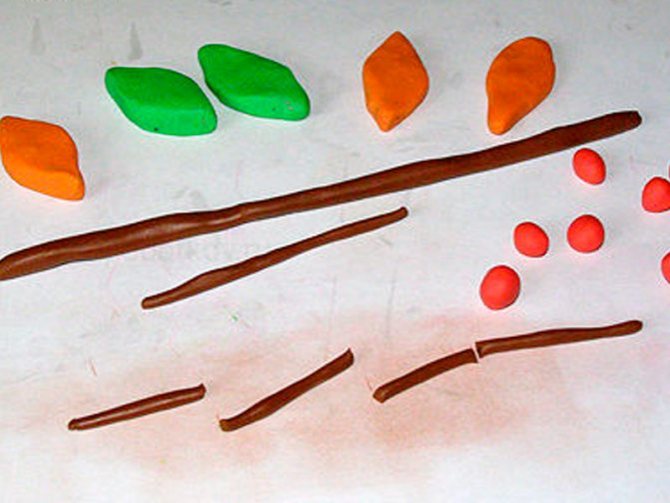
You can also depict a still life consisting of autumn vegetables, fruits and mushrooms on cardboard. The autumn harvest looks bright and impressive. You can see this in the example of a craft depicting a basket of mushrooms. Here are step-by-step instructions for creating it.
- First you need to make the main part of this application - the basket. It needs to be sculpted from a large piece of brown plasticine.
- A flat semicircle is attached to cardboard and decorated using a stack.
- You need to make a handle from orange and brown flagella. It turns out more voluminous.
- Once the basket is ready, you can start sculpting the mushrooms. They are made from plasticine of different colors. Each mushroom consists of a cap and a stem.
- You can place mushrooms in different parts of the application.
Green leaves and small snails will complement the picture. A composition created from fruits and berries will also look beautiful. It can be completely sculpted from plasticine or drawn, and then supplemented with three-dimensional details.
The craft consisting of apples, pears and blue grapes looks beautiful. It is complemented by voluminous green leaves.