Senior group. Senior preschool age. Children 5-6 years old
Summary of a drawing lesson for the senior group “Snowman” Department of Education of the Nizhny Novgorod City Administration Municipal Autonomous Preschool Educational Institution “Kindergarten No. 37”
(MADOU
"Kindergarten No. 37"
)
Summary of a lesson drawing techniques with children of the senior group 5-6 years old (within the framework of NOD...
Summary of the OOD on drawing with children of the senior group "Day of the Elderly" Municipal budgetary preschool educational institution kindergarten No. 13 combined type Summary of organized educational activities with children of the senior group on artistic and aesthetic development ( drawing )
on the topic
“Older Person’s Day”
Prepared and...
The importance of classes using non-traditional drawing techniques
The meaning of alternative drawing techniques:
- help overcome fears and insecurities;
- develop spatial thinking and a sense of color, shape, texture;
- create conditions for the free expression of children's individuality;
- introduce children to the properties of various materials;
- instill a taste for unconventional thinking and creative exploration;
- improve fine motor skills;
- allow you to experience a feeling of joy and emotional satisfaction.
Alternative drawing techniques allow you to discover the creative potential in every child
Unconventional techniques create a special atmosphere; they inspire and inspire. In addition, in combination with traditional techniques, which are extremely important, they give a sense of novelty and are an impetus for the development of initiative, independence, stimulate ingenuity and interest in visual activity.
Drawing. Lesson notes - Notes on drawing "Matryoshka" (senior group)
Publication "Summary of NOD for drawing "Matryoshka" (senior..." Goal: to continue to develop interest in the aesthetic side of the environment; to satisfy the needs of children in self-expression, the implementation of independent creative (visual) activities. Objectives: Educational: Teach independently, paint blanks of nesting dolls...
Summary of a drawing lesson in the senior group “My favorite toy”

Objectives: to develop creative imagination, the ability to conceive the content of one’s work, the ability to translate one’s ideas on paper, to evaluate one’s own work and the work of other children. Preliminary work: repeating poems by Agniy Barto from the “Toys” series, composing stories on the topic...
Summary of a drawing lesson in the senior group “Let's decorate Alyonushka's clothes with beautiful patterns” Topic title “Let's decorate Alyonushka's clothes with beautiful patterns” The goal is to introduce children to a new way of drawing using a stamp, to consolidate familiar methods and techniques of drawing Objectives Educational: to introduce children to the history of creation and technology performing Russian printed...
Summary of a drawing lesson “The girl is dancing” with children of senior preschool age
Priority area: Artistic and aesthetic development Integration of educational areas: RR; TFR; FR. Goal: To develop children’s ability to draw a human figure in motion Objectives: Educational: -Teach children to draw a human figure, conveying the simplest relationships in…
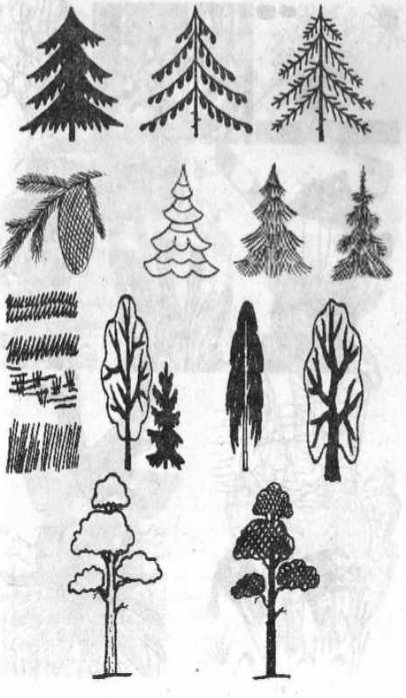
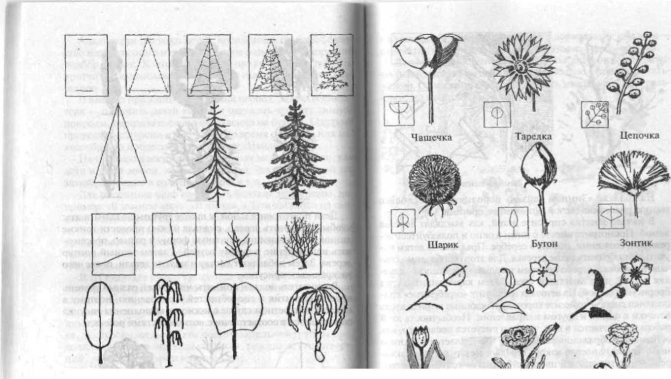
Methods of drawing trees and people in senior and preparatory schools
Technique for drawing trees
in senior and preparatory groups.
Senior group
The senior group teacher faces the following tasks: to develop
children have observation, imagination, initiative, independence;
to cultivate an aesthetic attitude towards the environment, to teach children to describe an object, its
shape, highlighting the most essential features, to compare objects by shape and color; convey the relative sizes of objects, form spatial imagination; learn to draw from winter chalk and from memory, achieve an expressive solution to the composition.
The teacher should introduce children to works of decorative and applied art, folk crafts; teach them to distinguish, name and select colors (red, yellow, green, blue, orange, purple, black, white), to distinguish shades (blue, pink, light green, etc.) and neutral colors (gray, gray-blue) .
oe in a drawing.
the ratio of two or three objects, arranging them according to the scheme: below - those that are on the ground, above - those that are in the air, in the sky; create a plot of five or six items.
Education for older children is aimed at improving visual skills and developing the ability to create expressive images using various means of representation.
The learning objectives are the following:
- teach how to correctly convey the shape of an object, its characteristics, relative size and position of parts; - teach how to convey simple movements in drawing; - develop and improve the sense of color; technical skills in working with pencil (shading methods) and paints (brush techniques); teach drawing techniques with crayons, charcoal, and watercolors.
Children must use watercolor paints and a brush correctly, holding it at an angle and turning it on a plane; must be able to depict a person in a frontal static position and in motion, depict birds and animals both statically and in motion.
Children love to draw autumn.
In autumn, children should pay attention to the golden leaves of trees. At this age they already know about different types of trees and
can draw them.
Explain that the thickness of the trunk can be conveyed by gradually increasing the pressure on the bristles
of the brush, and a very thick trunk can be painted by increasing strokes.
Each tree has a vertically directed trunk, thick and thin branches, and leaves on them that form a crown. These signs are also transmitted to children of the older group. Invite the children
to depict trees of certain species, placing them at some distance from each other. Suitable themes for children of the senior group are “Forest in autumn”, “Autumn park”, “Apple orchard in autumn*.
When working on the topic “Apple orchard in autumn*, children should know that apple trees are different - low and tall, young and old, spreading with a thick trunk and slender with
thin branches pointing upward. Fruits can be green, yellow, red. Particular attention should be paid to placing images of trees on the sheet.
Program material in the second quarter becomes more complex. Children should reproduce in their drawings pictures of winter nature, snow-covered houses and trees, winter games and entertainment, and draw objects that are more complex in shape and structure. The best paper for drawing on the theme “Trees Covered with Snow” is blue. The teacher shows how to apply white paint (snow) to tree branches with the tip of a brush.
The expressiveness of the drawing largely depends on the chosen vertical or horizontal position of the sheet of paper. To successfully cope with this choice, the child must very carefully analyze the object in various turns and note the features of its structure.
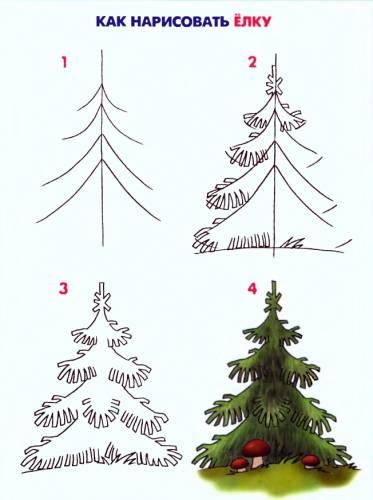
Spruce drawing.
We draw on two-stripe tinted paper with brown and green paint. We give 3 brushes: wide for the trunk, medium thickness for the branches and thin for the needles.
Explanation:
We don’t indicate where the spruce grows, we immediately draw the trunk. I take a wide brush and use brown paint to draw an even straight line at the end with pressure, from the top point I draw another similar line next to it and so on several times to get a beautiful, straight trunk. Now I paint the branches with a medium brush. The technique is the same as in the middle group. At the top 2 are small up, the rest are long to the sides. The spruce branches have “legs” - small branches, I’ll draw them under the big ones (show). Now we paint the pine needles with green paint and a thin brush.
We decorate the New Year tree with a garland and draw a stand under it. In this group we give images of fir trees near and far. Please note that here the branches are not painted separately with brown paint, but the spreading paws are painted immediately with green paint.
Drawing trees of different species
We will draw varieties of trees. Pay special attention to the fact that if children in the older group, even after repeated observations, draw poorly, then this work should be transferred to the preparatory group, since this material is very difficult for children.
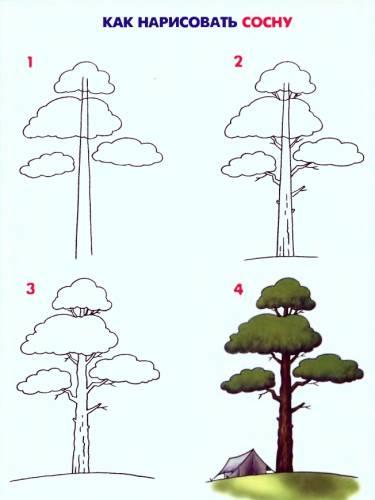
Pine
If children have mastered the technique of drawing fir trees well, they can be taught to draw pine trees.
We draw on two-stripe tinted paper, gouache, palette. We give 3 brushes: wide for the trunk, medium thickness for the branches, thin for the needles.
Explanation:
The pine has a beautiful, even trunk of light brown, golden color, because pine really loves light and sun. Create this color on the palette. The technique for drawing a trunk is the same as for spruce. Pay attention to the branches, they grow to the sides of the trunk, alternately on one side and the other, the branches are short at the top, longer at the bottom. There were also branches below, but they all lacked light and sun, and they broke off, leaving only small twigs. Pine needles are emerald, long and fluffy. Using a thin brush, make long strokes from the branch in different directions.
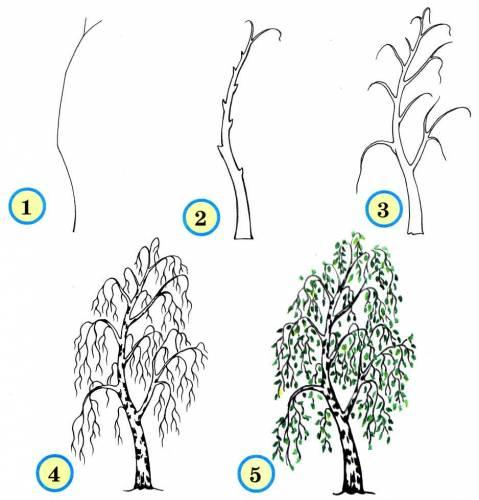
Birch
We draw on two-stripe tinted paper with white and black paint. We give 2 brushes: wide and medium thickness.
Explanation:
The birch has a beautiful trunk - I paint the trunk with a wide brush of white paint, just as we painted the trunk of other trees. The birch tree has black specks on its trunk, we will paint them later when the white paint has dried. Birch is called curly birch. Its branches are beautiful, elastic, and bent down. I take a medium brush and use black paint to paint thick branches from the trunk on one side and the other, starting from the top. And from the thick branches come thin ones, like garlands, descending down. The birch trunk has dried up, now let’s decorate it with black dots. Remember, when we looked at it, we noted that the trunk was very black at the bottom and there were fewer dots at the top.
We draw a birch tree at different times of the year: snow-covered in winter and green in spring (we draw the outline of the crown and the leaves with dots in a raw way).
Apple tree
We draw on two-stripe tinted paper, gouache, palette. We give 2 brushes: wide and medium thickness.
Explanation:
I paint the trunk with a wide brush and dark brown paint. The drawing technique is the same. Now I will paint the crown with a medium-thick brush. The crown of the apple tree is like a bowl. Large branches grow from the bowl towards the sun, and small ones on them. Because the apple tree has such a crown it is called spreading. I paint the leaves of the apple tree by dabbing, with the end of the brush pointing upward.
You can also give the theme “Apple tree in bloom” - with pink paint we paint the flowers with curls, but we don’t paint the leaves.
Drawing varieties of trees in the older group can only be taught if the children have high technical skills. In case of difficulties in the senior group, it is better to leave drawing a tree according to the method of the middle group and teach drawing a birch; the rest should be taught in the preparatory group.
It’s good to draw branches of trees and shrubs with leaves or flowers (willows, mimosa, spruce, poplar) from life.
It is more difficult to draw such objects than objects that have regular geometric shapes with a symmetrical structure. The complex structure of a plant, in which the leaves are attached in bunches, the branches have many branches, children of the older group will not be able to convey, but they can see and draw some leaves raised up, and others lowered.
Six-year-old children have fairly well developed analytical thinking. They can highlight both common features inherent in objects of the same type, and individual characteristics that distinguish one object from another.
This task is carried out starting from the first quarter, for example, in the depiction of various trees. Each tree has a vertically directed trunk, thick and thin branches, and leaves on them that form a crown. These signs are also transmitted to children of the older group. In the preparatory group they are taught to see and draw trees of different species, where all these common features are somewhat unique: in a fir tree the trunk gradually narrows upward and ends with a thin sharp tip, while in deciduous trees it also narrows, but at the top it branches and ends with many small branches; the birch has thick branches going up, and long thin branches hang down, and the linden has thin branches located parallel to the ground.
There are bent trees, with forked trunks, young and old. The ability to see this diversity and convey it in a drawing develops in children the ability to create expressive images of nature.
Preparatory group.
The objectives of training in the preparatory group are the following: - to teach the image of the structure, size, proportions, characteristic features of objects from nature and from representation; - teach how to convey a wealth of shapes and colors, create expressive images; -develop compositional skills (location of an object on a sheet depending on the nature of the shape and size of the object); -develop a sense of color (the ability to convey different shades of the same color); -develop technical skills (the ability to mix paints to obtain different colors and their shades; -apply pencil strokes or brush strokes to the shape of an object). Six-year-old children have fairly well developed analytical thinking. They can highlight both common features inherent in objects of the same type, and individual characteristics that distinguish one object from another. This task is carried out starting from the first quarter, for example, in the depiction of various trees. Children in the pre-school group should know: to draw a tree, you first need to draw thin lines indicating the basic shape and size, draw the direction and shape of the branches, and then the exact outline of the tree. Then foliage and small details are added, after which the design is painted. Each tree has a vertically directed trunk, thick and thin branches, and leaves on them that form a crown. These signs are also transmitted to children of the older group. In the preparatory group they are taught to see and draw trees of different species, where all these common features are somewhat unique: in a fir tree the trunk gradually narrows upward and ends with a thin sharp tip, while in deciduous trees it also narrows, but at the top it branches and ends with many small branches; the birch has thick branches going up, and long thin branches hang down, and the linden has thin branches located parallel to the ground. There are bent trees, with forked trunks, young and old. The ability to see this diversity and convey it in a drawing develops in children the ability to create expressive images of nature. The same diversity in conveying the features of an object is reinforced in topics on the depiction of vegetables, fruits, etc. For this, children in the first quarter become familiar with obtaining shades of color and composing new colors. Preschoolers master the ability to convey the characteristic features of the structure and shape of objects by drawing from life a variety of objects, initially simple in shape and structure: Christmas tree and pine branches, fish, birds, dolls. Twigs with leaves, flowers, berries, toys and other various small objects can be used as nature in the preparatory group. The proximity of nature more often attracts the child’s attention to it: he compares it with a drawing. In addition, the value of such an “individual” nature is that it allows you to focus on its characteristic features. The teacher selects a homogeneous nature with slight variations: on one branch there are 3 branches, on the other - 2, on one - all the leaves look up, and on the other - in different directions. Children’s attention is drawn to this difference when explaining the task and analyzing nature; They are invited to draw their twig so that they can recognize it later. At the end of the lesson, an interesting analysis of finding from a drawing of life or from the nature of a drawing can be carried out. Here children's attention to all details increases. Drawing from nature helps develop a sense of composition when conveying space. Children very quickly master the ability to arrange objects in a large space near and far when drawing from life the surrounding nature. For example, from the window they look with the teacher at the space between two trees: close to the children there is a lawn, behind it is a river, then a field, and where the sky seems to meet the ground, a narrow strip of forest is visible, where you can’t even make out individual trees . Children begin to draw, moving from nearby to distant objects, starting from the bottom edge of the sheet. It becomes clear to them what drawing in a wide space means. The void between earth and sky disappears. The expressiveness of the drawing largely depends on the chosen vertical or horizontal position of the sheet of paper. To successfully cope with this choice, the child must very carefully analyze the object in various turns and note the features of its structure. In the preparatory group, children begin drawing with a preliminary sketch, in which the main parts are outlined first, and then the details are specified. Using a sketch forces the child to carefully analyze the nature, highlight the main thing in it, coordinate the details, and plan his work.
Drawing fir trees
We draw on tinted paper, gouache, palette - on it we will create different shades of green. We give 3 brushes: wide for the trunk, medium thickness for the branches, thin for the needles.
Explanation:
The drawing technique does not change. Drawing like in the older group. Only when depicting the needles do we pay attention to the fact that the upper branches are young, elastic and the greenery on them is bright, while the needles on the branches below are old and dark in color.
Drawing trees of different species.
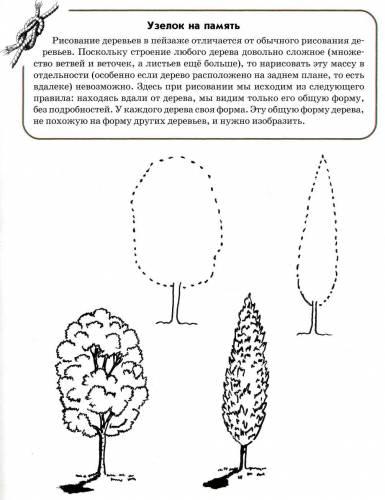
Drawing trees in a landscape is different from just drawing trees. Since the structure of any tree is quite complex (many branches and twigs, and even more leaves.). then it is impossible to draw this mass separately, especially if the tree is located in the background. Here, when drawing, we proceed from the following rule: being away from the tree, we see only its general shape, without details. Each tree has a shape that is different from other trees, and you need to depict
Oak
We draw on tinted paper in two stripes, gouache, palette. We give 3 brushes: wide for the trunk, medium thickness and hard.
Explanation:
The oak is called a giant, its trunk is very thick, I will paint it with a wide brush with brown paint like this - I will draw a central line and “build up” the trunk on one side and the other. The trunk is thick, the oak is mighty, it stands firmly on the ground - the roots are visible. Using a medium brush, I paint the branches with brown paint. The branches have bent from time to time, they are old and thick. The oak tree does not have a crown like other trees. At the top the branches are curved and thick curved branches extend from the trunk. Small curved branches come off from the thick branches; I paint them with the tip of a brush. The greenery of the oak is transparent, carved, I will paint it with a hard glue brush “poke”.
Pine
In this group you can teach drawing pine trees with colored pencils, but for children it is very difficult. Children also learn to draw a young pine tree.
We draw on two-stripe tinted paper, palette. We give 2 brushes: wide for the trunk and medium thickness for the needles.
Explanation:
Using a wide brush with light brown paint, I paint a short trunk. The technique is the same as when drawing fir trees. We pay special attention to the branches. I draw 2 small ones at the top, and then from the trunk I draw 2 branches up to the sun and from here 2 down. Now, with the middle brush, I paint the needles, the upper branches are young - the needles on them are light, bright, the lower branches are older - the needles are dark.
In this group you can show how to draw a crown without branches - with an outline.
Also at this age, children enjoy drawing various fairy-tale trees.
The image of a person is the most difficult thing in the development of visual creativity of preschool children, which, gradually becoming more complex, occupies a place in children's drawings throughout preschool childhood.
Children whose attention and visual memory are poorly developed are lost. Basically, in the drawings of children, people stand with their arms outstretched helplessly and their legs spread apart. And only talented, gifted children can convey movement.
Everything is natural and very nice for a certain period, but there must be development! I have learned from experience and believe that drawing a person should be introduced into work with children as early as possible. Young children are not yet afraid of making mistakes, they like everything, and drawing a person in children’s drawings occupies one of the most preferred places in their visual activity. But the quantity and quality of images of people directly depends on how a child (especially of older preschool age) can do it.
In order for a child to be able to convey his plans in a drawing, he must have visual and technical skills. Often, a child, dissatisfied that his image is not done at the proper level, may simply refuse to draw human figures. Experience shows that due to difficulties in depicting a person, children try to avoid depicting the image of a person in independent creative activities. Based on this, it is necessary to teach children how to draw a person, showing a variety of ways to depict them. And for the teacher, the primary task should be to teach children to depict a person in accordance with his age and individual abilities
Children begin to try their hand at drawing the human figure shortly after three years of age. At this time, they use several basic strokes with which they can portray a person: mom, dad or another family member. The child draws the figure according to the same pattern: “Stick, stick, cucumber, here comes the little man!” The conclusion suggests itself: for there to be development, systematic, planned training is necessary.
Teaching preschool children to depict a person is a complex and painstaking process, requiring the teacher to be able to take into account a number of requirements in his work and create the necessary conditions for children's creativity. Pedagogical guidance should be aimed not only at teaching the art of depicting a portrait, but also at developing perception and imagination. In other words, it is necessary to teach children to see and perceive, to gradually bring them to the understanding that their image can express different contents and the management of the process should be aimed, first of all, at the development of aesthetic perception, at the figurative reflection of their impressions in the drawing using certain visual means. It is necessary to find pedagogical techniques that can arouse interest in drawing a person, emotions, and the imagination of children, intensify the drawing process, evoke a desire to evaluate the drawing, and find elements of expressiveness in it.
A child in the world around him does not catch everything that his eyes see, therefore, in classes on developing the ability to portray a person, it is necessary to teach children observation skills in order to more fully and truthfully convey the characteristic features and traits of the person being depicted.
In the process of educational work in this direction, children develop an understanding of the created image, the beauty and expressiveness of a portrait drawing.
In addition to all that has been said, a free and creatively created image by a child of the world of people will not only allow him to experience the joy of creativity, the joy of creating expressive images, but also, finally, will help him more easily enter into real relationships with the surrounding world of people, that is, it will provide one of the ways to carry out the process socialization of a preschool child. Drawings by older preschoolers show their interest in both social problems and the life history of their people.
It is also important that children of senior preschool age will soon go to school, and practice shows that a first-grader who does not know how to portray a person will find it quite difficult to create “lively”, bright works for which the teacher will give a positive mark, which in turn is the main motive for a child - a first grader.
Middle group.
In the middle group, children learn to draw a “matryoshka doll”. The head is depicted, with an extended sundress towards the bottom. “Snow Maiden” - head, widened fur coat towards the bottom, arms from the shoulder. By the end of the year, the image becomes more complex, you can add the “raised hand” movement.
In the older group, children are encouraged to draw in more detail. You can suggest a drawing scheme from geometric shapes, a head drawing scheme.
Invite children to look at a doll or child in beautiful clothes. Clarify by asking children the shape of the dress, head, arms, legs, their location and size. Facial proportions: the head is oval in shape. To depict the face, the head is divided by transverse lines into three parts: from the top to the brow ridges, from the brow ridges to the tip of the nose, and from the end of the nose to the end of the chin. The teacher draws an oval of the face on the board, notes auxiliary lines, explaining that they are noticeable, shows how eyes are drawn, the distance between the eyes is small, no more than one eye, inside the eye there is a colored circle and a small pupil. Asks what is above the eyes (eyebrows). He further explains that a person’s nose is the same color as their face, so you only need to draw the tip of the nose. You can draw the tip of the nose with a short line or depict nostrils. From the tip of the nose to the end of the face, the lips are in the middle.
- Children, look at each other. Do you see that the upper lip is different in shape from the lower? There are, as it were, two waves on the upper lip, and one on the lower lip (draw lips). We draw ears and hair.
In the preparatory group we introduce children to the human structure. Consider the structure of the human figure and the proportional relationship of parts. The figure shows that when determining proportions, any part of the body, usually the head (its height), is taken as a scale unit. The height of the entire human figure is 7-8 scale units (including the head). The dimensions of the length of the body and head together are approximately equal to the length of the legs. The arms are one unit longer than the body (reach mid-thigh). The arm to the elbow is longer than the forearm; The elbow is at waist level (about halfway across the body). The width of the figure at the shoulders is approximately two units. The legs at the knees are divided into two equal parts.
Let's consider one of the ways to draw a person in motion. Theme: “Ski trip”. One of the drawing methods is drawing with ovals. We draw an oval - the torso to the waist, an oval - the pelvic part. Then we will draw ovals - legs up to the knee, from the knee - ovals, ovals - feet. Then we will draw the arms, first finding the place of the shoulder. We draw the hands in the same way: an oval up to the elbow, an oval after the elbow. The elbow is at waist level, the palm is an oval. And finally - the head. Find a place for the neck and draw the head. Then, using a smooth line, we assemble the pattern and dress it. After you have drawn a pencil sketch, use an eraser to erase the auxiliary lines. Let's start working in color.
In the middle group, children learn to draw a “matryoshka doll”. The head is depicted, with an extended sundress towards the bottom. “Snow Maiden” - head, widened fur coat towards the bottom, arms from the shoulder. By the end of the year, the image becomes more complex, you can add the “raised hand” movement.
In the older group, children are encouraged to draw in more detail. You can suggest a drawing scheme from geometric shapes, a head drawing scheme.
Invite children to look at a doll or child in beautiful clothes. Clarify by asking children the shape of the dress, head, arms, legs, their location and size. Facial proportions: the head is oval in shape. To depict the face, the head is divided by transverse lines into three parts: from the top to the brow ridges, from the brow ridges to the tip of the nose, and from the end of the nose to the end of the chin. The teacher draws an oval of the face on the board, notes auxiliary lines, explaining that they are noticeable, shows how eyes are drawn, the distance between the eyes is small, no more than one eye, inside the eye there is a colored circle and a small pupil. Asks what is above the eyes (eyebrows). He further explains that a person’s nose is the same color as their face, so you only need to draw the tip of the nose. You can draw the tip of the nose with a short line or depict nostrils. From the tip of the nose to the end of the face, the lips are in the middle.
Children begin drawing from the cone-shaped body.
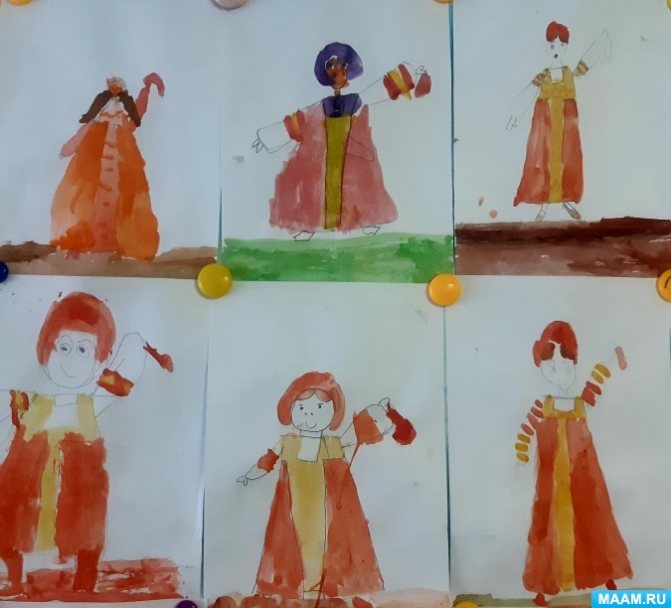
First topic: “Girl in a long fur coat.”
This topic is divided into two lessons.
1 lesson
Gouache – blue and flesh-colored (pink), wide brush.
Explanation:
I take a brush and paint the girl’s head with pink paint – it’s round. Now I will paint the girl’s long fur coat with blue paint. I step back a little from the head and draw a triangle. The fur coat has sleeves, like spruce branches, I paint with one downward movement of the brush. The girl has a hat on her head. To draw eyes, lips, nose, you can give a pencil or felt-tip pen. The teacher himself can draw: “Let’s bring your girl to life.”
Lesson 2
If the children did a good job, then we give them white paint and offer to draw the edge of the fur coat and hat. If it didn’t turn out well enough, you can invite all or some of the children to draw a friend for the girl. “You and I have already drawn a girl in a long fur coat, let’s draw a friend for her so that she won’t be bored.”
Lesson 3 – “Bear”
To make it easier for children to draw a naked doll in the next lesson, we first teach them how to draw a bear.
Gouache – brown, black, 2 brushes: wide and medium thickness.
Explanation:
I take a brush and use brown paint to paint a bear with a round head. To make the bear have an oval body, I will draw 2 circles - one under the other and then connect them, I will get an oval - the body of the bear. I will draw small ears on the head. Now I’ll draw oval paws - 2 at the top and 2 at the bottom (show). When the paint dries, paint the eyes and nose with black paint.
Lesson 4 – “Nude Doll”
Gouache - yellow, red, black. 2 brushes: wide and medium thickness.
Explanation:
We draw it in the same way as a bear, but we immediately draw the body oval. Oval arms and legs. Instead of ears we draw hair. Let's draw panties. When the paint dries, we bring the doll to life - draw eyes, a nose, and a mouth.
Lesson 5 – “Doll in a red dress”
Gouache – yellow, red, black. 2 brushes: wide and medium thickness.
Explanation:
We draw it the same way as a naked doll, but we dress it in a dress (triangle).
Senior and preparatory groups
A simple pencil.
We draw a person according to the diagram.
Explanation:
To make it easier for you to learn how to draw a person, I will teach you first to draw a diagram, and then from it - a little man. A person has a round head - draw a circle. Short neck - draw a vertical line. Now I draw a horizontal line - this is the line of the shoulders, it is wider than the head. Now I’ll draw a longer vertical line - this is the line of the body, it is equal to the size of two heads. Below I will draw the line of the hips, it is equal to the line of the shoulders. On the body I will mark the waist line, it is equal to half the shoulder line. Now I will draw a line of arms obliquely from the shoulders to the line of the hips. From the line of the hips we draw the lines of the legs; they are longer than the torso.
Several lessons are devoted to drawing diagrams until all children have mastered it, since this is the basis of the basics.
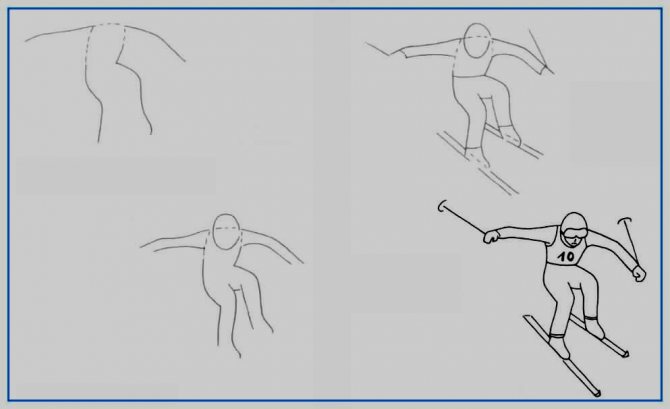
"Man on the Move"
A simple pencil.
Explanation:
In the first lesson, we draw the same diagram as usual, but mark the bend points on the arms and legs. Then we show how to draw a diagram to convey movement. To convey movement, you can use a child to show the direction of the lines of the arms and legs.
"Man on the move." Of course, it would not be easy to draw a person in motion if there was only one way of drawing, because we are all so different and our perception of the surrounding reality is also different. Fortunately, there are several ways of drawing and everyone can choose the most suitable one for themselves. Today we will talk about three ways to depict the figure of a moving person.
The first schematic drawing is traditional drawing, where we draw the human body with straight lines and then “dress” it with clothes.
1)2)
The second way is to draw with ovals. With this method, we convey the proportions of the human body using ovals of different sizes.
The third method is drawing with arcs, where we can depict a human figure using arcs, long and short, turned in different directions.
For all methods, without exception, you need a basic understanding of the proportions of the human body, which we will later study on the multimedia slide.
Explanation:
And so, we take the first sheet of paper and outline with a pencil, a barely noticeable line, the size of our person. Then, using lines, we depict the human skeleton, taking into account its proportions and the inclination of the torso, head, as well as the position of the arms and legs. Having drawn a diagram, we “dress” a person in clothes. The schematic representation is traditionally well known to everyone, so it does not cause any difficulties.
To master the method of drawing with ovals, take a blank sheet.
The entire drawing of a person consists of seven ovals the size of his head. That is, the full height of a person will be equal to seven circles, in one of which you will draw the head and neck. With the help of such a scheme, the proportions of the drawing will be strictly observed. The main thing is to draw the ovals the same. Let's try to make a drawing of a standing person and make the markings as on the slide, namely for the head and neck, shoulders and collarbone, chest, abdomen, legs and arms. Apply all these parts of the body to the previously prepared diagram, separately. First, on a drawing of a person, you need to draw an oval for the head, then an oval for the shoulders and circles for the joints. Next, draw two ovals placed on top of each other, the higher oval should be larger than the lower oval, this will be the chest and stomach of the person. Then you need to draw an oval for the hips, and then two ovals attached to the hips, these are the person's knees. The next step is to draw the legs and outlines for the arms as shown in my drawing. Now all that remains is to draw the general shape of the person’s torso and get the outline of a standing person. This is a very simple method, but it is very effective for those who have never drawn a person and helps to maintain exactly his proportions in the drawing. It will not be at all difficult for you to draw the general shape of the human body. Just trace all these ovals and circles with a pencil. The line can be very approximate, because the person in the picture is standing in clothes. remove all the extra contour lines and draw the clothes of the person
paper and draw the coordinate axis with very thin lines. Having stepped back equal segments from the horizontal axis up and down, we mark the person’s height with dots (both halves are the same size). Now we divide the lower part into two halves, these are the human knees. We also divide the upper part into two halves; this line separates the chest from the torso.
Method three,
drawing with arcs. Let's take a blank sheet of paper and try to draw, for example, a figure skater. We put a point just above the middle of the sheet (neck), draw two lines down from it, the arcs are wide at first, but gradually narrowing down, the lines are parallel. Then we draw two arcs upward, according to the same principle (hand), see the direction of the lines on the slide. We draw two arcs in the same way parallel to the lower lines, but a little more curved and a little shorter (the second leg in perspective). From the point where we started the drawing, we outline an oval (head), all that remains is to work out the small details, hands, skates, hair, dress. Middle-aged children can easily cope with this drawing, it is so simple.
So, in practice, we have mastered three types of images of a person in motion; if you wish, you can use all the skills and drawing techniques in one image to improve your drawing skills.
Additional non-standard techniques
- Prints – there are many options here. Imprints can be made using almost any object: corks, potatoes, crumpled paper, foam rubber and anything that has an interesting texture.
- Stencils – there are ready-made stencils, you can make them yourself. But in any case, the technique is very interesting, but requires skill.
- Wet painting - we draw either on a pre-moistened sheet of paper or the finished drawing is lowered into a basin of water for a couple of seconds. It turns out very beautiful!
- Painting with a toothbrush - spraying. Paint is applied to the brush and sprayed onto a sheet of paper with a stick. You can also draw pictures with a toothbrush, depicting grass, animal fur, etc.
- Monotopy is a cool technique, everyone knows it. Take a sheet of paper and fold it in half. Then on one half we draw a picture or element with paints, bend the sheet, and get a mirror image. This is how you can paint water landscapes. You can also do it another way: we apply the design to the oilcloth, and then press the oilcloth to the paper. It turns out great!
- A scratchplate is something similar to an engraving. We draw chaotic strokes on white or colored paper. After drying, rub the surface with wax. Next we paint it completely with black gouache. Then we scratch the design with a skewer.
- Plasticineography - drawing with melted plasticine.
- Stained glass - a sketch is drawn on paper, maybe graphic. Then we apply a layer of PVA along the contour and let it dry. Next, the space inside the outline is painted as in a stained glass window.
- Drawing with sand, salt, scraps of paper. First, we draw on a sheet of paper with PVA glue, then we sprinkle some loose material on top, shaking off the excess. You can also paint on top of the drawing, it will turn out very unusual.
- The non-traditional drawing technique in the older group also includes templateography. We take various objects and trace them along the contour, selecting the shape so that in the end we get the intended object.
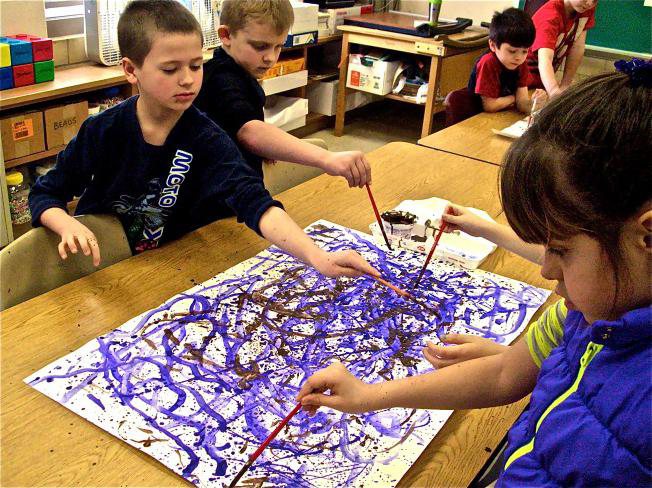
- Drawing with different objects: drinking straws, disposable forks, flat comb, toothbrush, wooden sticks, etc. Thick paints can be applied to paper with spatulas, rollers, or simply with your fingers, as I have already mentioned.
I wonder how you draw with children? Perhaps you have a personal patented drawing technique? Share with us?
It is clear that I have not listed all the methods, but I am talking about what I know myself. I advise parents to definitely try the listed image application techniques and report the results. Believe me, it is very exciting and useful for kids. You will thereby give children the opportunity to go beyond limits, to explore the endless possibilities of materials and imagination.
If you found the article informative, show it to your friends on social networks. I will be glad to see new subscribers to the news!
Sincerely, Tatyana Sukhikh! Till tomorrow!
What non-traditional methods of image transmission exist?
It should be noted that it is extremely important to use unusual drawing methods for children with developmental delays. They don't particularly like to draw, but they find it extremely rewarding to be creative. Therefore, you should show your child that there are many ways to depict something on paper. Remember that the child needs training; take the time to show the children how to draw using available objects.
A love of art instilled in children at an early age will help them grow into versatile individuals.
So, non-traditional drawing in the older group, and indeed for other age groups, involves the use of the following techniques:
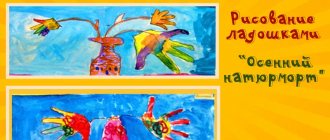
- Finger painting - if little children simply like to dip their fingers in liquid and move on paper, then older children already make complex patterns or combine finger painting with other methods. At the same time, older children dip each finger in paint of a different color and try not to stain the white sheet of paper, but to make impressions carefully. If you put a print of an entire palm, then you can draw many different characters from the resulting print.
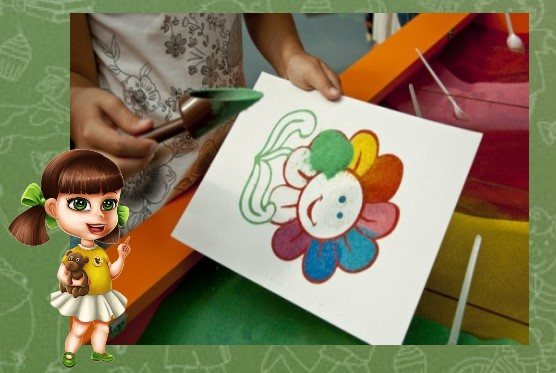
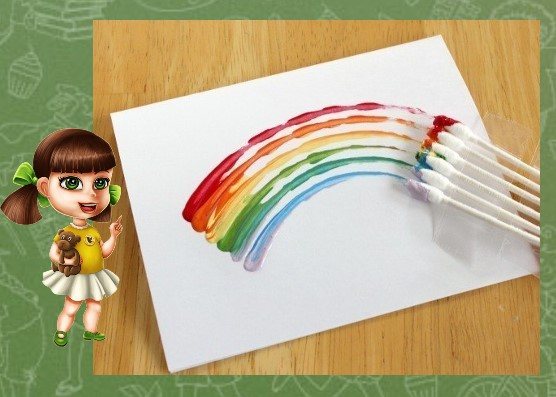
- Drawing with pokes - for this you take either a special brush with cut bristles or cotton swabs. You can draw using water or a dry poke. In the latter case, “fluffy” lines are beautifully obtained.
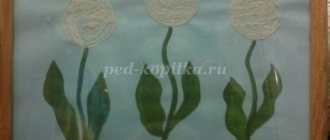
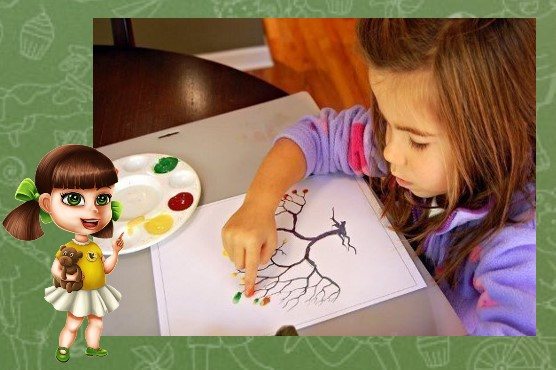
- Leaf stamps – here a real leaf from a tree, preferably dried, is used as a stamp. The paint is applied over the leaf, which is then gently pressed onto the paper. This technique can be used to create beautiful autumn landscapes.
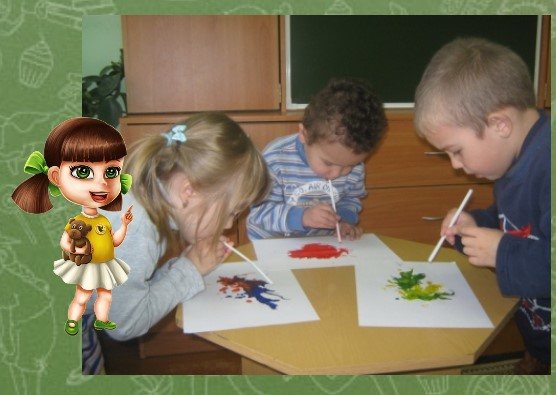
- It is impossible to imagine a non-traditional drawing class in the senior group without blotography - a favorite type of creativity for children. It's simple: put a blot of paint, take a drinking straw and blow through it onto the blot, blowing the paint in different directions. It’s especially interesting to figure out what can be added to make the blot turn into someone or something.
You can also drop a blot, fold the sheet in half and get a mirror image of a unique shape.
They also use threads for blotography - we wet the folded threads in paints of different colors, put them on paper, fold it in half or put another sheet of paper on top and pull the threads out from under the paper.
Long-term planning for non-traditional drawing for the preparatory group
The program on alternative drawing techniques contains:
- Explanatory note: place of the course in the educational program of the preschool educational institution,
- goals and objectives.
- consultations,
- exhibition of works,
Table: long-term plan for unconventional drawing (fragment)
| Month | Subject | Goals | Execution technique |
| October | "My hometown" |
| Students' choice |
| “Red, yellow, gold - all over the colored sheet” |
| Leaf prints | |
| November | "Birch" |
| Charcoal drawing |
| "Painted Forest" |
| Poking drawing | |
| Author | Naumova E. N., teacher of the Municipal Preschool Educational Institution “Kindergarten No. 164” | ||
| Quote from: https://www.maam.ru/detskijsad/perspektivnyi-plan-po-netradicionomu-risovaniyu-podgotovitelnaja-grupa.html | |||
Creativity is meant to bring joy to children. Let drawing in each non-traditional technique become a small but memorable game. Experiments with materials and tools, unexpected results and unbridled flights of imagination! Unusual drawing techniques expand possibilities and strengthen children's courage to express artistic talents.