Drawing with middle school children
Starting from 8-10 years old, boys and girls are much more interested in depicting not only domestic but also wild animals. At this age, you can teach children to make animals look realistic.
The bunny for a kindergarten child was cartoonishly round and consisted mainly of circles. For older children, we learn to draw a hare in a slightly different way step by step: it has long paws with claws, body proportions correspond to real ones, the skin is not monochromatic, but with drawn fur.
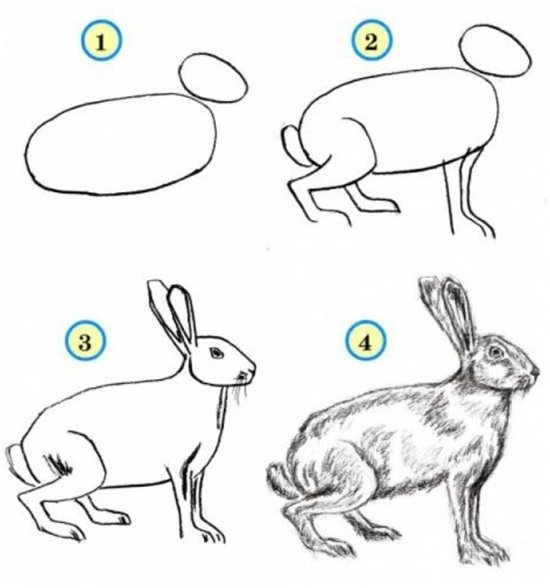
We learn to depict other animals in the same way: first - a sketch, then the main figures are completed. After we erase the sketch lines, we detail the drawing.
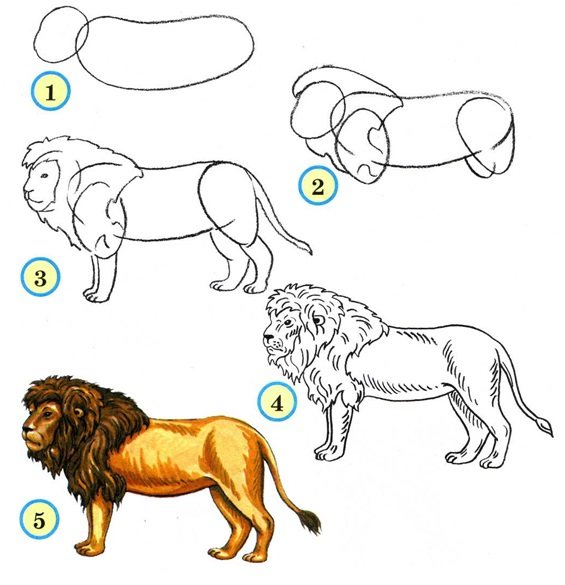
The final touch is to give the drawing volume using shading (if it is a drawing with a simple pencil, like a horse) or painting the animal in accordance with its real color (lion).
It is definitely worth teaching your child to work with a simple pencil. If some lines are not entirely successful, they can be easily erased. Having mastered the technique of drawing with a simple pencil, a novice creator can move on to more complex drawing methods.
We will draw the cow step by step using a simple pencil. If you managed to draw a cow correctly, you can color the drawing with paints or pencils.
If you decide to draw a cat with colored pencils or color it with paints, you can use the coloring of this drawing, which I made on a graphics tablet.
All children love to draw their pets, and I especially want to draw my loyal and smart dog. Try to first draw a St. Bernard step by step, and make the next drawing from your pet.
But since learning to draw this pet will likely involve small children with me, I made this lesson as simple as possible. I hope you will be able to draw a hamster with a pencil step by step the first time without making mistakes.
This amazing, miniature horse always attracts the attention of children, causing a lot of delight and a desire to draw this little horse at home, with the same small name - pony.
The donkey from the cartoon is a little different than in my drawing. But, if you like the cartoon character Donkey, then you can use this lesson to draw him. It is enough just to change the “face”, make it a little more expressive and emotional.
To learn how to draw a horse, you will have to ruin more than one drawing, since it is very difficult to convey the grace of the movements of this animal, especially for a novice artist. But, if you draw a horse step by step, then even children can draw it correctly.
To draw a horse, even step by step, you need experience and a good eye. But if you need to draw a drawing of this animal, this tutorial will help you figure out how to draw a horse's head.
In this lesson we learn to draw another pet - a rabbit. Drawn pictures of rabbits jumping merrily only at first glance seem simple to draw. In any drawing of an animal, you need to accurately maintain the proportions and convey its character.
Puss in Boots from a favorite fairy tale or a favorite cat often become characters in children's drawings. In addition, such pictures, drawn with pencil or paints, can be a good decoration for a child’s room. But in order to draw a cat correctly, let's learn a little. To make the cat in a good mood, we will draw him with a smile.
When drawing a kitten, you need to have time to catch at least the general contours of the animal, and fill in the remaining details from memory. A drawing of a kitten for children with a simple pencil looks too faded, it is advisable to color it. Kittens come in all sorts of unexpected colors, and children love bright pictures.
The camel has its main feature - one or two humps, thanks to which even a child’s drawing of a camel cannot be confused with the drawings of other animals. But still, it is better to draw a camel so that not only with them it looks like a realistic camel.
The process of drawing begins to interest children from the first years of life. Most children's drawings are of animals. In order for the picture created by the young artist on paper to correspond to what he wanted to depict, you need to show and teach him how to draw animals step by step.
When teaching your child the basics of drawing animals, take three main points as a basis:
- Explain to him what shapes the chosen animal will consist of. Most often it is a circle, oval or rectangle.
- Show your child how to make sketches that will later become filled with details.
- Start your training by mastering the simplest plots. Only after mastering the technique, move on to more complex objects.
To create simple drawings you will need paper, a medium-hard pencil and a soft eraser, as well as a set of colored pencils for coloring the finished picture.
Draw a raccoon
Some animals amaze with their unusual appearance and funny habits. These include handsome raccoons. These cute creatures are captivating because they skillfully portray emotions. We bring to your attention two options for how to draw these animals.
cartoon character
This easy-to-use option can be mastered by both beginning artists and young creative types.
We will do the work with a simple pencil, and remove small flaws with a soft eraser that does not leave marks on the paper.
- First of all, we draw the torso. To do this, in the lower half of the sheet, closer to the center, we draw the outline of a vertically elongated oval.
- We outline the location of the head. At the initial stage, it will be an oval, slightly elongated horizontally. Its size in relation to the body is 2/3.
- We give the head an outline, highlighting the muzzle area. It will be shaped like large lips. We give the lateral contours of the upper part of the head a concave shape. The result should be a figure that resembles a cap. We erase the original contours of the oval with an eraser.
- At the top of the head, with a slight shift to the side, draw a raccoon’s ear. First we draw the outer contour of the auricle, and then the inner one.
- We give the correct outline to the animal’s body. We draw the left part in the form of a curved line, making a slight narrowing in the central part. Using the same principle, we direct the right side. Both lines should be symmetrical.
- We draw the second ear of the animal, placing it at the same angle. We carefully wipe the oval, which originally designated the body, with an eraser.
- Let's start drawing the limbs. We depict the left paw bent at the elbow and pressed to the body. After this, we draw a thin inner line, the outlines of which duplicate the outer one.
- The inner line is the outline of the border of the raccoon's fur. It should be done in the form of waves or a zigzag.
- We design the raccoon's face. To create a contrasting combination, highlight the eye area with two drop-shaped figures. Draw little round eyes inside the spots. Underneath them we place an oval nose and a smiling mouth. We draw the contour of the cheeks with uneven lines imitating strands of wool.
- Draw the lower legs of a raccoon. In shape they resemble human ones, only very small in size. We depict them in the form of feet turned to the sides. We depict the hand of the upper foot in the form of a clenched fist.
- A raccoon's tail is as long and fluffy as a squirrel's. Its main decoration is its motley coloring. At the final stage, all that remains is to draw the right paw. It is raised upward as a sign of friendly greeting.
The picture is almost ready. You just need to remove unnecessary lines, draw small details and color using black, white and gray shades. If desired, the raccoon can even be depicted as the beloved character named Rocket from Guardians of the Galaxy.
Realistic image
Do you want to portray a real forest dweller? Take the guide below as a basis, which details how to draw animals step by step.
First of all, we outline the locations of the main elements on the sheet. We draw the contours of the tree trunk and the branch on which the raccoon is sitting.
We outline the dimensions of the animal's figure. We depict the torso as an oval, the thigh and head as circles. Using the outline of the circle as a guide, sketch out the animal’s muzzle, expanding towards the bottom. In the central part of the oval we place the eyes and nose.
We draw the contours of the body, tracing them with a broken line imitating wool. To obtain the desired effect, they should be placed close to each other, maintaining the direction in the direction of the growth of the animal’s fur. Using the same lines we highlight the front and hind legs and the hanging tail.
Let's start drawing the face. The stages of work are clearly presented in a step-by-step diagram.
At the final stage, all that remains is to draw the fur on the remaining parts of the body, and then highlight the fingers with tiny claws.
As a finishing touch, add texture to the tree trunk. Complete the picture with blossoming foliage and fluttering butterflies.
Drawing for children 4-7 years old
At this age, children can draw various geometric shapes, and their drawings based on natural motifs are already quite recognizable. Now the fidget is able to understand how to draw animals step by step.
The diagram is not particularly complicated: we learn to draw several circles (head and torso), which will serve as the basis; then we schematically depict the paws (legs), then add details and erase the auxiliary lines with an eraser.
You should teach beginning artists that the first stage of their work should be to determine the composition: where the main object will be located, which objects will be in the foreground, and which in the background.
As you can see, the animal drawings are still quite simplified and not burdened with details. All these nuances will need to be explained to the knights of pencil and paper when they grow up a little.
Lion is the king of the animals
Representatives of the cat family rarely leave anyone indifferent. These graceful pets make children very happy, keeping them company while they play. But true delight is caused by a truly royal cat - a lion. So why not invite your child to draw it?
Cute lion cub
There is nothing difficult about drawing a charming lion cub:
- First, at the top of the sheet, closer to the central point, draw the animal’s head. It has the shape of a circle. To maintain symmetry, we divide the circle into 4 sectors by two perpendicular lines. Since the lion cub is located at an angle, we make the lines curved and slightly shifted to the left.
- We add a torso to the head, depicting it in the form of a slightly curved oval. Please note that the oval is somewhat narrowed at the top and widened at the bottom. In the area of the lower sectors of the head we draw a smaller circle. This is the basis for the future muzzle.
- In the lower part of the oval we highlight the area of the hind legs, in the upper part we draw the outline of the erect front legs. All paws fit tightly to the body of the body. We draw the tail, depicting it with two parallel curved lines.
- We draw the details of the muzzle. To do this, closer to the crossing of the lines we outline the contours of the eyes, a little lower - the nose, shaped like a heart. We add the lower jaw to the circle of the head, first forming the outer contour, and then the inner one - the lower lip. Around the nose, extending to the lower jaw, we highlight the area of the cheeks. The cheeks should be symmetrical.
- Can there be a lion without a mane? To highlight the shaggy head, stepping back 2-3 cm from the contour, we outline another circle of a slightly larger diameter. We give its frame a jagged shape.
- At the final stage, all that remains is to remove the auxiliary lines. After this, draw the tassel of the tail, paint over the pupils with black, and make the main contours clearer.
Create your own zoo!
The main thing when we learn to draw animals is to learn that the important thing is the construction, which always has the same basis and principles. Move with your child from simple animals to more complex ones. Try to depict them in motion, combine how many individuals in one picture: fish and dolphins, playing kittens. Soon your zoo will grow, but the young artist’s imagination will not dry out.
Understanding the principle of how to draw animals is easy. In most cases, everyone, both domestic animals and forest animals, has approximately the same body structure. But what makes one “blank” a wild wolf, and the other a cute and funny kitten? This is what we'll talk about.
Animals from circles
The easiest way to teach a child to draw domestic and wild animals is to use ordinary circles as a basis. This option is perfect even for kids of preparatory age.
Look how easy and simple everything is! Each time the starting point when creating a drawing will be an ordinary circle. The young artist’s task is to strictly follow the sequence of actions.
Start with the simplest characters - a puppy and a goldfish, or a curled up cat and a cute owl
Do you want to portray a forest dweller? Why not draw the face of a kind bear cub. Please note that the basis of the picture is made up of only a few circles of different diameters.
What do you think of this snail with a house on its back? To create it, you need to perform only 6 simple steps: draw teardrop-shaped figures of the body, draw eyes and a mouth, and design the twisting spiral of the house.
Creating a drawing of the inhabitants of the underwater kingdom will not cause any particular difficulties. To the round body you only need to draw the head and limbs.
The idea of such drawings is simple: the circle is simply “overgrown” with ears, noses, eyes, paws and tails. Using this simple technique, it will not be difficult to depict not only animals, but also cartoon characters beloved by many, for example, the same Smeshariki.
Stage one: preparation for work
Of course, you can simply draw an animal in the center of a white sheet and leave it in the album. And you can make this work a real pride. First, decide what you will draw with: for paints, for example, it is better to make a larger sketch. Teach your child to use a brush or sharpen pencils and erase unnecessary lines with an eraser. Then choose which animal you want to depict. If the artist shows interest in a particular animal, then draw it. While drawing, you can tell your child about this animal. Next, decide on what background you will depict the animal. If it is, for example, a cat, then create a homely atmosphere and place a ball nearby. But if you have to depict the king of animals - a lion, then draw him in the savannah. The wolf will live in the picture, but the dolphin will live in the waters of warm seas. You can find many master classes on this topic on the Internet. There are also lessons in illustrations that advise animals step by step - but they also need to be voiced so that the artist understands why he draws certain lines. You can draw, or you can come up with an image yourself. So, we draw animals step by step. Let's look at the lesson using the example of several animals.
Pictures for kids
You can show your little one how to draw step by step those little animals that he is already familiar with. The simplest drawing technique is circles. True, for this you need your child to master these simple figures.
There is a simple algorithm for teaching little ones how to draw basic shapes: you need to take the child’s hand in yours and draw a circle with a pencil. If your little one has mastered drawing a circle, show him how you can use this shape to draw funny little animals:
In this way, you can learn to portray not only funny cats and dogs, but even your favorite cartoon characters (for example, Smeshariki).
We portray a cat
When talking about things for children, you shouldn’t lose sight of everyone’s favorite puppies and kittens. After all, kids usually begin to learn the drawing process from them. So, in pencil? Draw the head and torso in the form of two flattened circles. To make the picture more symmetrical, you can draw a vertical line. The next stage is drawing the eyes. To make them more expressive, make the tone at the bottom much lighter than at the top. Please note that all lines must have a smooth transition. In the form of an inverted triangle, draw a nose, from which lines will go to the ears and eyes. The cat's mouth is depicted in the form of an inverted English letter Y. That's basically it, all that remains is to correct the shape of the animal with soft lines.
Preview:
Lesson summary in non-traditional drawing techniques
(drawing with a plastic fork) in the older group
"My favorite animal"
Goal: To learn to expressively convey images of animals in drawings (body shape, location and shape of body parts, their size, proportions) based on a diagram.
Educational: Help children learn a new way of depicting - drawing with a fork. Continue to develop the ability to talk about your drawings and the drawings of your comrades.
Developmental: Strengthen technical skills and abilities in drawing (mixing colors to obtain the desired shade). Continue to develop figurative perception, imagination and children's visual creativity.
Educational: Foster a sensitive and caring attitude towards animals.
Gouache, A4 paper, thin and thick brushes, water, animal structure diagrams, color mixing diagrams, palettes, plastic forks, tape recorder, TV.
Drawing animals with wax crayons, pencils, felt-tip pens, sculpting animals, looking at illustrations, reading poems, stories, writing stories about animals.
Game situation “Letter”.
The postman brings a letter.
– Guys, which of you is this letter to, Amina – to you? No? Vova - for you? No? Who received this letter?
(Children make their guesses and open the envelope with the letter).
– Mowgli sent us this letter; he lost his favorite animals. Guys, how many of you know who this Mowgli is and what are his favorite animals?
Oh, what else is there?
- What does it look like (like some kind of map). Wow! What is a card? (Children's answers).
I wonder where this map will take us? The children suggest following the tracks indicated on the map. Following the map, we come to the table and see Mowgli’s favorite animals.
- Who is this? (Children's answers).
- We found Mowgli's friends. Would you guys like to introduce Mowgli to your favorite animals? (Children's answers). How can we do this? (children's answers)
– I suggest you paint your favorite animals. I'll take a photo of them and we'll send him a video letter.
– Who remembers where they start to draw an animal? (from the body)
– What shape is the body? (oval)
– The head, what shape can it be? (round and oval)
– Ears, what shape? (triangular, oval, round)
– Paws, what shape? (oval) How many paws do animals have? (four)
(pay attention to the diagrams depicting animals)
– Children, animals have different coat colors. Let's remember how to mix colors to get the desired shade.
(schemes of mixing gray, pink and orange)
– How should the animal be placed on the sheet? (large, in the center). The animal can stand, walk, lie down, and play.
– To draw the entire animal we use a thick brush, and to draw small details – a thin one.
– Our drawings will turn out beautiful if we stretch our fingers.
Claws can scratch
It's not their face, but their muzzle
Tail, mustache, and nose are wet
raise and lower 4 fingers on your hands
connect your fingers into a ball, bring them closer to your face
show mustache, outline nose
The children begin to work, during which music plays.
During the lesson, pay attention to the children’s posture, guide the children, encourage initiative, ask leading questions, pay attention to the patterns of animals and color mixing, and remind them of safety precautions.
– We’re not in a hurry to draw the face right away. You need to wait until the base color dries.
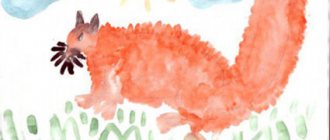
– To make our animals more realistic, so that the fur is visible). I will teach you how to use non-traditional art materials - a fork. Have you ever drawn with a fork? We take a plastic fork and dip it into the gouache, then apply it with strokes as the fur of the drawn animal grows. Starting from the edge of the picture, gradually approaching the middle. But. Be careful! Draw children's attention to safety precautions when working with plastic forks.
At the end, look at the children's drawings.
Invite the children to come up with nicknames for their animals and talk about them. Offer to choose those works where animals are well depicted (in reality, with character transfer).