Folder - travel "Autumn" : three folders - travel for kindergarten with pictures, poems and tasks for children about autumn.
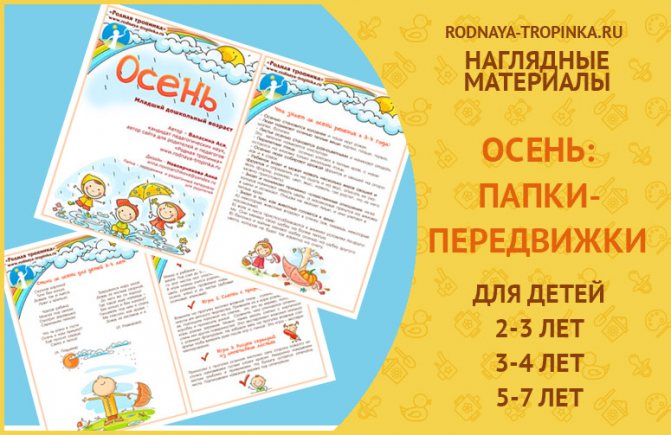
In this article you will find three folders—movements on the theme “Autumn” for parents of children of different ages and useful ideas for using them:
- folder “Autumn” for early ages (from 2 to 3 years),
- folder “Autumn” for children of primary preschool age (for children 3-4 years old),
- “Autumn” folder for older preschool children (5-7 years old).
Each folder contains 10 sheets and you can choose those that will be most interesting to you and your children and arrange them in any order. Therefore, we did not specifically number the sheets.
All folders - translations on the theme “Autumn” from this article can be downloaded for free and printed. I have provided download links below in this article.
Folders - moving “Autumn” for preschoolers: contents of folders
Each of the three folders contains the following pages:
- What does a child of this age know about autumn? What to tell him about.
- Pictures about autumn to look at with your child.
- Educational autumn games and experiments.
- Poems about autumn to read to children and memorize.
Each page has a landscape sheet format - A4 (vertical).
The material in each folder is designed taking into account the age of the children and all methodological requirements for familiarizing preschoolers with the world around them.
All sheets of folders are colorful and bright, realistic and are designed so that the pictures can be viewed with a child while discussing autumn phenomena in nature.
We tried very hard to create a special mood in each folder and look at autumn through the eyes of a child! And also bring joyful mood and smiles to all of you - our readers! Therefore, the folders turned out to be very bright and kind, very sunny and bringing you our warmth!
The authors of the “Autumn” folders are: I, Asya Valasina, Candidate of Pedagogical Sciences in the field of preschool pedagogy, practical teacher, author of this site “Native Path”. And designer Anna Novoyarchikova.
All materials in the book folders can be transferred to friends, colleagues, acquaintances, downloaded and printed, and used in kindergartens, centers, and families. We, the creators of these folders, will be glad if our work is in demand and needed by people, and as many people as possible use it! Therefore, we make these folders free for distribution and you can get them without any payments or subscriptions.
Classroom decorations with leaves
Another spectacular technique is twisted structures using the paper-plastic technique. The relief is created by inverted stripes - internal stripes. Works can be modular. In this case, diamonds of the same type need to be fastened together.
Technique:
- A stencil of autumn leaves for cutting out of paper needs to be traced. Only double-sided paper is used, otherwise the reverse side will be visible when flipped.
- The workpiece is cut along the contour, the internal parts are perforated with a paper knife.
- Thin central ribbons are turned over, making the leaf symmetrical, and secured with glue or a stapler.
All that remains is to fasten a few leaves into a composition. To avoid ruining the look, you can use double-sided tape.
Why do teachers need “Autumn” folders?
- Folders can be used as visual material for parents in kindergartens and children's centers (for example, a mobile folder can be located in the hallway of a kindergarten or in the locker room of a kindergarten group). This folder introduces parents to what educational games they can play with their child in the fall, what poems about autumn are intended for children of this age, and what to tell the child about in the fall.
- Folders can also be used as handouts for parents of preschool children on the topic “Autumn” at various family workshops and play libraries,
- The mobile folder can be printed as an A4 book, inserted into files (for this you need to purchase special folders with files) and get the book “Autumn” for the kindergarten group. This book can be passed from family to family and viewed in a group with children. It will serve you for a very long time!
Registration of a group in kindergarten
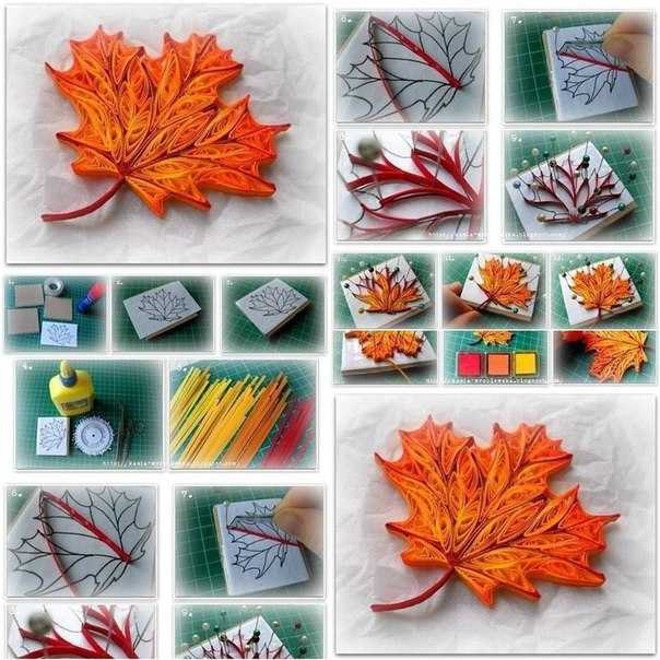
For large compositions, cut out and slightly tinted leaves from paper and cardboard are suitable. Large beads or berries from painted acorns can become rowan branches. A more stylish option is compositions using the quilling technique - lace patterns made from colored stripes.
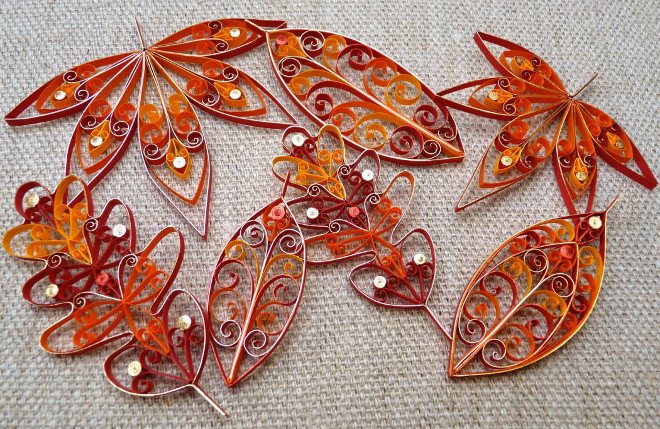
The teacher will have to take on most of the work, although children can also assemble the simplest spirals into flowers using a glue stick.
Technique:
- The selected ornament must be transferred to thick paper. The main pattern is laid out along the contour using pins. In the case of leaves, these are veins.
- Ribbons folded into spirals fill the volume of the sheet. You can play with the color of the parts of the composition.
- The joints are treated with a glue stick or a brush with PVA.
After complete drying, the composition can be removed from the template.
How parents of preschool children can use the “Autumn” folder
Option 1: Print the folder. And use it as a book or as a cheat sheet throughout the day.
Examples of using a move about autumn: We print the folder onto separate A4 sheets. Then it is very convenient to use these sheets with children, choosing the desired sheet for today. You can always take one piece of paper with a poem on a walk with your baby. And during a walk, take it out, look at the picture with your child, and read a poem to the child from this piece of paper. A sheet of paper from a folder looks very aesthetically pleasing and is convenient to look at with your baby; it is light and does not take up much space like a book or album. Then you and your child can look at the nature around you and find signs of autumn - the same as in the picture or in the poem from the folder.
A valuable idea from the experience of mothers: Many parents hang sheets of folders on the refrigerator (changing them) or on a home magnetic board and look at them with their children. These sheets serve as a cheat sheet - a reminder of a poem or a fall game planned for today with your child.
Option 2. Mobile option for using a folder about autumn without printing the folder on a printer. This option appeared in my experience of working with parents many years ago, when mobile phones with camera functions first appeared. Very convenient, fast way. You just need to save the pictures from the “Autumn” folder to your mobile phone. During a walk, you can always open the desired photo and read a poem to your child, look at the picture and find a similar landscape in the park around your baby, or remember an idea for a game and immediately play it with your child.
Working with a group of children, I often made such development folders and noted that parents did not just read them (and this is often what happens: they read them and happily... forgot). On the contrary, almost everyone takes pictures of my materials on their mobile phones and then returns to them at home and saves them for themselves. This is very convenient - you will always have a folder about autumn with you and does not take up space. Therefore, I decided to share “Native Path” with all readers.
We made three folders - movements about autumn according to the ages of children: early age (up to 3 years), junior preschool age (3-4 years), senior preschool age (5-7 years).
Now I will show examples of pages from folders - movements about autumn and give links to download these pictures in full format for printing.
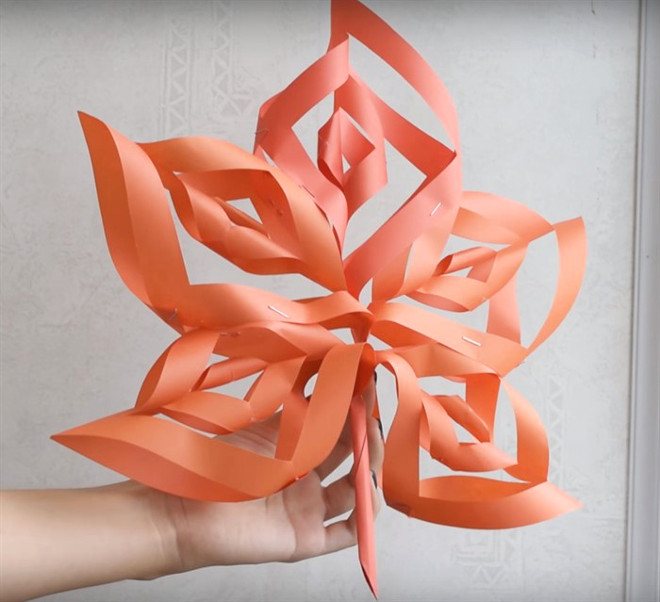
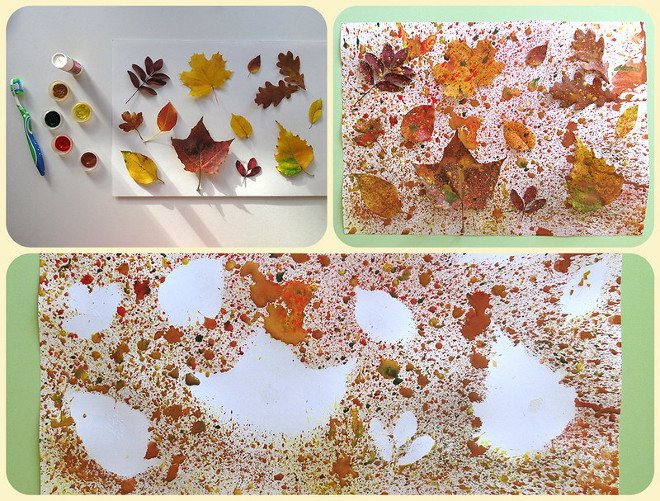
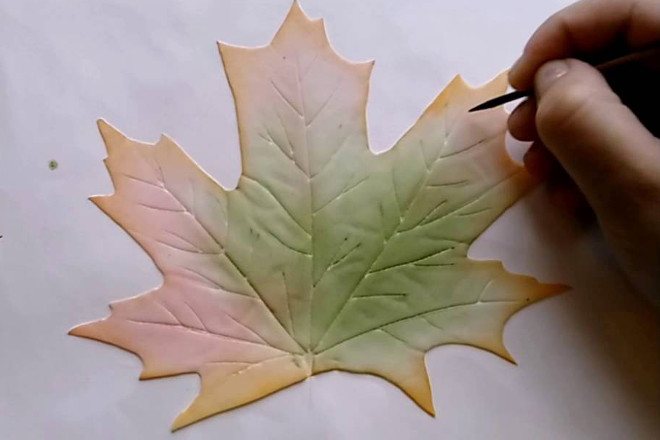
Volumetric leaves, like real ones
The naturalness of paper leaves is given by coloring. In any case, monochromatic options will look like crafts.
The paper can be tinted so that the colors do not seem rough:
- grated crayons or pencil lead;
- watercolors and blurred watercolor pencils;
- alcohol paints (for example, from a felt-tip pen) and a sponge;
- airbrush or spray drops with any stiff brush.
To make the composition beautiful and realistic, the teacher must tell you in advance which colors are characteristic of which plant and help you choose shades.
You can literally copy the texture of the leaves by simply highlighting it with chalk or a wax pencil. To do this, you need paper thin enough so that the relief of the veins can be clearly felt through it.
Having placed the original under the sheet, you need to lightly touch the surface so that the tinting lies brighter on the folds. If you choose the shade of the paper and chalk in advance, you can get a realistic effect.
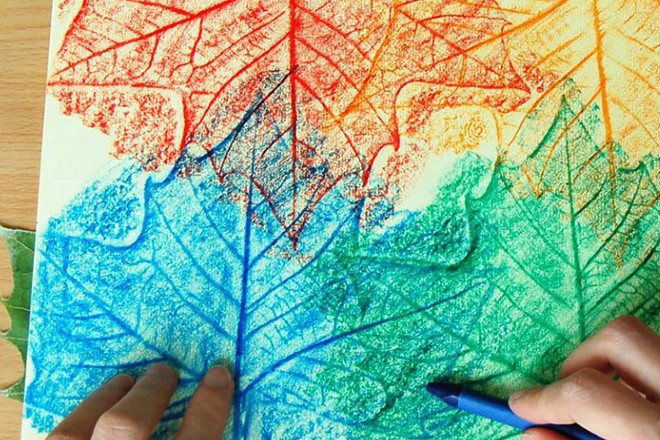
The veins of the leaves, even if they are made of plain paper, should be embossed. There are simple ways to corrugate a workpiece without resorting to complex stamping methods. To make embossed veins, you will need:
- a dense but fairly soft base (folded paper sheets, linoleum, thick oilcloth);
- scissors, sharp stick, toothpick or skewer;
- visual diagram.
Having placed the workpiece on a soft surface, you need to push through the veins, observing the natural pattern of the original. The lines should not be rigid or drawn according to a ruler.
For paper-plastic techniques that make it possible to obtain voluminous blanks, scissors are usually used. A part is passed through their cutting edge at a fracture, causing it to begin to curl.
When working with children, you can also use a thin ruler - this will prevent injury. The main thing is to show with an example how pressure affects the quality of twisting.
The veins on the leaves can also be made voluminous. To do this, you will need a glue gun or 3D pens that have become quite common. The relief is simply drawn with plastic, and then painted along with the main plane.
A similar effect can be achieved with simple PVA glue, if you dry it a little in an open container. It is difficult to implement such techniques in a kindergarten, but the use of new interesting technologies will make classes with older children more interesting.
Detailed description of folders - movements about autumn by age of children
Please note: In this article I am giving compressed images from a folder as an example.
You can download full pictures from all folders in excellent quality in the file using the links above.
Each folder is unique and the contents of each folder are not duplicated in other folders.
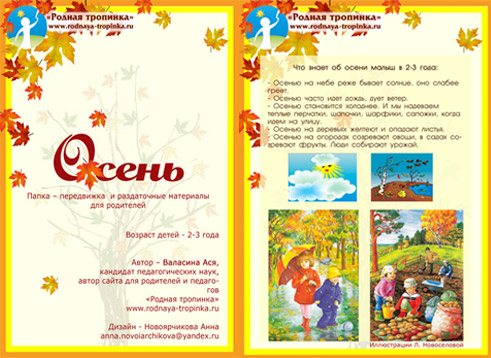
Folder - moving "Autumn": for parents of young children (2-3 years old)
The moving folder about autumn for young children includes the following sheets:
- Title,
— What does a 2-3 year old baby know about autumn? And pictures of autumn natural phenomena to look at with your child.
— Learning to look at pictures: seasons
— Learning to speak and playing with the autumn rain: speech exercises on a home walk.
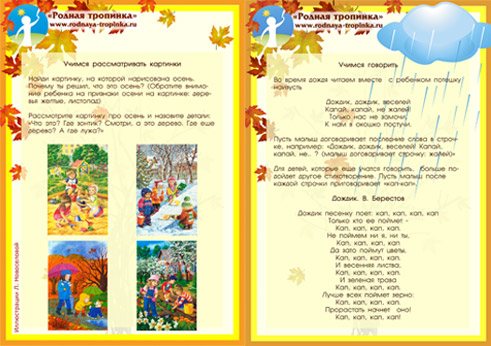
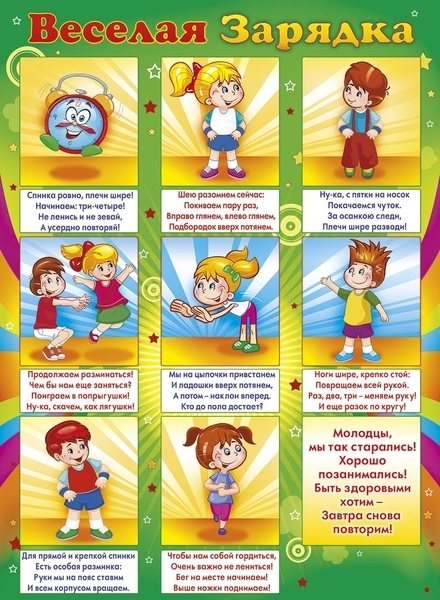
— Autumn educational games and tasks for the little ones: “Colorful leaves”, “Big - small”, “Dance with leaves”, “Where is the leaf?”, “What can you hear?”, “Learning to speak”, “Magic box”.
— We introduce the baby to the outside world during a walk in the yard
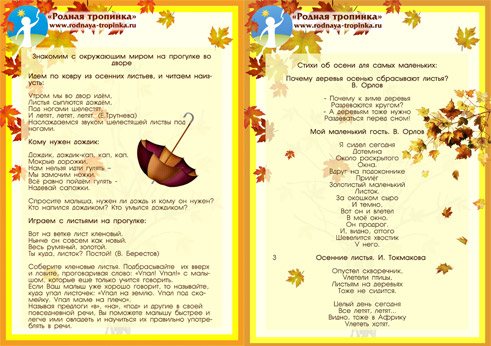
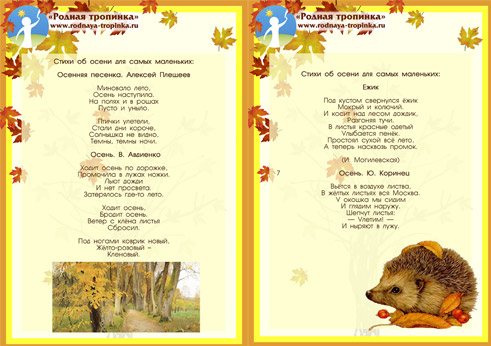
— Poems about autumn for the little ones: “Why do trees shed their leaves in autumn?” V. Orlov, “My little guest” V. Orlov, “Autumn Leaves” by I. Tokmakov, “Autumn Song” by A. Pleshcheev, “Autumn” by V. Avdienko, “Hedgehog” by I. Mogilevskaya, “Autumn” by Y. Korinets.
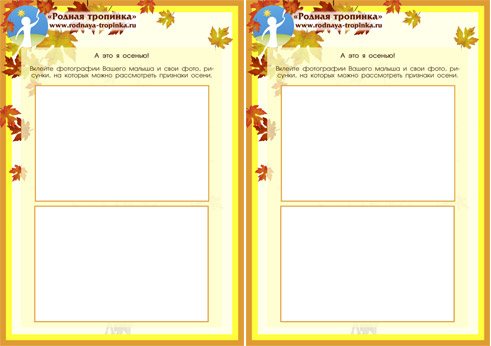
— Sheets “And this is me in the fall” for pasting home autumn photographs into an album or folder. You can paste autumn photographs of children, kindergarten groups, and photographs of children’s drawings about autumn into frames. The result will be sheets of galleries in which the baby will see himself! It is very important for a young child to look at photos of his mom, dad, all his relatives and himself in the fall: what the weather is like, who is doing what, who is wearing what.
The download link for this folder is given above in this article.
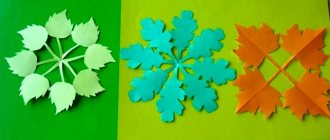
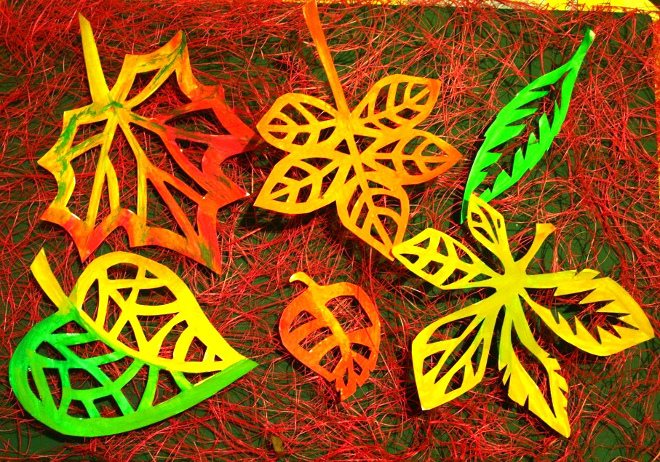
Cutting templates
To work with children, templates for any equipment can be printed on a printer, and then transferred to cardboard and cut out.
The high density of the blanks for tracing will ensure their durability. Having planned lace, requiring the use of a stationery knife, autumn leaves stencils for cutting can be made from thin plastic. Otherwise, the blanks will be disposable.
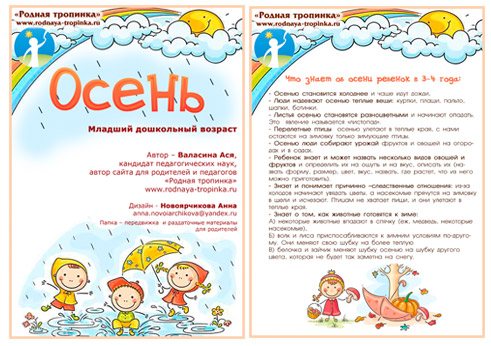
Folder - moving "Autumn": for parents of children 3-4 years old
Below in the folder description are examples of pictures in a compressed format. You can download the same pictures in full size and good resolution for free above in this article in the section “Download moving folders “Autumn”
The moving folder about autumn for children of primary preschool age includes the following sheets:
- Title,
— What does a 3-4 year old child know about autumn?
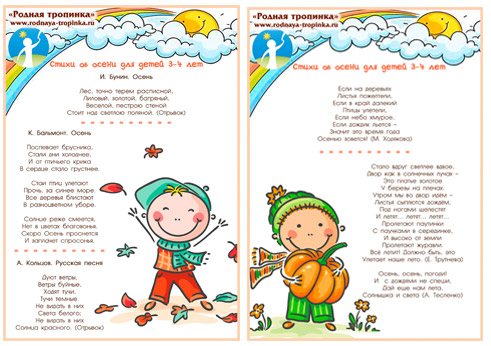
— Poems about autumn for children 3-4 years old: I. Bunin “Autumn”, K. Balmont “Autumn”, A. Koltsov “The winds are blowing”, M. Khodyakova “If the leaves on the trees turned yellow”, E. Trutneva “It suddenly became twice as bright”, A. Teslenko “Autumn”, A. Pleshcheev “Boring picture”, L. Razvodova “The rain of mischievous leaves swirled above me.”
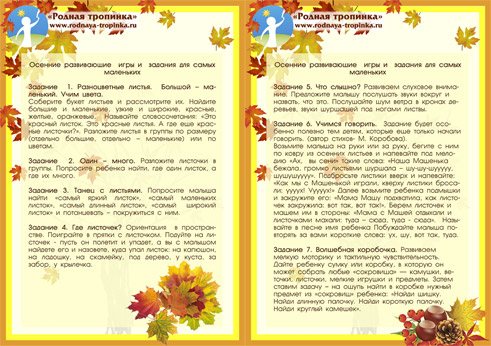
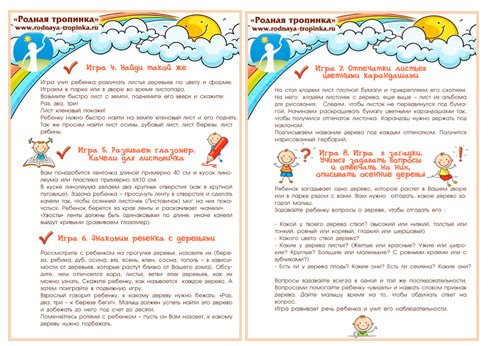
— Educational games on an autumn walk with a 3-4 year old child: “Which branch are the children from?”, “Casts from nature”, “Drawing a herbarium from leaf prints”, “Find the same one”, “Developing the eye. Swing for a leaf", "Introducing a child to trees", "Leaf prints with colored pencils", "Riddle game: autumn trees"
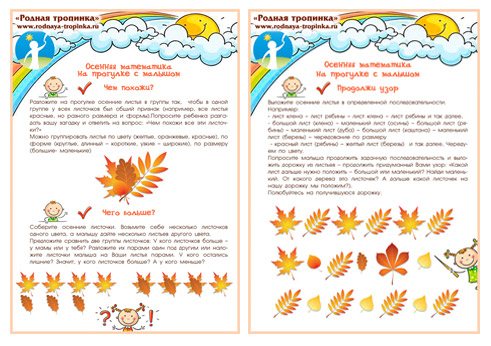
— Autumn mathematics on a walk with a child: “How are they similar?”, “What is more?”, “Continue the pattern.”
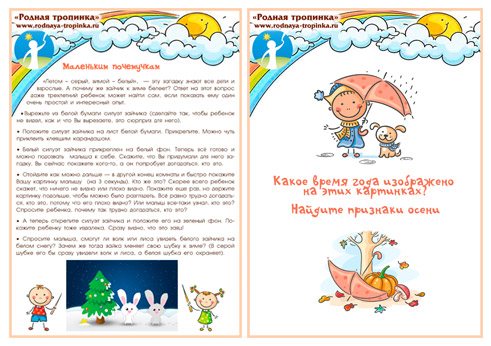
— For little reasons: why is the hare white in winter and gray in summer? Experiment for children.
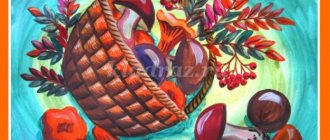
— Signs of autumn: pictures with the task for the child “Find the signs of autumn.” While discussing the top picture with your child, ask him why this is not summer? After all, it also rains in summer. Pay attention to the girl's warm clothes. If she dressed warmly, that means...? (it’s cold outside, but warm in summer). In the bottom picture, find signs of autumn (the harvest is ripe, the leaves are falling).
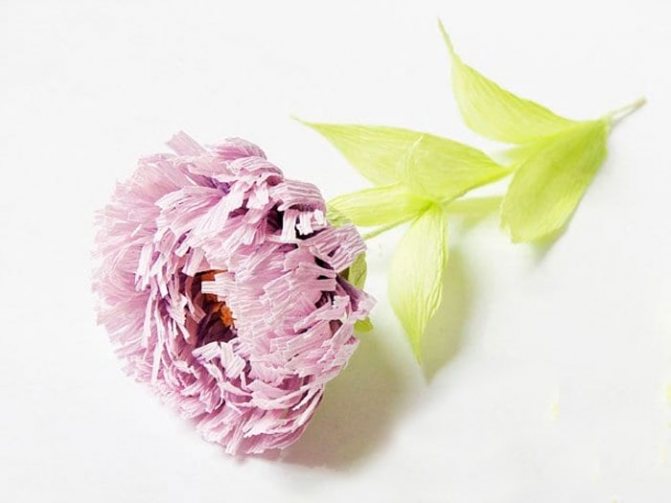
Corrugated paper aster
- Secrets of builders: working with couplings

DIY New Year's crafts - 9 best options
- DIY sweet crafts
You will need: corrugated paper of purple, yellow, green and light green, scissors, wire, glue gun, pencil, ruler, watercolor paints, brush.
Master Class
- Prepare a strip of purple corrugated paper 4 cm wide.
- Tint one edge of the strip with purple paint and set aside to dry.
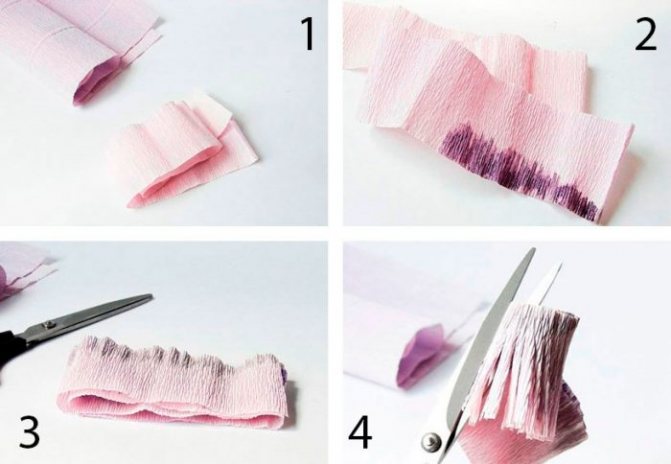
- Fold the strip several times.
- Make cuts along the unpainted edge. The first blank is ready.
- Make the second blank in the same way, only take a purple strip 6 cm wide.
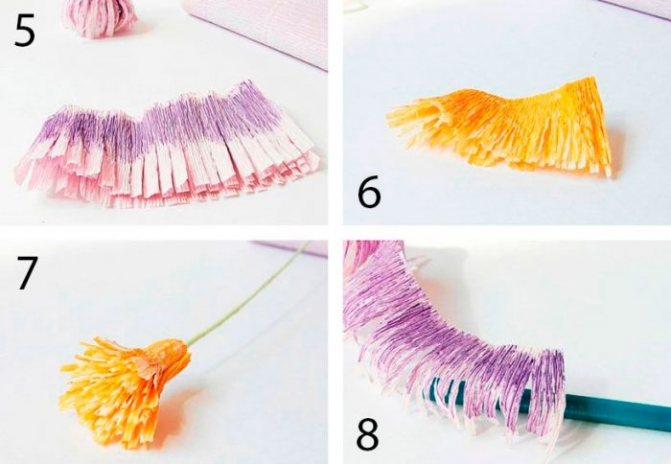
- Prepare a strip of yellow paper 3 cm wide.
- Fold the yellow strip several times and make cuts.
- Wrap the wire with a light green piece of corrugated paper and secure with glue. This will be the stem.
- Wrap a yellow blank around the end of the stem - these will be the stamens.
- Twist the ends inside the purple piece, which is 4 cm wide, using a pencil.
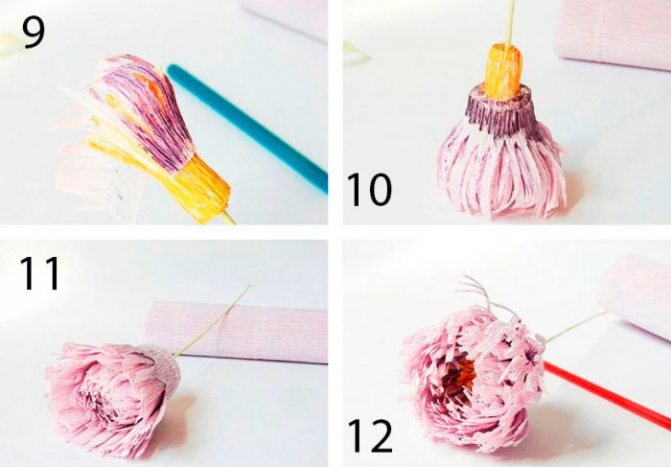
- Step back from the base of the stamens and glue the petals.
- Take a 6cm wide purple blank and wrap it around the bud as shown in the photo.
- Twist the ends of the petals and straighten the middle.
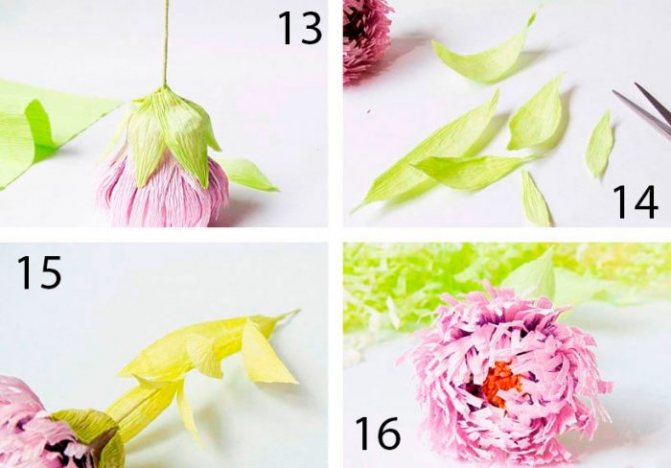
- Cut out 6 sepals from green paper, then glue them on.
- Cut 6 long leaves of different sizes from light green paper and glue them to the stem.
The corrugated paper aster is ready! You will find even more flowers HERE.
I recommend watching this video!
Note! Craft from Brussels sprouts and banana "lion"
Do it yourself: make an autumn garland and a wreath for the door in the European style
- home
- Design and decor
- Hallway
1 star 2 stars 3 stars 4 stars 5 stars If you can no longer stand the Instagram beauty of doors with wreaths of bright autumn leaves and your soul asks for creativity, our article will help you.
Instagram @nashvillecraftparty
- Base: strong long branch
- Materials for decoration: dried leaves, cut out leaves from strong cardboard, pine cones, acorns. You can diversify the garland with photographs
- Materials for fastening: nails, buttons, second glue, threads
- Tools: sewing needles and awl, hammer
- Additionally: spray paint optional, acrylic paints
On a long branch, use a thin marker to mark the places where the nails will be driven in.
This is important so that there is a step of the same size between the parts of the garland. Ropes are tied to the driven nails (jute looks the most authentic, but other strong ropes can be used), and decoration elements are attached to these ropes
You can fasten them using the same ropes if you make a hole in the decor - using a needle, an awl or a small drill. You can make bows where the ropes are tied to nails and decor to disguise the knots. The finished garland can be sprayed with gold spray paint.
The garland is hung on an empty wall or suspended from a cornice. It can also be used to decorate a false fireplace if you have one.
For the wreath you will need:
- Material for the frame: it can be branches/wire/hoop or a ready-made frame for a wreath from craft stores
- Materials for decoration: you can use dried autumn leaves, dried and artificial berries like rowan, dried roses and other dried flowers, wine corks, ears of wheat, acorns, pine cones, cinnamon sticks and anise, physalis, ribbons, battery-powered LED garlands (your imagination here practically unlimited)
- Materials for fastening: jute rope, glue moment, stapler
Fresh, recently collected branches bend easily, but dry and old branches that break easily are recommended to be soaked in boiling water first so that they bend more easily. At the collection stage, choose thin branches that are easier to bend. It is recommended to take birch, and in the absence of it, willow.
When the branches are prepared, you need to lay them out on the table. Next, separate as many sticks from the total mass of branches as you need to create the lightest layer of the wreath and arrange them on the work surface so that they form the shape of a wreath.
At this stage, you can decide on the size of the wreath. Now the thin ends of the branches need to be connected to the thick ends, as if head to feet. Then wrap the thin ends around thick branches.
Next, we move on to the stage of strengthening the wreath, gradually braiding it with new branches and increasing its volume. Small branches need to be hidden inside the wreath so that they do not stick out.
Now that your wreath is strong enough and does not fall apart in your hands, it should be additionally braided with wire for reliability. Trim the excess wire and hide the ends behind the back of the wreath. Then you can decorate the wreath to your liking.
If you find it difficult to figure out how to weave a wreath, watch the video:
Vytynanki - leaves on the windows
The vytynankas will look impressive on the windows. This is a lace cutting technique. Double-sided options will be equally impressive on both the inside and outside of the window. The technique is only suitable for children who can confidently handle a paper knife.
Cutting should not be offered to children due to the risk of injury. You can offer ready-made schemes for implementation. Older children can come up with an ornament on their own. The design is first drawn on cardboard and cut out, then the blank is used to transfer the design to the main color.
Materials for the parent's corner in the preschool educational institution - information in the parent's corner
Materials for the parent's corner in a preschool educational institution - information in the parent's corner
And now, let's figure out what information can be placed in the parent's corner. Remember that it should be presented as positively, clearly and, if possible, in not very large volumes. It is unlikely that parents will stand near the stand for a long period of time; they should see a short and informative message in front of them. It is also important to take into account that when placing printed information on a stand, it is necessary to indicate the authorship, date of publication of the material, and, if available, a link to the website, so that you can familiarize yourself with the material in full.
Materials for the parent corner in the preschool educational institution - information in the parent corner:
- Materials about the physical development of children
- Materials about the mental development of children
- Materials about aesthetic education
- Materials about developmental features
- Materials about health, ways to improve your health
- Materials about self-care skills
- Materials about planned classes
- Materials about children's literature
- Materials about music and musical works
- Materials about teaching methods for preschoolers
- Materials about the seasons
- Materials on speech development
- Advice from psychologists, speech therapists, pediatricians
- Thematic materials - New Year, March 8, Easter, February 23
To sleep sweetly
The flow of information directed at children is enormous. Musical, sports activities and walks alternate. You need quality rest to relax and take your mind off active activities.
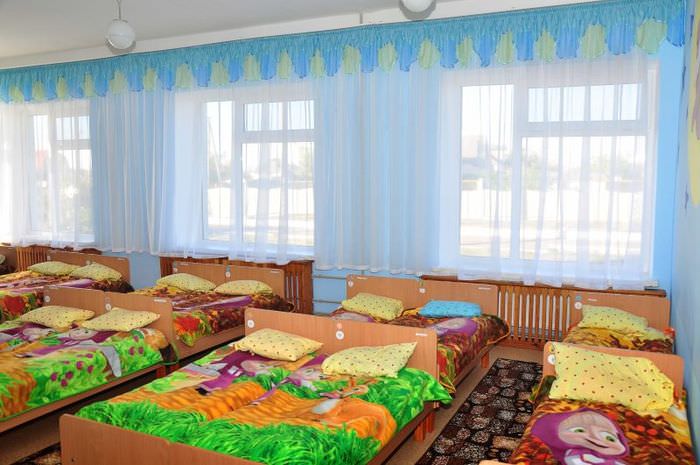
For finishing and interior design, environmentally friendly materials, mainly natural, are selected
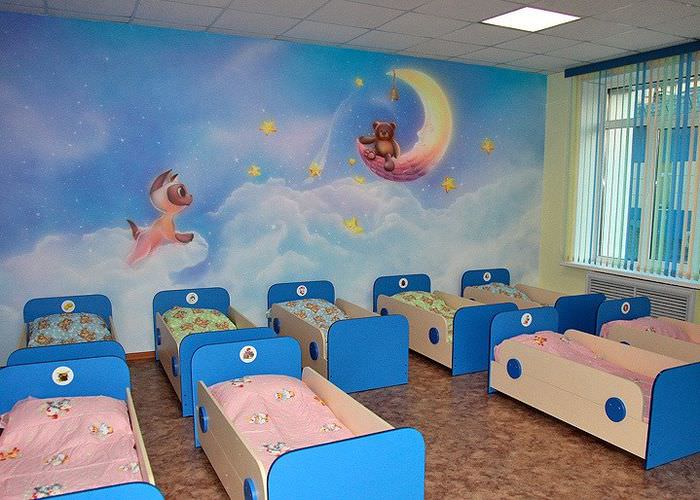
The bedroom is decorated in soothing pastel colors
The bedroom traditionally has a special cozy atmosphere. When creating it, adhere to the following rules:
- soft lighting;
- use textiles of the same color range, which does not irritate the eyes;
- bed linen is chosen in delicate shades; for pupils of older groups, sets with plot pictures are acceptable;
- there should be no bright images on the walls or ceiling; there may be fairy-tale or cartoon characters (it’s good if they are getting ready for bed, this will become a kind of positive example for children);
- When painting walls, soothing warm colors are preferred, which will help you calm down and fall asleep quickly.
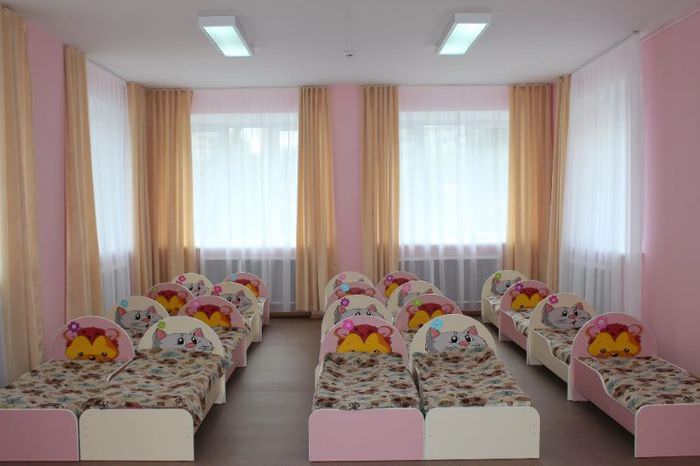
Thick curtains are hung on the windows to darken the room during the daytime.
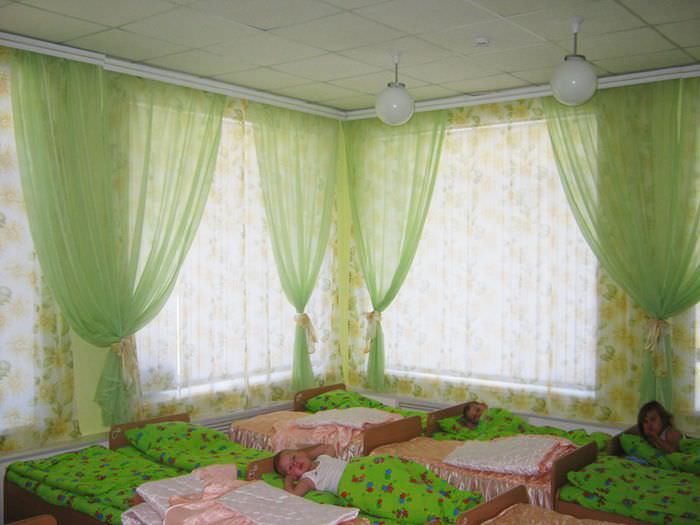
The material for the curtains is selected to match the style of the room
Finishing materials in the interior of a kindergarten, textiles, and furniture must be environmentally friendly and comply with safety standards. To darken the room, hang thick curtains made from natural fabrics and carefully fasten them. The walls are decorated using mosaics, stained glass, three-dimensional applications, and removable stickers. There is not much furniture; these are cribs appropriate for the age and height of the children. To determine each child's sleeping place, plot pictures are placed on the headboard.
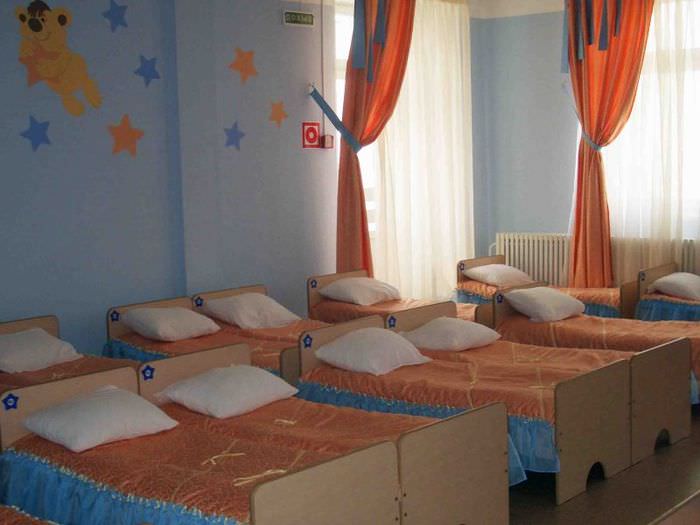
The bedroom should have a calm atmosphere that helps you fall asleep quickly.
See alsoDesign of a modern hairdressing salon, photo.