Fine art lesson on the topic “Flags on a string” in the second junior group
We must not forget! Children of primary preschool age readily perceive information presented to them in a playful form. This approach arouses interest in the children, which is an important motivation for mastering new and repeating already familiar material.
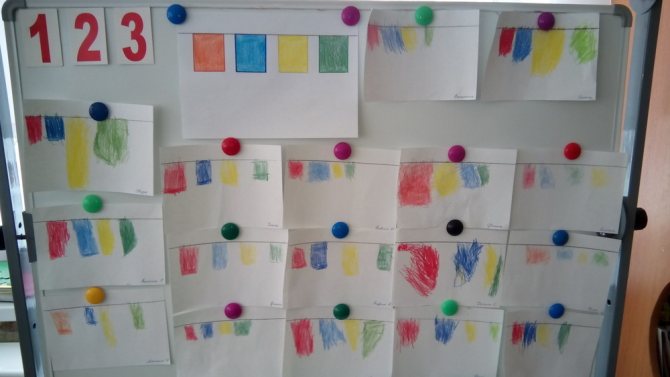
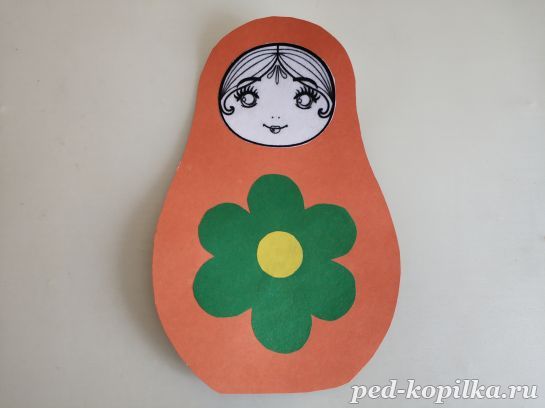
Application "Flag"
Example of drawing lesson notes
Educator: “Guys, I want to ask you, what holidays do you know? (Children name holiday events known to them)
What a great fellow you are, how many holiday dates have you named? Do you know that there is a day that is dedicated to all the children at once? This is Children's Day. It is celebrated on the very first day, June 1st.
Festive matinees and concerts are held for the children. To ensure that everyone is in a good mood on this day, music is played. There are always a lot of fun competitions and interesting competitions. And the soul becomes joyful from balloons and other decorations, for example, multi-colored flags.
Guys, do you want to learn how to make flags that you and I can use to decorate our group?
We have blanks that you can paint in bright colors: blue, red, yellow. We will assemble the finished flags on a string, and we will have a real festive garland.”
Drawing
What holiday event can the lesson be timed to coincide with?
You can make flags on the eve of Birthday, June 1, various themed holidays and memorable dates.
Implementation of the program content in educational areas: “Artistic and aesthetic development” (drawing), “Speech development”, “Physical development”.
Types of children's activities: gaming, communicative, visual.
The goals of the teacher’s activities: to teach children to draw objects of square and rectangular shapes, to use several colors of paint, to arouse interest in depicting flags of different shapes according to their design (rectangular, square, pentagonal, semicircular); develop accuracy, sense of shape and color.
Planned results are the targets of preschool education: shows interest in performing general developmental physical exercises, is active in creating an individual composition in the drawing “Bright Flags”, participates in an exhibition of children’s works, answers the teacher’s questions.
Materials and equipment: samples of drawings depicting flags of different shapes and colors, sheets of paper, brushes, paints, flags, a large envelope.
Contents of organized children's activities
1. Organizational moment.
Educator. We know that doing physical exercises with flags is interesting and fun. And we have such flags. (Shows.) But the residents of the Flower City do not. They ask us to send samples of different flags. I suggest you draw flags of different colors and shapes.
2. Drawing flags.
The teacher shows samples of drawings depicting flags and explains that flags can be not only square and rectangular, but also other shapes. Children draw flags. Then all the drawings are put into an envelope “to be sent to Flower City.”
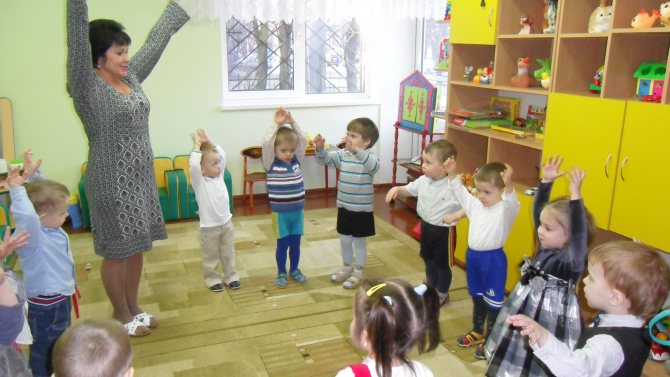
3. General developmental exercises with flags:
1) I. p.: standing, feet shoulder-width apart, flags in straight hands at the top; tilts left and right. (Repeat 5-6 times.)
2) I. p.: the same, flags above the head; on count 1 - bend forward, touch the flags to the floor, on count 2 - sit down, return to the starting position. (Repeat 3-4 times.)
3) I. p.: sitting, legs apart; tilt to the right leg, touch the flags to the toes, take the starting position, then tilt to the left leg and return to the starting position. (Repeat 3-4 times on each leg.)
4) I. p.: main stand; raise your hands up - inhale; lower - exhale, touch the toes with the flags, take the starting position. (Repeat 3-4 times.)
4. Reflection.
-What did we draw?
– What types of flags can there be in shape and color?
– What exercises did we do?
Lesson Objectives
During the lesson “Drawing a flag on a string, second junior group,” children not only gain skills in fine arts, but also form an idea of preparing for festive events, learn about the opportunity to decorate the surrounding space with their own hands and get pleasure from what is happening. These goals can be achieved by carrying out the following tasks.
Math corners in kindergartens and their design
Developmental
- Repetition of known colors: red, blue, yellow;
- Introduction to the concept of “rectangle”;
- Practicing the skills of coloring shapes with colored pencils.
Educational
It is important to instill in students the desire to make their daily lives more vibrant through creativity. Instill a culture of celebrating significant events and dates.
Summary of a lesson on application in an early age group. Theme: Matryoshka
Summary of a lesson on artistic and aesthetic development (application) in an early age group on the topic: “Visiting the nesting doll”
Purpose: Acquaintance with the Russian folk toy - the nesting doll. Formation of independence in productive activities in children. Objectives: educational:
to create in children an interest in the folk toy, the desire to decorate the nesting doll sundress with a pattern using ready-made forms;
continue to teach children to work sequentially, to place finished parts in the center. developing:
to develop aesthetic perception, attention, memory, eye, perseverance, creative activity.
educational:
to cultivate independence, accuracy, self-confidence and the ability to complete the work started.
Progress OD
The bell rings, the children approach the teacher.
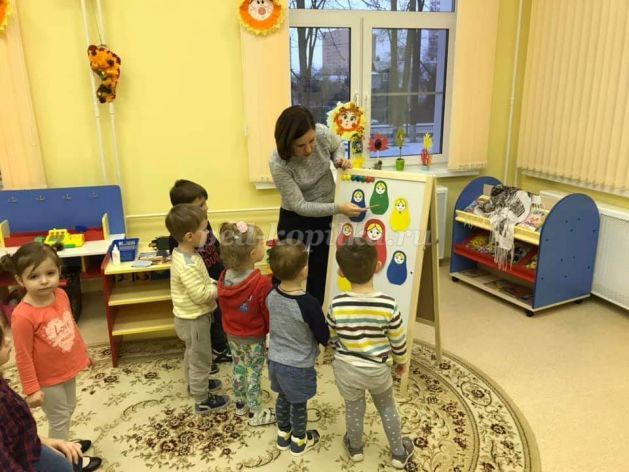
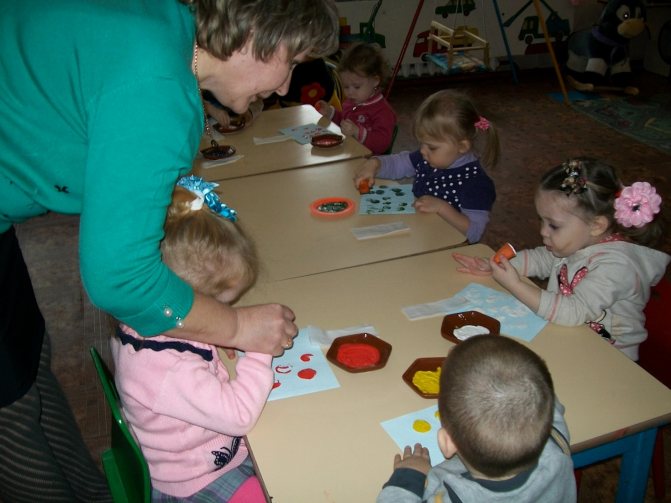
- Chok-chok-chok, close the tongue in the chest, lock the chest with a hook and silence. - Guys, today you and I will go on a visit and we will ride on a steam locomotive. Get up one after another, let's go. (song of the locomotive “Bukashka”). - Blow the pipes, beat the spoons! We came to visit ... (matryoshka). Right. To the nesting doll. Let's say hello to the nesting doll. - Matryoshka, matryoshka - Russian beauty, rosy cheeks, turquoise eyes, white shirt and Russian sundress. There is a scarf on your head, you won’t find a flaw! - How beautiful our nesting doll is! look how beautiful her outfit is. -What is she wearing on her head? (handkerchief) - What is the nesting doll wearing on its body? Children's answers (that's right, sundress) - Guys, what is painted on the sundress? Children's answers (flowers) - But our nesting doll does not live alone, she lives with her friends. Just look, these nesting dolls have lost the flowers from their sundresses. Let's make their sundresses beautiful again and stick flowers on them?
- I have prepared flowers, you can stick them on the sundresses of the nesting dolls.
But first, watch how I do it. — I put the colored side down, take a brush, put a little glue on it, spread it on the flower, then glue it to the sundress and press it with a cloth, then take the middle and do the same. — Before you start decorating sundresses, let’s stretch your fingers . We are beautiful matryoshka dolls, Multi-colored clothes. One is Matryona, Two is Malasha, Mila is three, Four is Masha, Margarita is five. It's not hard to count us! — Hold the nesting dolls and go to the table. Take flowers from the baskets, place them with the colored side down, take a brush, pick up glue, spread the flower, glue it to the sundress, press with a cloth. (the teacher controls and helps the children), then glue on the middle. Turn on Russian folk music.
The teacher reads
a poem : - All nesting dolls love colorful clothes.
Let's try a little, the nesting doll will be joyful. - Well done guys, you all did well. Let's bring the nesting dolls home. Now they are also beautiful, elegant and say thank you. - It’s time for us to return to the group. We say goodbye to the nesting dolls and go home on the steam locomotive. (we return to the music). - Where were we, guys, today? (visiting the nesting doll). — How did you decorate the sundresses with matryoshka dolls? (flowers). - Well done, you did very well. - Now let’s wash the glue from the handles. (go to wash hands). Practical part of the lesson
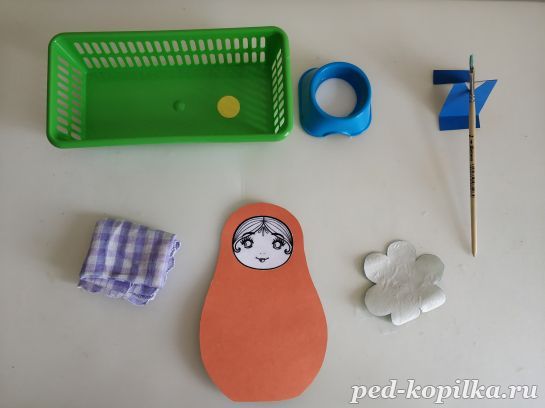
For children to work on the table: the basis for the applique is a matryoshka doll, flower details, glue, a brush, a rag.
Matryoshka template for cutting
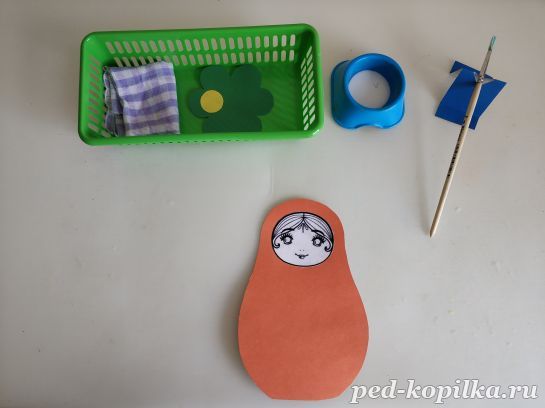
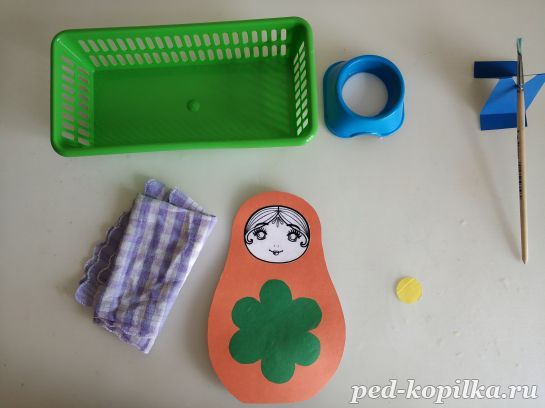
Place the first part of the flower with the colored side down and spread with glue.
Stick it on a matryoshka sundress and press it with a cloth.
The next part is the middle of the flower, spread with glue, turning the colored side down.
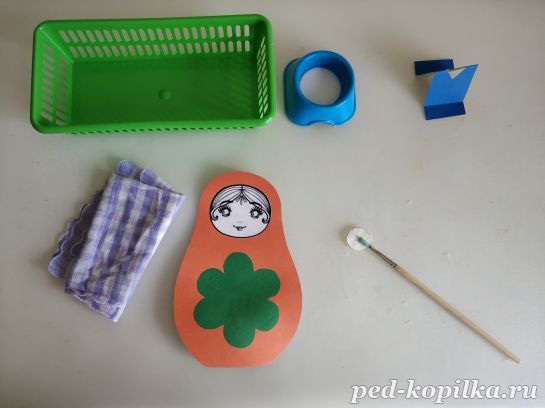
Stick to the middle of the flower.
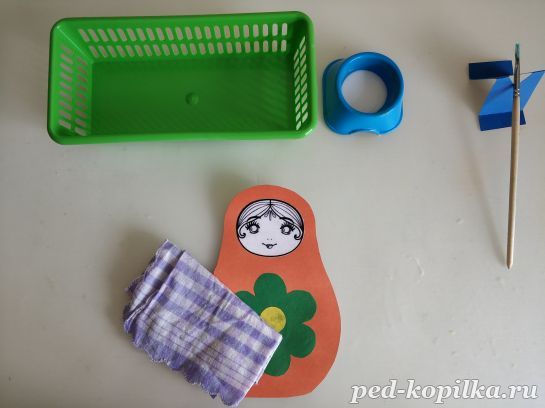
Final result.
We recommend watching:
Joint activities in an early age group. Synopsis of a lesson with children in the first year of life Synopsis of a joint educational activity for children of the 1st junior group “Winter-Winter” Complex thematic lesson in an early age group together with mothers
Similar articles:
Lesson summary for an early age group. Cockerel
Lesson summary for an early age group. Dandelion
Summary of a game developmental lesson in an early age group on the topic: Rays of the sun
Game development activity in kindergarten for children of the third year of life
Lesson summary for the first early age group on the topic: Toys
Materials and equipment needed for the lesson
To achieve a more productive result, for drawing flags on a string in the 2nd junior group, everything necessary for the lesson must be prepared in advance. Children must clearly imagine the end result. To do this, it is important to conduct a preliminary discussion and inspection of the finished garland. The children should also have the materials they need for drawing waiting on their tables.
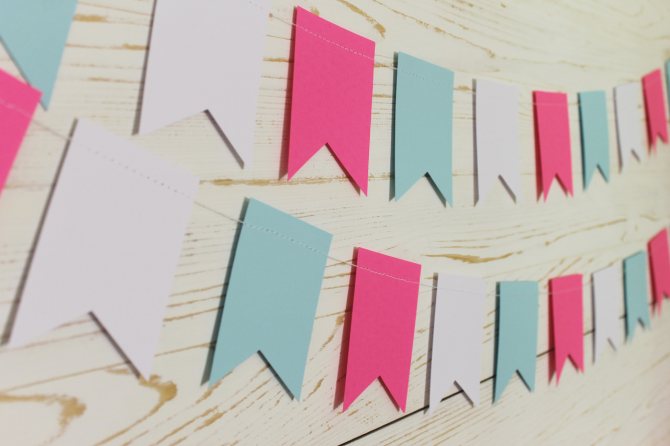
Demo
- Ready garland.
Dispensing
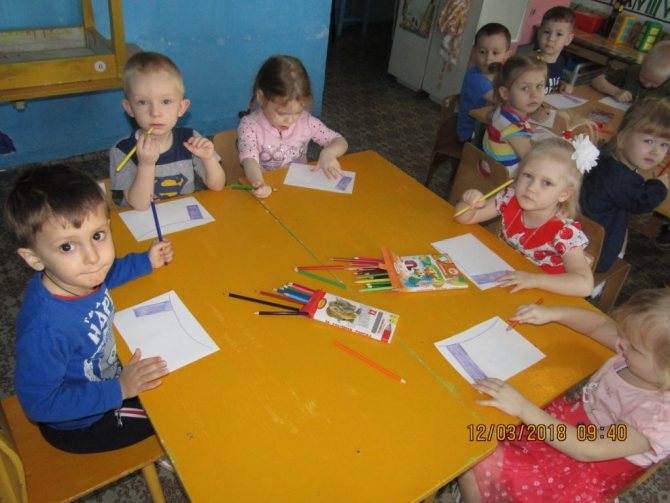
- Rectangles of white paper measuring 20x35 cm;
- Colour pencils.
Preliminary work with children, discussion of the topic
The teacher shows the children the finished garland and asks them to pay attention to its brightness and festiveness. He suggests that the garland is so beautiful because the flags in it are multi-colored. After this, he asks to name the colors: red, blue, yellow. To consolidate the colors, an active game is played, replacing physical education for a minute.
Important! Being able to move around and release pent-up energy will help you achieve greater focus and concentration while drawing.
Warm-up
Educator: “Guys, let’s check how you remember the colors.
(Children stand in a circle).
Let's come to an agreement with you. Each color will indicate a specific action. Red color is clapping your hands, blue color is jumping up, and yellow color is stamping your feet.”
(The teacher shows cards of each color several times, and the children perform the movements).
Image for application on paper
Teacher: “Look at the flag,
This is not a circle at all
Not a square, not a triangle,
This flag is a RECTANGLE.
Guys, today we will not draw an ordinary drawing. Today we will be magicians and turn white sheets of paper into a festive garland of flags. Tell me, what shape will the flags be? What colors will we use? So, one-two-three-four-five – let’s start drawing.”
Drawing lessons on the topic “Tank” for older preschoolers in preschool educational institutions
Practical part of the lesson, drawing beautiful holiday flags
Children in the younger group better perceive information accompanied by actions accompanying the process.
It is important to first show the children how they should complete the task.
The teacher must paint over the sample flag, explaining and showing how to hold the pencil correctly and how to apply strokes.
GCD move (drawing with pencils)
After a general explanation, you need to observe how correctly the guys complete the assigned task. Children who cannot cope with work require individual tips.
Individual assistance
Must remember! Children's inability is not a reason for comments and criticism.
Musical accompaniment
As they finish their work, the children give the flags they painted to the teacher. Using a thick needle with a thick thread or corsage elastic threaded through it, the teacher collects a festive banner. At this time, to create a festive mood, it is permissible to include a children's song with words known to children that they can sing along to.
Drawing process step by step
You need to start drawing by creating an outline. This must be done so that the edges do not remain unpainted, otherwise the work will have an unkempt and unfinished look. Having drawn a frame, you should fill the space with strokes from left to right, moving from top to bottom.
Regardless of the results obtained, every little artist deserves praise and approval.
Holiday stretch
Abstract of GCD for application in the first junior group: Pyramid
Summary of direct educational activities on application in the first junior group “Pyramid”.
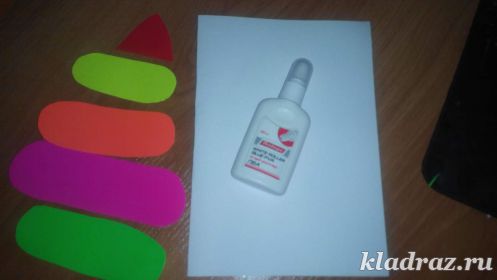
Author: Ionova Natalya Viktorovna, teacher of MBDOU Kindergarten No. 118, Orenburg Integration of educational areas: • Artistic creativity • Communication • Socialization Goal : Enriching the sensory experience of children when comparing objects by size. Reinforce the concept of “many” “one” Improve fine motor skills of the hands. Objectives: - Learn to group objects by color. Develop coordination of hand movements, develop visual and auditory perception. -develop the ability to correctly place and glue work parts; - learn to form a pyramid correctly - from the largest part to the smallest; teach accuracy, encourage the desire to do your work as beautifully as possible. - develop mental operations: comparison, generalization, ability to analyze; - develop coherent speech, the ability to reason, draw conclusions; - encourage independent formulation of conclusions. — improve children’s gaming skills, develop interest in games; - formation of cooperation skills, goodwill, and the ability to work in a group; — teach emotionally, to perceive the environment in the process of children communicating with each other. Equipment: 1\2 album sheet;
oval shapes of different colors and sizes cut out of colored paper and a small triangle for the top of the pyramid; PVA glue; Napkins; Oilcloth; Teddy bear toy; Toy Pyramid 1. GCD move:
A surprise moment, there is a knock on the door. Educator: Who came to us? Let's take a look, guys? Oh, yes, he came. (the teacher shows the toy Teddy Bear)
Children: - Bear!
Educator: That's right, Mishka tells me in my ear that he really likes to play with the pyramid. Today he came to us to play with the pyramid. The teacher puts the pyramid on the table and invites Mishutka to play with the pyramid with the children.
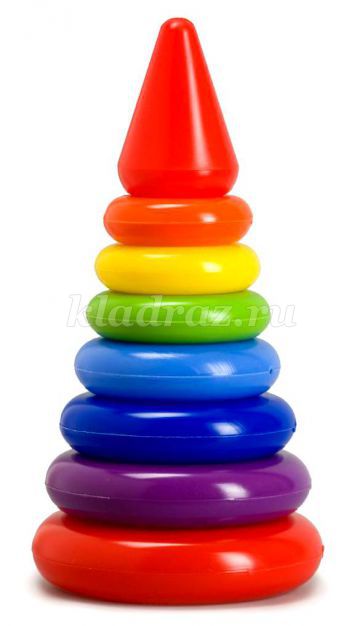
Game exercise “Assemble a pyramid” Educator : Children, look at what a beautiful pyramid we have. Let's look at it together. How many rings does the pyramid have? Children's answers (many). The teacher takes off the rings, and the children name their color and size. Educator: (takes off the first ring) which ring? What colour? etc. Children: this is a small ring, it is green, and so on until the end. If the children find it difficult, the teacher calls it himself. Then the exercise is repeated again; the children themselves begin the task: they put on the rings and name their colors. The children begin the task, and the teacher helps. Educator: Well done guys. We put everything together correctly and even helped Mishutka, let’s applaud our success. 2. Physical exercise. Three bears
Three bears were walking home The children waddled in place Dad was big, big.
Raise your arms above your head, pull up. Mom is shorter with him, hands at chest level. And my son is just a little baby. Sit down. He was very small, crouching and swinging like a bear. He walked around with rattles. Stand up with your hands clenched into fists in front of your chest. Ding-ding, ding-ding. Children imitate playing with rattles. 3. Making an application. Educator: “Today we will make pyramids for our guest Mishka from colored paper. Educator : Sit down at the tables and I will show you how to make a pyramid. Demonstration: Demonstrate the algorithm for performing the application on a magnetic board, then invite the children to repeat everything. 1. Place the prepared forms in the middle of the sheet, arranging the ovals in height from largest to smallest. During the work, the teacher guides the children’s actions, asking questions about the order of gluing, and helps some children correctly position and stick the figures. Finger gymnastics: We played, we played, (circular movements with the hands) Our fingers are tired. (movement of the hand up, down) And now we will rest (imitation of the movement of a wave) And we will begin to play again (circular movements of the hands) Fingers The fingers fell asleep, curled into a fist. One! Two! Three! Four! Five! Wanted to play! On the count of 1,2,3,4,5, open your fingers one by one from the fist. When they wanted to play with the words, their fingers moved freely.
4. Reflection. What did we do today? (children's answers) Well done guys! These are the beautiful pyramids we got. Do you guys like them? What kind of pyramid did you make, Kolya? What about you, Maya? You guys are so good at me, you made so many pyramids! Look how happy our bear is and dances! Let him now play with our pyramids! Finished works are laid out on the stand. Children, together with the teacher, admire the finished works.

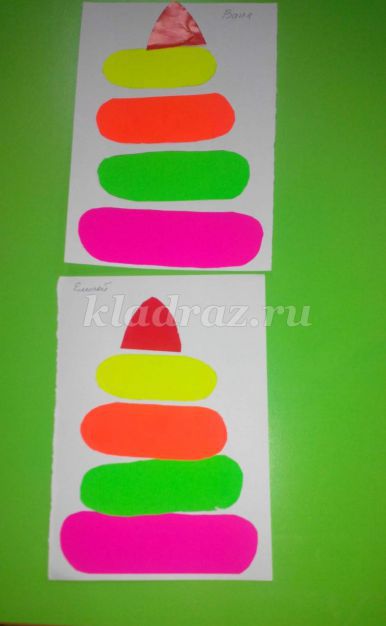
Application
Practical part of the lesson
We take 1/2 album sheet, PVA glue and ready-made cut out oval shapes of different sizes and a small triangle for the top of the pyramid 1)
Next, we arrange the shapes in order (from the largest oval to the smallest) First, glue the largest oval in the middle of the sheet at the bottom. Then glue the second oval. And so on in order (from largest to smallest). Next, when all the ovals have been glued in order, glue a triangle on top - This is the top of the pyramid and our pyramid is ready!
We recommend watching:
Summary of a game (integrated) lesson on environmental education for the 2nd junior group. A summary of the GCD in the junior group on traffic rules. A synopsis of the GCD on social and communicative development for the 2nd junior group. A synopsis of the GCD for physical education in the second junior group.
Similar articles:
Lesson summary for an early age group. Vegetables: turnips and carrots
Lesson summary for an early age group. Vegetables: beets and potatoes
Lesson summary for an early age group. Fruits: lemon and orange
Lesson summary for an early age group. Cat with kittens
Summary of a lesson in an early age group on a winter theme. Hare and fox
Questions for children
The teacher must show the final result of joint work. Draw the children’s attention to the fact that they made such a bright decoration with their own hands. Call everyone wizards, because they turned white paper into multi-colored flags. And the resulting garland transformed the group and created the mood. You can find out whether the mood changed when the duckweed was hung on the wall. Offer to save the garland and take it out on other holidays. Ask what dates this decoration would be suitable for. You can agree that on students’ birthdays it will become a tradition to hang a garland in the group.
The ability to transform the surrounding space is an important and useful quality. The ideas about preparing and holding holidays laid down in early childhood are a good hint for future adult life and the creation of family traditions.
