Modeling lesson in the preparatory school group “Modeling decorative dishes”
Sections: Working with preschoolers
Subject:
Modeling of decorative dishes.
Program content:
- Continue to learn how to depict decorative dishes, conveying the features of shape and painting.
- Take a creative approach to doing the work and choose your own sculpting method.
- Decorate the finished product with an in-depth relief using stacks or moldings.
- Strengthen your neat sculpting skills.
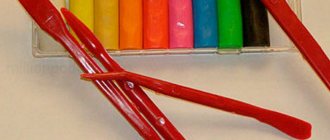
Material and equipment:
- Rotary machines, stacks, wet sponges, stands, clay for each child.
- Illustrative material depicting decorative tableware, samples of decorative tableware for various purposes, a tape recording of calm music.
Preliminary work:
- Modeling dishes in different ways in classes and in independent activities, examining decorative dishes to analyze their shapes and decorations, talking about types of dishes in speech development classes.
PROGRESS OF THE CLASS
Children enter the art studio, say hello and go to the teacher.
Educator: Hello guys. Today we will continue our acquaintance with decorative tableware. Stand comfortably, close your eyes and imagine that we have been transported to the ancient world. Introduced? Now listen to my story. People have been making pottery since ancient times. At first they stored various products in it: vegetables, fruits, grains. But one day one pot became strong, light, sonorous, but most importantly, it did not get wet from water. This is how pottery entered the life of the first people. Gradually, when sculpting dishes, people began to change the shape of the products, making jugs with long narrow necks for water and wide massive vessels with strong handles for other products. Soon they began to select the most successful and beautiful products, and then they themselves began to decorate the dishes in different ways. For example, an ancient Greek vase is decorated with clay of different colors. Also, in what ways can you decorate dishes?
(Children's answers: with moldings, in-depth relief, painting)
That is, over time, dishes became a real decoration of the table, and then of a person’s home. Fancy, elegant vases and jugs of various shapes and sizes appeared, i.e. decorative dishes appeared. What does the word “decorative” mean?
(Children's answers)
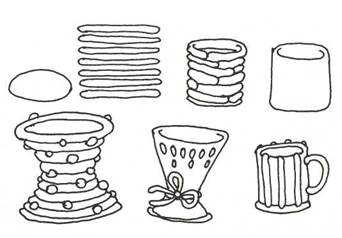
Let's take a closer look at some of the products. Here in front of you are different types of dishes: vases, jugs, candy dishes, bowls. Do you like them? What exactly?
(Children's answers)
Guys, how do you think this vase was sculpted? And this sugar bowl? etc.
(I listen to the children’s answers, complement, add, repeat the sculpting methods again: pressing, picking, tape method.)
So, today we will also create decorative dishes, we will sculpt a wide variety of dishes using known methods. And of course we will decorate it either with molds or draw a pattern in a stack.
Sit down at the tables as you wish, sit nicely, keep your back straight. Think about what kind of dishes you would like to fashion, and what method you need to use for this.
(Children’s answers, advice, hint from the teacher)
Think carefully about how many parts you will divide the piece of clay into. We will dry the most successful works and take them away to decorate the group. Let's get to work, knead the clay well, divide it into parts.
(Children’s independent work, help, hint, reminder that before applying or drawing, it is necessary to carefully smooth the surface.)
After work, the teacher invites the children to wash their hands and examine the products made by the children, mark the most successful ones, and select them for the group.
– Now let’s close our eyes for a minute and try to remember the most interesting moments of the lesson, what did you like most?
(Children's answers)
14.03.2007
Share this page:
xn--i1abbnckbmcl9fb.xn--p1ai
MOLDING modular from rings “Beautiful tableware for a cafe”
Tasks. Teach children to sculpt beautiful and at the same time functional (useful) objects for playing in a cafe. Introduce a new method of sculpting: from rings (modular technique). Show the possibility of modeling the shape of a product (expansion or contraction in certain places) by changing the length of the modules (“sausages”). Cultivate aesthetic taste.
Preliminary work. Examination of various items of utensils during a lesson on understanding the world around us.
Materials, tools, equipment. Clay or plasticine, stacks, rotary disks or oilcloth, paper and cloth napkins, beautiful beads, buttons, beads, seeds, ropes and narrow braid for decorating dishes.
Contents of the lesson. The teacher has a short conversation with the children about what a cafe is. Wondering which of the children attended
164
cafe and for what reason, what they did and what they saw in the cafe, what kind of dishes, food, napkins, etc. were there.
The teacher invites the children to make beautiful dishes from clay (plasticine) - such that they can put toy food in it. Clarifies children's understanding of the types of dishes, orients them towards creating dishes in the folk style (pots, jars, bowls). Shows pictures or real tableware items.
Next, the teacher explains a new way of sculpting hollow vessels - from rings (modular technique).
Modeling from rings is an original method of modeling, which has been used by folk potters since ancient times. As a rule, this technique is used for sculpting dishes. First, prepare the base for the vessel: make a flat cake or roll out clay (plasticine) and cut out a circle, as if from dough (put a glass or jar on top and press it tightly, turning slightly). Then roll out the roller to such a length that it can be laid along the edges of the base. Leave the first roller as a control so that the length of the rest can be checked against it. If the intended vessel is straight, all the rollers should be the same. If the vessel expands or, conversely, narrows upward, the ridges lengthen or shorten accordingly. Modeling consists of sequentially rolling the rollers into a ring and placing roller on roller (ring on ring) - higher and higher. In this case, you need to ensure that the joints (where the roller closes into a ring) do not line up in one line. More and more new rings are pressed tightly against each other. When the intended VESSEL is created (during the sculpting process the shape may change and differ from the intended one), its outer surface is smoothed with fingers or a napkin. If the vessel is made of clay, use a metal spoon for smoothing.
165
From the rings you can fashion not only dishes for food, but also many other useful and beautiful items: a vase, a jug, a bowl, a plant pot for a real flower pot.
Fashioned dishes can be decorated with flat or relief patterns (floral, zoomorphic, geometric or mixed). An unusual pattern can be laid out from ropes and beads (seed beads), pumpkin seeds, peas, etc. If the dishes are made of clay, it is better to lay out the ornament on a damp surface. Modeled clay products can be painted with gouache paints, but before doing this you need to dry them for several days.
After class. Completion of the design of stucco products. Using fashioned dishes for playing in a cafe: children “create” a display case (counter), on which they display the dishes and label what kind of food is in it, for example: a SOUP card is placed next to the bowl, a TEA card is placed next to the cup, a JUICE card is placed next to the glass, and etc.
DEVELOPMENT OF SPEECH AND BEGINNING OF LITERACY “Wonderful turnip”
Tasks. Teach children to compose a narrative text based on the beginning suggested by the teacher, analyze the text, and reason. Learn different ways to form the names of utensils. Cultivate an interest in writing. Develop children's diction and articulatory apparatus. Strengthen the ability to conduct syllabic analysis of a word and identify a stressed syllable.
Materials, tools, equipment. Cards with the words GRANDFATHER, GRANDMOTHER, ELEPHANT, HARE, TURTLE, cabbage soup, LOVES, JUICE, SOUP, TEA, • (dot).
Contents of the lesson. The teacher retells in his own words an excerpt from B. N. Sergunenkov’s fairy tale “The Wonderful Turnip.”
An example paraphrase:
Grandfather planted turnips
-
feed the chicken.
The turnip grew very small -
smaller than a grain.
Grandfather fed the chicken. Grandfather planted a turnip to feed the cow. The turnip grew as big as a haystack. Grandfather fed the cow.
My grandfather planted turnips for himself and his grandmother. The turnip grew, not small, not big - an ordinary turnip.
M.:
1 Reader for preschool children / Comp. Borisovskaya E. N. Slavic House of Books, 2003. P. 474-475.
166
The woman prepared baked turnips: she peeled them, doused them with water, put them in a cast iron pot, put them on the fire, and baked them.
Grandfather and woman sat down at the table, and their grandchildren sat with them. They started eating turnips. Ate, ate
—
they couldn’t eat it.
The teacher asks the children questions to clarify their understanding of the text:
- What is this fairy tale about?
-Who did grandfather feed with turnips?
- What kind of turnip was born for a chicken? For a cow? For grandfather? The teacher tells the children that the fairy tale is called “Wonderful
turnip". What's so wonderful about it? What miracles could happen to turnips? Listens to children. He asks how the fairy tale can be titled differently, why?
Next, the teacher invites the children to break into teams of 3 and tell a story: one starts, the other continues, and the third finishes. Each team must have its own ending. Listens to fairy tales performed by three teams.
Next, children are asked to determine whether the proverb is suitable for this fairy tale: “You can’t grow a turnip without care”1. Why? The teacher listens to the children's reasoning and asks everyone.
Then the teacher turns to the children: “Baba cooked turnips in a cast iron pot. A cast iron pot is a type of cookware. What other dishes do you know? Listens to children's statements. He asks what the name of the coffee utensils is? For crackers? What do you put the fruit in? Cookie?
Asks the children to listen to the word “cherries.” Asks how many syllables are in this word? Which syllable is stressed? He suggests checking the number of syllables by clapping.
How many syllables are there in the word “plum”? Which syllable is stressed? Next, the teacher puts the words on the typesetting canvas: GRANDFATHER, GRANDMOTHER, ELEPHANT, cabbage soup, LOVES, HARE, TURTLE. Asks children to “read” them. Shows new words: JUICE, SOUP, TEA. “Reads” words together with the children. Then he turns to the children: “Look at the sentence I made (GRANDFATHER LOVES TEA). Who can read this sentence? Children “read” individually and in chorus.
The teacher invites the children to make sentences from the words that are on the table, calls 2-3 volunteers. In conclusion, the children learn the tongue twister:
Valerik ate a dumpling, and Valyushka ate a cheesecake2.
Russian proverbs and sayings / Ed. Anikina V.P. - M.: Fiction, 1988. P. 17.
folk tongue twisters / Comp. G. Naumenko. —
167
The teacher clarifies what “cheesecake” and “dumpling” are. The tongue twister is read at a moderate pace with varying voice strength, standing, helping oneself with the fingers (clenching and unclenching the fists in time with the tongue twister).
After class. The teacher invites the children to make a menu for a toy cafe by writing familiar names of dishes on a folded sheet of paper. And also decorate a display case in a toy cafe, arrange the dishes they have put together and sign the name of the dish using the words SOUP, TEA, JUICE, cabbage soup.
CONSTRUCTION
"We decorate the table"
Tasks. Using new material for construction (whole vegetables and fruits), strengthen in children the ability to analyze shape as the basis of a possible craft, create an image in different ways (adding construction, removing excess, changing spatial position), achieve expressiveness and originality; demonstrate elements of festive table decoration.
Preliminary work. The teacher prepares 2-3 crafts in advance to examine and discuss options for transforming them to create new images.
Materials, tools and equipment. Boiled whole vegetables (potatoes, carrots) in various configurations and sizes, as well as some types of fruits (bananas, grapes, pears, etc.). For decorating crafts: dried berries or seeds, thin sprigs of parsley, dill. Equipment for work: for each child - an apron, a stand, a plastic disposable knife, toothpicks for attaching parts.
Contents of the lesson. The teacher asks the children whether they liked being “cooks” and making “delicious pictures” from vegetables and fruits. He offers to continue working and come up with new crafts, only now not from parts, but from whole vegetables and fruits. He wonders why such unusual crafts might be needed (to decorate the table for a holiday, to surprise and delight guests).
Asks children how to prepare for work (wash hands, put on clean aprons, prepare work area). Gives 2-3 minutes for each child to complete this. It is better to seat children around several tables, placing plates with a variety of vegetables and fruits in the middle of each table.
168
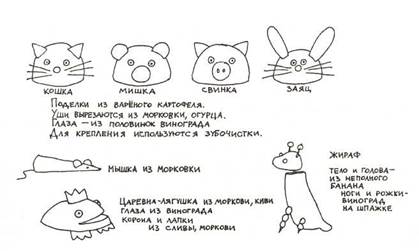
Next, the teacher shows the children his crafts (see picture), discusses with the children what material they are made of, how their elements are connected, and how the crafts are decorated. It is important to figure out with your children how to get a similar, but different craft. For example, turn a piglet into a bear, hare or cat.
Then the prepared material is examined. Using the example of several clumsy and unusually shaped potatoes and carrots, we discuss what they can be turned into, what details to add, and how to fasten them together. The teacher can also ask the children problematic questions, for example: “What if there are no suitable shapes for the cat’s ears? What can they be made from? What tool should I use? It is important to discuss the possibility of using different methods: adding missing parts, removing unnecessary ones, and changing the spatial position. Such a discussion will help “awaken” children’s imagination.
After this, children choose their own materials and create different figures.
At the end of the lesson, all crafts are “signed”: children put up signs with their names and the name of the work: CAT, BEAR, PIG, HARE, GIRAFFE, etc. The crafts are reviewed, it is discussed who liked which craft and why.
FICTION
"Poems by Daniil Kharms"
Tasks. Introduce children to the poems of Daniil Kharms. Involve children in a creative dramatization game that reflects the playful nature of D. Kharms’ poetry. Develop imagination, ability to reproduce
169
create unexpected situations, think about different possibilities for their interpretation. Create conditions for children's verbal creativity.
Contents of the lesson. The teacher comfortably places the children around him and invites them to listen to the poems of the poet Daniil Kharms. He tells the children that Daniil Kharms was a very cheerful person who loved to write funny poems, jokes, and stories where everything was unexpected. He was an inexhaustible dreamer and inventor. His works were published in children's magazines with funny titles “Chizh” and “Hedgehog”. And although not all adults liked his poems, children read them with great pleasure. “Listen, too,” says the teacher and reads the poem “Ivan Ivanovich Samovar” to the children.
After a short pause, he asks the children if they liked the poem. He proposes to come up with new characters who could come to the samovar in the morning and act out this episode.
Next, the teacher reads the poem “Pie” to the children. At the same time, the teacher does not pronounce the last word of every second line, asking the children to guess the word at the end of the phrase themselves.
The teacher discusses with the children whether it was difficult to select the right words, whether it is possible to say “invited” instead of the word “called”; why can't this be done? Together with the children, he concludes that in poems the last words (at the end of the lines) should sound similar and coherent.
Then the teacher invites the children to listen to another poem by D. Kharms, called “Away.”
The teacher asks why “there is literally nothing”? Listens to the children's reasoning (for example, “The big man crushed everything in the small mouse house,” etc.). Then he asks: “What would happen if a little, little mouse came to visit a big, big house?” Children's assumptions and fantasies are listened to.
Next, the teacher reads the poem “The Amazing Cat.”
The main character of the poem (the cat) and the object with which she “treated” her paw are identified. The teacher denotes them on the board with words (BALL, CAT), placing them inside pictures-symbols indicating a cat and a ball (see figure).
-Why were people so surprised? (Because the cat flies on a ball.)
- Could it be the other way around? (Changes the position of the signs: CAT, and under it the word BALL - see figure b.)
How would the situation change then? (Children fantasize about what could happen if the cat were to ride the ball.)
170
a B C D
The teacher changes the position of the tablets (see drawings) -
This results in a “cat in a ball” and “ball in a cat” situation. Children figure out how the cat could get into the ball, then how the ball could get into the cat, and what could come out of it. The teacher encourages children to create complete stories rather than individual statements. Children can help each other compose.
■
OCTOBER. WEEK 7 Work planning
Direction of pedagogical work. This week, children will get acquainted with some folk crafts from different regions of Russia, find these places on the map, and learn about the traditions of folk fairs. The teacher will talk about how flax is grown and processed in our country, and will teach the children the folk game “Grow, my little fennel.” Children will be able to plunge into the world of arts and crafts, creating patterns on paper towels using scissors, as well as molding and painting an elegant turkey based on the Dymkovo toy. If the area where the children live has its own fishing traditions, it’s time to talk about it in detail, and perhaps visit workshops or museum exhibitions.
In classes on speech development and fiction, children will become acquainted with various genres of amusing and playful folklore. They will compose their own fairy tales, participate in games with words, which will help awaken interest in folk verbal culture.
In nature education, children learn about what it takes to grow good crops; they will talk about soil as a component of nature, its properties and significance in the life of humans, animals and plants; carry out simple experiments.
Children will learn to measure using a conventional measure: they will determine the volume of bulk solids and measure the length of a tape.
| Day of the week | Time periods of the day | Contents of educational work |
| 1 day | Morning | Child-initiated games |
| Classes | 1. Knowledge of the surrounding world. “Goods for the fair. Linen" 2. Application. “Patterned towels” 3. Physical education No. 7.1. Learning the technique of walking with side steps forward. Strengthening the ability to jump with a 180° turn. Developing endurance (running at a slow pace for up to 2 minutes) | |
| Walk | Observations in nature Outdoor game “Catch up with your mate”, folk game “Grow up, my little fennel” Games initiated by children | |
| After lunch | Reading part 1 of S. Aksakov’s fairy tale “The Scarlet Flower” | |
| Evening | Child-initiated games | |
| Day 2 | Morning | Child-initiated games |
| Day of the week | Time periods of the day | Contents of educational work |
| Classes | 1. Development of speech and beginnings of literacy. “Knocked it down, knocked it together, here’s the wheel” 2. Decorative modeling. “Dressy Turkey” 3. Music No. 7.1. Singing: chant - Russian. adv. song "Blacksmith", Russian. adv. songs “Oh, tari, tari, tari”, “Where was Ivanushka?”, “In the forge”; Playing children's musical instruments: Russian. adv. song "Kalinka" Musical movement: the game “Whose circle will gather sooner” (Russian folk song “Oh, you, birch”) | |
| Walk | Observations in nature Outdoor game “Who takes the fewest steps”, folk game “Grow up, my little tree” Games initiated by children | |
| After lunch | Reading the 2nd part of S. Aksakov’s fairy tale “The Scarlet Flower” | |
| Evening | Child-initiated games | |
| Day 3 | Morning | Different types of children's games |
| Classes | 1. Mathematics No. 7 2. Fiction. “Jokes and jokes” 3. Paper construction. "Twist the cone" | |
| Walk | Observations in nature Games initiated by children Dynamic walk. Restoring the ability to crawl under obstacles of varying heights. Consolidating the ability to throw and catch a ball several times in a row. Strength development through outdoor games (“Strong Throw”, “Cock Fight”, etc.) | |
| After lunch | Reading the 3rd part of S. Aksakov’s fairy tale “The Scarlet Flower” | |
| Evening | Child-initiated games | |
| 4 day | Morning | Child-initiated games |
| Classes | 1. Development of speech and beginnings of literacy. “Time for business, time for fun.” 2. Decorative drawing. “Dressy Turkey” 3. Music No. 7.2. Musical game-dramatization: work on the sketch “Trough and Animals” | |
| Walk | Observations in nature Outdoor games “Don’t stay on the ground”, “Dash-dash” Games initiated by children | |
| After lunch | Reading according to the choice of the teacher or the desire of the children | |
| Evening | Child-initiated games Tips for parents to introduce children to arts and crafts |
172
173
| Day of the week | Time periods of the day | Contents of educational work |
| 5 day | Morning | Child-initiated games |
| Classes | 1. Nature. “How to preserve the soil” 2. Free activity 3. Physical education No. 7.2. Learning the technique of repeatedly throwing the ball up and catching it with both hands (10-15 times in a row). Consolidating the ability to walk with side steps forward. Development of flexibility (special flexibility exercises with a partner: bending, stretching, turning, etc.) | |
| Walk | Observations in nature Outdoor game “Catch up with your mate” Games initiated by children | |
| After lunch | Reading according to the choice of the teacher or the desire of the children | |
| Evening | Games initiated by children Working with parents: collecting metal objects to create a “collection” |
Observations in nature. (The teacher himself distributes the material by day.)
Observations on walks.
The teacher continues to conduct seasonal observations in nature with the children. Depending on the natural characteristics of the region, they can be different, for example, you can offer children:
- find trees and shrubs on the site (in the nearest park, square) that still have leaves on them;
- find plants whose leaves are still green;
- find herbs that have not yet turned yellow;
- find out if there are still plants with flowers on the site;
— find out whether new birds are flying to the site;
- watch the snow (look at the snowflakes, compare them, watch how they melt); during the day, find out whether the snow that fell in the morning has melted, in which places it lies the longest (in the shaded areas), and in which it melts quickly;
- observe how puddles begin to freeze, try to destroy the ice with a stick, find out if there is water under it, listen to how it cracks, find out how long during the day the ice remains in the puddle;
- pay attention to sunlight, the height of the sun and the length of the day.
The teacher and children explore the soil on the territory of the kindergarten (in the square, in the park). In regions where there is no snow yet, the teacher draws the children’s attention to areas where the soil is clearly visible (flower beds, alpine hills, lawns, areas under trees, shrubs, 174
vegetable gardens, etc.). The teacher invites the children to find out what the features of the land on the territory of the kindergarten are. What color is it? (Brown, black, gray...) In which places is the soil wet and in which places is it dry? When is the soil wet and when is it dry? In damp weather, children inhale the smell of the earth and find out what it smells like. The teacher gives the task to find areas on the territory of the kindergarten where the soil is soft, loose (vegetable garden, flower bed) and hard (paths, sports grounds). What do children think: Do underground animals live on the territory of the kindergarten? (In the northern regions, where it is already difficult to spot animals at this time of year, children remember who they saw in the warm season in the garden, in a flowerbed, and in other places.) Together with the teacher, preschoolers collect soil into bags. It will be needed for group research. The soil must be taken from two areas: from an area where the soil is loose (for example, from a flower bed), and from an area where the soil is dense (for example, from a path).
Observations in a corner of nature.
Children grow plants (for example, onions) in a transparent container in a corner of nature to observe the growth of roots. They remember why plants need roots. (Keep plants in the ground, help them feed.)
While caring for plants, the teacher draws the children’s attention to the soil in the pots: what color is it, are there any lumps in it, what does it consist of? He wonders why the soil is loosened. Children take lumps of earth and look at them through a magnifying glass to find out what the earth is made of. Is the same soil poured into pots for different plants? (No, some plants need soil with sand, others without sand, etc.) The teacher says that different plants need different soil. Children are asked to think about what will happen to a houseplant if it is planted in a pot without soil. Children put some soil in a bag and take it to a group for observation.
While working with the weather calendar, the teacher draws the children's attention to the fact that it rains more and more often, and the sun appears less and less often. It's getting colder, the first frosts are coming, the first snow is falling.
Children put lumps of earth brought from the territory of the kindergarten and from a corner of nature into different jars of water. Periodically monitor what is happening to the soil.
Observations at home.
The teacher asks the children to find out if they have soil at home (in pots with indoor plants) and tell the kindergarten about it. Children can, if they wish, bring to the group photographs of vegetable gardens, flower beds, alpine slides, taken in their summer cottages or in the courtyards of houses. The teacher, together with the children, looks at these photographs and discusses why soil is needed in such places, asks the children how they, together with adults, care for the plants.
175
Pedagogical support for children's story-based games. The “fair” content of this week can become emotionally significant for children and will be continued in amateur games. Elements of folk costumes and the surroundings of folk life can be attractive. Having received them for free use, children themselves will figure out how to use them. For example, peddlers advertise their goods: “Swoop in..., don’t yawn..., buy...”. Toys depicting animals can be associated with circus performances in squares. Children can “cook treats” for the holiday, etc.
Children who love to draw, sculpt, design, and make toys need to create conditions for the realization of their plans: provide them with natural materials, fabrics, foam rubber, cardboard, paper, felt-tip pens, and colored plasticine.
Folk game “Grow up, my little tree” (Ryazan region)
The players stand in a circle. One of the girls plays the hostess, she stands in the center of the circle and says: “I’ve already sown flax, isn’t it time to start a round dance?!” The remaining participants walk in a circle, first in one direction, then in the other, and sing a song:
Grow, my little tree, thin and racing. Oh, lali, lali, And thin, and racing. And as white as feather grass, and as strong as sinew. Oh, they loved, they loved, And as strong as life. The flax began to keep up, and I hurried. Oh, lali, lali, And I’ll hurry up. She began to call - Who is the white flax brother with? Oh, lali, lali, With whom do you share white flax? Vanka came to me, took the flax to the spinning wheel, oh, lali, lali, took the flax to the spinning wheel.
With the words: “Vanka came to me,” the boy whose name was mentioned in the song comes out of the circle. Together with the hostess, he begins to depict how he helps her work with flax.
‘ Naumenko G. M.
"Russian folk children's games with tunes." - M.: Liberea, 2003.
KNOWING THE WORLD AROUND
“Goods for the fair. Linen"
Tasks. To form in children some ideas about the history of fairs in Russia. To introduce children to folk crafts, to show what different areas of our country are famous for. Talk about traditional linen products and the labor-intensive process of their production.
Materials, tools, equipment. Crafts products (for example, clay Dymkovo and Filimonov toys, glass figurines from the city of Gus-Khrustalny, wooden dishes from Khokhloma and wooden Bogorodsk toys, Vologda linen products, etc.). Map of Russia. Pictures of cotton and flax growing (or the plants themselves).
Contents of the lesson. The teacher tells the children about the tradition of folk fairs.
Describes the differences between the structure of markets and fairs (compared to shops, galleries, supermarkets and boutiques). Discusses with children how fair trade works.
Tells about what goods Russian cities are famous for; what and where they bring to the fair from. Finds and shows cities - centers of folk crafts - on the map of Russia.
Discusses with children what materials various folk crafts are made from; what is made of clay, glass, wood.
Examines linen products (napkins, lace) with children. Reminds us of what fabrics are made of (threads). Asks if the children remember what threads can be made from (animal wool, cotton); how last year they themselves tried to make a thread from a piece of cotton wool. (If there are many new children in the group, the teacher can show them how to twist a thread from a ball of cotton wool, and give the children the opportunity to do this themselves after class.)
The teacher tells the children that cotton does not grow in our country: it grows only in hot countries. But even in the north we have a wonderful plant - flax, from which various fabrics are made. The teacher shows a picture of flax (or a real plant) and tells the children that different clothes are sewn from linen fabrics: dresses, shirts, trousers and suits; make towels and tablecloths.
The teacher asks the children if they know how to make fabric from flax and invites them to listen to K. Ushinsky’s story “How a shirt grew in a field.”
176
12 Order 1583
177
Tanya saw her father scattering small shiny grains across the field in handfuls, and asked:
— What are you doing, daddy?
— But I’m sowing flax, daughter: a shirt will grow for you and Vasyutka. Tanya thought: she had never seen shirts in a field
grew up.
About two weeks later the strip was covered with green silky grass, and Tanya thought: “It would be nice if I had a shirt like that!”
Once or twice Tanya’s mother and sisters came to weed the strip and each time they said to the girl:
— You will have a nice shirt!
Several more weeks passed; the grass on the strip rose and blue flowers appeared on it.
“Brother Vasya has such eyes,
-
Tanya thought,
“
but I’ve never seen shirts like this on anyone.”
When the flowers fell, green heads appeared in their place. When the heads turned brown and dried out, Tanya’s mother and sisters pulled out all the flax by the roots, tied sheaves and put them in the field to dry.
II
When the flax dried out, they began to cut off its heads; and then they sank the headless bunches in the water and piled more stones on top so that they wouldn’t float up.
Tanya watched sadly as her shirt was drowned; and the sisters then told her again:
- You will have a nice shirt!
About two weeks later, they took the flax out of the river, dried it and began to beat it first with a board on the threshing floor, then with a whip in the yard, so that the poor flax flew in all directions.
Having frayed, they began to comb the flax with an iron comb until it became soft and silky.
— You will have a nice shirt! - her sisters said to Tanya again. But Tanya thought: “Where is the shirt? It looks like Vasya’s hair, not a shirt.”
III
The long winter evenings have arrived. Tanya's sisters put flax on their combs
and they began to spin threads from it.
“These are threads!
-
Tanya thinks.
“Where is the shirt?” Winter, spring and summer have passed, autumn has come. Father installed in the hut
krosna3, pulled the warp and began to weave. The shuttle ran quickly
'Rattled - a jagged board. 2Kostrika is garbage. 3 Krosna is a loom.
between the threads, and then Tanya herself saw how the canvas came out of the threads.
When the canvas was ready, they began to freeze it in the cold and spread it out in the snow; and in the spring they spread it on the grass in the sun and sprinkled it with water. The canvas turned from gray to white, like boiling water1.
Winter has come again. The mother cut shirts from canvas; The sisters began to sew shirts and for Christmas they put new shirts on Tanya and Vasya, white as snow.
The teacher discusses with the children how much work it takes to make threads from flax. He remembers with them that flax is first pulled out of the ground by its roots, soaked in water for several days, and then dried. After this, the stems are beaten and crushed, and then combed with special brushes to separate the soft fibers that are inside the stem from the hard ones that are outside. Only after this they begin to weave and twist threads from soft fibers.
In conclusion, the teacher tells the children that at fairs people not only traded various goods, but also had fun: they watched performances with the participation of buffoons and Parsley, performances by a trained bear, and feasted on delicious things in the “gluttonous” rows. He invites the children to organize a fair themselves: make various crafts and goods, come up with entertainment.
After class. In music classes, children learn roles for the leisure-entertainment “Fair”; During art classes they make crafts in the style of folk crafts.
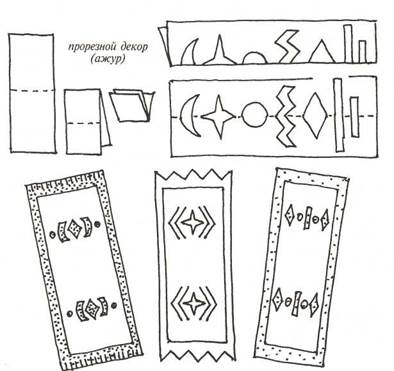
Decorative APPLICATION (cut-out decor) “Patterned towels”
Tasks. Continue to introduce children to a new technique of applique decoration of household products - cut-out decor (“paper folklore”). Learn to create a pattern of slotted elements on a paper rectangle folded in half or twice in half. Develop a sense of composition (build a pattern, alternating elements) and color (select beautifully combined colors for an overlay two-color appliqué).
Preliminary work. Acquaintance with new types of folk arts and crafts (weaving, paper appliqué). Looking at patterns on different towels.
Boil - white foam.
178
12 »
179
Materials, tools, equipment. Scheme “Paper folklore” (decorative elements for cutting out of paper); paper rectangles of different colors (2-3 different sizes) for making patterned “towels”.
Contents of the lesson. The teacher shows the children beautiful linen towels or napkins, handkerchiefs with woven or embroidered patterns; invites you to look at them and admire them.
Tells the children that people learned to make towels a long time ago. There were no factories or factories then; women wove towels at home on homemade wooden looms. They tried to make each towel beautiful and unusual. The festive table was decorated with elegant towels, and bread and salt were served on them. Patterned tablecloths, tabletops, towels, rugs, runners, bedspreads and, of course, elegant clothes (shirts, sundresses, caftans) were known in ancient times.
The teacher reminds the children that in the old days, clothes and household items - tablecloths, towels, rugs - were woven by hand on small looms from different threads: warm wool, durable linen, thinner cotton.
180
The teacher invites the children to “transform” into weavers and weavers and create beautiful patterned towels from colored paper. To do this, you need to take two paper rectangles of different colors and sizes (it is important that you get a beautiful color combination, for example: red and white, crimson and green, yellow and purple). Set one rectangle (the larger one) aside. And the other one is to fold it in half twice along the length and cut out a pattern on the fold line. You need to try to come up with a beautiful and “talking” pattern. Then the small rectangle needs to be glued onto the large one - its color will be visible through the openwork cutouts. The protruding edge of the lower rectangle can be cut with fringe or teeth - if desired - or decorated with a pattern of openwork elements (those that remained after cutting out the pattern): circles, rhombuses, triangles, etc.
The teacher reminds what certain openwork elements mean. Children remember that a circle is the sun, a semicircle is a month, a wave is a road or water, a zigzag (broken line) is lightning, a rhombus is a field (earth), an arc is a bow, a curl is ram’s horns, etc.
Children choose two rectangles of different colors and sizes, decorate them with elegant patterned towels and show them to the teacher.
At the end of the lesson, the teacher invites the children to admire each other’s “towels”.
After class. The works made by the children are then used to decorate the hall for the “Fair” holiday.
Abstract of GCD Artistic creativity (modeling) TOPIC “Decorative plates for decorating a group”
TOPIC “Decorative plates for decorating a group”
Software tasks:
To develop the ability to creatively create an image based on a sense of form, selection and original combination of elements, color, in a unique composition.
Develop a sense of form, composition and the ability to create a pattern on any silhouette.
Create a desire to share joy, successful work with other people, a desire to give gifts to family and friends, using your skills in decorative activities
To develop children’s ability to sculpt decorative plates from a whole piece of plasticine using a plastic method.
Practice rolling a lump of plasticine between your palms, flattening it, and evenly pinching the edges
Introduce children to Khokhloma painting and its history. Fix to see and highlight the characteristic elements of the painting. Introduce the names of the painting elements: berries, flowers, curl, grass. Pay attention to the color scheme. Cultivate interest and love for folk art.
To cultivate respect for the traditions of Russian folk art.
Development in children of the prerequisites for a sense of patriotism, love, respect for the Motherland and people.
To cultivate respect for the traditions of Russian folk art.
Vocabulary work: exhibition, decor, exhibits, wood.
Materials: Khokhloma products, plasticine, stacks, surprise, music center.
Progress of the lesson.
Russian folk melody sounds
V. — Hello, guys, please say hello to our guests.
I suggest you play the game “Give a Compliment”, “Mood”
Today I invite you to the exhibition.
V. — Imagine that there are tickets on my palm. To take your ticket you need to touch my palm and say your name.
Children take turns coming up and saying their names.
V. - Does everyone have tickets? Go to the exhibition. This exhibition was created by the wizards - the artists of Golden Khokhloma.
All the leaves are like leaves,
Here, every one is golden.
Such beauty people
They call it... Khokhloma!
Music turns off
Our exhibition is completely unusual, unlike others - a unique exhibition. At our exhibition, objects can be picked up.
There are Khokhloma dishes on the table and shelves. I give the children objects to look at.
Q. - What do you think the products are made of? (children's answer)
These products are made of wood.
Q. - Why were they called gold? (children's answer)
They were called gold because the products have yellow leaves and a yellow background - similar to gold.
I’m telling you this while demonstrating a Khokhloma plate.
V. — Traditions in the manufacture and painting of products are passed down from generation to generation - to a son from his father, to a father from his grandfather. Bowls, bowls, and vases are first carved from wood and then prepared for painting. Cover with a thin layer of clay, dry the product, spread with oil and dry again in the oven, cover with drying oil, then rub with aluminum powder (silver). When the painting is finished and dried, the artist coats the product with varnish, and the silver under the yellow film becomes very similar to gold. This is how wonderful golden cups, bowls, vases and many other utensils are born.
www.prodlenka.org
Types and methods of modeling in kindergarten
“Types, methods and techniques of modeling in kindergarten”
(Methods and techniques for sculpting animals)
Modeling in kindergarten is a type of visual activity during which children depict objects of the reality around them, create a plastic image from soft materials (clay, plasticine, etc.)
Modeling:
- Develops children's powers of observation and sense of touch
- Develops more complete figurative representations
- Strengthens visual memory and small arm muscles
- Develops imagination and creativity
- Meets the age characteristics of children, satisfying their need for activity
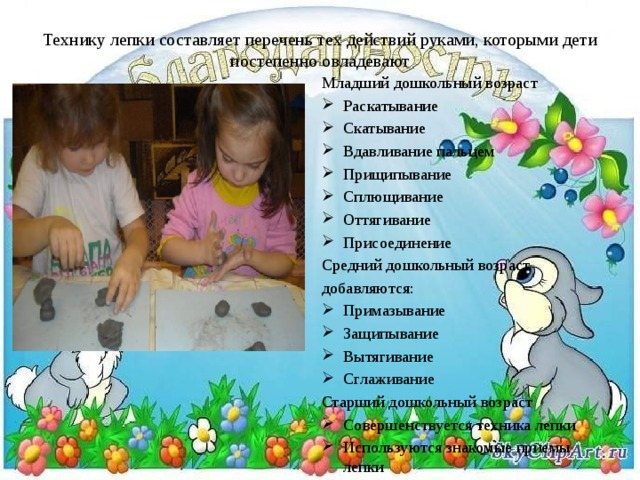
The modeling technique is a list of those manual actions that children gradually master
Junior preschool age
- Rolling out
- Rolling up
- Finger pressing
- Topping
- Flattening
- Pulling back
- Accession
Middle preschool age
added:
- Smearing
- Pinching
- Pull
- Smoothing
Senior preschool age
- Improving sculpting techniques
- Familiar sculpting techniques are used

The subjects of modeling are very diverse. Children sculpt almost all the objects around them. Often, when modeling for children, there is one goal - to create an object with which they can play.
Children love to sculpt animals, but they will do it better if adults help them.
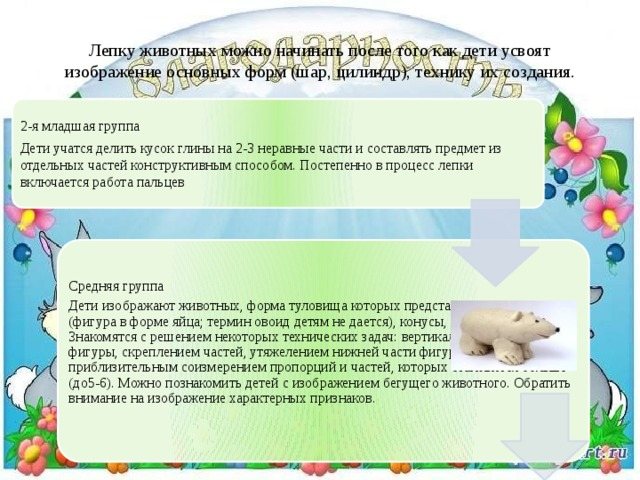
Animal sculpting can begin after children have mastered the image of basic shapes (ball, cylinder) and the technique of creating them.
2nd junior group
Children learn to divide a piece of clay into 2-3 unequal parts and assemble an object from individual parts in a constructive way. Gradually, finger work is included in the sculpting process.
Middle group
Children depict animals whose body shape is an ovoid (an egg-shaped figure; the term ovoid is not given to children), cones, cylinders, balls. They get acquainted with the solution of some technical problems: vertical installation of the figure, fastening parts, weighting the lower part of the figure, approximate measurement of proportions and parts, of which there are more (up to 5-6). You can introduce children to the image of a running animal. Pay attention to the image of characteristic features.
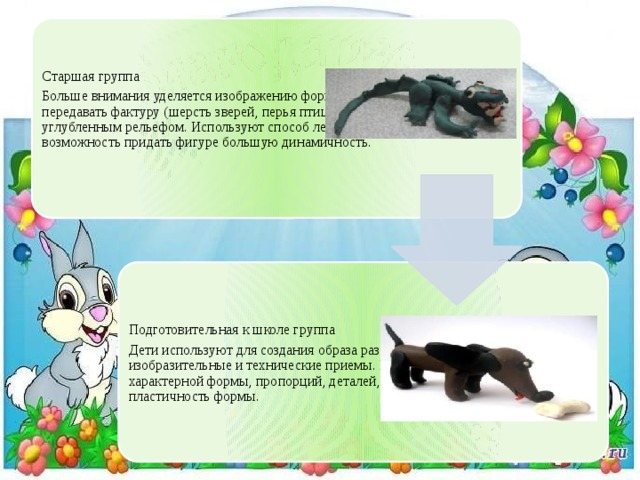
Senior group
More attention is paid to the image of the form and its clarification. Children are taught to convey texture (animal fur, bird feathers) using voluminous (high) or deep relief. They use the method of sculpting from a whole piece, which makes it possible to give the figure greater dynamism.
Preparatory group for school
Children use various means of expression, visual and technical techniques to create an image. They convey an image of a characteristic shape, proportions, details, an image of movement, and plasticity of form.
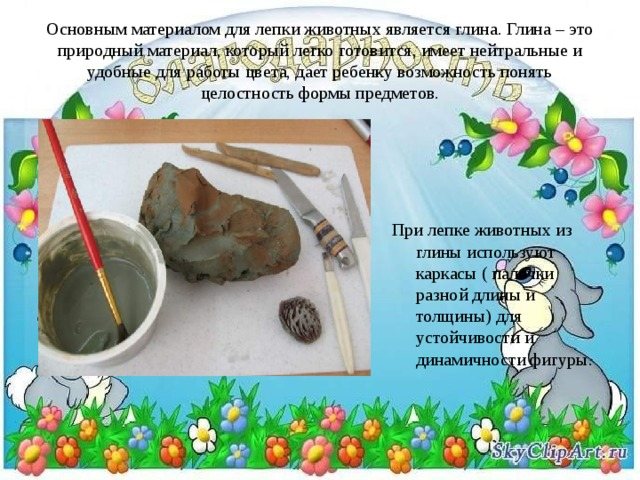
The main material for sculpting animals is clay. Clay is a natural material that is easy to prepare, has neutral and easy-to-work colors, and gives the child the opportunity to understand the integrity of the shape of objects.
When sculpting animals from clay, frames (sticks of different lengths and thicknesses) are used to ensure stability and dynamism of the figure.
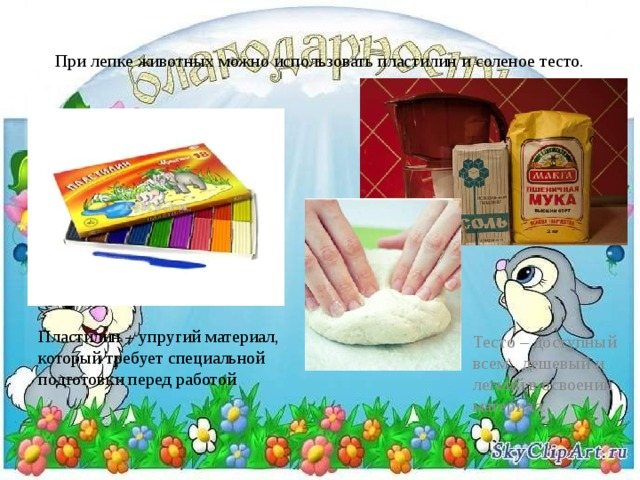
When sculpting animals, you can use plasticine and salt dough.
Dough is a material accessible to everyone, cheap and easy to master.
Plasticine is an elastic material that requires special preparation before work.
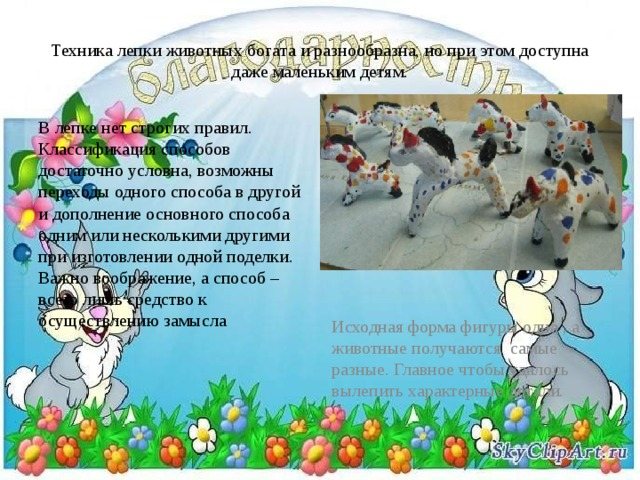
The technique of sculpting animals is rich and varied, but at the same time accessible even to small children.
There are no strict rules in sculpting. The classification of methods is quite arbitrary; transitions from one method to another and the addition of one or more others to the main method when making one craft are possible. Imagination is important, and the method is just a means to realize the plan.
The initial shape of the figure is one, but the animals turn out to be very different. The main thing is to be able to sculpt characteristic details.
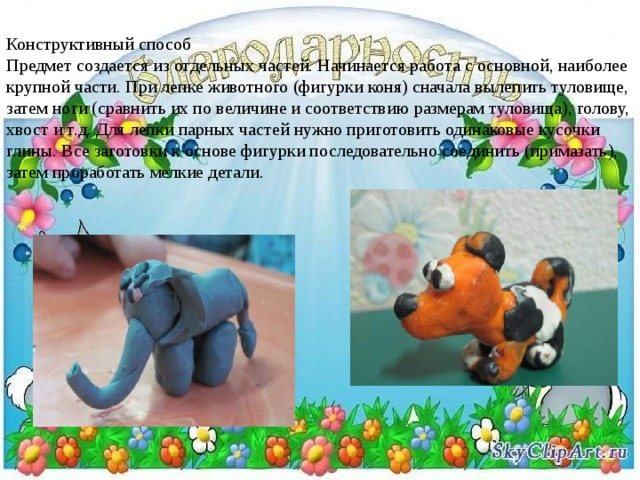
Constructive method An object is created from separate parts. Work begins with the main, largest part. When sculpting an animal (horse figurine), first sculpt the body, then the legs (compare them by size and correspondence to the size of the body), head, tail, etc. To sculpt paired parts, you need to prepare identical pieces of clay. Connect all the blanks to the base of the figure sequentially (coat them), then work on the small details.
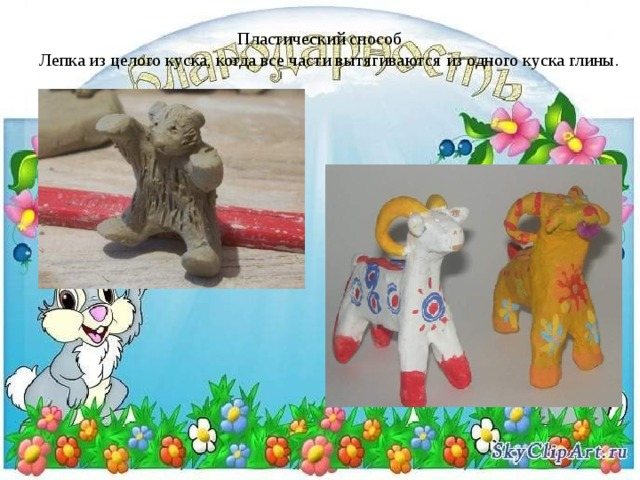
Plastic method Modeling from a whole piece, when all parts are pulled out from one piece of clay.
Methods for sculpting from a whole piece:
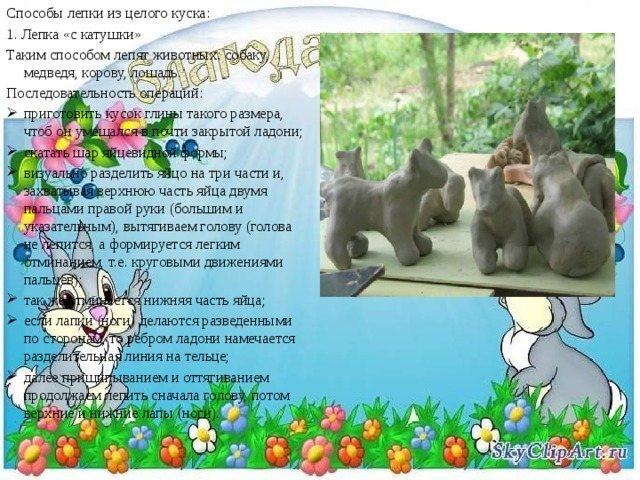
1. Modeling “from a reel”
Animals are sculpted in this way: a dog, a bear, a cow, a horse.
Sequence of operations:
- prepare a piece of clay of such a size that it fits in an almost closed palm;
- roll into an egg-shaped ball;
- visually divide the egg into three parts and, grasping the upper part of the egg with two fingers of the right hand (thumb and index), stretch out the head (the head is not sculpted, but is formed by lightly kneading, i.e., with circular movements of the fingers);
- The lower part of the egg is also kneaded;
- if the paws (legs) are spread apart, then the edge of the palm marks a dividing line on the body;
- Then, by pinching and pulling, we continue to sculpt first the head, then the upper and lower paws (legs).

2. Modeling “from the egg”
In this way they sculpt a cockerel, a chicken, a ram.
Sequence of operations:
- prepare a piece of clay of such a size that it fits in an almost closed palm;
- roll into an egg-shaped ball;
- visually divide the egg into three parts and, grasping the upper part of the egg with two fingers of the right hand (thumb and index), shape the head by kneading, i.e. circular movements of the fingers. When making a ram, the first part to be separated (including the horns) must be larger;
- lift the comb by smoothing the clay (sliding movements of your fingers in an upward direction). At the same time, a sufficient amount of clay is “collected” for a comb or horns and ears;
- on the front part of the head, mark the eyes symmetrically by pressing the inner and outer sides of the first phalanx of the index finger;
- shape the breast so that it is convex and wide;
- “pick up” the paws so that the toy’s fulcrum is its tummy and tail (we make it in the form of a short cylinder);
- Then, by pinching and pulling, we continue to sculpt small parts.
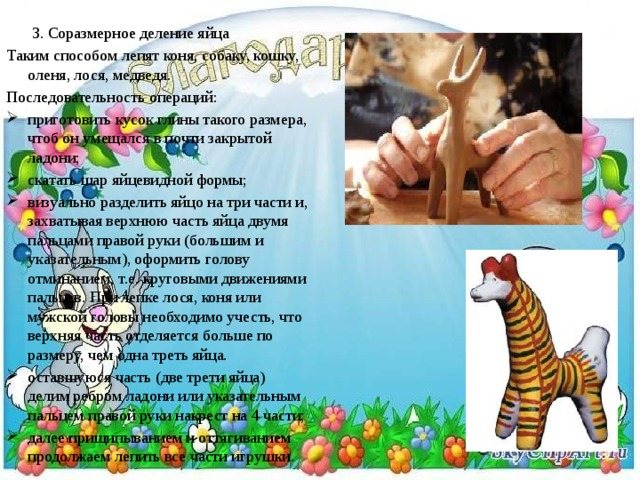
3. Proportional division of the egg
This method is used to sculpt a horse, dog, cat, deer, elk, and bear.
Sequence of operations:
- prepare a piece of clay of such a size that it fits in an almost closed palm;
- roll into an egg-shaped ball;
- visually divide the egg into three parts and, grasping the upper part of the egg with two fingers of the right hand (thumb and index), shape the head by kneading, i.e. circular movements of the fingers. When sculpting an elk, a horse or a man's head, it is necessary to take into account that the upper part is separated in size larger than one third of the egg.
- divide the remaining part (two-thirds of the egg) with the edge of the palm or the index finger of the right hand crosswise into 4 parts;
- Then, by pinching and pulling, we continue to sculpt all parts of the toy.
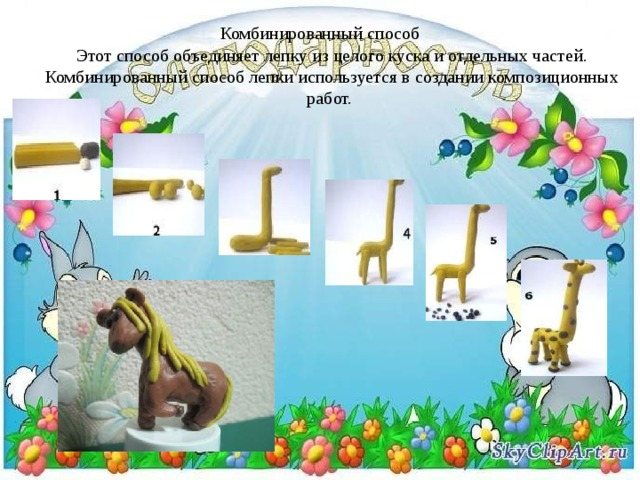
Combined method This method combines modeling from a whole piece and individual parts. The combined method of modeling is used in creating compositional works.
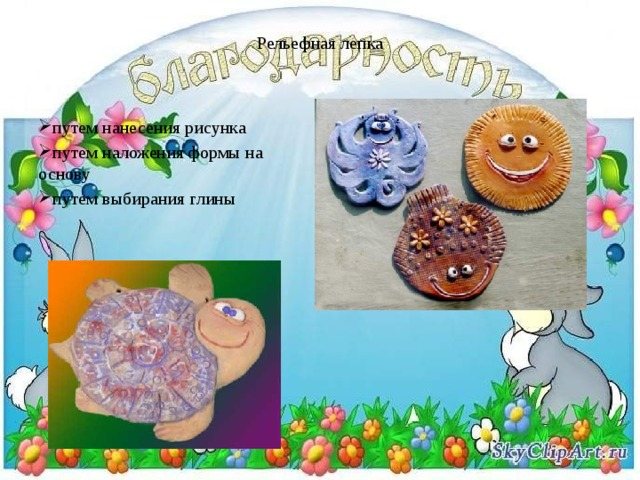
Relief modeling
- by drawing
- by applying the form to the base
- by selecting clay
Molding
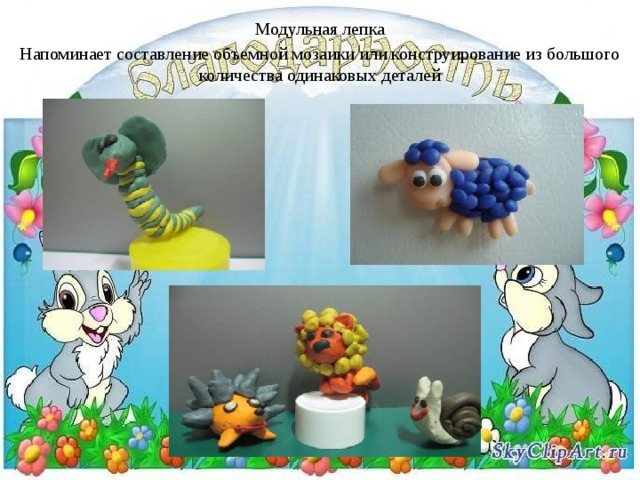
Modular molding
Reminiscent of making a three-dimensional mosaic or constructing from a large number of identical parts
Abstract of the GCD “Artistic Creativity” TOPIC “Decorative plates for decorating a group”
| Program objectives: To develop the ability to creatively create an image based on a sense of form, selection and original combination of elements, color, in a unique composition. Develop a sense of form, composition and the ability to create a pattern on any silhouette. To form a desire to share joy, successful work with other people, the desire to give a gift to family and friends, using one’s skills in decorative activities. To form children’s ability to sculpt decorative plates from a whole piece of plasticine using a plastic method. Practice rolling a lump of plasticine between your palms, flattening it, and evenly pinching the edges Download the full version of the abstract Introduce children to Khokhloma painting and its history. Fix to see and highlight the characteristic elements of the painting. Introduce the names of the painting elements: berries, flowers, curl, grass. Pay attention to the color scheme. Cultivate interest and love for folk art. To cultivate respect for the traditions of Russian folk art. Development in children of the prerequisites for a sense of patriotism, love, respect for the Motherland and people. To cultivate respect for the traditions of Russian folk art. Vocabulary work: exhibition, decor, exhibits, wood. Materials: Khokhloma products, plasticine, stacks, surprise, music center. Progress of the lesson. A Russian folk melody is playing. V. - Hello, guys, please say hello to our guests. I invite you to play the game “Give a Compliment”, “Mood”. Today I invite you to the exhibition. V. — Imagine that there are tickets on my palm. To take your ticket you need to touch my palm and say your name. Children take turns coming up and saying their names. V. - Does everyone have tickets? Come to the exhibition. This exhibition was created by the wizards - the artists of Golden Khokhloma. All the leaves are like leaves, but here, every one is golden. People call such beauty... Khokhloma! The music turns off Our exhibition is completely unusual, not like others - a unique exhibition. At our exhibition, objects can be picked up. There are Khokhloma dishes on the table and shelves. I give the children objects to look at. Q. - What do you think the products are made of? (children's answer) These products are made of wood. Q. - Why were they called gold? (children's answer) They were called gold because the products have yellow leaves and a yellow background - similar to gold. I’m telling you this while demonstrating a Khokhloma plate. V. — Traditions in the manufacture and painting of products are passed down from generation to generation - to a son from his father, to a father from his grandfather. Bowls, bowls, and vases are first carved from wood and then prepared for painting. Cover with a thin layer of clay, dry the product, spread with oil and dry again in the oven, cover with drying oil, then rub with aluminum powder (silver). When the painting is finished and dried, the artist coats the product with varnish, and the silver under the yellow film becomes very similar to gold. This is how wonderful golden cups, bowls, vases and many other utensils are born. V. - Guys, let's put the exhibits in place, I invite you to the second hall. There are empty shelves there. I pay attention to the children's reactions. V. - This is an unusual hall. You see that the shelves here are empty. This is a hall for beginners, young masters. Do you know how to sculpt from plasticine? Do you know what patterns are? Can you organize your own exhibition? D. - Yes, we will be able to organize our own exhibition. . Guys! Please look at the plates on the tables, are they as beautiful as this one? Why? That's right, they're not finished. And you young masters will have to work hard to complete the work so that the plates can be placed at the exhibition. Do you agree? Please sit down at the tables. Finger gymnastics Here are all my fingers, turn them the way you want: (Look at the open palms and twirl them) And this way, and this way, they won’t be offended in any way. (Rub our hands together) One, two, three, four, five, (Clap our hands) They can’t sit again. (Shaking the brushes) Knocked, (Knocked on the table) Twirled (Circular rotations with the brush) We wanted to sculpt. (Rub with hands) They will work a little, (Actively moving fingers) We will let them rest. (Put palms together) I give instructions to the children: It’s time for us to decorate the exhibition; whoever has finished, put the beautiful plates on the shelves. Now in the hall of young masters there are also products and are pleasing to the eye. You like? Our exhibition is ready. Which one of you will be a guide and tell you about your product: what color is the plate, what patterns are drawn? 1 – 2 children talk about their work. We had a wonderful exhibition. Did you like it? Do you want to further improve your skills? As a souvenir, I want to give a workbook “Khokhloma Painting” and a coloring book. This will allow you to become real Khokhloma masters. doshkolnik.ru |
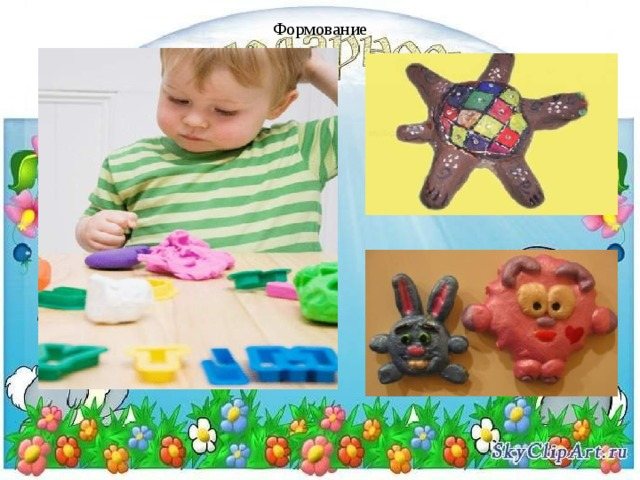
modeling of decorative dishes
Modeling lesson in the preparatory school group “Modeling decorative dishes”
Program content:
Continue to learn how to depict decorative dishes, conveying the features of shape and painting.
Take a creative approach to doing the work and choose your own sculpting method.
Decorate the finished product with an in-depth relief using stacks or moldings.
Strengthen your neat sculpting skills.
Material and equipment:
Rotary machines, stacks, wet sponges, stands, clay for each child.
Illustrative material depicting decorative tableware, samples of decorative tableware for various purposes, a tape recording of calm music.
Preliminary work:
Modeling dishes in different ways in classes and in independent activities, examining decorative dishes to analyze their shapes and decorations, talking about types of dishes in speech development classes.
PROGRESS OF THE CLASS
Children enter the art studio, say hello and go to the teacher.
Educator: Hello guys. Today we will continue our acquaintance with decorative tableware. Stand comfortably, close your eyes and imagine that we have been transported to the ancient world. Introduced? Now listen to my story. People have been making pottery since ancient times. At first they stored various products in it: vegetables, fruits, grains. But one day one pot became strong, light, sonorous, but most importantly, it did not get wet from water. This is how pottery entered the life of the first people. Gradually, when sculpting dishes, people began to change the shape of the products, making jugs with long narrow necks for water and wide massive vessels with strong handles for other products. Soon they began to select the most successful and beautiful products, and then they themselves began to decorate the dishes in different ways. For example, an ancient Greek vase is decorated with clay of different colors. Also, in what ways can you decorate dishes?
(Children's answers: with moldings, in-depth relief, painting)
sundekor.ru
The sequence of sculpting a human figure and dishes in different age groups and teaching methods.
Modeling is the process of creating relief and three-dimensional figures, paintings and even entire compositions from plastic materials - plasticine, clay, dough, snow and others.
| junior group | A person consists of 2 balls of the same size that are attached to each other - tumbler |
| Middle group | Weighting occurs due to the cone-shaped body - a girl in a long fur coat. To get this shape, you need to connect your palms with your index fingers - get a “roof of the house” and roll out a piece of clay. |
| Senior group | Modeling a person in parts (head, torso, arms and legs separately) and a whole piece (head and torso), thick, short legs, wide feet - all this will give stability to the figure. |
| Preparatory group for school | Insert the legs into the recess in the bottom of the clothing (sculpt the torso, make a recess with a finger or some wide object, insert the legs into the recess and cover the joint). Model according to the type of folk clay toys. |
Modeling dishes.
| Junior group | The dish looks like a disk (the ball is flattened) |
| Middle group | Sculpt the dish by pressing your thumb into the ball (then bend the edges). Folding the edges of a flattened shape (first sculpt a disk, then bend the edges). |
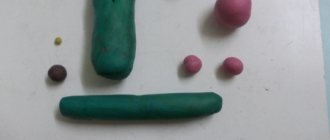
| Senior group | Using the belt method (roll a thick sausage, flatten it, connect it, grease the joint - you get a hollow cylinder, then connect it to a flattened disk - the bottom). To make the dishes stable, connect the bottom to the walls in the following way: use your index finger or thumb to smear the clay from the walls to the bottom. |
| Preparatory group for school | Laying the rings on top of each other: roll out the sausages to the same length, place one on top of the other, then smooth them out inside and out. To decorate the dishes, you can not smooth the sausages, then the surface on the outside remains ribbed. Another technique is to pick up clay in a stack from the ball. First, roll a ball and use a stack to make a depression, selecting clay. |
| Visual teaching methods | Verbal teaching methods | Practical teaching methods | |
| TECHNIQUES | Examination of the item | Conversation | Exercises |
| Use of nature | Explanation | Completing of the work | |
| Observations | Questions for children | ||
| Sample teacher | Incentives | ||
| Showing how to do the job | Artistic word | ||
| Analysis of children's works | Clarifications, instructions |
The sequence of sculpting animals and birds in different age groups and teaching methods..
Modeling is the process of creating relief and three-dimensional figures, paintings and even entire compositions from plastic materials - plasticine, clay, dough, snow and others.
| Junior group | Modeling animals consisting of 2 balls of the same shape (like a tumbler), just attach the tail and ears |
| Middle group | To convey a running animal: the body is a cylinder, the round head is tightly attached, the tail and ears are pinched. |
| Senior group | When executing an animal, the shape of the head and tail is specified, and the technique of sculpting from a whole piece is used (head + torso, torso + legs |
| Preparatory group for school | When making an animal's body from a thick cylinder, a cut is made in the middle (legs) from one end and a stack from the other, then the foot is bent and the body is bent into an arc. |
| Visual teaching methods | Verbal teaching methods | Practical teaching methods | |
| TECHNIQUES | Examination of the item | Conversation | Exercises |
| Use of nature | Explanation | Completing of the work | |
| Observations | Questions for children | ||
| Sample teacher | Incentives | ||
| Showing how to do the job | Artistic word | ||
| Analysis of children's works | Clarifications, instructions |
The concept of design. The importance of design for the development of a child’s personality. Types of design. Learning objectives. Material for construction. Contents of children's buildings (topics).
1. The concept of design.
2. The importance of design for the development of a child’s personality.
3. Types of design.
4. Learning objectives (table from the program “From birth to school”).
5. Material for construction.
6. Contents of children's buildings (theme). Name of building material
Literature:
- Kutsakova L.V. Construction and manual labor in kindergarten: a manual for kindergarten teachers: from work experience. – M.: Education, 1990. – 158 p.
- Lishtvan Z.V. Construction: a manual for kindergarten teachers. – M. Education, 1981. – 159 p.
- Methods of teaching visual arts and design: Textbook. manual for students of pedagogical education. /under. ed. T.S. Komarova. – 3rd ed., revised. – M.: Education, 1991. – 256 p..
- Theory and methodology of visual activities in kindergarten. Textbook for pedagogical students. institutions. – M., “Enlightenment”. – 1977. – 250 p.
1. Children’s construction is usually understood as the implementation of buildings from a building set
2. Meaning:
- Develops technical abilities;
- Observation skills develop;
- The child learns to focus attention;
- Spatial imagination develops;
- The emotional and volitional qualities of the individual develop;
- Children form generalized ideas about objects;
- Children learn to use theoretical knowledge in practical activities;
- Children learn to accept a mental challenge and find a way to solve it;
3. Construction from building material.
Types of building material:
to size:
- large (for all ages);
- intermediate (from 3 years old);
- small (from 4 years old).
by topic:
- geometric (for all groups);
- thematic (for older ages);
- lego;
according to the material of manufacture:
- wood;
- metal;
- plastic;
- printed.
Construction from designer parts.
4. Learning objectives.
Construction from building material:
| group | Tasks |
| The second group of young children. (1 – 2 years) | Introduce children to certain shapes (cube, brick, prism), “objectifying” them (prism - roof). Builder desktop and floor). Continue to introduce children to some forms (cube, brick, prism, cylinder), “objectifying” them (cylinder - column, pipe). Introduce methods of construction - applying, overlaying. Encourage children to play with buildings together with an adult and use story toys for games. To develop the ability to use familiar forms of building materials and elements of plastic construction sets when constructing their own various buildings. In the summer, play with natural materials while walking. Combine sand games with games with building materials, water games with story games. Develop the ability to lay out familiar figures depicted by adults on the sand with pebbles, shells, and pine cones. Encourage children to independently include natural material in story games as substitute objects (leaf - plate). |
| 1st junior group (2 – 3 years) | Develop productive (constructive) activities. Introducing children to details (cube, brick, triangular prism, plate, cylinder), with options for arranging building forms on a plane while playing with tabletop and floor building materials. To develop children’s ability to construct elementary buildings according to a model, to support the desire to build something on their own. Formation of ideas about spatial relationships. Encourage the use of additional story toys commensurate with the scale of the buildings (small cars for small garages, etc.). Introduce children to the simplest plastic construction sets. Offer to design turrets, houses, cars together with an adult. Support children's desire to build on their own. In the summer, stimulate interest in construction games using natural materials (sand, water, acorns, pebbles, etc.). Form the habit of putting toys away when you finish playing. |
| 2nd junior group (3 – 4) | Encouraging research interest, conducting simple observations. Familiarity with methods of examining objects, including simple experiments (sinking - not sinking, tearing - not tearing). Leading children to a simple analysis of created buildings. Improving constructive skills. Consolidating the ability to distinguish, name and use basic building parts (cubes, bricks, plates, cylinders, triangular prisms), construct new buildings using previously acquired skills (overlaying, attaching, attaching), and use parts of different colors in buildings. Maintaining a sense of joy when creating a successful building. Forming the ability to place bricks and plates vertically (in a row, in a circle, around the perimeter of a quadrangle), to place them close to each other, at a certain distance (fence, gate). Encouraging children to create design options by adding other details (put triangular prisms on the gate posts, cubes next to the posts, etc.). Forming the ability to change buildings in two ways: by replacing some parts with others or building them up in height and length (low and high turret, short and long train). Developing a desire to build buildings according to one’s own design. Forming the ability to play with buildings, combine them according to the plot: path and houses - street; table, chair, sofa - furniture for dolls. After playing, teach children to carefully put the parts in boxes. |
| Middle group (4 – 5) | Attracting children's attention to various buildings and structures around their crowbars, kindergarten. On walks while playing, examine cars, carts, buses and other types of transport with children, highlighting their parts, naming their shape and location in relation to the largest part. Development of the ability to distinguish and name construction objects (cube, plate, brick, block); learn to use them taking into account their structural properties (stability, shape, size). Develop the ability to establish associative connections by asking them to remember what similar structures children have seen. Developing the ability to analyze a building sample: identify the main parts, distinguish and correlate them by size and shape, establish the spatial arrangement of these parts relative to each other (in houses - walls, at the top - ceiling, roof; in a car - cabin, body, etc. ). Developing the ability to independently measure buildings (in height, length and width), to comply with the design principle set by the teacher (“Build the same house, but tall”). Children construct buildings from large and small building materials, use parts of different colors to create and decorate additions. Develop ideas about architectural forms. Introduction to paper design techniques: bend a rectangular sheet of paper in half, matching the sides and corners (album, flags for decorating a site, greeting card), glue parts to the main shape (to a house - windows, doors, pipes; to a bus - wheels; to chair - back). Introducing children to making crafts from natural materials: bark, branches, leaves, cones, chestnuts, nut shells, straw (boats, hedgehogs, etc.). Learn to use glue and plasticine to secure parts; use reels, boxes of different sizes and other items in crafts. |
| Senior group (5 – 6 years old) | Developing the ability to establish a connection between the buildings being created and what children see in the life around them; create a variety of buildings and structures (houses, sports and play equipment, etc.). Consolidating the ability to identify the main parts and characteristic details of structures. Help analyze crafts and buildings made by the teacher; Based on the analysis, find constructive solutions and plan the creation of your own building. Acquaintance with new parts: plates, bars, cylinders, cones, various in shape and size. Strengthen the ability to replace some parts with others. Formation of the ability to create buildings of different sizes and designs of the same object. Consolidating the ability to build according to a drawing and independently select the necessary building material. Developing the ability to work collectively, unite your crafts in accordance with a common plan, agree on who will do what part of the work; help each other when necessary. |
| School preparatory group (6 – 7 years old) | Forming interest in a variety of buildings and structures (residential buildings, theaters, etc.). Encouraging the desire to convey their characteristics in constructive activities. Development of the ability to see the structure of an object and analyze its main parts and their functional purpose. Encouraging the desire to independently find individual design solutions based on an analysis of existing structures. Strengthening teamwork skills: the ability to distribute responsibilities, work in accordance with the general plan, without interfering with each other. Construction from building material. Development of the ability to construct various structures of the same object in accordance with their purpose (bridge for pedestrians, bridge for vehicles). Forming the ability to determine which parts are most suitable for construction, how best to combine them; continue to develop the ability to plan the construction process. Consolidating the ability to construct buildings united by a common theme (street, cars, houses). Construction from construction kit parts. Getting to know a variety of plastic construction sets. Forming the ability to create various models (buildings, planes, trains, etc.) from a drawing, from the teacher’s verbal instructions, from one’s own design. Introducing children to a wooden construction set, the parts of which are attached with pins. Consolidating the ability to create various structures (furniture, cars) based on drawings and verbal instructions from the teacher. Consolidating the ability to create structures united by a common theme (children's playground, parking lot, etc.). Consolidating the ability to disassemble structures using a staple and a mallet (in plastic construction sets). |
5. Material for construction.
See textbook and notebook entries:
Theory and methodology of visual activities in kindergarten. Textbook for pedagogical students. institutions. – M., “Enlightenment”. – 1977. – P.194.
Methods of teaching visual arts and design: Textbook. manual for students of pedagogical education. /under. ed. T.S. Komarova. – 3rd ed., revised. – M.: Education, 1991. – 256 p. – P. 198.
6. Subjects of children's work. Name of the building material (see earlier paragraph 4; section No. 4 - P. 203 - 222; section No. 3 - P. 200 - 219).
1 ml.gr
. – Turrets, fences, paths, furniture, transport, house, stairs, slides.
2 ml.gr
. - road, fences, houses.
avg.gr
. – towers, gates, transport (cars, ships), bridges
st.gr
. – buildings (multi-storey building, train station), airplanes,
preg.gr
. -aircraft, rockets, robots.