MAGAZINE Preschooler.RF
Educational project “Doll on a spoon - theater in the palm of your hand”Authors:
- M.A Maul,
- T.V. Samkharadze,
Educators of GBOU "School No. 2098" in Moscow
“The theater is not at all a trifle and not at all an empty thing. This is the kind of pulpit from which you can say a lot of good to the world.” N.V. Gogol
In modern kindergarten, many types of dolls are used for theatrical activities. However, in order to maintain children’s interest in their native culture and family traditions, intensify cognitive and creative activity and instill moral values and kindness, it is necessary to constantly update the developmental environment of the theater centers (corners) of the kindergarten
To implement the tasks of spiritual and moral education and development of preschool children, dolls-images are needed that contribute to the formation in children of value and semantic ideas about the world, good and evil, and the moral qualities of folk ideals. This idea is revealed in the Concept of spiritual and moral education of the individual citizen of Russia (1), proposing a national educational ideal. For children, such ideals are images of folk tales and epics (2): good fellows, beautiful maidens, heroes, craftsmen and needlewomen, images of a kind mother, a caring and wise priest. By agreement with the parents, these images can be images of Russian saints and images of biblical and gospel subjects.
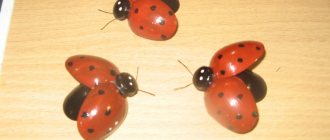
A doll on a spoon, spoon theater is becoming increasingly popular in the work of preschool organizations. Doll on a spoon, spoon in hand - this principle helps children master puppeteering techniques. The historical roots of the doll on a spoon can be correlated with dolls for nativity theaters with a rod base on which clothes and jewelry were attached. Another advantage of the spoon theater is the wide possibilities of its use for theatrical performances for children from two to seven years old. At four years old, a child can help adults make a doll, and at five years old, he can even make one himself. For this you need a spoon, shreds and ribbons. It is necessary to draw children's attention to the artistic image of the doll, selecting scraps for clothes, developing fine motor skills when dressing up the doll or technical skills in using glue and assembling small parts for the eyes, hair, bows, mouth and nose.
The image of a doll on a spoon should be familiar to children, attractive and loved, only if it will stimulate children's imagination, development and creativity. Such image dolls should be easy to make and necessarily carry a value-semantic educational load. Dolls - actors and actresses should be aesthetically pleasing, bright, light, accessible and safe for children to use.
Highly appreciating the identified pedagogical potential of dolls on spoons, we have developed an educational project “Doll on a spoon - theater in the palm of your hand . Its goal is to develop the child’s personality through theatrical activities, providing conditions for interaction with other types of children’s activities in the holistic pedagogical process. Among the tasks, we will highlight the most important ones.
- Social and communicative development: assimilation of moral norms and values of Russian culture, development of a culture of communication and interaction of the child with adults and peers; development of social and emotional intelligence, emotional responsiveness, empathy, formation of a respectful attitude and a sense of belonging to one’s family and to the community of children and adults; formation of positive attitudes towards various types of work and creativity.
- Cognitive development: acquaintance with a new type of puppet theater - the theater of spoons, development of the ability to play out words with puppets; development of imagination and creative activity, interest in spiritual and moral culture, curiosity and cognitive motivation; formation of cognitive actions; the formation of primary ideas about oneself, other people, objects of the surrounding world, about the small homeland and fatherland, ideas about the socio-cultural values of our people, about domestic traditions and holidays.
- Speech development: enrichment of vocabulary, development of speech culture, including coherent, grammatically correct dialogical and monologue speech, speech creativity, sound and intonation culture of speech, phonemic hearing; acquaintance with book culture and children's literature.
- Artistic and aesthetic development: the formation of an aesthetic attitude towards the surrounding world; formation of elementary ideas about types of art; perception of music, fiction, folklore; formation of prerequisites for value-semantic perception and understanding of works of art (verbal, musical, visual), the natural world; teaching children how to make puppets for the spoon theater, motivating them to play independently with theater puppets and include song and dance improvisations in independent games; stimulating empathy for characters in works of art; implementation of independent creative activities (visual, constructive-model, musical, etc.).
- Physical development: gaining experience in motor activity, developing their physical qualities (coordination and flexibility), developing fine motor skills of both hands, instilling the values of a healthy lifestyle while forming useful habits through the traditions of Russian culture.
The project implements an educational program in forms of activity specific to preschoolers, primarily in the form of play, cognitive and research activities, creative activity that ensures the artistic and aesthetic development of the child. The project involves preparatory group students, teachers, and parents. The project is designed for four months (December, January, February, March). Type of project: educational, game.
Expected results:
- Increasing the competence of educators and other participants in the educational process in developing the abilities and creative potential of each child as a subject of relationships with himself, other children, and the adult world.
- Child development in all areas of educational fields.
- Significant expansion of children's ideas about theatrical culture.
- Increasing the level of general culture of preschool children.
- Creating a subject environment that promotes the development of theatrical culture in children.
- Increasing the level of priority and general recognition in the children's team of the values of humanism, respect for the environment, attitude towards each other, mercy, and readiness to help.
Project stages
The goal of the first, preparatory stage is to determine the level of knowledge about the spoon theater in children and parents. To achieve this goal, we solve the following tasks: create conditions for diagnosis (we develop criteria for assessing knowledge and skills, tests, questionnaires, questionnaires, select methodological literature); we diagnose the primary level of children’s knowledge about puppet theater; we encourage parents to take part in the survey; We select methods for diagnosing the level of children’s creative abilities, including formalized (questionnaire tests) and informal (observations, conversations), we identify the level of creative abilities of each child.
The success of the first stage is facilitated by an emotionally prosperous atmosphere in the kindergarten group. Availability of special pedagogical conditions for the development of children's creativity and subject-development environment.
It is important to draw up a long-term work plan for developing creative abilities in older preschoolers through theatrical games, and conduct a survey of parents “How do you teach goodness?” . We also conduct individual conversations and consultations with parents. Revealing their interest in replenishing the theater corner, as well as opportunities and abilities in a particular area of handicraft.
The second stage involves organizational and pedagogical work aimed at creating conditions for broadening the horizons of children, raising people who love and understand art, striving for theatrical creativity.
Objectives of the main stage: introduce children to the history of the wooden spoon and how to make it; introduce children and parents to puppet theater; introduce children and parents to puppet theater on wooden spoons; tell children about the work of S.Ya. Marshak ( "The Tale of the Stupid Mouse" ), arouse interest in the theatrical production of this tale through a puppet theater on wooden spoons.
For successful work in the second stage, we propose the following plan:
- Lesson No. Journey into the Past of Spoons.” We enrich children's understanding of the history of the spoon.
- Virtual visit to the museum (watching video). We introduce our culture to the past and present. We are designing the album “Museum Stands” .
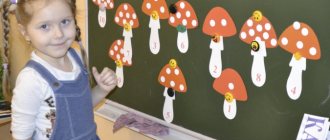
- Lesson “Oh you spoons, my spoons . We strengthen children's ability to play on spoons, develop a sense of rhythm and hearing. We paint wooden spoons. We introduce children to the arts of Khokhloma painting, develop a sense of color and composition; We create conditions for children's artistic creativity. We listen to folk music performed by the Lozhkari . We teach children to recognize by ear what wooden spoons sound like; We evoke an emotional response to Russian folk melodies. We conduct experiments “Which spoon heats up faster - wooden or metal?” “Which spoon is lighter?”
- Lesson "Puppet theater on a wooden spoon" . We introduce children and parents to a new type of puppet theater, evoke an emotional response and a desire to participate in the performance.
- Knowledge of "Dolls made from wooden spoons" . We teach children to create images of animals using non-standard materials - wooden spoons, pictures of animals; We develop fine motor skills. Master class for parents: we teach different ways to make dolls on a wooden spoon.
- Lesson “Which doll to choose?” . We discuss the characters’ characters, agree on who would like to play what role. We select music for the text. We learn to convey the character, habits and mood of the characters with the help of music. Playing dialogues from a fairy tale. We learn to convey the character of the characters in a fairy tale using facial expressions, gestures, intonation, and voice timbre.
- Rehearsal of a fairy tale with music and decorations. We consolidate puppeteering skills behind a screen.
At the third and final stage, we monitor the project and compare the level of the initial knowledge with the final results. It is important that we diagnose knowledge of theatrical activities in two aspects: theatrical knowledge and skills and personal development, then analyze the data and compare the results. Adding entertainment to the third stage is the exhibition “Do-It-Yourself Puppet Theater on Wooden Spoons ,” an album of photographs with scenes from the play and, of course, a puppet show for parents and kindergarten teachers. We also recommend keeping a book of reviews of performances.
In the process of implementing the project, a significant expansion of children’s knowledge about spiritual and moral culture and the traditions of puppet theater can be observed. Children learned the simplest ways of making theatrical puppets and mastered puppeteering skills. Both children and parents are pleased with the results. By performing sketches with dolls and speaking in front of the audience, students improve their speech culture and enrich its intonation and grammatical structure. Dialogue speech develops significantly. The level of children’s general culture has increased through their familiarization with Russian folk culture, the values of humanism, and respect for the world around them.
The pupils also show positive dynamics of personal changes, and the level of communicative development has increased. The project promotes the formation of a sense of empathy, responsibility for one’s actions, responsiveness towards peers, the ability to peacefully resolve conflicts through collective action, interactions with other children and adults. Thanks to joint activities during the implementation of the project, relationships between children, teachers, and parents were strengthened. Children have become more sociable, relaxed, confident in themselves and their abilities, and are not afraid to speak in front of audiences.
In the parents, we found support not only in the preparatory work (making scenery, attributes of dolls on wooden spoons), but also saw in them talented directors, artists, and teachers of their children.
Literature
- Danilyuk A.Ya., Kondakov A.M., Tishkov V.A. The concept of spiritual and moral development and education of the personality of a Russian citizen. M., 2009.
- Nesterenko A.V. Ethno-artistic education of children and adolescents based on Russian traditional culture. M., 2008.
| Next > |
How to make a screen for a puppet theater?
This is an essential attribute of puppet theater. Check out the simplest options:
- Cover the hole under the table with a cloth, tying its two corners to the top of one and the other leg. The child sits on the floor behind him and leads the characters at the level of the table top - just above it.
- Take an old curtain or sheet. Gather any of these fabrics onto a rope, tie the ends of the thread on one and the other side of the doorway. Make a rectangular cutout in the center of the top of any of these pieces. It should be at such a height that it is not visible to a child or adult sitting behind the curtain who are playing the role of puppeteers.
- A tabletop screen is made for the finger theater. The easiest way is to make it from cardboard. Take the box. It needs to be disassembled, covered with wallpaper or colored paper, and 2 sides bent so that a canvas of sufficient size remains in the center. There is a cutout in it through which the puppeteer shows finger toys.
Here's how to make a plywood screen. For it you will need:
- plywood;
- jigsaw;
- fabric or piece of wallpaper;
- glue;
- small door hinges.
Manufacturing instructions:
- Based on the presented dimensions, cut out 3 blanks from plywood: a central one and 2 side panels. Cover them with fabric.
- When the canvas is dry, attach the loops to the designated areas so that you can close the puppet theater screen and fold it.
See how to make a screen out of cardboard so you can show performances with mitten, glove, and cane puppets.
It should be such that the puppeteer can fit there freely, standing up to his full height. If the performance is performed by children of different ages, then the tall ones will kneel, placing a pillow under them. In order to make a screen, you will need:
- PVA glue;
- rope or lace;
- carton boxes;
- wallpaper;
- stationery knife;
- awl;
- roulette;
- wide brush;
- long ruler;
- rag.
You can make a screen for a puppet theater with your own hands as follows:
- The drawing is given for teenagers or adults whose height is 1 m 65 cm. If you are making a screen for children, reduce this figure.
- To make it durable, make it three-layer. To do this, stick a second one on one large sheet of cardboard, then a third one on the other side. Apply PVA glue with a wide brush. This way you will make the front part - the apron.
- The side elements are also made in three layers, but the folds, which you then glue to the apron, should consist of one layer.
- Connect the parts by gluing them. When the glue has dried, sew in these places with a lace, having previously made holes in the fastening points. Attach the top arch in the same way.
All that remains is to cover the screen with wallpaper of a dim color so that it does not distract from the theatrical performance.
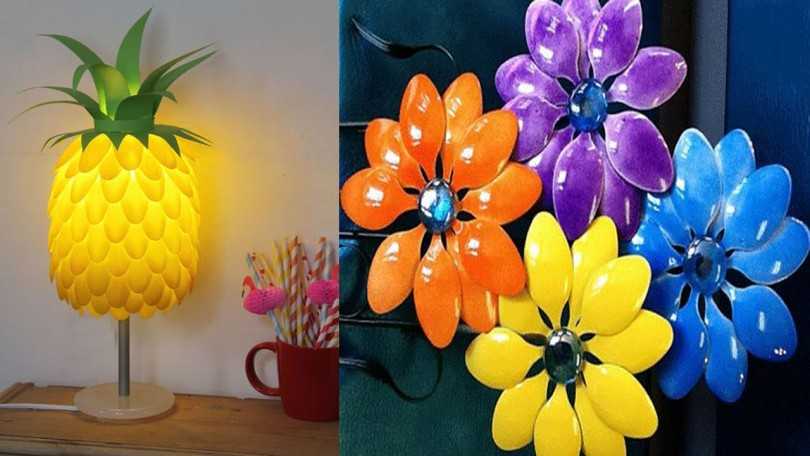
Pineapple made from plastic utensils
An original piece of decoration in a child's room. It is easy to make, practical and fits into almost any room interior. To make it you will need: an oval lamp, a glue gun, spoons, yellow gouache, a knife, green cardboard, a bottle.
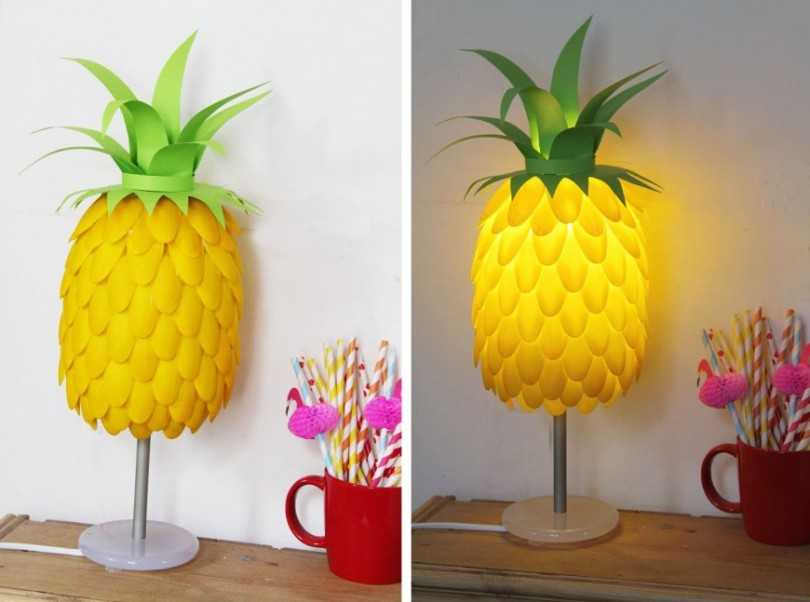
We cut out a cylinder from the bottle, cutting it off on both sides. We paint the devices in a yellow shade, after cutting them and leaving only the top side. We take the deep sides of the tools and attach them to the bottom row.
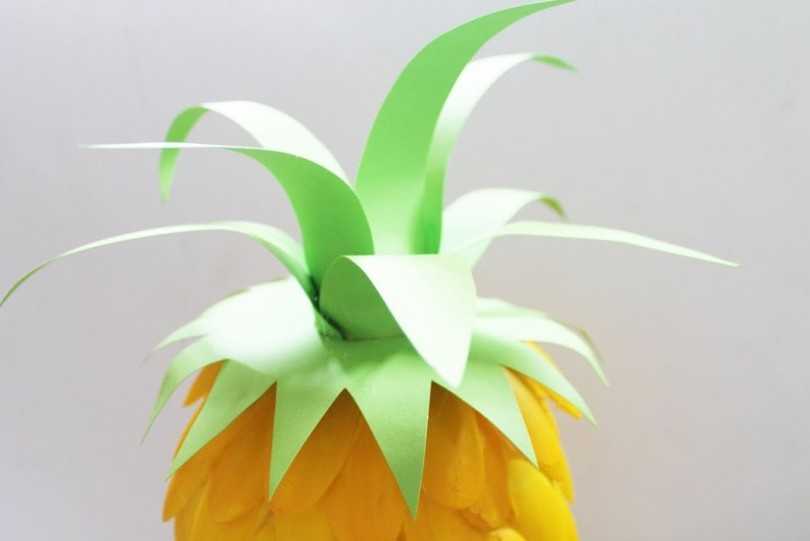
Glue another layer to cover the gaps between the petals. Thus, we glue the entire bottle. We make leaves from green cardboard and glue them to the base of the bottle. Finally, place the pineapple on a suitable lamp.
DIY crafts from plastic bottles for the New Year
If you have accumulated a large number of plastic bottles, then they can be used as material for crafts for the New Year. You can make simple and original things with your own hands that will help you decorate your home in an original way for this beloved holiday.
By using your imagination and the additional decoration materials available in your home, you can create beautiful New Year’s crafts from plastic bottles.
You can get these cute penguins from two plastic bottles
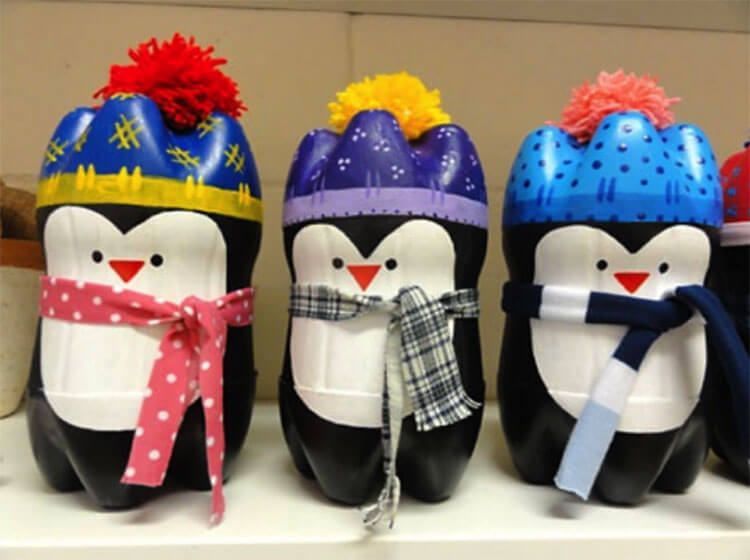
We use the bottom of one bottle as a hat for our penguin. When working, it is better to use acrylic paints, which will adhere better to plastic.
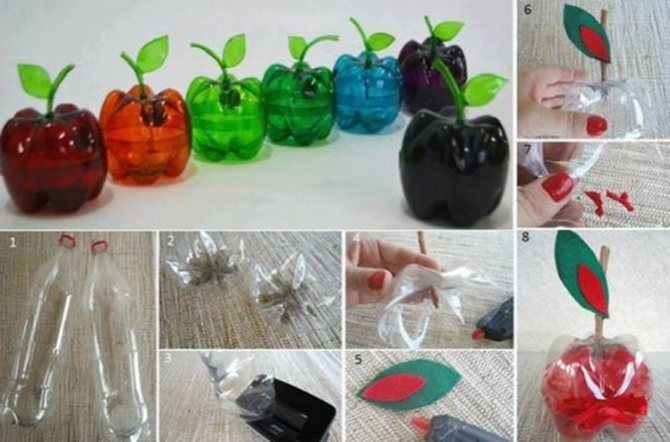
Using multi-colored plastic bottles, you can make beautiful apples, which can be used both for the New Year as decoration and on any other holiday.
Snow globe: craft from a plastic bottle
This beautiful and original New Year's craft can be made at home, all you need is the necessary materials.
You will need:
- Smooth plastic bottle
- Styrofoam
- Brush, glue
- Sequins, beads, sequins
- Acrylic paints
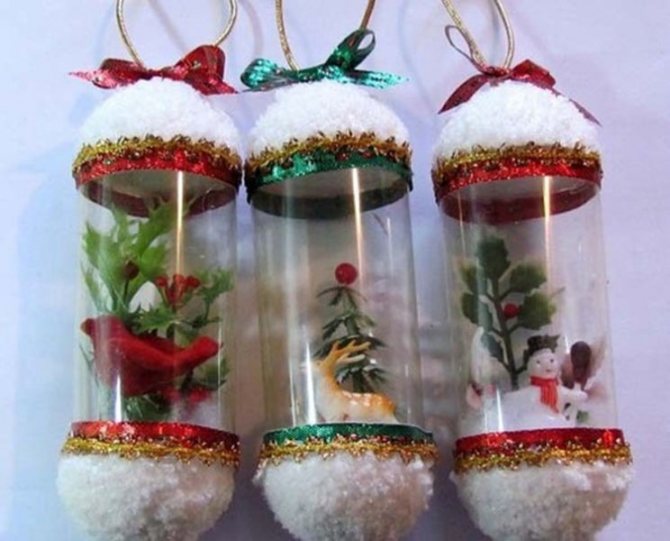
Cut off the top and bottom of the bottle. Leaving only a straight section of the container.
We prepare a composition that needs to be placed on foam plastic, pre-cut to the diameter of the bottle.
We carefully fix the foam with our composition at the bottom of the bottle using glue.
The upper part can also be covered with foam plastic and decorated with artificial snow, sparkles, and ribbons.
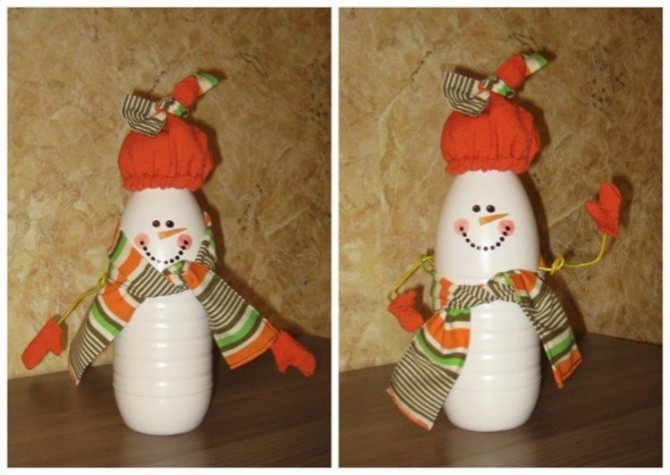
These funny snowmen can be made from kefir bottles
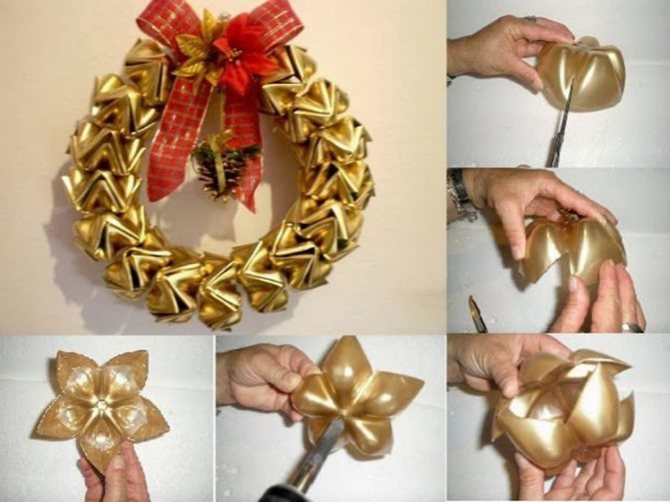
If you have a lot of identical plastic bottles, then you can use them to make an original wreath for the door. In this case, you will only need the bottoms of the bottles. in which you need to make holes and string them on a tight rope.
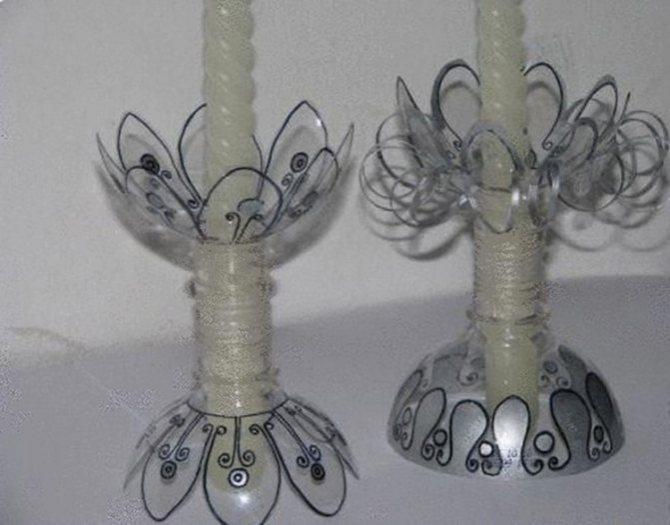
If you want an original decoration for the holiday table, then you can make these beautiful candlesticks using plastic bottles. If desired, they can be painted with acrylic paints.
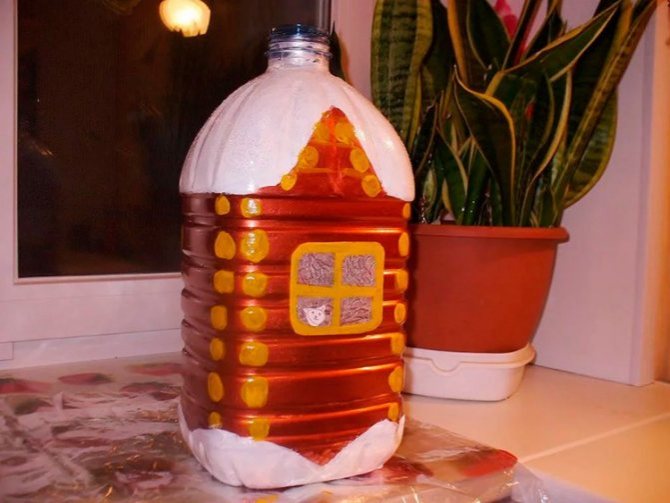
You can make a fabulous New Year's house from a 5-liter plastic bottle. painting it completely with paints.
Tulips
The easiest way to make tulips. Especially if you are new to such experiments.
You will need:
- Plastic spoons (5 spoons for 1 product);
- Colored paper (corrugated);
- Glue, scissors;
- Green electrical tape;
- Cocktail tube.
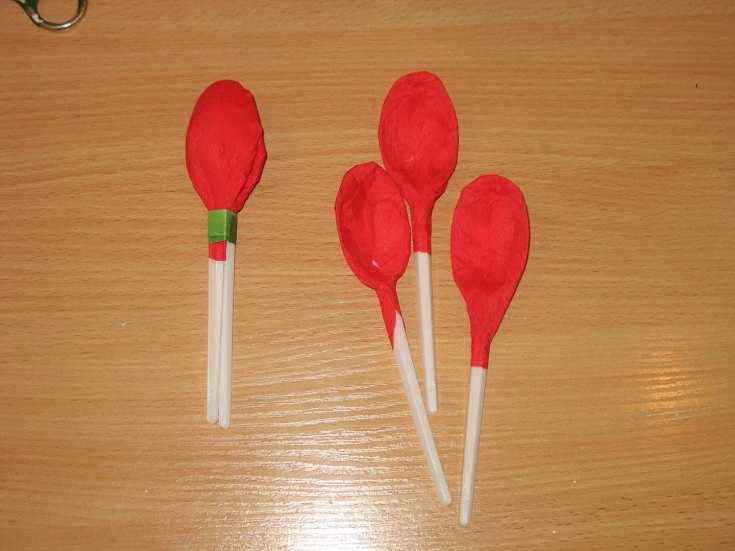
Cut equal, even squares of colored paper. Wrap spoons in them and seal them so that they resemble tulip petals. Pre-cut the legs of the spoons.
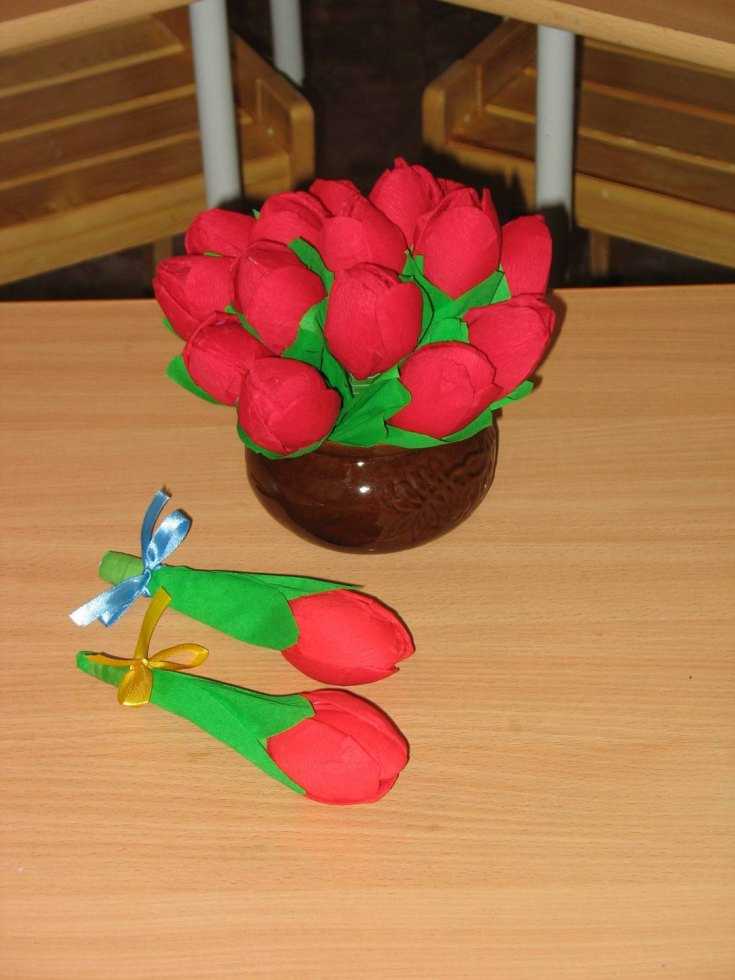
Even a child can do what is described. Save all children's crafts (even unsuccessful ones) from plastic spoons: over time, you will be curious to track the progress of the little inventor.
Interior decoration
To make these decorations look better, you need to purchase colored devices or paint them only with spray paint. This way there won’t be streaks left on the spoons from the brush. Below are described in detail 2 options that are easy to implement.
Sunflower mirror
This craft is suitable for decorating a kitchen, bathroom or nursery.
What materials and tools are needed:
- small round mirror (10-15 cm in diameter);
- thick cardboard (a box from under household appliances will do);
- pencil;
- scissors;
- glue gun;
- glue Moment;
- yellow and black spray paint;
- 80 white spoons or 16 black and 64 yellow;
- screwdriver.
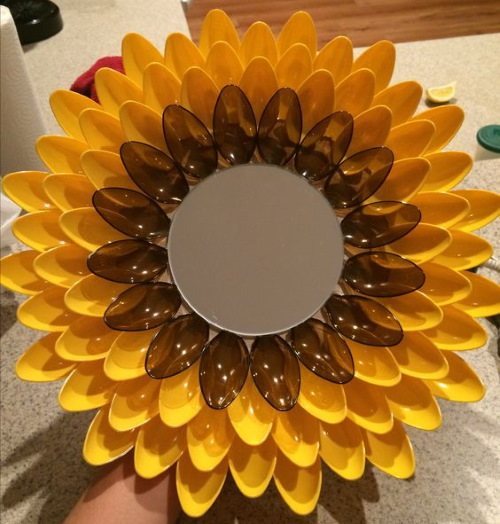
Crafts from plastic spoons, forks - a mirror in the shape of a sunflower
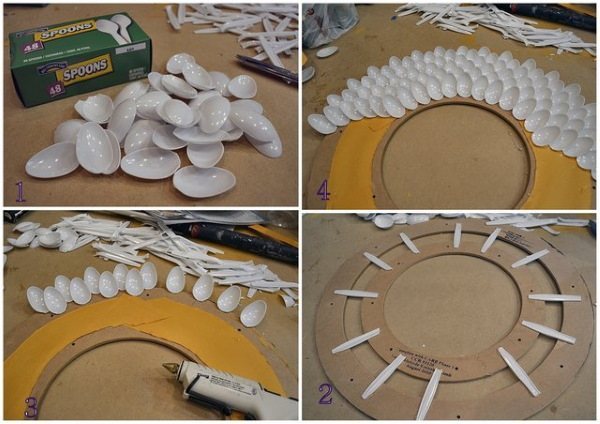
Step-by-step instruction:
- Draw 2 circles on cardboard: 25-30 cm in diameter and 5-7 cm in diameter. Cut circles with scissors. Determine the center of the large circle and glue the small one to this place, then find the center of the small circle and glue the mirror evenly.
- Paint 16 spoons black and the rest yellow. If the dishes are already painted, then simply cut off all the handles under the base.
- With the concave side up, the black petals need to be glued to the cardboard with a glue gun so that the bases of the spoons fit into the gap under the mirror, which was formed due to the small cardboard circle.
- Glue all the yellow spoons in a circle in a checkerboard pattern so that they cover the gaps between the petals in the previous rows. The bases of each of them should not be visible.
To hang a mirror on the wall, you need to make a hole on the back side with a screwdriver, closer to the center. The cardboard is thicker in this area due to the small circle. Now you can “stick” the mirror onto the nail.
Clock for the kitchen or cafe
For this craft, disposable utensils do not need to be cut or deformed. It is the original shapes that will help you create a kitchen-themed watch.
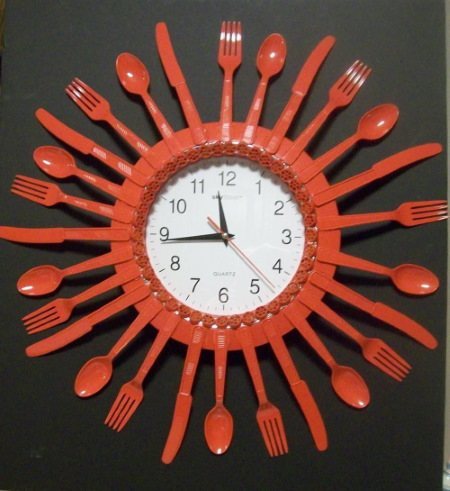
Crafts from plastic spoons, forks - watches
What you will need:
- a small round watch with a flat frame around the dial;
- A4 office paper;
- compass;
- pencil;
- scissors;
- 10 disposable forks, 10 knives and 10 spoons;
- glue gun;
- a handful of small pasta in the shape of a wheel;
- spray paint.
How to design a watch:
- First of all, you need to protect the dial glass from glue and paint. Using a compass on paper, draw a circle equal to the diameter of the glass. Cut out and apply to the dial.
- Glue cutlery to the frame in a circle, alternating them (fork, knife, spoon).
- Glue the pasta in a circle, separating the handles of the cutlery from the glass.
- Hold a piece of paper and spray paint onto the clock.
It is important that all parts are well coated with paint, so 2 cans may be required
Panel of forks
Fans of unusual decorative items will appreciate this craft. The panel looks like a flower, looks stylish and will decorate the interior.
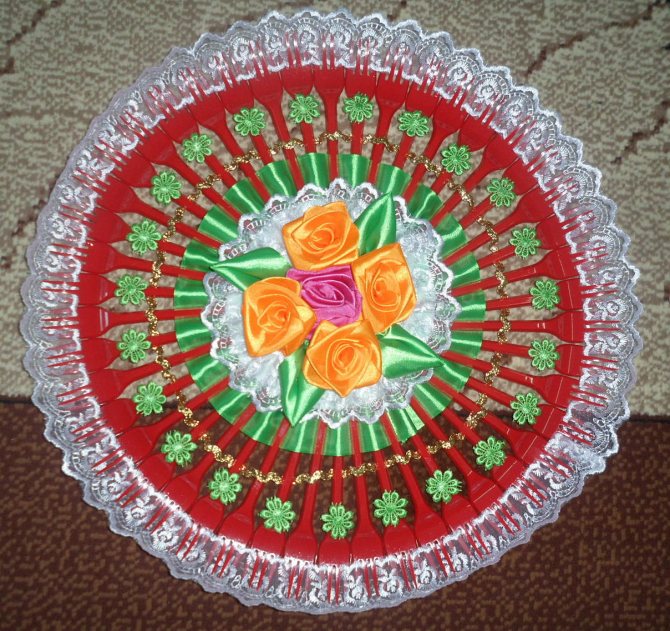
@svoimi-rukami-club.ru
To work you will need:
- disposable forks (from 20 pieces, depending on the planned distance between them);
- old music records or CDs;
- colored cardboard;
- ribbons and lace, beads and artificial flowers for decoration;
- glue gun;
- scissors;
- acrylic paints (optional).
Making a frame is not difficult. The work consists of several stages:
- To see how the panel will look, it is recommended to place the forks around the entire circumference of the plate/disc before work. You can mark with a pencil the places where the forks will be glued. Only after this should you move on.
- The most important and painstaking task is gluing the forks onto the plate. This must be done carefully so as not to smear the glue on the surface of the future craft.
- When the previous stage is completed, you can begin decorating the panel with lace and ribbon. This is not difficult to do: one end of the tape needs to be secured with glue and intertwined with all the forks.
- Then the second plate is applied to the cardboard and traced along its contour. Next, a circle of cardboard is cut out and glued to the plate.
- The resulting blank is decorated as desired. After that, it is glued to the plate with forks.
You can glue an artificial flower or beads to the center of the finished panel, and on the wrong side it is recommended to make a loop from a thin satin ribbon.
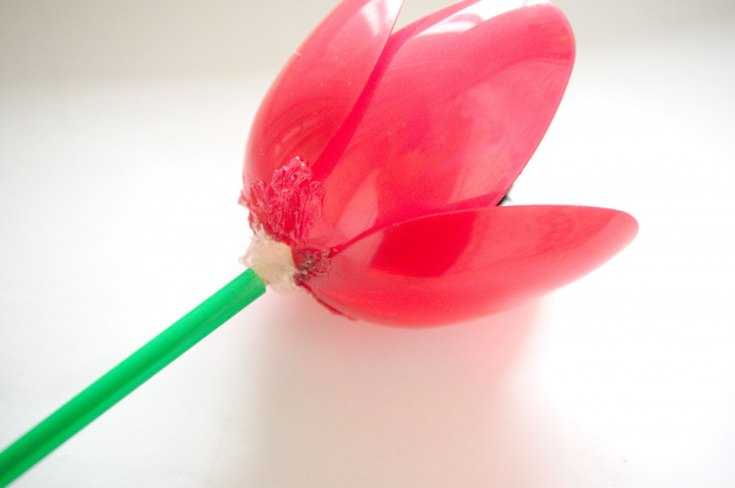
Tulips made from plastic spoons
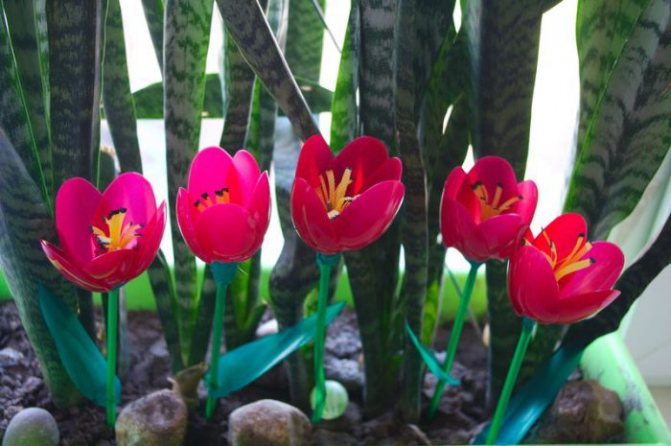
You will need: 4 pairs of plastic spoons (for one tulip), cocktail straws, a disposable plate, a green plastic bottle, a wooden skewer, a candle and scissors.
Master Class
- Cut off the top of the spoon.
- Place the spoons overlapping each other over the candle.
- Form the bud in the same way.
- Cut out the blanks for the stamens from the plate.
- Attach them to a skewer.
- Cut a hole for the stem.
- Thread a cocktail tube through as a stem.
- Thread the skewer through the stamens.
- Cut a leaf from a plastic bottle and attach it to the stem.
- Make a whole bouquet of these tulips.
Other options
If your CD is not scratched, then you can not hide it in cardboard and glue it entirely, and then simply decorate it.
You can use satin ribbons more densely, and fill the free space with them in a checkerboard pattern.
By the way, here is another version of the New Year's fan. A typical attribute of this holiday is used - tinsel.
There are colored forks in stores, so if they match the chosen color scheme, feel free to use them.
In general, when it comes to decorating the fan itself, you can use all the techniques you know. For example, very elegant flowers are made from satin ribbons; the method of creation is called kanzashi. If you have the skills to work in this technique, you will find another use for it, and if this is new to you, you will acquire new knowledge.
As you can see, creating the base of the forks is, in principle, simple and monotonous. But decorating the product will allow the craftswoman to demonstrate all her knowledge, skills and imagination. Ribbons, lace, various yarns, beads, beads, rhinestones, feathers and much, much more - everything that is at hand can become part of amazing creations. And believe me, no one can pass by such creativity indifferent.
Materials for working with crafts
If you have disposable spoons, forks or any other plastic utensils lying around, you should not keep them until a future picnic or throw them away because they may not be useful. It’s better to sit and think about what you can do with disposable tableware. Simple crafts for kindergarten can become your child’s first masterpiece. And family members certainly won’t be bored with such an activity. In addition, you can keep the product with your own hands and use it as some additional element to the interior or give such a creation to your loved ones on their holiday. All you need is:
In addition to the above examples, you can make other crafts using your imagination. The easiest way is to make flowers from plastic spoons, but if you decide to make your own invented masterpiece, then you won’t have to look for a photo of a sample, and this is already harder. You can make it using ready-made templates, for example, a lake with one swan or a whole family of these wonderful birds. By the way, your imagination can be completely unpredictable, so turn your ideas into reality!
All the characters you see in the photo have one thing in common - they were created using plastic spoons. This one for creativity allows you to work wonders!