Preparation for the application “Boats float on the river”
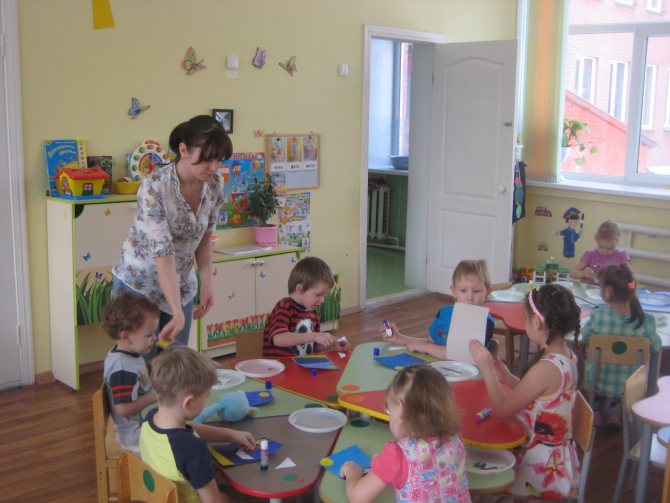
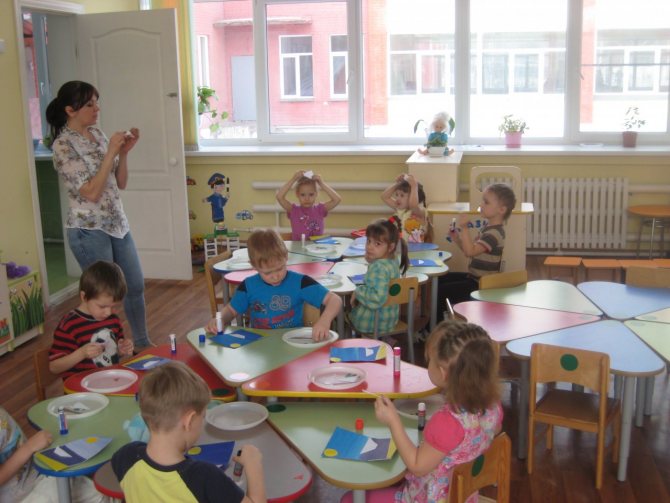
The success of an application lesson largely depends on its preparation. And here the leading role, of course, belongs to the teacher. After all, in the middle group, the guys still cannot prepare parts on their own.
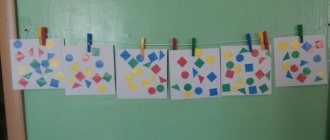
Suitable materials
First of all, to create a composition you will need a base - a sheet of white A5 paper. The teacher also prepares colored paper for each child:
- long narrow stripes of blue, dark blue or gray (to create the image of a river) or ovals of the same colors (lake);
- paper rectangles of different colors (base for boats) of different sizes (approximate size 7X3 cm);
- scraps of colored paper for decorating boats (flags, portholes, etc.).
You can play with the base in a more interesting way - use blue or light blue cardboard, and give the traditional rectangle wavy edges. This will give the impression that the boat is actually rocking on the waves.
You can play with the base in an interesting way - give a traditional rectangle wavy edges
Of course, to work, preschoolers need scissors, glue, brushes, oilcloths and napkins.
Summary of an open lesson on artistic and aesthetic development “Boat”
Summary of an open lesson on artistic and aesthetic development
Application on the theme “Boat”
.Integration of educational areas:
cognitive development, speech development, artistic and aesthetic development, social and communicative development. Program content: Activate and diversify the technique of working with paper: learn to tear paper (napkin) and crumple it (with a lump and a flagellum), stick an image according to the plan. Introduce children to an excerpt from the poem “Boat.” Arouse interest in creating an image. Develop imagination, sense of composition, fine motor skills. Cultivate interest in visual arts and accuracy when performing work.
Equipment:
Sheets of blue colored paper, white and blue napkins, a boat, a sail, a sun cut out of colored paper (according to the number of children). Equipment for application.
Progress of the lesson:
Educator: Hello, children. How beautiful and elegant you are today. Look, we have guests today. Say hello to them. Everyone look at them. We looked. Well done! Now listen to me carefully.
Guys, today we will try to create a picture. Yes, not simple. The poem will tell us what will be depicted in the picture. Listen to it and try to imagine everything you hear about.
Reading the poem "Boat"
Today I came to the river, Ship
in my hand. Let him sail to Wonderland, say hello to his friends, He will see many countries, He will go far across the ocean To meet the icebergs and the sun, But he will definitely return!
Tell me what you imagined when you listened to the poem? So, what should be depicted in our picture? After all, in the dark we would not be able to see either the boat, or the sail, or the sea, or the clouds.
And before we start working with paper and glue, let's practice our fingers. Let's play a finger game.
A physical education session is held:
Seagulls are circling over the waves, Let's fly after them together, Splashes of foam, the sound of the surf, And above the sea - you and I! (children wave their hands).
We are now sailing on the sea. And we frolic in the open space. Have fun rowing and catching up with the boat (children row with their hands).
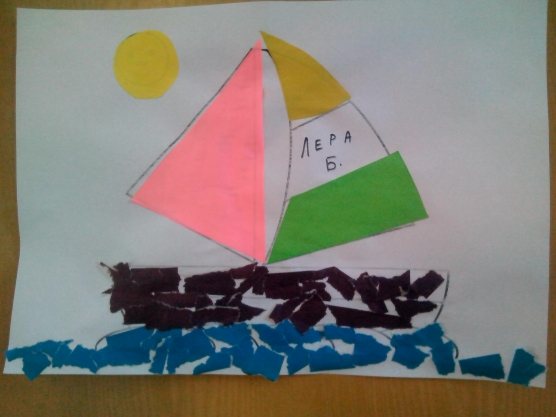
There are sheets of paper in front of you. What color are they? Blue like the sky. This is where we will place the sun in the sky. Find the “sun” among other elements of our picture. How did you guess that this was it? That's right, it's round and yellow. Attach it to the top of the sheet. Now stick it on.
Guys, take a piece of blue napkin in your hands and crumple it with both hands like this (demonstration) to make a flagellum. Now expand the flagellum a little. We got sea waves. Now you need to smear glue on the bottom of the sheet (located vertically) and apply waves of crumpled blue napkin to the glue.
What words did the poem begin with? "The boat sailed on the waves." We have waves, now we need to make a boat. Place the boat on the blue napkin so that it is clear that the boat is floating on the wave. Happened? Then glue the boat. I remind you that the boat needs to be placed on oilcloth with the colored side down and coated with glue. Then we carefully take it, place it on top of the waves and carefully press it with a napkin.
Now all that remains is to glue the sail. Yes, our boat is not simple, but with a sail. This type of boat is called a “sailboat”. Remember: a sailboat is a ship with sails. Repeat this word and remember it. What needs to be done to make the boat we pasted become a sailboat? Glue on the sail. And we'll do it like this. The teacher shows exactly how to position the triangle - the sail - with an acute angle upward.
And what is missing in our picture is clouds. Let's make two clouds. Take a white napkin in your hands and tear it into two parts. Crumple each piece, but not too much, so that you get clouds. In which part of our picture will we glue the clouds? Up there, where the sky is.
So our picture is ready. Let's remember once again the poem that helped us create such a wonderful picture. Those who remember the words of this poem can recite them with me. Today I came to the river, Ship
in my hand. Let him sail to Wonderland, say hello to his friends, He will see many countries, He will go far across the ocean To meet the icebergs and the sun, But he will definitely return!
Now, while the glue on our work dries, let's dance.
Dynamic pause music about a sailing boat
After the lesson, you can learn the poem “Boat” with the children and arrange an exhibition of children’s works.
Techniques and techniques used
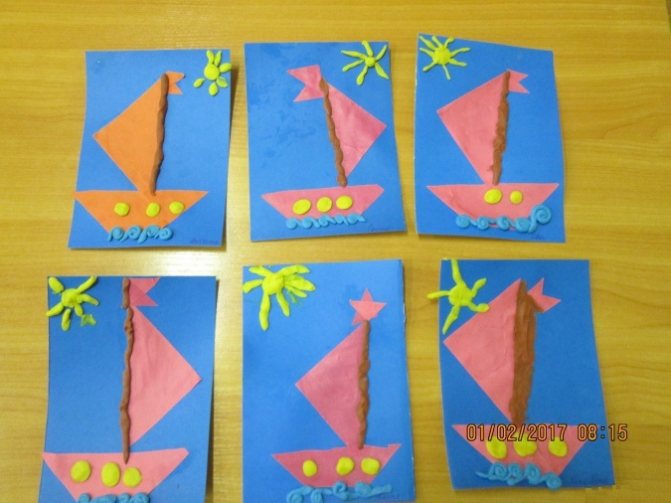
Students in the middle group begin to work with scissors - they learn to cut parts in a straight line, as well as round corners. To create the look of a boat, you need to cut the corners on one side so that the rectangle turns into a trapezoid.
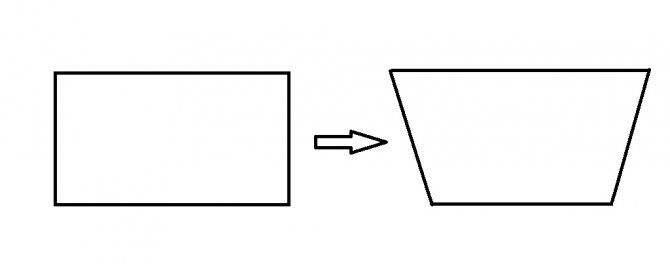
The preschooler's task is to cut off the corners of a rectangle so that it turns into a trapezoid
If the boat is supposed to have a sail, it can be designed in the form of a triangle or semicircle. In the first case, the child cuts a square diagonally, in the second option, the resulting part needs to round the corner, turning it into a semicircle.

To create a sail, the child will need to cut a triangle from a square, and then transform this figure into a semicircle
A semi-oval can also be obtained by cutting off the corners of a rectangle.

You can make a sail from a rectangle, turning it into a semi-oval
First, the teacher clarifies the shape of each part and demonstrates a sample. Children move their hand along the imaginary outline of an object in the air.
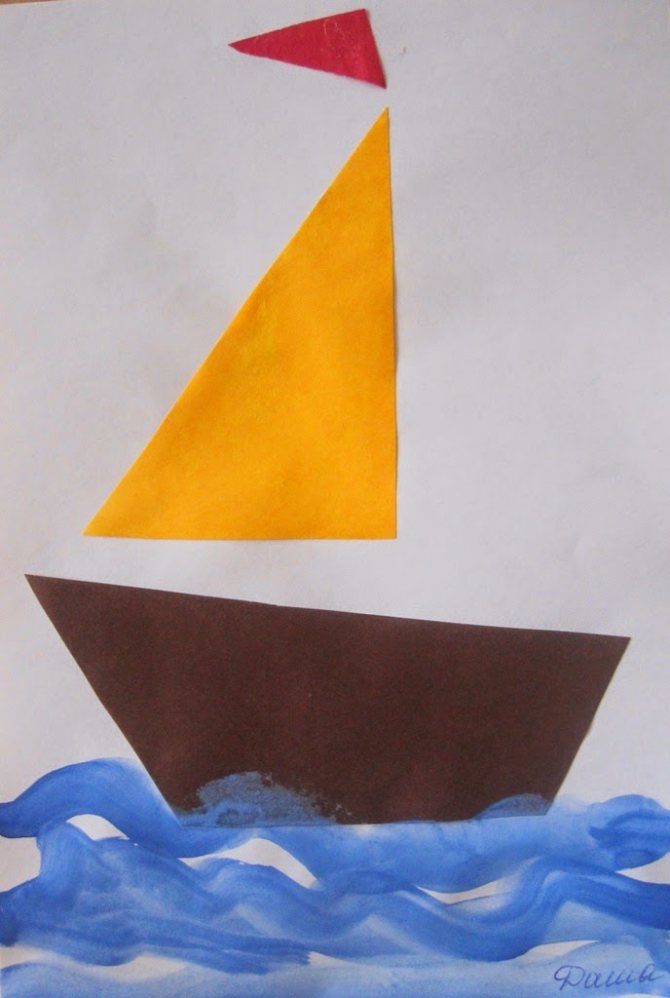
The finished boat can be decorated with a flag (triangle).

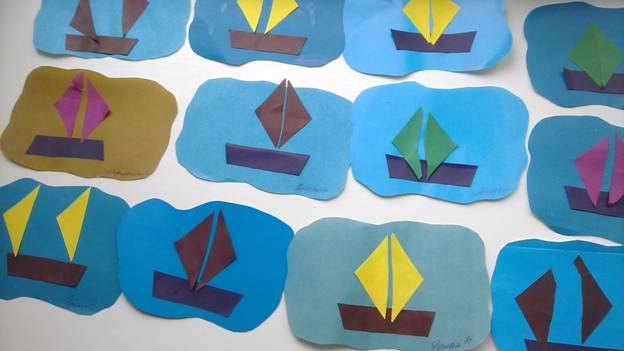
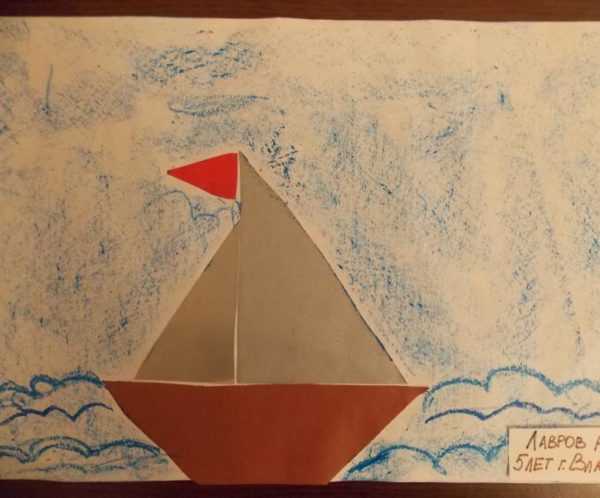
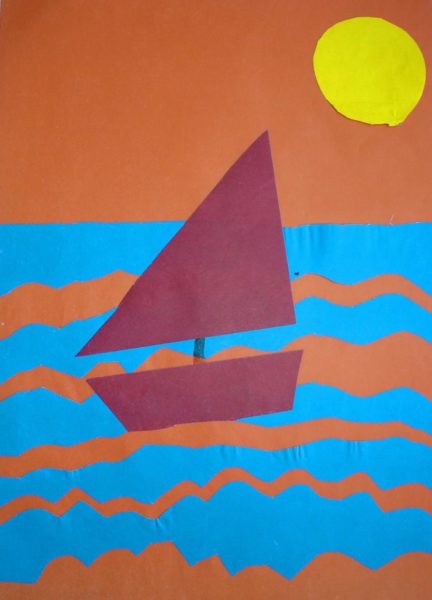
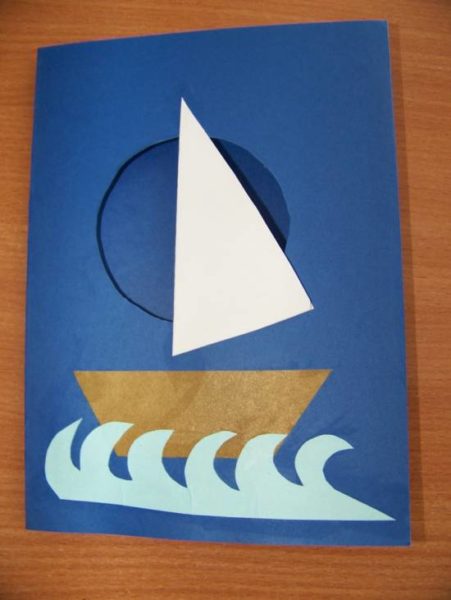
The finished compositions in the traditional version look something like this
When all the details are cut out, the teacher pays attention to the composition, discusses with the children how to beautifully arrange the boat on the base, depending on their number - one, two or three. After this, the skills of careful gluing are practiced: you need to apply the glue with a brush carefully, in a small amount, with the part being positioned with the colored side down.
Video: boat made of geometric shapes (process of application)
Unconventional applique
You can depict boats floating on the river not only using traditional techniques. Preschoolers can successfully use cut-out appliqué by creating an image from small pieces of randomly sized paper that are torn off by hand.

You can depict a boat using the broken applicative technique
Alternatively, this method can only depict a river or lake.

In the breaking technique you can only depict water
An interesting idea is to make a boat using the origami technique. You need to take the simplest option, when the image is obtained by folding a square and bending its edge. And the work will be complemented by waves from a satin ribbon (the child can easily glue it on, following the teacher’s instructions).
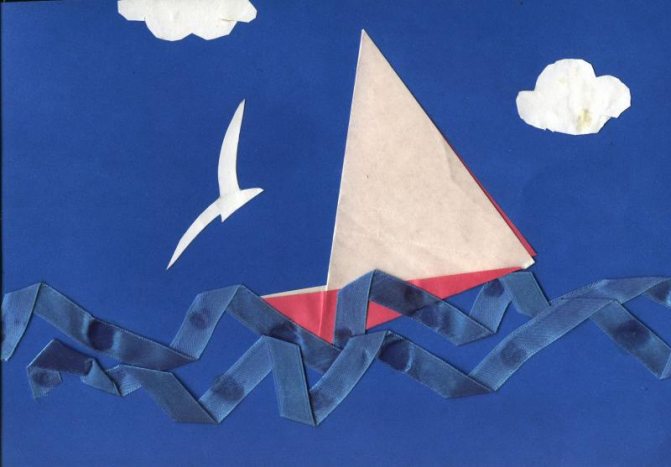
A sailboat can be made very easily using the origami technique, and waves made from satin ribbon will make the composition even more original
Unusual waves can be created from pieces of crumpled napkins. To do this, it is torn into small pieces, and lumps stick together. Another option is to crumple the napkin with your hands to form a flagellum, and then unfold it a little and glue it.

Interesting waves can be made from a crumpled napkin
A similar method is good for depicting clouds in the sky (cotton wool is also suitable for this).
Video: a boat with voluminous sails, sea foam made of cotton wool (the parts are prepared by an adult, and the child glues them on)
What can be added to the application?
Additional visual techniques will help you create an original composition of boats. So, the waves that rock the boat can be painted with watercolors or brighter gouache.
Waves can be painted with watercolors or gouache
Plasticineography also goes well with applique. Thus, plasticine can be used to represent the mast and portholes of a boat, as well as sea waves and a bright yellow sun in the sky.
Applique and plasticineography complement each other perfectly
Ship. Abstract of GCD on application with drawing elements for the middle group
Abstract of GCD on application with drawing elements for the middle group “Boat”
Author
: Efremova Victoria Sergeevna, teacher of MBDOU No. 98, Miass
Program content:
Teach children to create a figurative picture, using previously acquired skills: cut out rectangular objects along the lines - markings, as well as cut off the corners of rectangles, connect parts according to the model and demonstration of the teacher. Develop hand motor skills, imagination, sense of composition, arouse interest in creating an image. Cultivate interest in visual arts and accuracy when performing work.
Handout:
- watercolor paper; - blue watercolor paint; - brush; - white, blue and yellow colored paper; - scissors; -PVA glue, glue brushes, napkins; - felt-tip pens of different colors. (You can simplify the fake, make the applique in several stages, or take a sheet of blue cardboard instead of a sheet of watercolor paper)
Progress of the lesson:
Educator: - Guys, today I want to invite you to go on a trip by sea. Do you agree? (children's answers). What do we need for this journey? (children's answers). I want to read you a riddle, and you try to guess it. What kind of miracles are these: Is the wind blowing into the sails? Neither a ferry nor an airship - It floats on the waves... (Ship) Educator: Well done guys! You guessed the riddle correctly. For our journey we need a beautiful and durable ship. We will start building it now. Your tables have everything you need for this. Well, in order for the ship to turn out strong and beautiful, your task is to listen to me carefully, not to rush, and of course to do the work carefully.
- The first thing we need to do is take a sheet of watercolor paper and
paint half of them with blue paint (let dry a little)

- While the watercolor paint dries, we prepare everything necessary for the application. When the paint has dried, glue half a sheet of blue paper to the background.
- Cut a strip of yellow paper about 4-5 cm wide. Glue it at the bottom of the sheet.
- Take a square of white paper approximately 10*10 cm (prepared in advance). Cut it into two triangles. For one triangle, cut off a corner. (An angle that is 90 degrees)
- Glue a triangle with a cut corner onto a blue background - this will be the boat itself, then a triangle that remains intact - this will be the sail.
- From yellow paper we cut out (according to the markings) a circle - the sun and glue it above the boat. Using a felt-tip pen, draw a mast and decorate the sail.

Educator: - Our boats are ready! We did a great job and now we can go on a trip.
The teacher reads a poem. Today I came to the river, Ship
in my hand.
Let him sail to Wonderland, say hello to his friends, He will see many countries, He will go far overseas, To meet icebergs and the sun, But he will definitely return! M. Piudunen
Individualization of tasks
In fine arts classes, it is imperative to use an individual approach. So, for children who are not yet very good at handling scissors, you can offer to make only boats (hulls), and for those who are already good at cutting out parts - boats with a sail.
During the applique class, the teacher should actively encourage the manifestation of children's activity and creativity. Some children cope with any work quickly, so they definitely need to complicate the task even more - offer to supplement the composition with details: for example, cut out the sun and clouds from paper or decorate their boat with details. You can also give paints so that the child can depict rain or fish looking out of the water.
There are many options here. The main thing is to captivate the child so that his interest in creativity only becomes stronger.

Some children quickly and efficiently cope with basic work; they definitely need to be given additional tasks in order to maintain interest in creativity
Composition options based on theme
According to the visual arts program for the middle group, an application on the theme “Boats float on the river” is offered to preschoolers in October. The composition options are designated as “Fishing boats went to sea” and “Yachts on the lake”.
However, this lesson can be carried out in the spring, connecting the theme with spring streams, along which it is so fun to float paper boats (“A paper boat floats along a stream”).
You can make such an applique for Defender of the Fatherland Day - let it be a warship sailing on the waves, which the children will present as a gift to dad.
The lesson can also be associated with reading V. Suteev’s fairy tale “The Boat”, designating the topic as “A Boat for Animals”. This will be a more fabulous option, and instead of a sail, the teacher can offer each child a fresh or dried leaf of a tree.
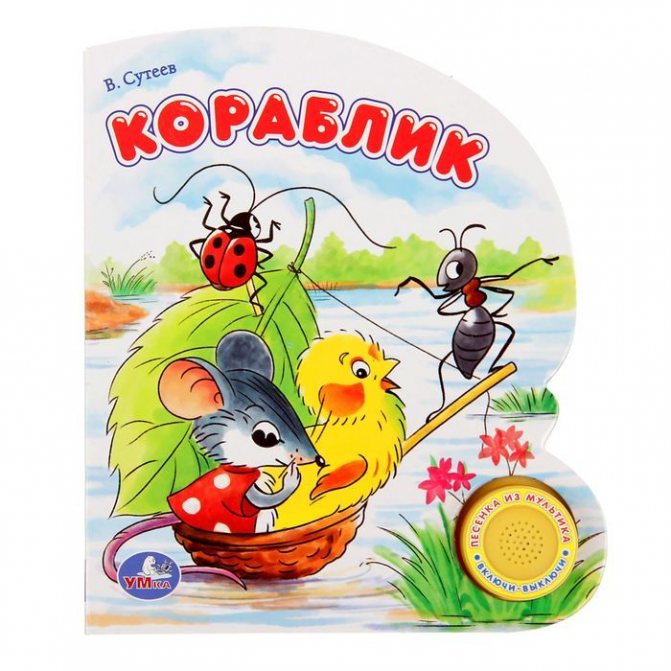
The application can be timed to coincide with the reading of the fairy tale “The Ship” by V. Suteev and create the same image
Video: cartoon “Boat” (1956)
MAGAZINE Preschooler.RF
Educator: Abdulova D.S. 2011 Goal: to educate children to have a good attitude towards their dad; evoke a feeling of pride and joy for the noble deeds of a loved one, evoke a desire in children to make a gift for dad with their own hands; continue to learn how to fold applique parts on a sheet of paper, gluing them carefully; develop hand motor skills Materials: Glue, a glue brush, a sheet of cardboard, crayons, stands for brushes, oilcloths, rag napkins, a trapezoid and two triangles cut out of corrugated paper - according to the number of children; demonstration sheets with step-by-step implementation of the application Contents: Educator: Guys, in many countries there is a holiday for real men - sons, dads, grandfathers. And here in Russia this holiday is called Defender of the Fatherland Day. This holiday is celebrated at the end of winter, on February 23. Listen to these words - “Father” and “Fatherland”. How similar they are! It probably happened that real men are fathers and grandfathers, always and at all times defending their country, the Fatherland from harm. (Showing illustrations) They multiplied her wealth and guarded her borders, protected the weak, supported the offended. In order to truly love your homeland and defend the Fatherland, you must be brave and strong, be able to stand up for yourself and for others, be able to give your word and keep it. Educator: Children, do you know that it is customary to give gifts on holidays. (Children's answers) Educator: Children give gifts to the dearest, most beloved dads. And the most expensive gift will be the one you make with your own hands. Do you think dads will be happy with your gifts (children's answers) Guess the riddle and you will find out what we will give dads. He sails on the sea, he carries the captain. (Boat) Educator: That's right, boat. Here are the finished figures, they need to be carefully glued. Let's stretch our fingers first. Finger gymnastics: On a ship from distant countries (“ship”) A brave captain (“little man”) is sailing, From a cramped wheelhouse, at the helm (“movements by the helm”) He saw quite a bit through binoculars (“binoculars”). (carried out 2 times) Educator: Who can tell us how to glue the parts? Children: you need to take a strip and put the colored side on the oilcloth. Take a brush, dip it in glue and spread the entire strip with glue. Place the brush on the stand. Take a strip, place the smeared side on a sheet of paper, press the pasted strip with a napkin to remove excess glue. First, we glue the deck of the ship, spread glue, apply it to the cardboard, holding it with a napkin. Educator: That's right, guys, first we glue the deck, then the sail and the flag. Now we take crayons and draw the sea so that our boat floats. Educator: Let's hang our work on the board and see what kind of boats we got. Educator: Here are the postcards for dads. Well done, everyone tried their best. Give it to your dads in the evening.| Next > |
Motivating start to class
In order for a child to do work with joy, he must be motivated. This can be done in different ways, for example, using a game character who comes to the children for class and asks for help.
This could be Leopold the cat. The hero reports that he was invited to visit the little mice, but they live far away. To reach them, you need to cross a wide river. And for this you need a boat. Of course, the kids will enthusiastically get to work to help the cat.
Some famous character, for example, Leopold the cat, comes to the guys and asks for help - they need to make him a boat
Another option is a telegram from Doctor Aibolit. Sick animals are waiting for him in Africa. But to go there, you need a ship with sails (after all, it’s a long way to sail).
You can start the lesson with a riddle to intrigue the children. For example, this option:
- A cap is floating along the river From a huge soldier The guys are waving their oars It’s not a cap, it’s... (a boat)
What follows is a discussion of what geometric shape the boat most resembles (a rectangle because it is long). As a result, the teacher invites the children to make their own boats.
Another way is for the teacher to invite the kids to use their imagination and draw a picture based on the poem. The poem “Ship” sounds:
- The boat sailed on the waves, the sail was rushing towards the clouds. The waves rose towards the side and crashed against the ship. Svetlana Sirena (Kotlyar)
Then a conversation is held on the poem, after which the children begin the creative process - creating an image of a paper boat.
You can start a conversation about spring, about how fun it is to launch boats along streams when the sun warms everything around with its warm rays.
To maintain the interest of preschoolers in the topic of application, the teacher must conduct appropriate finger gymnastics or physical education.
Table: finger gymnastics “The wind walks across the sea...”
| Text | Movements |
| The wind blows across the sea | children shake their palms, imitating waves |
| And the boat speeds up | palms cupped |
| He runs in the waves | move fingers starting with thumb |
| With full sails. | fingers spread wide |
Table: physical education (based on a poem by A. Barto)
| Text | Movements |
| Tarpaulin, | put a hat on your head |
| Rope in hand | Place clenched fists next to each other, spread your arms - show the length of the “rope” |
| I'm pulling the boat | cup your palms |
| Along a fast river. | rock the boat |
| And the frogs jump at my heels, | jumping in place |
| And they ask me: | press your hands to your chest |
| - Take it for a ride, captain! | extend open palms forward |
Summary of GCD for children of the middle group, on the topic: “A boat is sailing on the river”
(Children are surprised)
Teacher: Guys, this boat is sad and alone and wants you to help him make other boats that will become real friends.
Guys, can we help the boat?
(Children's answers)
Finger gymnastics
Then get your fingers ready! It's time to play, stretch our fingers. And Daniil Kharms’ poem “The Ship” will help us with this.
A boat is sailing along the river. He swims from afar. (Fold your palms into a boat and imitate how it floats and sways)
There are four very brave sailors on the boat. (Show four fingers with one hand and swing the hand of this hand to the beat)
They have ears on the top of their heads, (Put your hands to your head, showing your ears)
They have long tails. (Place one hand back behind your back, showing the tail with wave-like movements with your whole hand)
And only cats are scary to them, Only cats and cats! (Make cat claws from your fingers and imitate scratching)
Teacher: Now take your scissors and use strips of colored paper to make a deck for our boats. From the rectangles of the blanks, we cut off 2 triangles at the edges at an angle to form a deck. Guys, what shape does the deck look like if you turn it over? (Children's answers: trapezoid)
Well done! Set aside your decks.
Teacher: Now we cut out the long mast. Who wants to help me? chooses one of the students.
Wonderful! The masts are ready, put them in plates.
Teacher: And the final stage of working with parts of the boat is the jib, our sail made of red paper, which perceives wind pressure and uses it to move. Guys, I need an assistant to check if this is true and if the sail really helps the boat move. He chooses one of the pupils according to a counting rhyme and asks him to blow on a boat in a basin of water. You see the boat runs on the water from the breeze and the sail helps it with this! Great!
Get your scissors ready and let's try to cut a sail for our boat from a square. We cut the square shape diagonally and get two equal triangles, which will be our sails.
How smart you guys are! Our little boat is already looking forward to his new little boat friends that you will give him.
Teacher: Let's start assembling our boat. Guys, in what order should you glue the parts of the boat?
(Children's answers)
That's right, well done!
Prepare your brushes and glue the decks to the edge of the sheet, try to work carefully not to stain the boat, then the mast in the middle of the deck and at the top of the mast is the jib, our sail.
It’s great that while you were gluing your boats together, our lonely friend told me straight from the basin that you guys don’t forget to draw the waves. Let's take blue and green watercolor pencils and draw waves for our boats!
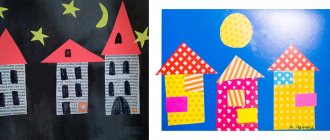
Photo gallery of finished works - ideas for teachers

The application is combined with gouache painting and plasticineography
The applique is combined with drawing with wax crayons. A combination of applique (boats made using origami) and drawing (the sky and reeds)
Original waves are made from strips using the breaking technique

Simple origami, which is complemented by drawing
Application in the form of a postcard for dad with original waves (the teacher prepares them)
A broken applique with filling in a drawn template. Children fill in the drawn outline with pieces of paper; sails made from bright fragments look colorful
Applique classes should practice and improve the visual skills of preschoolers, as well as expand their horizons and knowledge about the shape of surrounding objects. Thus, the theme of a boat or a boat sailing along a river can be played out in a very interesting way, using the right motivation and using unusual materials.
Greeting card for Defender of the Fatherland Day “Ship”. Master Class
Larisa Savchuk
Greeting card for Defender of the Fatherland Day “Ship”. Master Class

The master class is designed for preschool children for teachers and parents.
Purpose: as a gift for the holiday of February 23, interior decoration.
Goal: making a greeting card with your own hands for the holiday of fathers and grandfathers
- develop the ability to make cards with your own hands;
- develop aesthetic and artistic taste, creative abilities of children;
— improve application skills;
- cultivate independence, accuracy, love for loved ones
Required material:
- cardboard of silver, golden, brown color;
- white and colored paper (yellow, red, blue);
— scissors, simple and with zigzag blades;
— printed congratulatory poems and inscriptions “Happy February 23”;

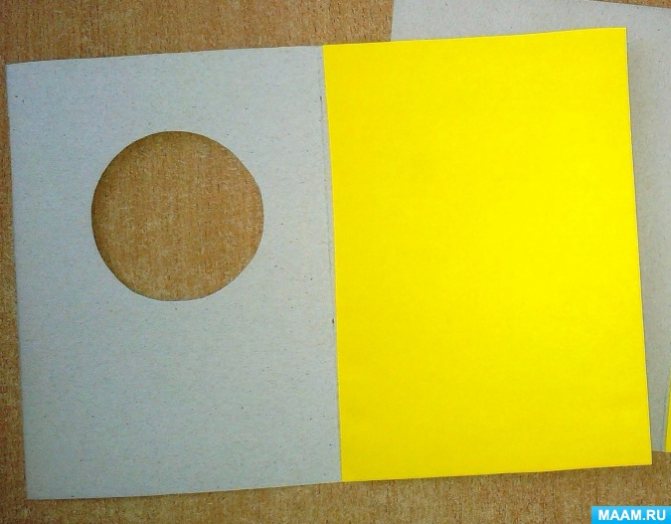
Sequence of making a postcard:
Draw templates on cardboard and cut them out.

Make blanks for the card base:
- fold a sheet of golden (silver) cardboard in half,
- cut a round hole with a diameter of 8cm on the front side of the base,
- glue a sheet of yellow paper to the right inner side of the postcard
Using the template, prepare all the details for the card, cut out inscriptions and congratulatory poems

Glue a poem, an inscription and a star on the inside

On the front side of the postcard, place an image of a boat sailing on the waves.
The greeting card for February 23 is ready!
Modern greeting card for mom. Master class I would like to offer you a master class on making a modern postcard for your mother. Mother's Day is a wonderful occasion to give back. Master class “Postcard for dad for Defender of the Fatherland Day” Postcard for dad for “Defender of the Fatherland Day” For work we will need the following materials and tools; Scissors, glue stick, glue. Master class “Greeting card” Greeting card. We prepared such postcards for the Day of the Elderly. 1. For work we needed: Colored cardboard, colored.