1. Lesson topic: “Self-portrait.”
Combined lesson: students must independently create self-portraits based on the knowledge acquired in the lesson. The work is carried out with graphic material (hard and soft pencils).
2. Type of lesson: Aesthetic perception of reality. Image on a plane (shape, proportions, design).
Purpose: To acquaint schoolchildren with how the analysis of proportions, the structural and anatomical structure of the human head, and volumetric shape occurs. The variety of human faces and characters.
Tasks:
- expand students’ understanding of the portrait genre;
- study the proportions and anatomy of the face;
- develop graphic skills;
- activate creative imagination;
- develop artistic taste;
- contribute to the formation of an aesthetic attitude to reality.
Equipment for the teacher: methodological table “Constructive form of parts of the face”; reproductions of Belarusian and world fine art, magnets, a poster with the inscription “Our class”.
Equipment for students: paper, pencils (hard and soft), eraser.
DURING THE CLASSES
1) Organizational part of the lesson. Preparing students for active educational and cognitive activities. (2-3 minutes).
2) Studying new material (20 minutes).
Guys, let's start our lesson with a riddle.
Here is an easel, and here is a tripod - Paint me, artist, If it doesn’t look like it, Don’t be sad, so what. A red eye over a blue ear, Don’t lose heart anyway, It means you haven’t worked a lot, Start your work from the beginning. (Portrait)
Portrait! What could be simpler and more difficult! Listen to what the writer Zabolotsky said about the beauty of human faces.
There are faces like lush portals, Where everywhere the great appears in the small. There are faces - like miserable shacks, where the liver is boiled and the rennet gets wet. Other cold, dead faces are closed with bars, like dungeons. Others, like towers, in which for a long time No one lives or looks out the window. But I once knew a small hut, It was unprepossessing, not rich, But from its windows the breath of a spring day flowed onto me. Truly the world is both great and wonderful! There are faces - the likeness of jubilant songs, From these, like the sun, shining notes, a song of heavenly heights is composed!
Have you ever thought about the fact that people should be very similar to each other? Indeed, all people have a nose, a mouth, two eyes on their faces, above them eyebrows, a forehead, hair, and the face is vertically divided into approximately three equal parts. But, nevertheless, you are sitting in front of me 30 people and you are all completely different. Why? You have different shapes and sizes of eyes, lips, noses, you are all different from each other, so I distinguish you. Let's take a close look at each other and try to see the diversity and uniqueness of features and their combinations.
You may be interested in: How to draw Chuck the bird from the game Angry Birds
A) Conversation about the genre of portraiture.
One of the genres of painting, sculpture and graphics dedicated to the depiction of a specific person is the portrait. The main quality of a portrait is its resemblance to the original. But there is little external resemblance.
The observant eye of the artist sees in the facial expressions, in the expression of the eyes in gestures and posture, in the manner of walking, sitting, dressing, in the surrounding environment the manifestation of certain character traits, habits, experiences, moods and feelings, that is, the internal state of a person . In addition to external individual resemblance, artists strive to convey in a portrait a person’s character, his spiritual world. And for this they communicate with the person being portrayed, study its characteristics and only then convey their impressions on paper, canvas, or stone.
Therefore, different portraits of even one person can be both similar and dissimilar by different artists (after all, each also conveys the characteristics of the author of the portrait: a certain coloring, painting technique).
The word portrait means, translated from French, “to reproduce feature by feature” of the person depicted (“portrait” - image).
In the old days, noble people ordered portraits of all family members from contemporary portrait artists and passed them on from generation to generation (just as we pass on albums with family photographs). Through portraits you could get to know your great-great-grandfather or your great-great-grandmother’s mother.
Tip #2: Make your workspace comfortable
Make sure operating conditions are optimal. For some of us, having our own studio may be a luxury, but it's still better to have something than just a sketchbook on your lap.
Place the mirror where it's easy to see—don't drag your art supplies into the bathroom! Mount the wall mirror on the camera tripod; this way it will be closer to the drawing surface without having to head back and forth between the drawing and the mirror.
Make sure you have a good light source and a vertical surface to draw on, because on a flat surface the drawing can get away from you and become distorted. An inexpensive easel and backlight are a great option.
Varieties of portrait (Demonstration of illustrations).
Depending on the size of the image in pictorial portraits, there are head (when only the head to the shoulders is depicted), chest, waist, knee and full length.
With regard to the pose of the presented figure, they distinguish between profile, “from the face” (en face), three-quarter turn to the right or left.
Based on the nature of the image, the following are distinguished:
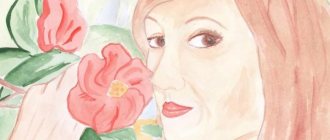
Self-portrait is a graphic, pictorial or sculptural image of oneself (the artist), made using a mirror or from memory.
Visual range:
Thomas Gainsborough "Self-Portrait". O. Kiprensky “Self-portrait”. I. E. Repin “Self-portrait”.
A ceremonial portrait is a portrait showing a person in full growth, on a horse, standing or sitting. Typically, in a formal portrait, the figure is shown against an architectural or landscape background.
Visual range:
A. Bogolyubov “The ceremonial portrait of Empress Catherine II.” (National Art Museum of the Republic of Belarus). K. Bryullov “Horsewoman”. Thomas Gainsborough "Viscount Ligonier", "Viscountess Ligonier".
Group portrait - a portrait that includes at least three characters.
Visual range:
M. Savitsky “Rose Bush”. Adolf Gugel “Songs of the Native Land” Triptych. Central, part. F. Hals “Regents of the Almshouse in Amsterdam.” M. Shibanov “Wedding contract”.
A chamber portrait is a portrait using a half-length, bust-length, or shoulder-length image of the person depicted. Usually in a chamber portrait the figure is shown against a neutral background.
You may be interested in: Art lesson for 2nd grade. “Easter gift”
An intimate portrait is an intimate portrait with a neutral background, expressing a trusting relationship between the artist and the person being portrayed.
Visual range:
V. Stelmashonok “Portrait of Y. Kolos.” Adolf Gugel “Songs of the Native Land” Triptych. Left and right side. Nathan Isaevich Al. V. A. Tropinin “Portrait of A. S. Pushkin. Thomas Gainsborough "Princess Elizabeth". Vladimir Borovikovsky. Portrait of M. I. Lopukhina.
Conclusion: portraits not only convey to us images of people from different eras, reflect part of history, visibly transmit it to descendants, but also talk about how the artist saw the world, how he related to the person being portrayed (the model).
With the invention of the camera, artists did not stop drawing portraits, and people did not stop ordering them. After all, a photograph is made by a mechanism, and the author works on the painting. He can show a person in different ways, notice something in him that the lens will not notice.
Question for students: - What type of portrait can we classify this work as? Vasily Pukirev “Unequal marriage”. National Art Museum of the Republic of Belarus (group portrait).
B) A conversation about proportions, the structural and anatomical structure of the human head.
Guys, today in class you need to draw a self-portrait. We will place the face in front (in front). Knowledge of the basic features of facial anatomy and the sequence of working on a portrait will help you in your work.
The teacher explains the manual “Constructive form of parts of the face” . The teacher gradually draws all stages of the work on the board.
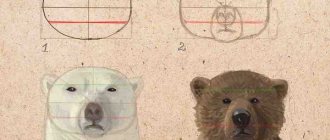
1. The composition of the drawing should occupy the entire sheet format. Since a person’s head has an elongated shape, place a sheet of paper vertically in front of you. Draw an oval face.
2. When constructing a head drawing, an important role is played by auxiliary lines, which allow you to maintain the position and relationship of the parts of the face.
The middle vertical auxiliary line runs from the occipital protuberance, in the middle of the frontal bone, to the base of the nose, in the middle of the jaws. And divides the face into two equal parts.
The height of the front part of the head is divided into three equal parts (horizontal auxiliary lines).
- the first - from the base of the tip of the chin to the base of the nose;
- the second - from the base of the nose to the eyebrows (brow ridges);
- the third - from the eyebrows to the middle of the forehead (frontal bones).
3. The shape of the eyes is oval, the distance between them is approximately equal to the eye. (The teacher continues to draw). The eye itself consists of an eyeball covered by the upper and lower eyelids, which form the palpebral fissure.
In the center is the pupil, a black dot that decreases or increases in size depending on the amount of light. Around it we draw the iris (colored) shell, and a highlight (white reflection) appearing on the spherical “shiny” surface of the cornea.
You may be interested in: Art lesson “Magic Butterfly”. 2nd grade
Eyes can be small and large, narrow and wide, and in color - blue, gray, brown, green.
4. Eyebrows are located above the eyes and are located on an auxiliary horizontal line. Eyebrows can also be wide and narrow, straight and curved.
5. The lower part of the face is divided into two parts by an auxiliary horizontal line. On it is the tip of the nose with symmetrical right and left wings. The nose is shaped like a four-sided pyramid. The nose can also be short, long, snub, “eagle”, “potato”, straight or “Greek”.
6. Next, draw the lips, upper and lower. They are located below the nose and have a wavy contour. The length of the lips is the size from the middle of the pupil of one eye to the middle of the pupil of the other eye. Lips can be narrow, medium, thick and swollen.
7. The ears are located in height from the continuation of the lines of the eyebrow (top) and mouth (bottom).
8. The neck is twice as narrow as the width of the head. Hairstyles are very diverse.
9. Then, using tone, we clarify the shadow and illuminated parts of the head. The general shape of the head resembles a ball, an egg, we repeat the same shape in the drawing. We apply a falling shadow and our own shadow, usually in the area of the base of the nose, eye sockets and lips.
3) Independent artistic and creative activity of students. (20 minutes)
According to plan:
- Students are asked to draw a “Self-Portrait”.
- Thinking over the idea, creating a layout sketch.
- Determining the size of the compositional center and secondary elements of the composition.
- Easy markup - layout of the picture in the selected format.
- Working with graphic materials. Black and white modeling of a human head.
Reproductions and a pedagogical drawing of the structural structure of the human head remain on the chalkboard
Teacher's job:
- monitor the sequence of work;
- cultivate accuracy when drawing;
- individual assistance to students in resolving emerging issues.
4) Summing up the lesson.
Reflection, analysis and evaluation of the results of artistic and creative activity (2-3 minutes).
— Guys, what will the type of portrait be called, where we will all be depicted together? (Group).
If you didn’t have time or want to finalize your self-portrait, take it home.
During class time, we will paste our composition onto a large sheet of paper, let the group portrait of the class be preserved for a long time!
Tip #3: Work from the general to the specific
The best way to tackle something as complex as a self-portrait is to keep it simple. Think about the biggest shapes and contrasts - light and dark.
Work freely and easily at first, developing correct proportions and contrasts, gradually moving closer to the details. Don't switch to drawing a realistic eye, for example, and then move on. Your entire drawing should be on the same level. This helps you keep the whole picture in mind instead of focusing on the small details.
Summary of educational activities for drawing in the preparatory speech therapy group “Self-Portrait”
Nina Kupreichik
Summary of educational activities for drawing in the preparatory speech therapy group “Self-Portrait”
Summary of GCD for drawing in the preparatory speech therapy group.
Topic: " Self-Portrait "
.
Goal: to develop a person’s artistic perception. Continue to learn how to convey facial features in a drawing. Learn to draw a self-portrait from memory (head and shoulders)
.
Develop aesthetic taste, imagination and independence. Cultivate love for loved ones, the desire to give them gifts, and accuracy in work. Reinforce the concepts of “portrait”
,
“single portrait”
,
“
group portrait ” .
Materials: album sheets for each child, pencils, felt-tip pens, pencils, gouache, wax crayons, watercolors, erasers, mirrors, stencils.
Preliminary work: examining photographs and portraits, landscapes, still lifes.
• Consideration of thematic albums from the “Human World”
on the topic:
“Parts of the body”
.
• Didactic game “Name it kindly”
,
“Name the parts of the head”
,
“Name what a person has 2”
,
“Define genres”
.
On the topic: methodological developments, presentations and notes
GCD for artistic and aesthetic development “We draw a still life” for children of the older group.
Summary of educational activities in the educational field “Artistic and Aesthetic Development” on the topic: “Winter Christmas trees” in the senior group.
Abstract of GCD artistic and aesthetic development On the topic: “Horses” for children of the older group.
Summary of continuous educational activities in the educational field “Artistic and aesthetic development” (drawing) in the senior group.
This summary is intended for teachers in preschool educational institutions. The goal is the development of fine motor skills of the hands in modeling from salt dough.
Goal: formation of positive motivation for educational activities through applications.
a comprehensive lesson with elements of experimentation for senior preschool age on the topic “Space”.
Source
Tip #4: Try and try again!
Let's be honest. There is no shortcut to becoming a great artist. It may be a cliché, but the old saying that success is “99% sweat” is absolutely true.
Practice, practice, practice - these are the rules. We can only learn from mistakes, and every realized mistake is a step towards a better self-portrait.
So the best advice for drawing a great self-portrait is to draw as much as you can and don't work alone. Let other artists see what you do and talk to them about your work. Accept criticism!
But the most important thing is work. An art professor once said this: “Everyone has a thousand terrible works. The faster you get rid of them, the faster you’ll get to the good ones.” The good news is that it's not a thousand terrible jobs in a row. From time to time you will create something great, and the more you do it, the more often good work will appear. So draw!
Author: Paul Heaston