How to make a paper boat with your own hands
Paper crafts are considered the simplest boats. They fold quickly, do not require much time to create, and the child can decorate and color it as desired.
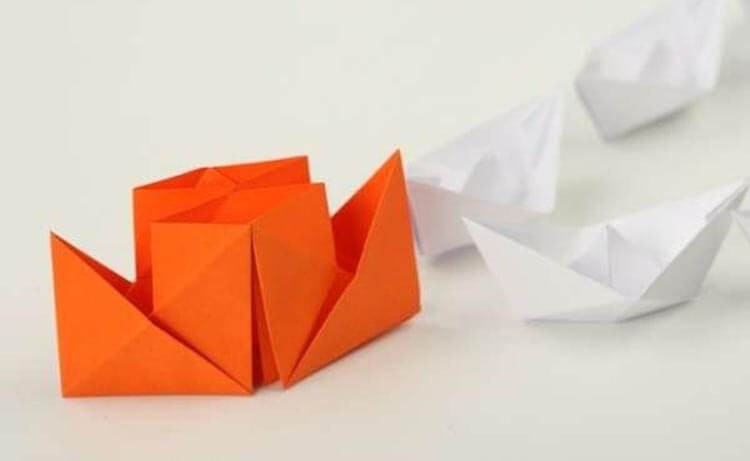
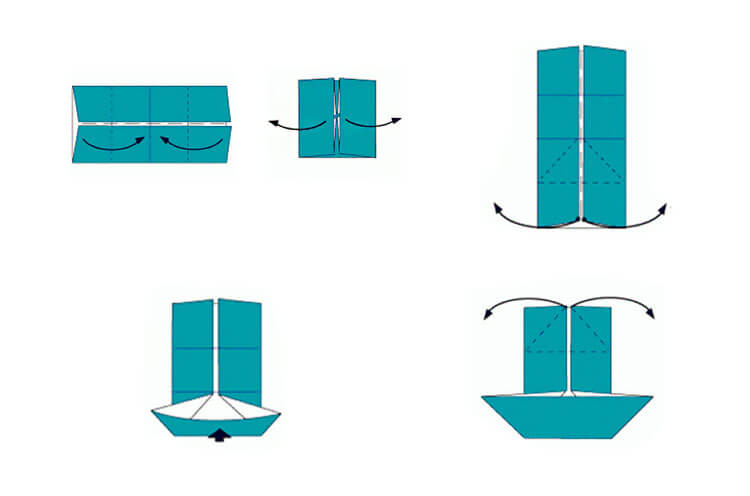
How to make a two-pipe motor ship from A4 paper: step-by-step diagram
You can make a boat from a sheet of paper in different ways and the models come out different. The most classic options are familiar to everyone, and the scheme for folding a paper boat is passed down from parents to children. But for those who have forgotten, there are step-by-step descriptions.
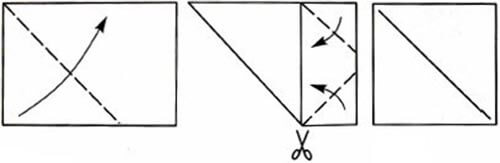
To make a paper boat, we need a sheet of paper and scissors.
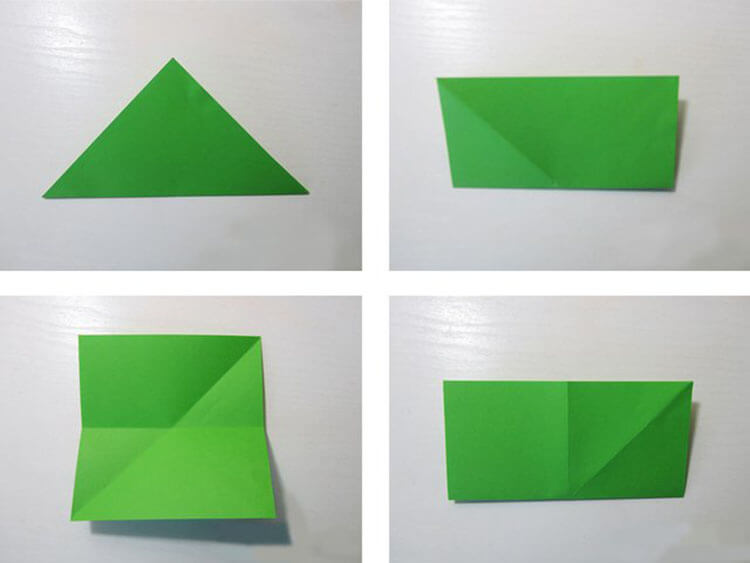
Make a square from a rectangular sheet of A4 paper. Fold the sheet diagonally and carefully cut off a strip from the edge.
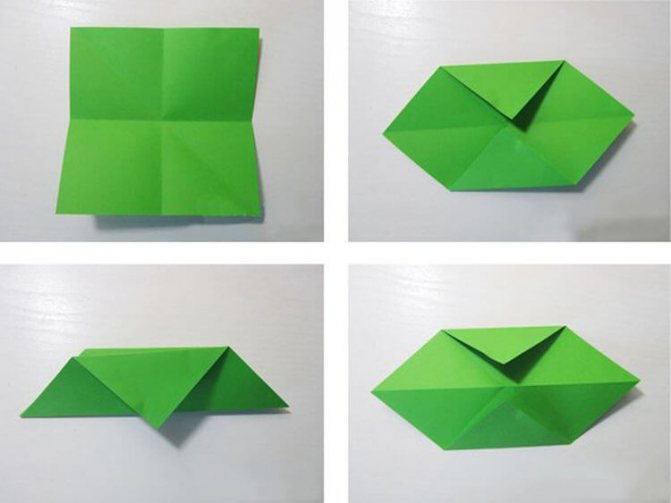
In the resulting square, fold all 4 corners towards the center. Turn the workpiece over and fold all the corners towards the center again. And let's repeat it again. Let's turn the workpiece over and unfold two small squares - this is how we get the pipes of the future ship.
We put these pipes together and smooth them out.
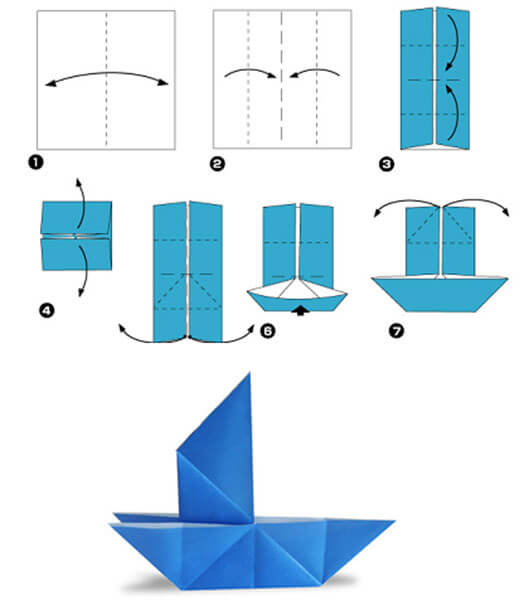
A4 paper boat: classic paper version
This version of a paper boat is familiar to many. You can make it from a white sheet of paper and then paint it and glue decorative elements. But you can use colored paper to make your boat different from the rest. This option for making a boat is ideal for getting ready for a walk in 10 minutes in rubber boots and launching boats with friends in large puddles.
To make a boat from a sheet of A4 paper, fold the sheet in half.
The upper corners must be bent at right angles to the center.
Fold the free edges of the sheet up on both sides.
Fold the loose corners inward to create a triangle.
The corners of the base need to be brought together to form a square.
Now you need to bend the lower corners on both sides up and again we get a triangle.
The angles at the base of the triangle need to be brought together and we get a square. Move the workpiece to the sides by the upper corners.
Move the corners all the way until you get a boat.
Straighten all the corners of the boat to give it stability.
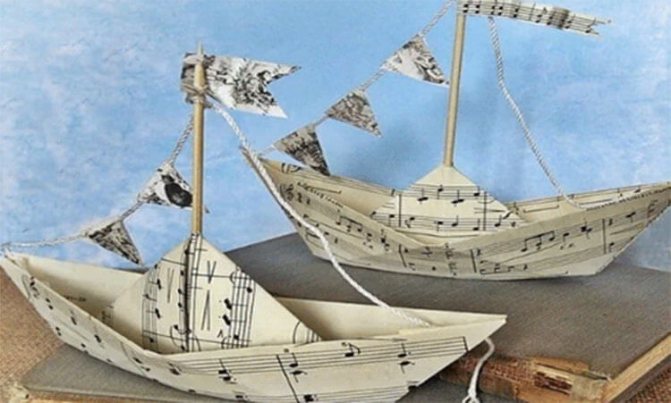
Paper boat: folding pattern
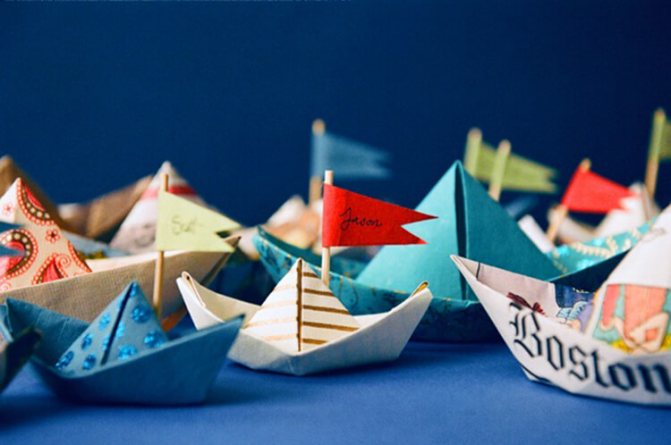
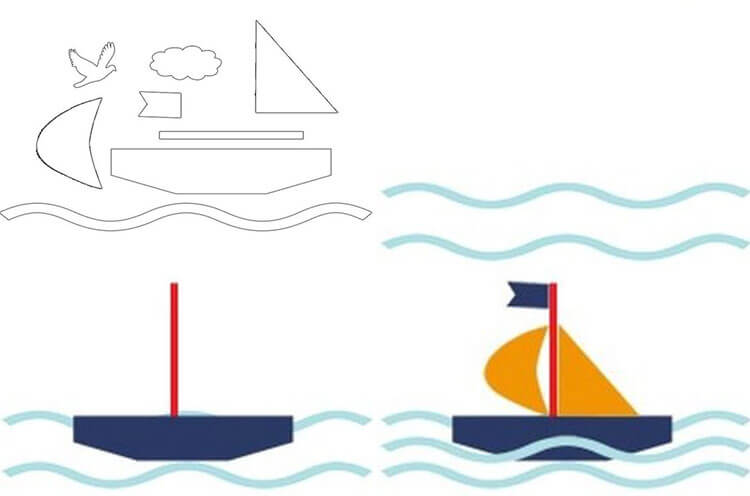
By showing your imagination, you can create dozens of different ships by design.

A boat with a sail or flags will look original
Theme of the week: “Winter fun”
Lesson 15. Snow woman
(Imprint with crumpled paper. Gouache)
Program content. Continue to teach children to convey in a drawing the features of the depicted object, using an imprint with crumpled paper. Learn to bring an object to the desired image using a brush.
Material. A blue or blue sheet of cardboard, saucers with white gouache, slightly diluted with water, medium-sized lumps of crumpled paper, gouache, brushes, jars of water (for each child).
Progress of the lesson
Read to the children the beginning of A. Barto’s poem “Not Alone”:
We didn't eat, we didn't drink,
They sculpted a snow woman.
February snow light-weak
Wrinkled under my hand,
But just right for a snow woman
We need one like this.
Ask the guys: “What did the children make? (Snow woman.)
Invite the children to draw a friend for the snow woman in an unusual way - with crumpled paper.
Show the children how to place crumpled paper in a saucer of white paint and apply it several times to the bottom of the cardboard to make a round ball. Then draw a small ball in the same way. When the paint dries, you need to finish painting the snow woman’s eyes, carrot nose, and twig hands.
You can end the lesson with lines from the same poem:
The sound of the tram will soon subside
And the moon will rise,
Our snow woman
There will be more than one.
DIY paper boat: step-by-step instructions
Knowing how to make a classic boat and sailboat, you can try to make a double boat or catamaran. In order to make a catamaran, we need a sheet of paper and scissors.
We need to make a square sheet from A4 sheet. Fold it in half, and then fold each half in half again towards the center.
Rotate the rectangle 90 degrees and repeat the folding procedure.
Let's turn the workpiece and see that it is divided into squares. Fold the opposite sides of the square towards the center.
We take the lower corners of the sheet and move them apart. Fold the 2 inner squares diagonally.
Turn the workpiece and repeat the procedure on the other side.
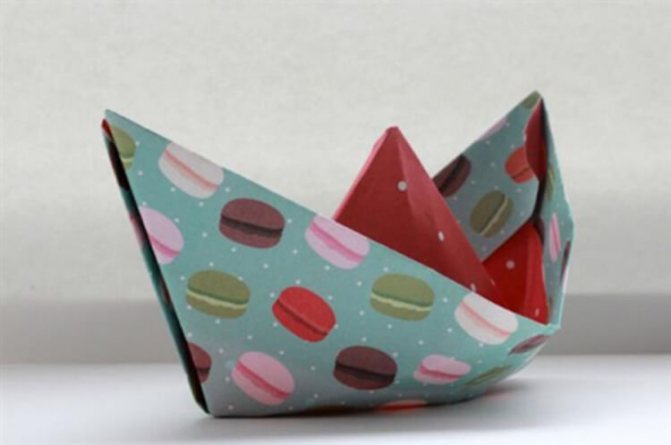
Fold the layout in half and open it, creating volume.
How to assemble a paper boat: diagrams
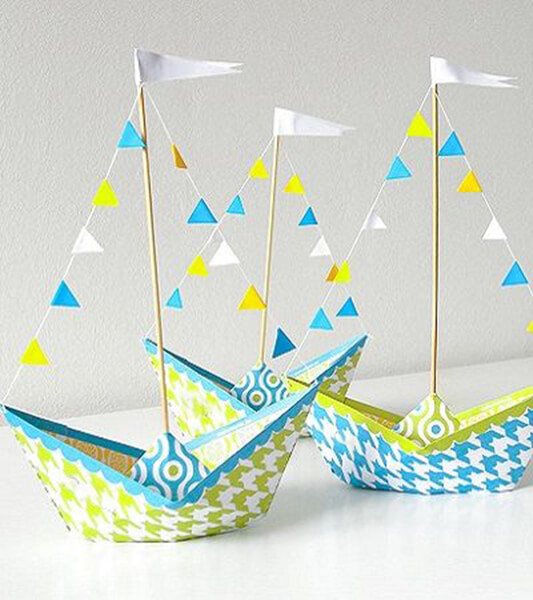
Add to your collection a few more options for paper boats that are suitable for beginners and experienced shipbuilders. Unusual DIY ship crafts can decorate any children's room.
Tip: to prevent a paper boat from becoming limp in water for a long time, dip it in melted paraffin and dry it. This way it will be able to repel water and will last longer.
How to make a warship out of paper
Ask any boy what his favorite game is and he will name war games. They can be on the ground with an army of soldiers, or using planes or ships.
You can easily make a warship out of paper. It is enough to choose any version of a paper ship, simply paint it with the appropriate colors, and add military attributes.
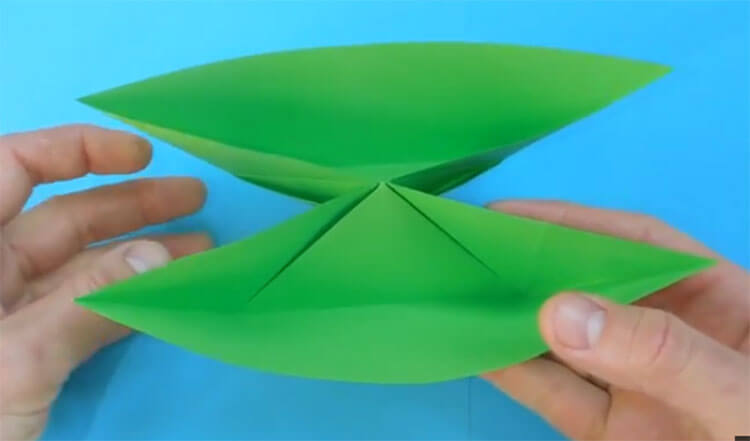
Such a ship can be made from green paper, or you can pre-paint a white sheet with camouflage.
Let's draw two lines on a piece of paper - horizontally and vertically.
Bend the bottom part of the leaf in half and turn the product over.
We fold the two edges of the figure inward towards the vertical line; they will play the role of the side of the ship.
Let's open the corners at the bottom of the workpiece, which will be the side of the ship.
Carefully fold the top part and bend it upward immediately.
We bend the corners on the sides.
We open the product along the marked lines, and fold the edges of the top closer to the center.
We turn the workpiece.
Paper warship: diagram
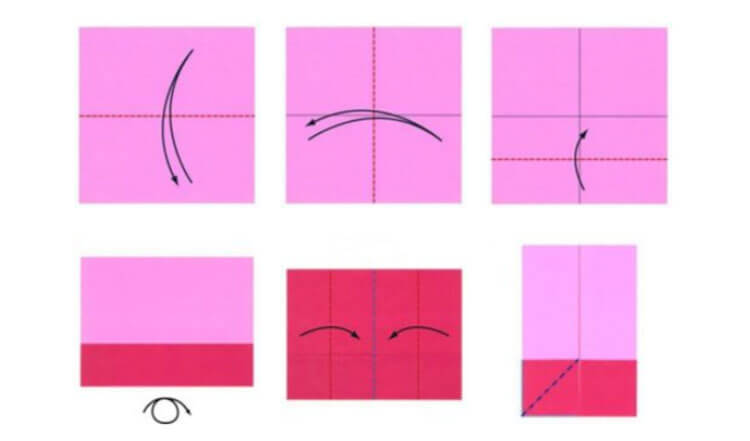
A boat with a paper sail: step-by-step description with diagram
A paper boat with a sail looks much more attractive and more similar to the original. Making a boat with a sail is quite easy.
The simplest option is to make a classic boat and attach a mast with sails to it.
You can immediately make a sailboat out of paper. To do this you will need a sheet of paper of any color.
We make a square from a sheet of A4 paper. Fold it in half diagonally to create a triangle.
Unfold the sheet back and fold it in half in the usual way.
Unfold the sheet and fold it in half again on the other side.
Straighten the sheet and bend the corners of the squares drawn with lines towards the center. Fold the craft in half and unfold.
Fold the free left corner towards the center and you will get an open envelope. Bend this edge to the side. We bend this corner into the ship.
We will get something like a diamond.
Bend the right corner up - we get two sails in the end.
Bend the bottom corner back towards the center and turn the product onto your face.
Such a boat can be decorated or some details can be drawn to complete the picture.
Theme "Pets"
Lesson 18. Filimonov horse
(Drawing with felt-tip pens)
Program content. Cultivate interest in the works of folk artists. Teach children to paint the silhouette of a Filimonov toy, alternating straight stripes of two colors (green and red).
Material. Clay Filimonov toys and illustrations with their images (young ladies, soldiers, horses, deer, ram, birds); samples of elements of Filimonov painting. Silhouettes of Dymkovo horses cut out of yellow paper, felt-tip pens or colored pencils (for each child).
Progress of the lesson
Tell the children that in the village of Filimonovo they made toys-whistles from white clay for the holidays - animals, birds, horses, ladies, soldiers.
Show the children the Filimonov horse and pay attention to its features: the horse, like all Filimonov toys, has a very elongated neck and a small head. The horse is decorated with narrow stripes of green and crimson (red), in the center there is a flower consisting of rings of the same colors.
Invite the children to become Filimonov masters and color horse silhouettes cut out of yellow paper with alternating stripes of red and green.
The result was festively painted Filimonov horses.
Ship: paper applique in kindergarten
Activities with colored paper are not only fun, colorful results, but also creative development. For kids who are not yet 3 years old, you can make blanks, cut out the parts in advance, and then glue them onto a sheet of cardboard or paper. Older children can be given scissors with rounded edges.
It is convenient to use glue for appliques - a pencil or PVA with a brush.
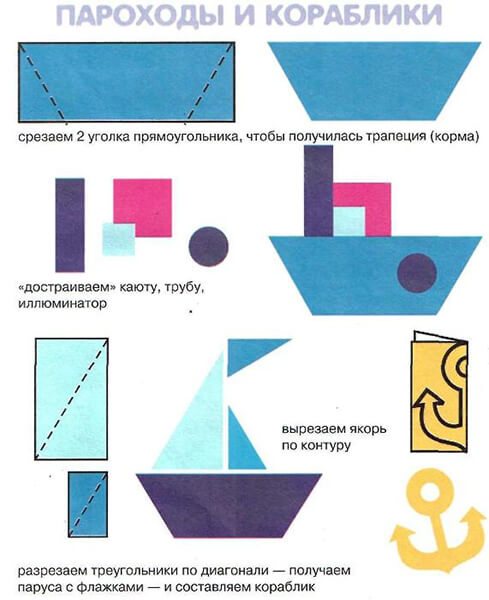
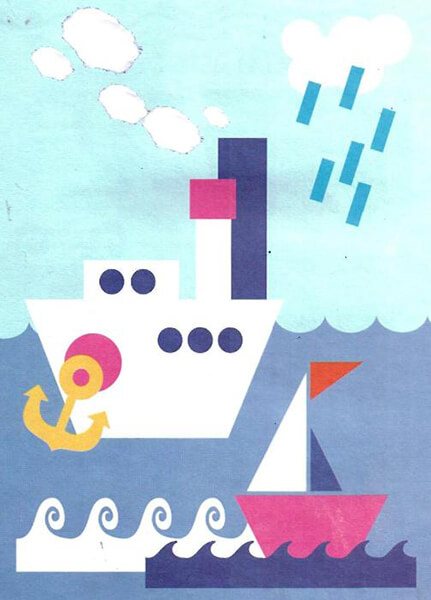
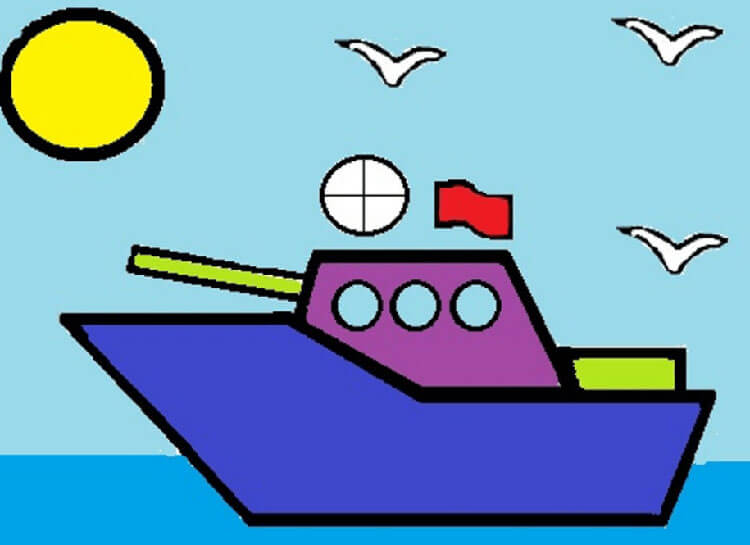
Ship made of colored paper: simple application
To make a beautiful and bright applique, we will need a set of colored paper, scissors, glue, pencil, and ruler.
Let's transfer the part templates onto colored paper:
- 3 clouds on blue paper,
- yellow triangle, blue flag,
- yellow semi-oval,
- red rectangle,
- blue hexagon,
- 3 waves of blue color,
- Black bird
The colors of the ship can be safely replaced with those that the child wants more.
Boat template: paper applique
Glue two waves on the bottom of the sheet, leaving room for the third wave.
Glue the deck in the form of a blue hexagon and perpendicularly a long red rectangle - the mast.
Glue a yellow triangle to the right of the red mast, and a semi-oval to the left. We will place a flag on the mast. Directly on the blue deck, between the two waves, we will glue the third wave.
Ship: applique for the younger group
For little ones, prepare pre-printed parts - you can even cut them out in advance. This is important so that children can understand which colors to combine and learn to understand shapes.
Print out ready-made templates and help children understand which part to glue where.
You can choose from several options, focusing on varying degrees of difficulty.
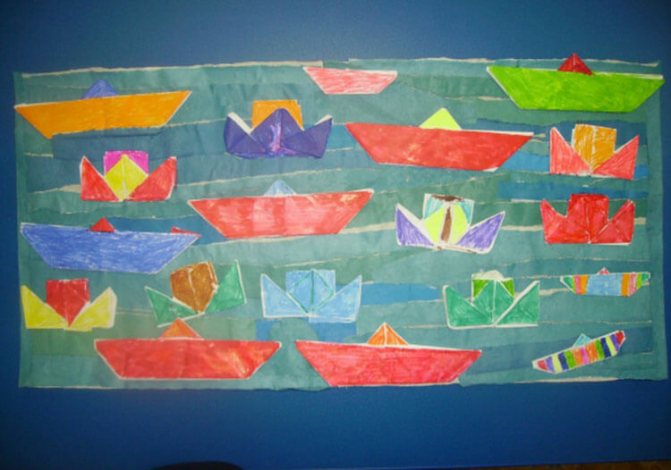
The boat is sailing: three-dimensional applique
If you make some details voluminous, the applique will turn out to be more original. The parts that create volume are glued last.
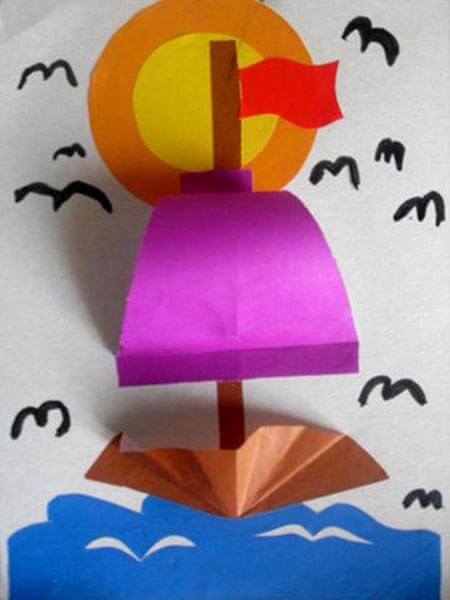
How to make a three-dimensional applique: a boat in the senior group
This work uses the skills of drawing, gluing, and cutting, as well as the child’s creative talents.
Materials:
- White sheet A4
- Watercolor
- Brush
- Scissors
- Colored paper
- Markers
- PVA glue
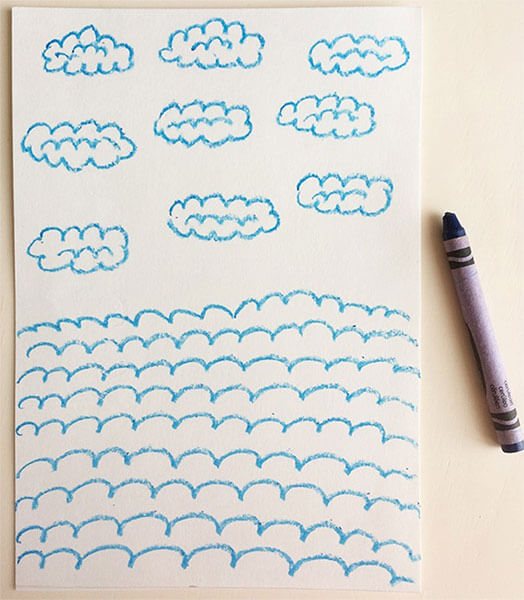
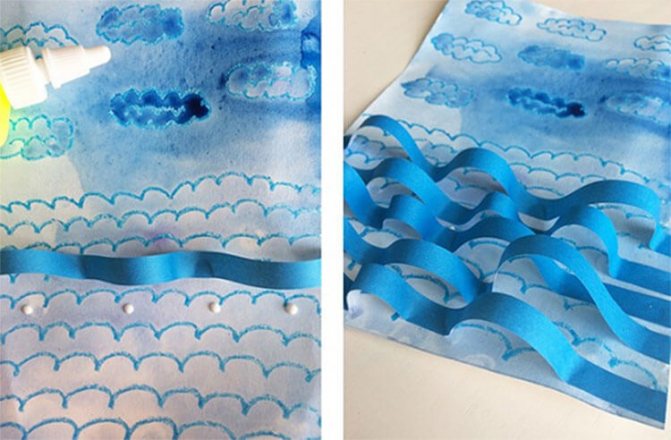
We start by designing the background of the craft. We draw waves and clouds with a blue or light blue pencil.
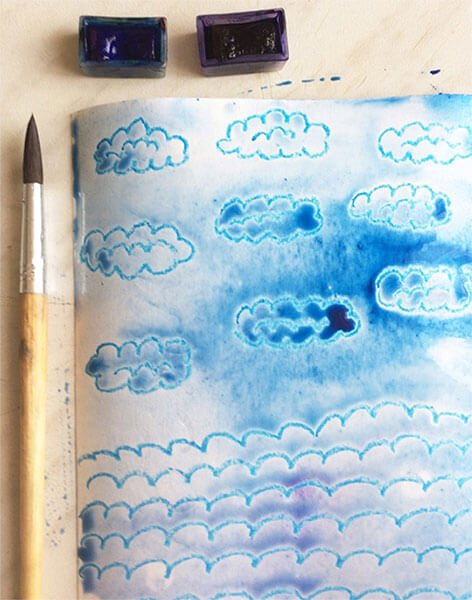
Paint the background with blue watercolors
To make a beautiful boat, you can print the template
Cut out parts according to a template from colored paper
Glue blue stripes that will be waves. Apply 3-4 drops of glue at an equal distance from each other and attach wave strips to them, creating volume.
On the main parts of the ship, draw stripes and glue three blue circles - portholes.
Glue on the mast and flag
Now let's glue the white sailboat
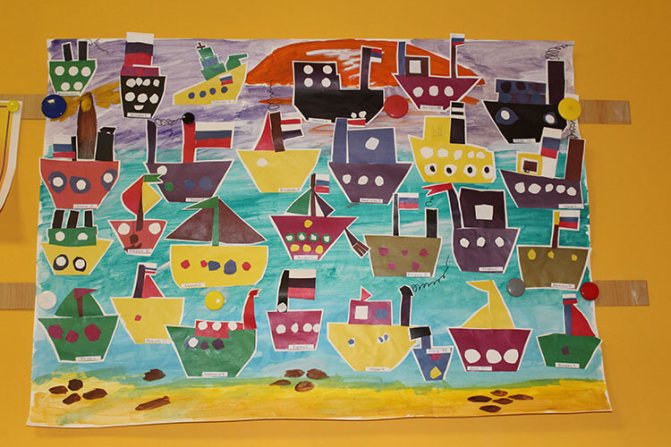
Ships on the roads: application in the preparatory group
You can easily place several ships on this application and this work can be done collectively. This process will help children learn to identify the parts of a ship. Each boat may have a different shape and deck color. You can depict pirate or warships.
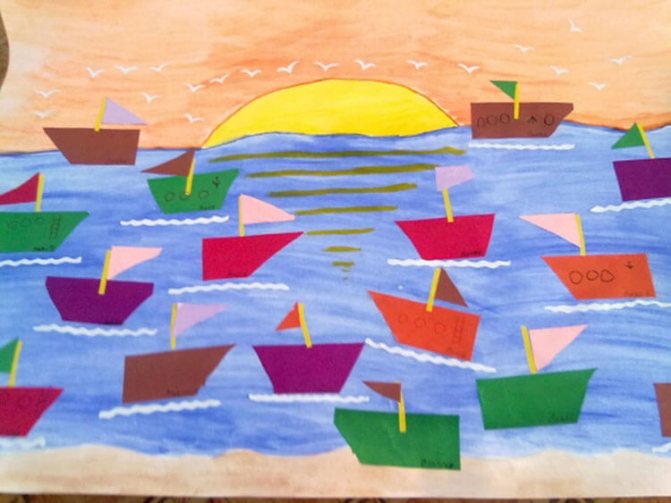
You can pre-color the background
If the work is done by a group of children, you can give each child the task of creating their own model of a ship.
Applique Warship
An application of this type would be appropriate on postcards for February 23, or May 9. When children make cards for dads or grandfathers, they will need the ability to make warship appliqués.
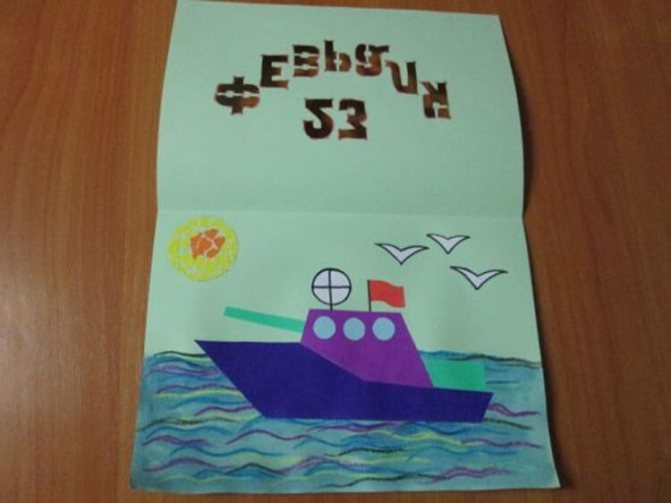
You can use a template to prepare a ship.
Ship template for applique
Applique Ship for the little ones
Little ones should learn to use scissors and glue and be able to draw basic elements of nature before they go to school.
Therefore, such an applique as a boat at sea, which is combined with drawing skills, will be an excellent training.
Materials:
- Colored paper
- Cardboard
- Scissors
- Glue
- Crayons
- Markers
For the base of the applique we use a white sheet of cardboard.
Tear off a few strips of blue paper to glue along the bottom edge of the base, making waves.
Let's cut out the sun, clouds and ship elements from colored paper.
Draw the birds and add other details to the applique.
Theme of the week: “Winter”
Lesson 14. Winter landscape
(Brush painting. Gouache)
Program content. Start introducing children to the landscape. Learn to draw winter trees with the whole brush and the tip of the brush. Learn to draw a contrasting winter landscape using white and black gouache. Develop imagination, emotional and aesthetic feelings, love for nature.
Material. Reproductions of paintings depicting a winter landscape. Blue or gray sheets of paper, gouache, brushes, jars of water, rags (for each child).
Progress of the lesson
Tell the children that when an artist paints nature, he is depicting a landscape. Ask what the artist can draw. (Sea, mountains, forest, river, lake, street with trees, etc.)
Read B. Kapetyan’s poem to the children:
Snow-white, white-winged
Our winter is winter,
I whitewashed everything diligently:
Both trees and houses.
Invite the children to draw a landscape - a winter street with trees and bushes. Ask what colors can be used to represent trees, bushes and snow. Tell me that trees can be painted with black paint, and snow with white paint.
Invite each child to draw black trees in the form of pillars expanding downwards with thin branches diverging in different directions and bushes consisting of branches. When the paint dries, paint white snow and falling snowflakes around with the tip of a brush.
Cardboard ship: how to make it yourself
Children and parents are often asked to bring joint crafts to school on a given topic. It’s not difficult to come up with a cardboard craft on a marine theme. The ship can be made in one evening, taking an old equipment box.
Materials:
- Thick cardboard - old box
- Scissors
- Pencil
- Glue
- Scotch
- Colored paper
- Decor
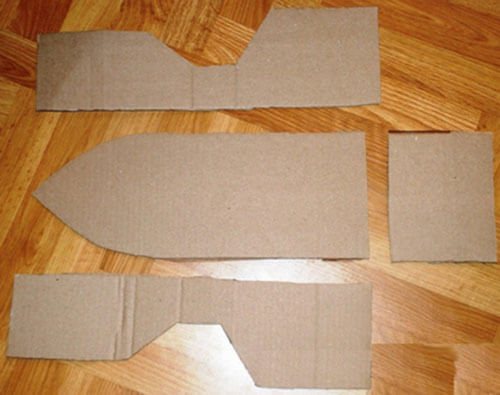
Print or draw a template. Transfer it to cardboard
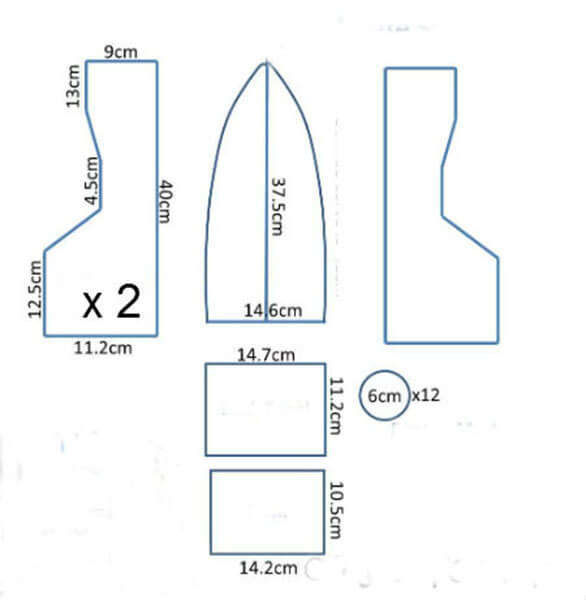
Cutting out parts from cardboard
Assembling the ship using glue and tape
Dilute the PVA glue with water, tear the paper into pieces and soak it in the glue. Glue the pieces to the ship blank
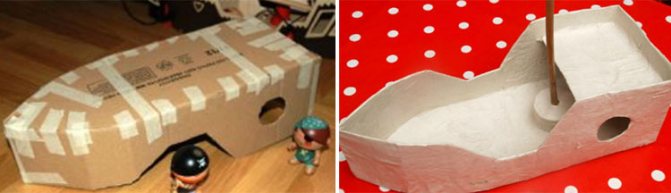
You can paint the ship and cover it with colored paper.
Also make a mast from a plastic tube or wooden skewer. Don't forget that every ship must have a flag. Make sails out of cardboard.
And if you recently bought a refrigerator or other large household appliance, then you can make a large ship out of cardboard to the delight of any boy.
Ship made of cardboard and paper
Cardboard is a very convenient material for crafts, and colored paper will help make the craft bright and attractive. In order for the work to turn out beautiful and neat, use good scissors that will not tear the cardboard, but will make a beautiful and even cut. If it is too early for a child to use sharp scissors, then parents can do it for them.

Toilet paper rolls are also actively used in crafts due to their shape.
Theme of the week: “Transport”
Lesson 13. Ship
(Drawing with wax crayons and a brush. Watercolor)
Program content. Teach children to draw objects consisting of two parts according to their imagination and paint over them with wax crayons. Learn to tint a sheet of paper with watercolors.
Material. Half sheets of watercolor paper, wax crayons, watercolor paints, brushes, jars of water.
Progress of the lesson
Read an excerpt from A. Pushkin’s poem:
The wind blows across the sea
And the boat speeds up.
He runs in the waves
On swollen sails -
Past the steep island,
Past the big city.
Ask the children: “What does the ship have? (Hull, deck, sail.)
Invite the children to draw a boat with wax crayons. First you need to draw the hull in the form of an inverted trapezoid, and on top a triangular sail. Paint the ship with crayons in a continuous layer. Paint the sea around it with blue watercolor paint, diluting it with plenty of water.
How to make a ship out of wood with your own hands
A wooden boat is every boy's dream. Together with your dad or grandfather, you can carve the simplest version of a boat.
To preserve the wood longer, you can paint the top or varnish it.
How to make a ship out of shells with your own hands
Did you bring a lot of shells from the sea? They can be used and beautifully decorated by making a boat out of shells. Resorts sell ready-made souvenirs in the form of ships made of shells, but it is much nicer to put on a shelf a craft made by your child.
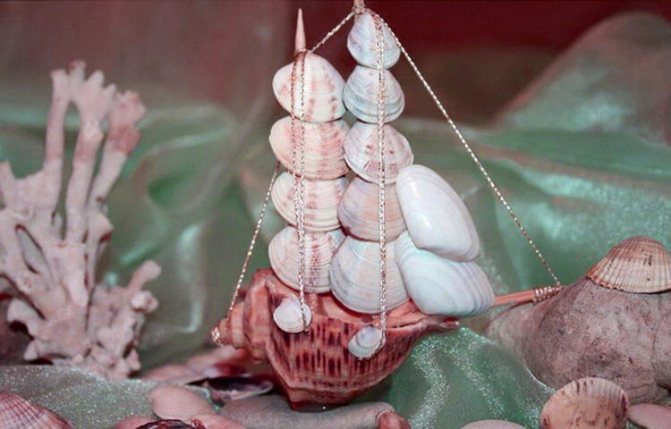
Materials:
- Big shell
- Small shells
- Super glue
- Braid
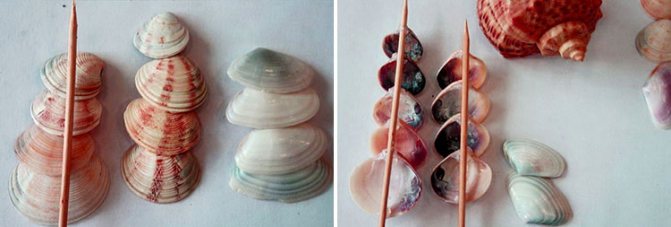
Come up with a diagram of your ship.
Place several shells in a row with a toothpick. It will look more beautiful if you arrange the shells according to size - wider at the bottom and smaller at the top.
Lubricate a toothpick with glue and attach the shells. Let's leave it to dry.
Let's attach these sails to a large shell. The base of the toothpick should be generously coated with glue.
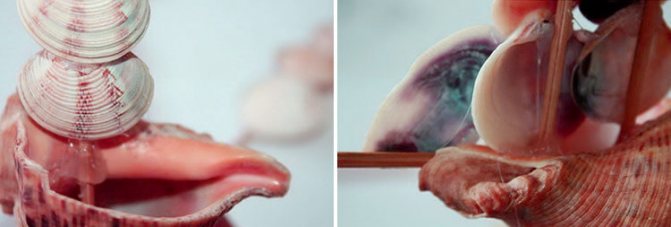
We use a chain or gold braid. We wrap it around the mast. To ensure that the boat stands level, you can glue a large shell onto a piece of wood or a flat stone.
Text of the book “Drawing with children 4-5 years old. Class notes"
Theme of the week: “Furniture”
Lesson 11. Blanket for Vanyushka (Drawing with felt-tip pens) Program content.
Teach children to decorate a rectangular object with colored stripes, alternating them by color. Learn to understand and analyze the content of the nursery rhyme. Cultivate a friendly attitude towards others.
Material.
Rectangles cut out of tinted paper, colored markers (according to the number of children).
Progress of the lesson
Read the nursery rhyme to the kids:
The swallows are sleeping, all in their nests. Killer whales are sleeping, all in bushes. The foxes are all sleeping under the bushes. Little children sleep in cradles. Sleep, Vanyushka, Sleep, dear child!
Ask the children: “Where do little children sleep?” (In cradles, in beds.)
“What do the kids hide with?”
(Blankets.)
Invite the children to make a beautiful striped blanket for Vanyushka.
Give the children the prepared paper rectangles and tell them that they can only decorate the blanket with long stripes. Use a felt-tip pen to draw continuous lines. Make sure that when drawing, children do not press hard on the paper and hold it with their left hand.
Theme of the week: “Clothing”
Lesson 12. My winter hat (Brush painting. Gouache)
Program content.
Teach children to draw a hat with a simple pencil; paint over with gouache of different colors. Develop thinking and attention.
Material.
A large sheet of paper with three hats (red, yellow and blue) and three pairs of mittens (same colors) drawn on it. Simple pencils, halves of album sheets, gouache, brushes, jars of water (for each child).
Progress of the lesson
Invite several children to use a pencil to connect a red hat with red mittens, a yellow hat with yellow mittens, and a blue hat with blue mittens.
Read an excerpt from S. Marshak’s poem “That’s how absent-minded”:
Instead of a hat as he walked, He put on a frying pan, Instead of felt boots, he pulled gloves on his heels. That's how absent-minded he is from Basseynaya Street!
Show the children how to draw a hat with a pencil in the form of a large semi-oval with a round pompom on top and give the children the opportunity to paint over the hat with a brush, using gouache in different colors. Make sure your kids let the paint dry and then paint with a different color. You can advise children to decorate their hats with multi-colored patterns.
Theme of the week: “Transport”
Lesson 13. Ship (Drawing with wax crayons and a brush. Watercolor)
Program content.
Teach children to draw objects consisting of two parts according to their imagination and paint over them with wax crayons. Learn to tint a sheet of paper with watercolors.
Material.
Half sheets of watercolor paper, wax crayons, watercolor paints, brushes, jars of water.
Progress of the lesson
Read an excerpt from A. Pushkin’s poem:
The wind is blowing across the sea and the boat is urging on. He runs in the waves On swollen sails - Past the steep island, Past the big city.
Ask the children: “What does the ship have? (Hull, deck, sail.)
Invite the children to draw a boat with wax crayons. First you need to draw the hull in the form of an inverted trapezoid, and on top a triangular sail. Paint the ship with crayons in a continuous layer. Paint the sea around it with blue watercolor paint, diluting it with plenty of water.
Theme of the week: “Winter”
Lesson 14. Winter landscape (Brush painting. Gouache)
Program content.
Start introducing children to the landscape. Learn to draw winter trees with the whole brush and the tip of the brush. Learn to draw a contrasting winter landscape using white and black gouache. Develop imagination, emotional and aesthetic feelings, love for nature.
Material.
Reproductions of paintings depicting a winter landscape. Blue or gray sheets of paper, gouache, brushes, jars of water, rags (for each child).
Progress of the lesson
Tell the children that when an artist paints nature, he is depicting a landscape. Ask what the artist can draw. (Sea, mountains, forest, river, lake, street with trees, etc.)
Read B. Kapetyan’s poem to the children:
Snow-white, white-winged, our winter-winter, diligently whitewashed everything: both trees and houses.
Invite the children to draw a landscape - a winter street with trees and bushes. Ask what colors can be used to represent trees, bushes and snow. Tell me that trees can be painted with black paint, and snow with white paint.
Invite each child to draw black trees in the form of pillars expanding downwards with thin branches diverging in different directions and bushes consisting of branches. When the paint dries, paint white snow and falling snowflakes around with the tip of a brush.
Theme of the week: “Winter fun”
Lesson 15. Snow Woman (Imprint with crumpled paper. Gouache)
Program content.
Continue to teach children to convey in a drawing the features of the depicted object, using an imprint with crumpled paper. Learn to bring an object to the desired image using a brush.
Material.
A blue or blue sheet of cardboard, saucers with white gouache, slightly diluted with water, medium-sized lumps of crumpled paper, gouache, brushes, jars of water (for each child).
Progress of the lesson
Read to the children the beginning of A. Barto’s poem “Not Alone”:
We didn't eat, we didn't drink, we sculpted a snow woman. The February snow, weak and weak, crumpled at hand, But just for the snow woman, we need one like this.
Ask the guys: “What did the children make? (Snow woman.)
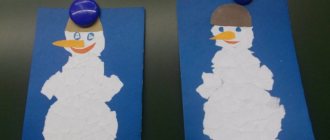
Invite the children to draw a friend for the snow woman in an unusual way - with crumpled paper.
Show the children how to place crumpled paper in a saucer of white paint and apply it several times to the bottom of the cardboard to make a round ball. Then draw a small ball in the same way. When the paint dries, you need to finish painting the snow woman’s eyes, carrot nose, and twig hands.
You can end the lesson with lines from the same poem:
Soon the ringing of the tram will subside and the moon will rise, Our snow woman will not be alone.
Theme of the week: “New Year’s holiday”
Lesson 16. Christmas ball (Drawing with wax crayons and a brush. Watercolor)
Program content.
Continue teaching children to draw with wax crayons and watercolors. Develop imagination.
Material.
Circles cut out of paper, wax crayons, watercolor paints, brushes, jars of water (according to the number of children).
Progress of the lesson
Read the poem by S. Marshak to the children:
What grows on the Christmas tree? Cones and needles. Multi-colored balls do not grow on the Christmas tree. Gingerbread and flags do not grow on the Christmas tree, Nuts do not grow in golden paper.
Tell the children: “The poem says that cones and needles grow on the Christmas tree. Where do the balls, flags, and golden nuts on the Christmas tree come from every New Year?” (People decorate Christmas trees, they hang New Year’s toys.)
Invite the children to make beautiful Christmas balls that can be used to decorate the Christmas tree. To do this, each child must decorate a paper circle with patterns using wax crayons. Then paint the ball with watercolors. You will get a lot of New Year's toys that can be hung on the Christmas tree. You can make three-dimensional balls by gluing three decorated circles in halves.
Topic of the week: “Poultry”
Lesson 17. Chicken (Poke with a hard semi-dry brush. Gouache)
Program content.
Continue teaching children to draw an object consisting of two circles with a simple pencil. Learn to convey the features of the depicted object using a poke with a hard, semi-dry brush; Bring the item to the desired image using a brush.
Material.
Half album sheets, simple pencils, gouache, hard and soft brushes, jars of water, rags (for each child).
Progress of the lesson
Read V. Berestov’s poem “Chickens” to the children, accompanying it with appropriate actions:
Chick-chick! Atty-batty! We are chickens! We are chickens! We peck, peck, peck Everything we meet along the way. And we sing, we sing, we sing: Piti-piti-pi-ti-ti!
Invite the children to draw chickens. Show how to draw a large circle (torso) with a simple pencil, and a smaller circle (head) on the top left.
To make the chicken fluffy, you need to put quite a bit of yellow gouache on a dry, hard brush and, holding the brush vertically (the brush taps with the “heel”), make “poke” on top, placing them inside and along the edges of the circles. When the paint dries, you need to finish painting the chicken's eyes, beak, and paws with the tip of a soft brush.
Theme "Pets"
Lesson 18. Filimonovskaya horse (Drawing with felt-tip pens)
Program content.
Cultivate interest in the works of folk artists. Teach children to paint the silhouette of a Filimonov toy, alternating straight stripes of two colors (green and red).
Material.
Clay Filimonov toys and illustrations with their images (young ladies, soldiers, horses, deer, ram, birds); samples of elements of Filimonov painting. Silhouettes of Dymkovo horses cut out of yellow paper, felt-tip pens or colored pencils (for each child).
Progress of the lesson
Tell the children that in the village of Filimonovo they made toys-whistles from white clay for the holidays - animals, birds, horses, ladies, soldiers.
Show the children the Filimonov horse and pay attention to its features: the horse, like all Filimonov toys, has a very elongated neck and a small head. The horse is decorated with narrow stripes of green and crimson (red), in the center there is a flower consisting of rings of the same colors.
Invite the children to become Filimonov masters and color horse silhouettes cut out of yellow paper with alternating stripes of red and green.
The result was festively painted Filimonov horses.
Topic of the week: “Pets and their babies”
Lesson 19. Kitten (Poke with a hard semi-dry brush. Gouache)
Program content.
Continue to teach children to convey the features of the depicted object using a poke with a hard, semi-dry brush. Strengthen the ability to independently select the desired color; Bring the item to the desired look using a soft brush.
Material.
Halves of album sheets with a drawn silhouette of a kitten, gouache, hard and soft brushes, jars of water, rags (for each child).
Progress of the lesson
Read the nursery rhyme to the children:
Like our cat, the fur coat is very good, like the cat, the mustache is amazingly beautiful, the eyes are bold, the teeth are white.
Ask the children: “What kind of fur coat does the cat have? (Soft, fluffy, warm, red, gray, white.)
How can you draw fluffy fur?
(Using a hard brush. Poke.)
Give the children half of a landscape sheet with a drawn kitten. Show how to put a little paint of the desired color on a dry, hard brush and, holding the brush vertically, make pokes on top, placing them inside and along the edges of the outline. When the paint dries, you need to finish painting the kitten’s eyes, nose, and whiskers with the tip of a soft brush.
Theme of the week: “Wild Animals”
Lesson 20. Meeting of the fox and Kolobok (Poke with a hard semi-dry brush. Gouache)
Program content.
Teach children to create a story composition. Continue to teach how to convey the features of the depicted objects using a poke with a hard, semi-dry brush; Bring the item to the desired look using a soft brush.
Material.
Illustrated books with the fairy tale “Kolobok”, a toy fox - a character in a puppet theater. Landscape sheets with a painted fox, gouache, hard and soft brushes, jars of water, rags (for each child).
Progress of the lesson
First read the Russian folk tale “Kolobok” to the children.
Play out the situation: a fox (toy) came to visit the guys: “Hello, guys! Do you recognize me? Who am I? (Fox.)
In which fairy tale did you meet me?
(“Kolobok” and other fairy tales.)
What am I like in the fairy tale “Kolobok”?
(Cunning, smart, dexterous, red-haired, beautiful.)
Who did I meet in this fairy tale?
(Kolobok.)
Invite the children to draw a meeting between the fox and Kolobok. Look at the illustrations in different books that depict this episode.
Give the children album sheets with a drawn fox and say: “To make the fox and Kolobok fluffy, you need to put just a little orange gouache on a dry, hard brush and, holding the brush vertically, make pokes on top, placing them inside and along the edges of the outline. Then use yellow gouache to draw Kolobok. When the paint dries, you need to finish painting the fox and Kolobok’s eyes, nose and mouth with the tip of a soft brush.”
At the end of the lesson, the fox praises the children’s work and is glad that it turned out so beautiful.
Topic of the week: “My Home”
Lesson 21. Houses for nesting dolls (Drawing with colored pencils)
Program content.
Teach children to draw small and large objects consisting of a square and a triangle. Continue learning how to compose a plot composition. Cultivate a responsive attitude towards others.
Material.
Two nesting dolls (large and small). Landscape sheets, simple and colored pencils (for each child).
Progress of the lesson
Play out the situation: two nesting dolls came to visit the guys. Show the children two wooden nesting dolls - a large one and a small one. Hide the small doll in the big one. Ask if you can hide a large nesting doll in a small one.
Say: “It’s already winter, and the nesting dolls have nowhere to live. They are cold. Let's draw houses for them. What kind of house is needed for a large nesting doll? (Big.)
Which one is for the little one?
(Small.)
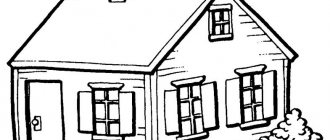
Show the children on a separate sheet of paper how to draw a house with a simple pencil: first draw a square (the wall of the house), and a triangle on top (the roof). Inside the square you need to draw a small rectangle (door) and a square (window).
Then each child draws a house for a small matryoshka on the left side of the sheet, and a house for a large one on the right. Then the houses need to be painted over with colored pencils so that the strokes go in the same direction and lie next to each other. The houses need to be connected by a path so that the nesting dolls can visit each other.
Theme of the week: “My City”
Lesson 22. Masters from the City (Brush painting. Gouache)
Program content.
To acquaint children with the traditional craft of Gorodets, with the elements and color combinations characteristic of Gorodets wood painting; with products of Gorodets craftsmen. Learn to mix red and white, blue and white paints to obtain pink and blue colors. Learn to draw buds and leaves based on Gorodets painting.
Material.
Illustrations and wooden products of Gorodets craftsmen (cutting boards, plates, salt shakers, ladles, toys, furniture, chests), samples of elements of Gorodets painting. Landscape sheets cut horizontally, gouache, brushes, jars of water, rags (for each child).
Progress of the lesson
Tell the children that many years ago in Gorodets, folk craftsmen began to make toys, dishes, boxes from wood and very beautifully paint them with bright colors.
With your children, look at the wooden products of Gorodets craftsmen and determine their features: pink and blue buds and flowers (roses, roses, daisies) have a red edge, and blue ones have a blue edge. Flowers are enlivened by white dots, arches, and strokes. There are green leaves around the flowers. Background – dark yellow.
Invite the children to practice drawing Gorodets buds and leaves. Show the children that if you mix red paint with white, you get pink, which you need to use to draw a pink circle. While the paint dries, you can place green leaves around it. Then a red pea is drawn at the top of the circle, and a red border is drawn at the bottom inside the circle. You can draw white dots, strokes or arcs inside the circle. Show the children a sample of the blue bud. Tell us how to get the blue color (mix blue and white gouache), and offer to draw a blue bud yourself, edging it with blue gouache and highlighting it with white paint.
Theme of the week: “Defender of the Fatherland Day”
Lesson 23. Salute (Painting with a brush on a wet sheet of paper. Watercolor)
Program content.
Introduce children to a new technique of drawing on a damp sheet of paper. Continue to learn how to select beautiful color combinations to create your intended image.
Material.
Sheets of watercolor paper, watercolor paints, wide and thin soft brushes, jars of water, rags (for each child).
Progress of the lesson
Tell the children a riddle about fireworks:
And suddenly, out of the black darkness, bushes grew in the sky, and in them blue, crimson, golden flowers bloomed of unprecedented beauty. And all the streets below them also became blue, crimson, gold, multi-colored.
Ask the guys: “When do fireworks take place? (When there is some kind of holiday.)
What holiday is approaching now?
(Defender of the Fatherland Day.)
Invite the children to draw fireworks in honor of this holiday. First, you need to apply water to the landscape sheet with a wide brush.
Then put watercolor paint on a thin brush and touch it to a sheet of paper in several places. The dots will begin to spread out. The empty spaces need to be filled with spreading dots of other colors.
Make sure children rinse the brush thoroughly in water.
Theme of the week: “Professions”
Lesson 24. Rooster and paints (Brush painting. Gouache)
Program content.
Expand children's understanding of the visual possibilities of paints. Strengthen the ability to name primary colors, learn to select the right color when creating a certain image. Cultivate compassion and kindness.
Material.
An uncolored rooster drawn and cut out of paper. Landscape sheet with a drawn silhouette of a rooster, red, yellow, blue and green gouache, brushes, jars of water, rags (for each child).
Progress of the lesson
Introduce children in advance to V. Suteev’s fairy tale “The Rooster and the Colors.”
Play up the situation as if an unpainted rooster came to your class and said: “Everyone is laughing at me, saying that I am unpainted and not real. They told me to go to the artists. They have some paints they can use to paint me.”
Show the rooster four gouache paints - red, blue, yellow and green - and tell him what they are called and what you can paint with them. Tell them that with their help you can paint any object, and it will turn from unpainted into a real, beautiful one.
Ask on behalf of the rooster: “Can you guys color me?” Answer the rooster: “Of course we can, we are artists today and we have paints. Look how we will make you a real rooster: we will paint the comb and beard with red paint (as we explain, color the cut-out rooster), blue paint - the feathers on the tail, green paint - the wings, and yellow paint - the breast... What a beautiful rooster it turned out to be.”
“Thank you,” says the rooster. – I still have friends, roosters – also unpainted. Guys, help them become real."
Give the children album sheets with silhouettes of roosters and offer to help the roosters - color them - using all four colors in their work.
Theme of the week: “My family”
Lesson 25. Family of tumblers (Brush painting. Gouache)
Program content.
Encourage children to look at different sized tumblers. Learn to draw a tumbler from life with a simple pencil of a certain size; convey the characteristic features of tumblers.
Material.
Several tumblers of different sizes. Landscape sheets, simple pencils, gouache, brushes, jars of water, rags (for each child).
Progress of the lesson
Give the children a riddle and ask them to guess who will come to them:
This fat toy cannot be placed on a pillow. I took an example from a horse: Sleep standing up, not in a crib! N. Tolokonnikov
Play out the situation: a family of tumblers came to visit the children. Invite the children to arrange the tumblers according to their height. Ask who is the tumbler mother and who is the tumbler daughter. Count how many daughters there are and how many tumblers there are. Draw children's attention to the fact that all tumblers consist of two red balls.
Invite the children to draw one of the tumblers with a simple pencil. Some of the children will draw a mother, some the biggest daughter, some the smallest or middle-sized one. To do this, you need to draw two circles with a simple pencil - one small (head) and one large (torso). On the side, draw two hands in the form of small circles. Then you need to highlight the face with an inner circle, draw eyes, nose, mouth and color the drawing.
Then the tumblers can be cut out, arranged according to height and glued to a long sheet of paper (or to a roll of wallpaper).
Theme of the week: “Mother’s Day”
Lesson 26. Mimosa sprig (Drawing with a brush and finger. Gouache)
Program content.
Teach children to draw a mimosa sprig from life with a brush. Continue learning how to draw flowers with your finger. Cultivate love for loved ones.
Material.
Live mimosa branch. Half a landscape sheet, gouache, brushes, jars of water, rags (for each child).
Progress of the lesson
Read E. Avdienko’s poem “Mimosa” to the children:
In the subway and on the trolleybus, In every tram, Mimosa sparkles, Like the sun in May. Mimosa doesn't freeze! Mimosa is alive! It’s as if she lived somewhere in the north. There is a Mimosa on every window And a yellow lantern burns brightly.
Invite the children to make a gift for their mothers - draw a mimosa. Look at the mimosa sprig with the guys. Describe it: Mimosa has a branch, leaves that look like pine needles, and small yellow flowers. Discuss with the children the sequence of depicting mimosa: first you need to draw a twig with green gouache, draw leaves on it in the form of rhythmic short stripes, and draw dots (flowers) on the twig using your finger.
At the end of the lesson, compare real and painted mimosa branches with the children.
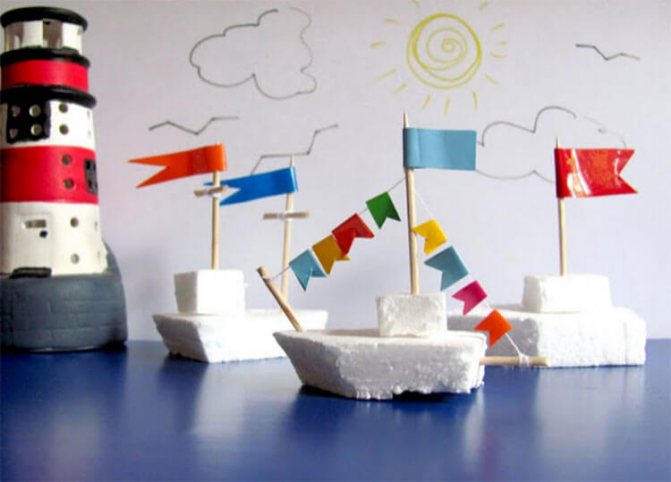
DIY foam ship for children
Do not rush to throw away foam plastic after purchasing household appliances, especially if you have children. It can be useful for making a quick boat.
Materials:
- Styrofoam pieces
- Toothpicks
- Knife
- A thread
- Film for decoration
- Colored paper
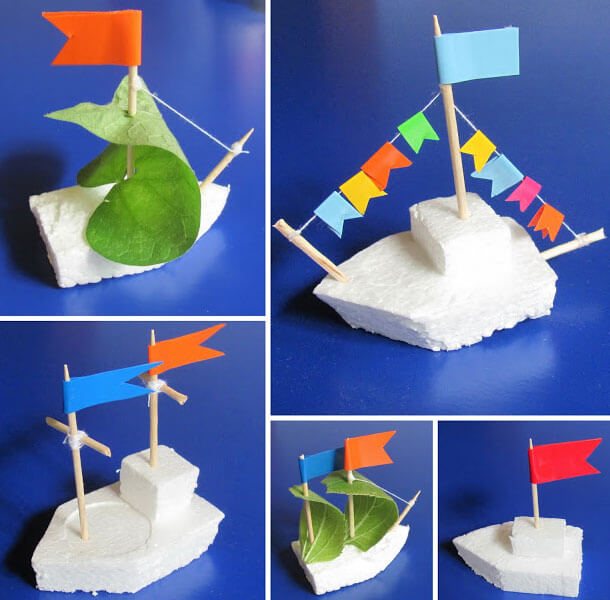
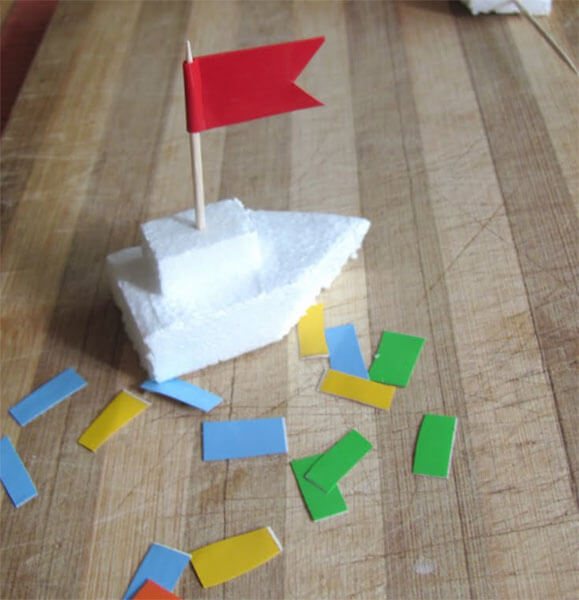
Using a knife, cut out the shape of a boat - two rectangles of different sizes. A large rectangle needs to have a sharp nose.
Using glue or a toothpick, connect both parts
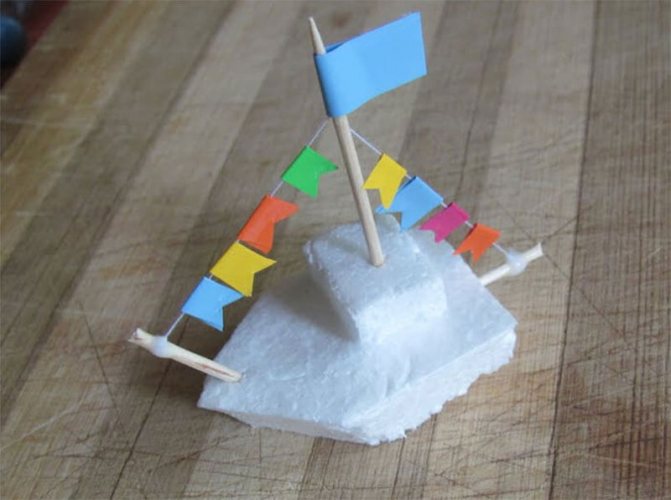
All that remains is to decorate the boat. In this matter, you can give your child room for creativity.
Cut out flags from paper and glue the flag onto the mast.
You can add a second toothpick to the ship and tie them together with rope or thread. We'll insert another toothpick at the back of the deck. The places where the thread is attached can be lubricated with glue.
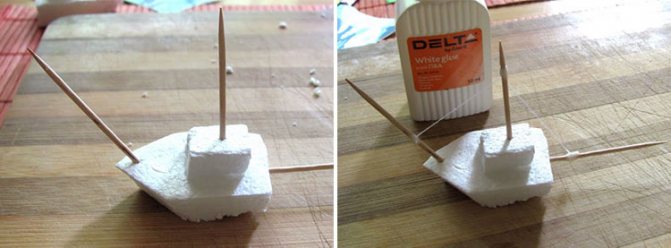
The outermost toothpicks need to be shortened.
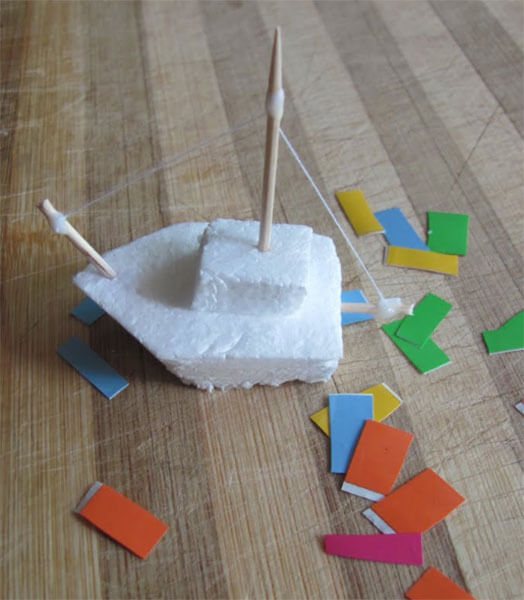
We will hang small flags folded in half on the thread.
Another option for a ship's mast made of foam.
Let's make a cross from two toothpicks and wrap it with thread. Let's break off the ends.
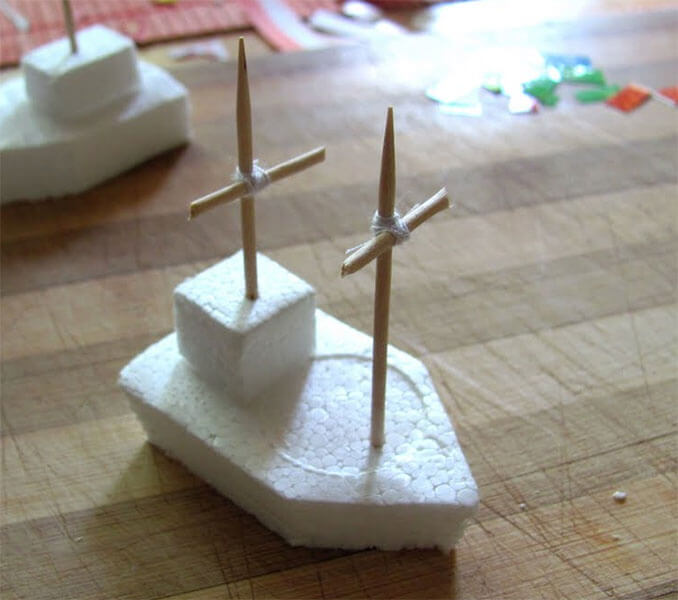
The sail can be made from a tree leaf or fabric.
More complex foam ship designs will require more time.
Topic of the week: “Poultry”
Lesson 17. Chicken
(Poke with a hard semi-dry brush. Gouache)
Program content. Continue teaching children to draw an object consisting of two circles with a simple pencil. Learn to convey the features of the depicted object using a poke with a hard, semi-dry brush; Bring the item to the desired image using a brush.
Material. Half album sheets, simple pencils, gouache, hard and soft brushes, jars of water, rags (for each child).
Progress of the lesson
Read V. Berestov’s poem “Chickens” to the children, accompanying it with appropriate actions:
Chick-chick! Atty-batty!
We are chickens! We are chickens!
We peck, peck, peck
Everything we meet along the way.
And we sing, we eat, we eat:
Piti-piti-pi-ti-ti!
Invite the children to draw chickens. Show how to draw a large circle (torso) with a simple pencil, and a smaller circle (head) on the top left.
To make the chicken fluffy, you need to put quite a bit of yellow gouache on a dry, hard brush and, holding the brush vertically (the brush taps with the “heel”), make “poke” on top, placing them inside and along the edges of the circles. When the paint dries, you need to finish painting the chicken's eyes, beak, and paws with the tip of a soft brush.