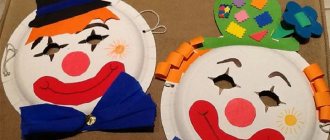
Summary of GCD for modeling junior group Insects
Summary of educational activities
Cognition + sculpting
in the younger group
on the topic: “Insects in the clearing.”
Subject
: “Insects in the clearing”
Tasks:
— developing:
Continue to develop children's interest in understanding the world around them (insects live only in the summer), imagination, thinking, speech, and auditory perception.
- raising:
cultivate a desire to engage.
— educational
: expand children's understanding of insects living around us: beetle, butterfly, ladybug, caterpillar. Learn to name the distinctive features of appearance: the caterpillar has a long body and cannot fly; the beetle has antennae; The butterfly has beautiful wings. Continue to teach children the ability to assemble pictures from several parts.
Methods and techniques:
gaming – creating a gaming situation; verbal - conversation, question - answer, literary word; practical - performing actions with objects, demonstrating modeling techniques, performing a type of movement - walking on tiptoes.
Visual teaching aids:
Demo -
easel, illustrations of insects, illustrations of meadows (winter and summer), chairs.
Dispensing –
tray, pictures from 4 parts, insects according to the number of children, boards, plasticine.
GCD structure
: 1.hour introductory – 5 min; 2.h. main – 12 min; 3. final – 3 min.
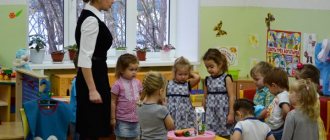
Progress:
Children enter the group, I teach the children:
Me: “Guys, I suggest you take a walk to the clearing. In order not to scare off the insects, let's approach them on our tiptoes. Let’s say the sound “tssssss” to each other (we close our mouths with a finger to our lips, we turn our heads towards each other). Walking on tiptoe with the children, I pronounce the words:
In a forest clearing
In a clearing in the forest, a beetle and a caterpillar met. A butterfly also flew to them. It was a sunny day. And all three of us were friends
You appear in the clearing
And show yourself to the guys.
We go to the easels on which insects are displayed (beetle, butterfly, caterpillar, lady's box).
-Who is this, guys?
Children list insects.
- Guys, what does the beetle have? (paws, antennae...). Well done, right.
- The butterfly has (wings, antennae...). Fine. The caterpillar has (head...). Tell me which insect cannot fly (caterpillar). How does she move? (crawls). Guys, tell me what shape is God's head (round)? Colors? (black). Torso? (red)
I suggest going to the tables on which parts of the pictures lie.
Did. A game
“
Assemble a picture.” (
from 4 parts, assemble a whole one - a beetle, a caterpillar, a ladybug, a butterfly). Children list what they have collected.
Then I suggest you go to the carpet; on the carpet there is a large sheet of paper with a winter and summer landscape drawn on it.
Did. Game “What time of year do insects live?”
— At what time of year do insects appear? (In spring, when it gets warmer and green grass appears). That's right, well done. Here are the insects, I propose to take one insect at a time and put it in the clearing that depicts the time of year in which the insects live. Think and decide.
Children each take an insect and place it on the summer landscape.
- Tell me why you put it in the summer meadow? Children's answers:
- Because in winter they will freeze. It's cold in winter, warm in summer, etc. In winter, insects hide in the bark of trees to wait out the winter.
- That's right, insect guys can only live in the summer, and in the winter they will freeze from the cold.
Please note that we assembled a picture from 4 parts and among them there was a ladybug, but it is not in the clearing. Maybe he hasn’t woken up from the warm spring sun yet. A buzzing sound is heard. (I turn on the buzzing sound).
- So the beetle is looking for its girlfriend. I propose to help the beetle and make a ladybug so that he can have many friends.
Children go to their desks. There are boards and pieces of red and black plasticine on the tables. I show sculpting techniques and talk through my actions.
The children get to work. I help those who are in difficulty. At the end, the children also take their work to the green meadow.
“I’ll put my ladybug in a green clearing, there’s a beetle that’s been waiting for it for a long time.” (I take the ladybug to the table where the clearing is depicted). (from what colors of plasticine did we sculpt the ladybug, what shape is the head, body, what does the ladybug have on its back?
I analyze the lesson:
-Where did we go? Who were you considering? What time do insects live? etc.
https://nsportal.ru/detskiy-sad/applikatsiya-lepka/2016/11/06/konspekt-obrazovatelnoy-deyatelnosti-poznanie-lepka-vo
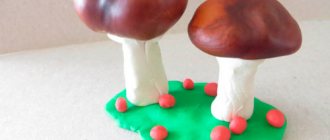
Summary of a modeling lesson in the younger group Topic: “Ladybug”
Goal: to introduce children to the world of insects.
Task : We continue to work on modeling with salt dough. We enrich the child’s experience of sensations and perceptions (sensory experience).
We strengthen children's skills: To develop children's ability to pinch off small pieces of dough from a piece and roll them into a ball between their palms, a large red ball (torso), a small black ball (head); use different types of techniques to add expressiveness to the image (poking technique - black spots on the back).
We develop the child’s ability to work neatly at the table, see beauty in living nature, develop an interest in working with dough, and develop fine motor skills.
Materials: thematic pictures “Insects”, a pre-made lawn with flowers, plasticine, blanks for laying out work, napkins, boards.
Preliminary work: conversations about insects, looking at illustrations, photographs of insects, guessing riddles about insects, reading fiction.
Progress of the lesson.
The teacher invites the children to go visit the insects to learn a lot of new and interesting things. To the music, children enter a group decorated to look like a flowering meadow. The teacher offers to sit down and relax. The children notice a box containing an envelope with a letter. The teacher opens the letter and asks the children a riddle:
Red, small lump,
There are a few dots on the back
Doesn't scream or sing
And it crawls along the leaf. (Ladybug.)
Children: Ladybug.
Educator: That's right, well done!
Educator: let's play a game with you: we will pass the flower around in a circle and name the insects that you still know. Children take turns naming insects
(Children's answers.) butterfly, ant, grasshopper, dragonfly, bee.
Educator: that's right, well done guys!
Guys, let's look at the picture and tell me which ladybug? Children's answers: (round, red, beautiful, with a mustache).
Educator: Maybe some of you saw her?
(Children's answers.) Yes, on a walk.
Educator: Guys, look, we also have a ladybug (the teacher takes out a pre-made lawn with flowers, on which there is a pre-made ladybug).
But she’s very bored alone, let’s make some more ladybugs so she won’t be bored in the clearing alone. But first, let's play with our fingers.
Together we count our fingers. We call the insects (squeeze and unclench) Butterfly, grasshopper, dragonfly.
This is a beetle with a green belly. (we bend our fingers into a fist one by one) Who is this ringing here? (rotate with the little finger) Oh, a mosquito is flying here! Hide! (we hide our hands behind our backs).
Educator: Now our fingers are ready to work, let's go to our workplaces
Children go to the tables. The teacher explains step by step how to sculpt a ladybug. (First you need to make a ball of red dough and flatten it on one side. Then you need to take black dough and roll it into a ball. This will be the head. Now the head needs to be attached to the body. Take the black dough again and make a thin strip so that the cows had wings. We make small balls from black dough and attach them to the wings. This is what a beautiful ladybug we got.)
Educator: what beautiful ladybugs you got, let's plant them on the lawn! What a beautiful lawn we have. Now let's play the game: Earth, water, air. The teacher chooses the driver, and the remaining players stand in a circle. The driver begins to walk in front of the players and touch each of the children with his hand. At the same time he says: Water, earth, air.” He stops in front of some player. If the driver stops at the word air, then the player must name the bird. If you settled on the word “Earth”, then you need to name the animal; if “water”, then a fish or a sea creature living in the water.
Educator: Well done, guys! We had fun playing.
Summary of a modeling lesson in an early development group on the topic “Caterpillar”
Marina Putilova
Summary of a modeling lesson in an early development group on the topic “Caterpillar”
Marina Putilova
Summary of a modeling lesson in an early development group on the topic “Caterpillar”
Objectives: To cultivate interest in co-creation with the teacher and other children in creating a collective composition. Cultivate patience, perseverance in class, and a friendly attitude towards insects. Develop fine motor skills, attention and hand-eye coordination, visual perception. Continue to introduce children to the diverse world of insects. Clarify children's ideas about the appearance of caterpillars. Develop a sense of shape and color. Learn to roll plasticine into small balls, place the balls neatly one after another, from large to small.
Materials and equipment: A 4-size sheet of green cardboard, pictures of a caterpillar, a modeling board, green and black plasticine.
Preliminary work: Examination of images of caterpillars in book illustrations, conversation about the appearance of a caterpillar, game “Caterpillar”.
Progress of the lesson:
Children sit on the carpet with the teacher.
Educator: - Guys, what insect do you think I met in my garden this weekend?
Children: - Bug!
- Spider!
-Butterfly!
Educator: -No, but you almost guessed it right. It was a caterpillar. She sat on the first leaf and basked in the sun. It was so beautiful, green and shimmering in the sun. I really liked it and I decided to show it to you. I decided to make it for you. Look how lovely she is!
The teacher shows the children a caterpillar made of plasticine
Educator: - Guys, would you also like to make your own caterpillar?
Children: - Yes!
Educator: -Okay, then take the chairs and sit at the table.
Let's first prepare our fingers so that we can get beautiful caterpillars.
Finger gymnastics “Caterpillar”
Caterpillar, caterpillar,
Butterfly's daughter
The palm of one hand “crawls” like a caterpillar, folding and unbending, along the inside of the other arm from the shoulder joint to the tip of the fingers.
It crawls along the blades of grass,
Eats leaves
Same movement with the other hand
Am! Am! Am! Ate -
The palm of the right hand strokes the stomach in a circular motion.
I wanted to sleep.
Place your hands palms together under your cheek
Woke up, stretched
Stretch your arms up
Turned into a butterfly!
We cross our arms at the wrists, our palms are now butterfly wings.
It flew, it flew, it flew!
We wave “wings” (wrists or forearms crossed, left palm waves near the right shoulder and vice versa)
The teacher tells and shows how and where to start working
Educator: -Take a piece of plasticine, knead it, place it on one palm, cover the second one on top and make circular movements, periodically turning the future ball until it becomes round
Throughout the work, the teacher constantly explains what he is doing and what needs to be done. This activates children's vocabulary.
The teacher helps the children (whoever needs it, makes eyes for the caterpillars from black plasticine.
Children, together with their teacher, plant their caterpillars on a large green piece of cardboard and admire the work done.
Educator: - You guys are great, you did a good job!
Design of a modeling lesson in the second junior group “Fluffy Clouds”
author: Krasnoshchekova Irina Anatolyevna
Teacher of MBDOU PGO "Kindergarten No. 40 of a general developmental type", Sverdlovsk region, Polevskoy city, 2022
Design of a modeling lesson in the second junior group “Fluffy Clouds”
Design of a modeling lesson in the second junior group “Fluffy Clouds”
Krasnoshchekova Irina Anatolyevna
Target:
Teach children to create relief images from plasticine - pinch off pieces and apply to the background, attach with their fingers. Arouse interest in creating a beautiful fluffy cloud from pieces of plasticine of different (blue) colors. Develop hand motor skills. Strengthen your fingers and hand.
Tasks:
- develop the ability to pinch off pieces of plasticine, apply to the background, attach, smear with fingers;
- arouse interest in creating a beautiful fluffy cloud from pieces of plasticine of different (blue) colors;
- diversify the ways of dividing plasticine into parts (pinching off, tearing off, unscrewing);
- develop a sense of form, texture, tactile sensations;
- develop fine motor skills.
Contents of educational activities
Introductory part (motivational stage).
Materials:
silhouettes of clouds made of light blue or white cardboard, plasticine blue, light blue, white, stacks, wet wipes, sun (toy).
Progress of the lesson:
The teacher raises the sun above his head, brings the silhouette of a cloud to it, covers the sun with a cloud and reads Berestov’s poem:
"The cloud and the sun again
Started playing hide and seek.
Only the sun will hide -
The cloud will burst into tears.
How can the sun be found?
A rainbow is laughing in the sky"
The teacher invites the children to play hide and seek with the sun - to make beautiful fluffy clouds. Gives the children silhouettes of clouds and offers to decorate them so that the clouds become fluffy. Children take the silhouette and trace the outline with their finger.
Children's activities:
listen to the teacher, select clouds, trace the silhouette with their fingers.
Expected Result:
gather children's attention and interest them in doing plasticine work.
Main stage
The teacher shows the children a way to create the image of a fluffy cloud: a piece is pinched off from a block of plasticine, crumpled in the palms of their hands, applied to the cloud, and pressed. Such actions are carried out with three colors of plasticine.
Children's activities:
observe and repeat the teacher.
Expected Result:
- develops the ability to pinch off pieces of plasticine, apply them to the background, and attach plasticine;
- consolidation of knowledge about the colors used; development of fine motor skills; senses of color, tactile sensations; development of a sense of form and texture.
Final part
(reflective stage)
The teacher invites the children to look at the resulting plasticine clouds. Set up an exhibition.
The teacher asks questions:
- what did we sculpt from plasticine? - children's answers: Clouds.
- What color was the plasticine? - Children’s answers: blue, light blue, white.
— what phenomena can be observed when clouds appear and it rains?
Expected Result:
the ability to evaluate the results of one’s activities is formed, as well as the skill of maintaining a dialogue with the teacher.