Notes on drawing in the preparatory group “We are young designers”
Summary of the lesson on children's design " We are young designers " in the preparatory group
Goal: to develop in children an idea of design as a field of art in the objective world; about the value of design developments; about the structure of a specific labor process ( modeling , clothing production). Introduction to the new painting technique "frottage".
Tasks:
-Continue, generalize ideas about the connection between the labor of people employed in the same production.
— introduce children to the profession of fashion designer and its purpose.
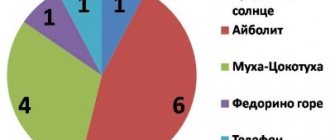
— Introduce the work of great couturiers and designers (V. Yudashkin, V. Zaitsev).
-Introduce preschoolers to the non-traditional technique of texture drawing, frottage.
— To develop the ability to create design using the knowledge gained when performing practical tasks: decoration ( design ) of modern clothing.
-Improve shading skills, adjust pressure, select colors, strengthen the ability to create a composition.
— Develop the skills necessary for collective creativity, communication skills, observation, creativity, aesthetic taste.
-To develop the ability to bring the job started to completion, to work in a team. Arouse interest in non-traditional visual material and a desire to act with it. — Foster respect for the work of adults.
Material and equipment: pictures depicting great couturiers and designers -V . Zaitsev and his clothing collection, V. Yudashkin and his collection of designer clothing . A box with spools of thread, a tape measure, scissors, needles, chalk, a thimble, a small sewing machine, a piece of fabric, a pattern, a finished dress. Sketches of clothes on A 4 paper, wax crayons, soft colored pencils, various textures for placing under paper, samples of ready-made patterns.
Progress of the lesson
Organizing time
Educator: - Look guys, today I brought a beautiful box class Let's all see what's in it together?
The teacher takes one item out of the box and asks the children to name these items (thread, tape measure, scissors, needles, chalk, thimble, fabric, small sewing machine, pattern, dress style).
Educator: - Well done! Tell me, who works with these objects, and what can be done with the help of these objects? (Children’s answers).
Educator: - List the professions that relate to tailoring? (Cutter, seamstress, tailor, fashion designer) .
Educator: - You correctly named the professions of people who are engaged in tailoring.
- I invite you to play the Question and Answer game with me.
Questions: 1. All people are wearing something, where do they buy their clothes? 2. How did the clothes get into the store? Who sewed it? 3. What are the people who sew clothes called? 4. And if you can’t find what you need in the store, where can you sew clothes? 5. In the atelier, the person who cuts the clothes will take the order. What is the name of his profession? 6. They brought fabric to the seamstress and asked her to sew a dress. Where does she start her work? 7. What should you do before cutting a dress for sewing? 8. Where does a dressmaker get clothing designs ? 9. Who comes up with clothing models ?
— Not all people can sew and design beautiful clothes. You need to study a lot and love doing it, be a dreamer, and have aesthetic taste.
All professions: seamstress, cutter, fashion designer are closely related to each other and are employed in the same production.
Educator: - You are all great and answered all the questions correctly, correctly named the professions that are involved in tailoring and talked about the function of each.
Educator: - In today's lesson Fashion Designer better .
Main part: The teacher's story.
A fashion designer (in the Russian tradition) is a specialist in making clothing models , a clothing designer , a creator of experimental samples, developing decor, choosing colors and materials, thinking through accessories and additions.
— We will now get acquainted with two famous fashion designers who were the first to win recognition and fame in the fashion industry and glorified this creative profession not only in Russia, but also beyond the borders of our Motherland.
Vyacheslav Zaitsev is a couturier, artist, poet, president of the Moscow Fashion House, member of the Union of Artists of the Russian Federation, Honored Artist of the Russian Federation. Man of the Year in the Fashion World.
Born on March 2, 1938 in Ivanovo, in a working-class family. He graduated with honors from the Ivanovo Chemical-Technological College and received a qualification as an artist in textile painting. 1962 - graduated with honors from the Moscow Textile Institute. Worked at an experimental garment factory. Now he heads the Moscow Fashion House. V. Zaitsev conducts multifaceted creative work with young artists, fashion designers and designers . Largely thanks to his efforts, Russian fashion has reached the world level, taking its rightful place . (display of a clothing collection from V. Zaitsev)
Valentin Yudashkin was born on October 14, 1963 in the village of Bakovka, Odintsovo district, Moscow region.
passion for modeling manifested itself in school. Days and nights, the future couturier drew his first “ models ” and brought them to life himself. I made patterns, sewed from everything that came to hand - for myself and for friends. After passing the final exams, there was no question for Valentin where to go to study. The news of his decision upset his parents, who believed that the profession of a fashion designer was “not for men.” In 1981, Valentin entered the Moscow Industrial College at the Faculty of Modeling . Yudashkin was not stopped by the fact that there were only girls in his “ Fashion Design ” course. It turned out that from the very first steps in his profession, Yudashkin represented the Russian fashion industry abroad, collections of his works were demonstrated in all the world’s fashion capitals, some models of Yudashkin’s dresses are in the Museum Louvre costumes. Among celebrities, he is considered the king of wedding fashion. (collection show)
I bring to your attention a collection of other fashion designers who create beautiful dresses not only for adults, but also for children.)
(showing a collection of dresses for girls)
Educator: — Did you like the unusually beautiful, exclusive design works of fashion designers ? (answers)
I'm going to open a school for young ,
Would you, girls and boys, like to go to this school (yes) I’m very glad, but first, I say without further ado
Desire alone is not enough - everyone must be ready: DRAW - DRAW, CUT AND SEW Learn quickly, and for this we all
The School of “Young Fashion Designers ” will be very useful.
Educator: - I enroll everyone in the school of “ Fashion Designers ” and before going to work, I suggest they play the outdoor game “Figure with Scarves.”
(there is a dynamic pause accompanied by musical accompaniment)
Music sounds once, Music sounds two, Music sounds three, Beautiful figure with scarves, freeze. (play 2 times)
Educator: - What beautiful movements you performed to the music, and the figures were interesting, well done.
“And now I ask you to go to school and try yourself as a fashion designer and develop a collection of clothes, and since summer is coming soon, I propose to make a summer collection called “Bright Colors of Summer.” Guys, look at your tables there are clothing models. (Skirt, shorts, dress, T-shirt) - blanks cut out of paper. Choose any model for yourself. But your models are one-color and in order for them to become designer, you need to choose a fabric for them. Now we will paint your models using a technique called frottage. Stencils for our fabric can be any objects with a corrugated surface: a regular comb, napkins, lace, tree leaves, a vegetable grater, design parts, corrugated cardboard, a mosquito net, wallpaper with a convex pattern. You need to take a stencil and place it under your sketch, select wax crayon that you like and shade the model. Using textured surfaces and colored pencils or wax crayons, you can create not only beautiful fabrics, but also original designs.
Educator: Guys, I suggest you choose stencil templates and get to work.
You need to draw carefully, do not go beyond the outline of the figure, paint each detail in one direction, hold the base, select the appropriate colors.
Independent work of children using the Frottage technique. Individual assistance for everyone.
Educator: Today you are all great! You tried very hard, you got good and interesting outfits. Let's arrange an exhibition of works. (works are hung on the board, children comment on their works, each work is discussed).
Educator: - When you become adults, maybe one of you will become a famous fashion designer , cutter or tailor.
Lesson notes for the senior group “Winter clothes. Hats. Shoes"
Savina Natalya Viktorovna,
MDOU "Kindergarten No. 18 of a combined type", Saransk
teacher
Abstract of NOOD in the senior group
“Winter clothes, shoes, hats.”
Goals:
to form in children a clear, differentiated understanding of different types of clothing, their purpose and use;
develop and activate speech; cultivate motivation for cognitive activity. Preliminary work:
examining, trying on clothes, highlighting design features, shape, material. Enriched practice of recognizing and modeling clothing sets based on purpose and function. Reading fiction, looking at educational albums, dressing up, playing with clothes, guessing riddles. Looking at illustrations. Didactic games: “Guess the clothes from the description”, “Where are the clothes made?”, “What can the clothes “tell” about?”
Materials and equipment.
Subject pictures on the topic of clothing, for the game “The Fourth Wheel”, individual pictures on the topic “Clothing”. Items of doll clothes.
GCD move.
Org. moment.
The one who names the items of clothing will sit down.
Riddle about clothes:
Everywhere you see these things, because they are comfortable and warm, and there are many of them in this world, but remembering them is difficult. You need to know these things, play them well and sleep well. Walk in the summer and in the cold, and even in the cold hide your nose. They can tell you a lot: Who put them on, where did they go, why should they be tried on? For the legs, for the arms, for the head, they are important and good. Beautiful - just a sight for sore eyes, what is my poem about
- That's right, this is a riddle about a variety of things that can be called in one word - clothes.
2. — Does a person need clothes and what is it for? - Needed. To protect our body from cold, rain, sunburn. (Cards depicting seasonal changes are displayed: SNOWFLAKE). - What sign is this? (SNOWFLAKE) - What time of year does it belong to? (for winter) - What clothes do we wear in winter? (warm) - Find and show cards with winter clothes. - Look at the cards. Was everything shown correctly? -What is the name of your clothes?
Game "Fourth wheel"
Headwear (scarf, hat, boots, cap) Footwear (felt boots, boots, coat, shoes) Body (jacket, fur coat, hat, coat).
(Cards with items of clothing are displayed, children name the extra item).
The game “Winter Walk” is a physical activity. just a minute
(performing movements following the text)
It's very cold in winter, (pat yourself on the shoulders)
But we will go for a walk with you. (steps in place)
I will put on a hat (we imitate the “put on a hat” movement)
I'll put on a fur coat (we show you how to put on a fur coat)
I'll put on a scarf and tie it tight. (“we tie” a scarf)
Personal website of Valentina Nikolaevna Bulygina
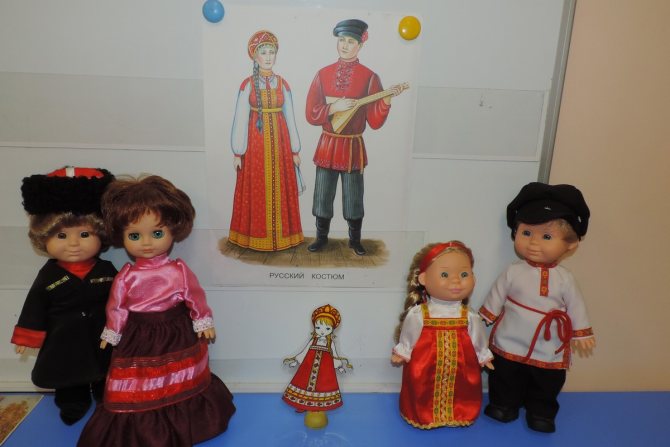
Summary of a lesson in the preparatory drawing group on the topic “Doll in a national costume”, 11/09/2020
Goal: To introduce children to women's and men's Russian folk costumes.
Tasks:
Educational:
– introduce children to different types of national clothing, traditional Russian costume, folk customs and clothing decorations;
– Strengthen the ability to draw a human figure, conveying the structure and shape, proportions of body parts.
– Learn to depict the characteristic features of the national costume.
– Strengthen skills in pencil technique. Continue learning to draw an outline with a simple pencil.
Educational:
– Form aesthetic taste, creative imagination, fine motor skills.
– Broaden your horizons, develop curiosity.
Educational:
– Cultivate interest in the culture of different peoples.
– To cultivate in children love and respect for the folk culture and traditions of the Russian people, the creativity of the Russian people, and the desire to create themselves.
Vocabulary work: sundress, kokoshnik, kosovorotka shirt, trousers, cap, amulet, embroidery.
Materials: pictures depicting people in national costumes, dolls in Russian national costumes and pictures on TV depicting details and ornaments of Russian folk clothing, sheets and pencils for each child, erasers.
Progress of the lesson:
- Organizing time
Educator: Guys, on November 4, we celebrated National Unity Day and talked about the fact that we live in the largest country - Russia. Our country is inhabited by people of different nationalities who have their own traditions, customs and costumes. I suggest you go to the exhibition and try to guess the nationality based on the costumes.
(Children express their guesses)
Educator: Despite all the differences, we all live in Russia and the main language is Russian, and we are all Russians and we all need to live together.
- Motivational moment.
There is a knock on the door, the teacher comes in with dolls dressed in Russian national costume.
Educator (in a different voice): Hello, good people! Low bow.
- Main part
Educator: What strange guests she has visited us with. And they are dressed wonderfully and greet in a special way. And our guests Ivan and Marya arrived from Ancient Rus'. He is wearing a shirt, and she is wearing a painted sundress. The music turns on.
“In the old days, our great-grandmothers wore a white shirt, a painted sundress over it, and an apron over the sundress. An apron is an apron decorated with different patterns. A woman wore a kokoshnik on her head - this is a women's headdress, which is decorated with gold embroidery, beads and pearls. And the hair is braided and decorated with ribbons. On their feet they wore boots with a pointed toe and heel.
– Great-grandfathers wore a shirt-shirt, belted with a belt and trousers. The kosovorotka shirt was called that because it was fastened at the side, obliquely. And bloomers are pants with wide legs. They had long black boots on their feet.
Educator: Guys, do you like the clothes on Marya? She is not dressed in a simple dress, she is wearing a Russian national costume. Look at what a bright, red sundress she is wearing, a white shirt underneath, and a kokoshnik on her head.
– Look at what beautiful patterns-symbols. What do you think they are for? (for beauty).
– According to popular belief, embroidery not only decorated clothes, but also served as a talisman, protection from evil forces. The patterns on the sleeves protected the hands and preserved their dexterity. The patterns on the hem and front of the sundress protected the heart. They usually embroidered wavy lines, crosses, and circles.
– For example, what does this sign look like? (sun) That's right, the sun.
– What does the sun give? (warm). And this sign means fertility, happiness, prosperity.
-What does this sign look like? (stream). It runs, gurgles, brings joy.
– Another sign is a sown field and means prosperity.
Educator: Guys, I suggest you thank our guests Ivan and Marya and give them a gift by drawing them.
– But before we start drawing, I suggest you do some finger exercises:
Whose shirt is this? (clench and unclench fingers)
White peas? (show peas with fingers)
Grandma tried
Sew for Alyoshenka (make movements reminiscent of sewing with a needle)
Whose sundress is this?
With white daisies? (clench and unclench fingers)
Grandma tried
I sewed for Natasha. (make movements reminiscent of sewing with a needle)
– Where do you think we will start drawing?
– First you need to decide which of them you want to draw.
– We will start drawing with a human figure. And for this we will make a sketch with a simple pencil. We take a pencil in our hands, place the sheet of paper vertically in front of us, straighten the backs and get started.
– We will have an image on almost the entire sheet, so we depict the head of our doll in the shape of an oval at the top, in the middle of the sheet. We do not press hard on the pencil so that we do not have to erase it too hard and persistently, and do not spoil our drawing.
– Next we depict the neck, shoulders, arms with fingers, torso and legs.
– We make the body oval and finish drawing the straps of Marya’s sundress.
– We draw the sleeves of the shirt in the shape of an oval and Ivan’s trousers.
– We draw the sundress.
– We draw a kokoshnik or cap, draw the neck and remove the extra lines that we no longer need.
– We draw the hair that is visible from the kokoshnik and the braid with a ribbon. Ivan has boots on his feet, and Marya has them visible from behind her sundress.
– Now let’s draw the faces of our dolls. These are ears, eyes, nose, mouth.
Educator: Guys, after you have made a sketch in pencil, what should we do next?
– Next we will decorate our doll’s outfit. We will continue to do this in the next lesson or tonight.
- Lesson summary:
- Guys, tell me. What did you do in class today?
– What kind of costume did your guests come to you in? (in Russian national costume)
– What does Marya’s Russian national costume consist of? (shirt, sundress, kokoshnik, boots)
– What does Ivan’s Russian national costume consist of? (shirt, trousers, cap, cap, boots)
– You did a good job, at the next lesson we will continue our work and present the drawings to Ivan da Marya.
09.11.2020 at 17:05. Categories: Classes. Topics: Summary of a drawing lesson in the preparatory group
Text of the book “Drawing with children 6-7 years old. Class notes"
Theme of the week: “Feathered Friends”
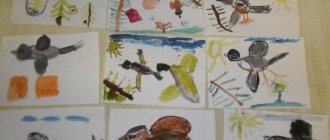
Lesson 11. What kind of bird is this? (Drawing with colored pencils) Program content.
Teach children to draw unusual birds on their own and decorate them with fabulous patterns. Strengthen the ability to draw with the end of the brush and the entire bristle. Develop imagination, fantasy, artistic taste when selecting beautiful color combinations. Cultivate interest and love for literary works.
Demonstration material.
Book by V. Suteev “What kind of bird is this?”
Handout.
Landscape sheets, simple pencils, colored pencils.
Progress of the lesson
Introduce the children in advance to V. Suteev’s fairy tale “What kind of bird is this?”
During the lesson, look again at how strange and unusual the birds turned out to be. Offer to invent a bird that does not exist and draw it. Remind that every bird has a body, head, neck, legs, tail, and beak. And what these parts will be like - the child can come up with it himself and draw a bird on a landscape sheet with a simple pencil. Then you need to color it with colored pencils, using bright colors and fancy patterns. Lesson 12. Kargopol birds (gouache painting)
Program content.
Introduce the painting of the Kargopol toy, its characteristic elements (stripes, arcs and ovals). Learn to decorate a three-dimensional product with Kargopol patterns. Develop visual memory, imagination and sense of color. Foster a love of folk art.
Demonstration material.
Kargopol clay toys (whistles: tubes, ducks, chickens; animal figures: horses, deer, dogs, three white horses; people: a spinner, a sower with a basket, a bearded man with an armful of firewood, a peasant woman with a child).
Handout.
Ducks, gouache, thin brushes, jars of water, rags, palettes made from clay during a modeling class and covered with white (mixed with PVA glue).
Progress of the lesson
Tell the children about the history of the origin and development of clay Kargopol toys: in the northern city of Kargopol and its surrounding villages, clay toys have long been made, they were decorated with chalk and stove soot.
The painting of toys is unique. It has northern restraint and the severity of the region. The patterns resemble a field, ears of corn, flowers in a meadow. The craftsmen used soft colors of pale shades - gray, pink, yellow, green, lilac-blue, yellow-orange. There are three ways of painting: solid, with spots and lines, and a combination of strokes (in the form of a kind of geometric pattern). Show the children samples of toys.
Invite the children to paint their birds. The head and neck of the duck can be completely painted over with blue or greenish color. And on the white body and tail place stripes, arcs and ovals.
Theme of the week: “Golden Autumn”
Lesson 13. Joyful autumn (Watercolor painting)
Program content.
Summarize children's knowledge about the autumn months, the different periods of autumn, its characteristic features, using reproductions of paintings and poems. Practice drawing different trees. Bring children to understand that a drawing has a foreground and a background. Strengthen the ability to dilute watercolors with water to obtain light colors. Learn the technique of blurring.
Demonstration material.
Reproductions of paintings depicting early and late autumn.
Handout.
Sheets of watercolor paper, pencils, watercolor paints, brushes, jars of water, rags, palettes.
Progress of the lesson
Remember with your children the names of the autumn months.
Look at reproductions of paintings and determine what time of year the artists depicted. Give the children a problem situation: why is autumn so different? (Different periods of autumn.) At the beginning of September the sun still warms the earth, by the end of the month multi-colored leaves gradually appear on the trees, leaf fall begins in October, and in November the trees are already bare, frosts begin, and snow falls.
Read L. Shevchenko’s poem “Autumn” to the children and invite the children to think about which picture this poem can be attributed to and why:
Quiet. Everything froze in the light of September. Where are you, artist? What is your name? Who painted the leaves - I don’t understand: All the trees of the forest are in golden fire.
That's right, the poem describes the period of early (golden) autumn.
Ask the children:
– What colors does early autumn have? (Green, yellow, orange, red, ocher, purple.)
Autumn during this period can be called joyful and golden. Pay attention to the guys how the artist conveys objects, trees that are close and far. (What is close is drawn large, and the background is smaller and not so detailed; the foreground obscures the background.)
Invite the children to think about how they would depict golden autumn.
The guys draw a horizon line, make a pencil sketch and draw up the drawing in color, using the brush wash technique directly on the sheet. At the end, be sure to paint over the remaining pieces of white paper. Lesson 14. Sad autumn (Drawing with gouache)
Program content.
Summarize children's knowledge about late autumn and its characteristic features. Learn to depict gloomy autumn, cloudy skies, strong winds, cold rain, bare trees. Learn to convey the foreground and background in a drawing. Develop the ability to convey the color characteristic of late autumn and select the right colors. Learn to convey the mood in a drawing.
Demonstration material.
Reproductions of paintings depicting early and late autumn.
Handout.
Landscape sheets, simple pencils, gouache, brushes, jars of water, rags, palettes.
Progress of the lesson
Look at the reproductions of paintings, determine which of them depicts late autumn. In late autumn there are very few leaves on the trees and bushes, it rains, the trees sway from the wind.
Ask the children:
– What color is late autumn? (Brown, gray, black.)
Read the poem “Autumn” by V. Avdienko to the children:
Autumn walks along the path, her feet are soaked in the puddles. It's raining and there's no light. Summer is lost somewhere. Autumn is walking, Autumn is wandering. The wind knocked the leaves off the maple tree. Underfoot there is a new rug, Yellow-pink - Maple.
Ask the children:
– What autumn did you imagine when you listened to this poem? (Sad, rainy.)
Invite the children to think about how they would depict late rainy autumn. You can use drawing on a wet sheet of paper. The guys draw a horizon line, make a pencil sketch (remind them about the foreground and background), and draw up the drawing in color, using the colors of sad autumn.
Theme of the week: “Indoor flowers”
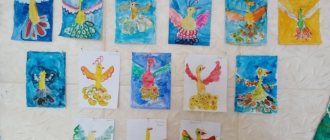
Lesson 15. Thumbelina (Drawing with gouache)
Program content.
Continue learning to draw illustrations for a fairy tale. Continue learning to draw a fairy-tale character, observing body proportions; achieve expressiveness of the image.
Demonstration material.
Book by H. H. Andersen “Thumbelina” with illustrations.
Handout.
Landscape sheets, simple pencils, gouache, brushes, jars of water, rags, palettes.
Progress of the lesson
Introduce children in advance to G. H. Andersen’s fairy tale “Thumbelina.” During class, read the beginning of this fairy tale to the children: “Once upon a time there was a woman. And she didn’t have children, but she really wanted to have a baby. One witch gave a woman a grain of barley that needed to be planted in a flower pot. From this seed grew a large wonderful flower, very similar to a tulip, but its petals were tightly compressed, like an unopened bud. The woman could not resist and kissed the red and yellow-veined petals. Something clicked and the flower blossomed. It turned out to be a real tulip, with a tiny girl sitting inside. She was an inch tall, so they called her Thumbelina.”
Invite the children to draw a pot with a beautiful flower and Thumbelina on the flower themselves.
Remind the children that the flower was big and the girl was small. Lesson 16. Zhostovo flowers (Gouache painting)
Program content.
Introduce children to Russian artistic craft - Zhostovo painting, the construction of traditional Zhostovo geometric and floral patterns and flower shapes (roses, daisies, peony, etc.). Learn to draw elements of painting with the end of a brush, holding it perpendicular to the surface of the sheet. Exercise children in composing compositions and beautiful combinations of colors. Develop children's imagination and creativity.
Demonstration material.
Zhostovo trays, samples of elements of Zhostovo painting.
Handout.
Cardboard tray templates (different in shape), tinted with black gouache, gouache, thin brushes, jars of water, rags, palettes.
Progress of the lesson
Tell the children that not far from Moscow there is a village called Zhostovo. It is home to craftsmen who draw bouquets of flowers (daisies, roses, peonies, bells, etc.) on iron trays. In the center of the trays there are bright, large and juicy flowers, closer to the edges there are smaller flowers. There are green leaves scattered around on a tray. The shape of the trays is different - oval, round, rectangular, square, and even triangular. There are trays that are large, like a dinner table, and there are small ones, no bigger than a plate. The trays are made of metal and varnished.
Give the children tray templates and sample painting elements. Show how to use wavy lines with dots and leaves to decorate the sides of a tray. Suggest placing several simple-shaped flowers in the center: daisies, cornflowers, apple blossoms, and scatter green leaves around.
Topic of the week: “Who lives in our apartment”
Lesson 17. Family of snakes (Drawing with cotton swabs. Gouache)
Program content.
Learn to draw with a simple pencil, writing an image on a sheet of paper. Continue to teach yourself how to select suitable colors and draw using a cotton swab. Practice decorating objects with dots. Develop your imagination.
Demonstration material.
Pictures of snakes.
Handout.
Landscape sheets, simple pencils, cotton swabs, gouache, jars of water, rags.
Progress of the lesson
Read E. Kotlyar’s poem to the children:
Here it is a family: Snake, Snake And Snake!
Ask the children:
– How many snakes does this family consist of? (Out of three.)
Offer to look at the image of snakes and draw them on a landscape sheet with a simple pencil.
Then you need to put gouache of a certain color on the tip of a cotton swab and press it to the body of the snake. You can make various patterns from dots: flowers, multi-colored stripes, geometric shapes, etc. In order to change the color, you need to take a clean cotton swab. Lesson 18. Goldfish (Drawing with wax crayons and watercolors)
Program content.
Learn to use various means of expression - lines, colors. Learn to combine several drawing techniques in a drawing. Develop artistic abilities.
Demonstration material.
Book by A. S. Pushkin “The Tale of the Fisherman and the Fish” with illustrations.
Handout.
Sheets of watercolor paper, wax crayons, watercolor (or acrylic) paints, thin brushes, jars of water, rags, palettes.
Progress of the lesson
Introduce children in advance to A. S. Pushkin’s fairy tale “The Tale of the Fisherman and the Fish.” Start your lessons by reading an excerpt from this fairy tale:
An old man lived with his old woman by the very blue sea; They lived in a dilapidated dugout for exactly thirty years and three years. The old man was catching fish with a net, the old woman was spinning her yarn. Once he threw the net into the sea, the net came with nothing but mud. Another time he cast a net - A net came with sea grass. For the third time he cast the net - The net came with one fish, With a difficult fish - a golden one.
Ask the children:
– How do you imagine this fabulous fish? (Iridescent, lace, etc.)
Suggest using wax chalk to draw the body of the fish (on the entire sheet) and divide it with thin lines into separate scales. Then paint over each scale with watercolors of a certain color. The result is a fish shimmering with multi-colored scales. You can draw the sea and algae around it.
At the end of the lesson, discuss the drawn fish with the children and note the beautiful color combinations.
This activity can be complicated if you draw the contours and scales of the fish with ink using a stick or pen.
Topic of the week: “In the kitchen”
Lesson 19. Gzhel dishes (painting with gouache)
Program content.
Continue to introduce children to the traditional Russian artistic craft - Gzhel. Learn to highlight the characteristic features of Gzhel painting and decorate tableware patterns with the simplest types of plant patterns (straight and wavy lines of various thicknesses, dots, droplets, tendrils, springs, leaves, nets, flowers). Continue learning how to mix blue and white paint to create a blue color. Foster a love of folk art.
Demonstration material.
Dishes of Gzhel masters (cups, saucers, jugs, vases, teapots, trays), samples of elements of Gzhel painting.
Handout.
Templates of cups and plates, white and blue gouache, thin brushes, palettes, jars of water, rags.
Progress of the lesson
Remind the children about the Gzhel craft: “For a long time, in the village of Gzhel near Moscow (from the word “burn” - to burn clay), they have been creating pottery and toys from clay, different in shape, but painted with blue paint on a white background.”
Examine the patterns on Gzhel dishes with your children. Pay attention to the border: it can consist of multiple repeating combinations of lines, dots, strokes, etc. The border is located at the top and bottom of the product. In the center are flowers made of “droplets”, “strokes” and “curls”. One of the main elements is a rose or rose petals. Roses can be arranged in a bouquet, or they can be “scattered” over the entire surface of the product. Porcelain is also decorated with strange blue birds or scenes from people’s lives. Use a separate template to show children how to make patterns on the border and center. Please pay attention to the children that Gzhel painting is painted immediately with a brush, without preliminary drawing with a pencil.
Remember with your children how to get the color blue.
Give the children templates and suggest, based on the samples, to decorate the template in the style of Gzhel painting. The template can be rotated in different directions so that the hand and brush are in a comfortable position. Lesson 20. Gzhel saucer (Gouache painting)
Program content.
Continue to introduce children to the traditional Russian artistic craft - Gzhel. Learn to highlight the characteristic features of Gzhel painting and decorate a papier-mâché saucer with the simplest types of plant patterns (straight and wavy lines of various thicknesses, dots, droplets, tendrils, springs, leaves, nets, flowers). Continue learning how to mix blue and white paint to create a blue color. Foster a love of folk art.
Demonstration material.
Dishes of Gzhel masters (cups, saucers, jugs, vases, teapots, trays), samples of elements of Gzhel painting.
Handout.
Papier-mâché saucers made during the appliqué class, covered with white gouache with a small admixture of PVA glue, white and blue gouache, thin brushes, palettes, jars of water, rags.
Progress of the lesson
Place samples of elements of Gzhel painting in front of the children and offer to decorate the saucer yourself with borders and simple plant ornaments.
Topic of the week: “My room”
Lesson 21. Wallpaper (Drawing with wax crayons)
Program content.
Teach children to make patterns for wallpaper. Continue learning how to choose contrasting colors. Strengthen the ability to draw with wax crayons. Develop artistic taste, fantasy, imagination, independence.
Demonstration material.
Squares cut out from different wallpapers and pasted on cardboard (a geometric figure is cut out in the middle of each square), patches for this wallpaper in the form of corresponding geometric shapes.
Handout.
Sheets of watercolor paper, wax crayons.
Progress of the lesson
Lay out pieces of various wallpaper in front of the children and ask them to choose suitable patches.
Invite the children to come up with wallpaper patterns themselves and arrange them on the sheet.
It is preferable to use bright colors. You can make striped wallpaper or wallpaper strewn with dots, flowers, etc. Lesson 22. Photo frame (Drawing with glue. Acrylic paints)
Program content.
Introduce children to the method of creating a “glue” picture. Learn to perform work in strict sequence to obtain the desired result. Develop creativity, fantasy, imagination, independence in creating a drawing. Cultivate neatness.
Handout.
Photos of children, frames of different shapes cut out of cardboard (square, rectangular, round, oval) for photographs, simple pencils, PVA glue with a narrow nozzle, wide soft brushes, acrylic or watercolor paints, palettes, jars of water, rags.
Progress of the lesson
Ask the children to bring their photos. Look at the photographs with your children and ask them to tell you what is shown on them.
Offer to make photo frames. Children need to choose the shape of the frame they like, outline any patterns (stripes, wavy lines, curls, dots, flowers, etc.) with a simple pencil. Then apply glue from a bottle with a special nozzle onto the contours of the patterns in a thin convex line.
In their free time, when the glue has dried, the children completely cover the relief frame with acrylic or watercolor plain paint.
The photo frame is ready.
Theme of the week: “My wardrobe”
Lesson 23. Vologda lace (White gouache painting)
Program content.
Develop an interest in creating lace products. Learn to identify different patterns. Learn to draw elements of Vologda woven lace - wavy and straight lines, droplets, curls, knots, nets, circles. Strengthen the ability to draw with the tip of a brush. Form aesthetic taste.
Demonstration material.
Vologda lace products (napkins, capes, bedspreads, collars, cuffs), samples of elements of drawing woven lace, reproduction of V. Tropinin’s painting “The Lacemaker”.
Handout.
Black templates in the form of sweaters, white gouache, thin brushes, jars of water, rags.
Progress of the lesson
Tell the children that people have long sought to decorate clothes: with embroidery, beads, ribbons, ruffles, flounces. And in the city of Vologda, people created lace products (show the children samples). Please pay attention to the children that the lace is cut out - there is a dense and transparent part. Lace is woven from thin threads, starting from a central circle and creating patterns around it in the form of larger circles, as well as straight and wavy lines, droplets, curls, knots and nets. Lace is woven using wooden sticks (bobbins). Show the children V. Tropinin’s painting “The Lacemaker.”
Give children templates of dark sweaters and encourage them to decorate them with thin white lace.
Lesson 24. Russian folk clothing (Drawing with colored pencils and felt-tip pens)
Program content.
Continue to introduce children to the history and features of Russian folk costume. Expand children's knowledge about Russian folk culture. Show the beauty of embroidered products, patterns from plant elements. Learn to draw Russian folk clothing, conveying its characteristic features, and decorate it with plant patterns (flowers, leaves, stems, herbs).
Demonstration material.
Images of Russian folk costume, samples of embroidery elements of plant patterns.
Handout.
Landscape sheets, simple pencils, colored pencils, felt-tip pens.
Progress of the lesson
Show the children images of Russian folk clothing (women's and men's) and tell them a little about it: “On holidays, women wore long white shirts - shirts decorated with an embroidered pattern. On top they wore sundresses, also embroidered with patterns or decorated with appliques made of bright ribbons or fabrics. Scarves and kokoshniks decorated with beads, pearls, and mother-of-pearl were worn on the head. The most common shoes were bast shoes, and in winter - felt boots.
Men dressed in embroidered shirts with a belt, which were called kosovorotki, ports (pants), they wore caps on their heads, and bast shoes or leather boots on their feet.”
Give the children samples of embroidery of plant patterns, tell them how women decorated their clothes: they embroidered various geometric, plant or zoomorphic (animal) patterns on them. Plant patterns consisted of stems, grasses, leaves and flowers. Draw the children's attention to where the embroidery was located: along the edges of the shirt (on the collar, on the sleeves and hem), in the center and at the bottom of the sundresses.
Invite the boys to draw men's clothing (shirt and pants) with a simple pencil, and invite the girls to draw a long shirt and sleeveless sundress. Then color in with colored pencils, and make plant patterns with felt-tip pens.